SWIFT Correlation Repository Sample
The SWIFT Correlation Repository (SCR) is a Java CAPS utility used to visualize SWIFT workflows. In addition, the SCR:
-
Reconciles Messages into Transaction Processes
-
Provides Message Browsing and Message Monitoring
-
Offers services for Duplicate Checking and validation of MX and MT messages
-
Allows for Message Repair and Resubmit
Prerequisites
The following prerequisites are needed in order to run the SRC project:
-
Windows Operating System
-
Java CAPS 5.1.3, with the following modules:
-
eGate
-
eVision
-
Oracle eWay
-
File eWay
-
-
SWIFTOTDLibrary.sar
-
Oracle 9.2
-
Internet Explorer
Installation steps
-
Ensure all prerequisites are installed.
-
Install Hotfix 109645 for the Enterprise Designer.
-
Install the database schema from the SCR_CreateUser.sql and SCR_CreateTable.sql files (located in the SCR_Create_Cleanup zip file).
-
Extract the contents of the SampleSCR.zip file into your local drive.
-
Import the SampleSCR.zip file into Enterprise Designer.
-
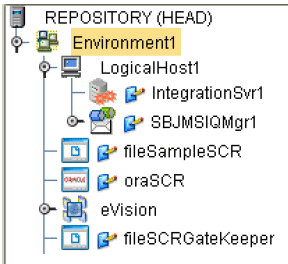
Set the environment variables (as shown in the figure below).

-
Create a deployment profile in the SCR project.
-
Create a deployment profile in the TesterGatekeeper project.
-
Deploy both the SCR and TesterGatekeeper deployment profiles.
Preparing an SCR flow
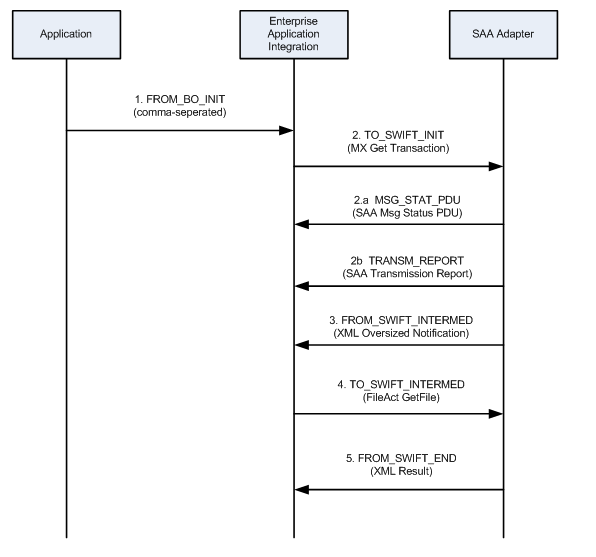
The SCR Workflow follows the tasks, procedural steps, required input and output information, for each step in the business process. The SCR workflow is used to view, manage, and enforce the consistent handling of work. The following figure is an example of a design of an SCR flow.

Designing an SCR flow
-
Start the Enterprise Designer.
-
Open the imported SCR project.
-
Choose both a short name and a long name for the flow (example: t2 :: Target2).
-
Choose a string name for each event / message / direction (as shown in the SCR flow example above: TO_SWIFT_INIT).
-
Add the flow name as a new choice in the viewer by navigating to the Viewer on the SCR page, then to the 1TrxList, and then to the pgTrxList.
-
On the Properties tab, select SelDomain.
-
Right-click the highlighted area on the design canvas, and select Edit Options. The Edit Options window opens.
-
Add new flow elements to the properties of the control SelDomain. This project already ahs defualted values entered (t2 :: Target2).
-
Linking the Domain Name and Direction to a Color
You can link the name of a Domain to specific pointer directions and colors within the monitoring application.
-
Link the domain name and the direction to a color by opening the SCR.properties file located in c:\SampleSCR\properties.
-
A list of available directions and colors are listed in the SCR properties file. Possible Colored Directions (CD) for message lists include:
-
DEFAULT
-
LGREY, RGREY
-
LBLUE, RBLUE
-
LGREEN, RGREEN
-
LORANGE, RORANGE
-
LRED, RRED
-
-
Link the Domain to a specific pointer directin and color by using the following Syntax: CD_<Direction String> = <Colored Directions>.
Using the SCR for Monitoring Flows
Applications that send events to the SCR must do two things:
-
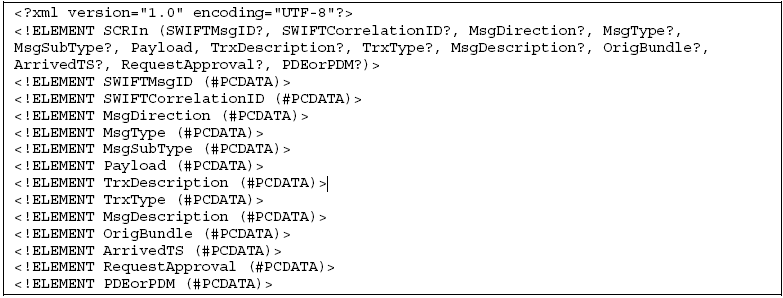
Create a message following the input format shown below. Do not use the field whose usage is indicated as “Gatekeeper only”.

-
Send the message to either:
-
A file in the c:\SampleSCR\In location, with a .txt extension and a name starting with Loader.
-
A JMS message to the JMS queue, qSCRInEnv, in SCR/Loader.
-
Using the Viewer for Monitoring Transactions
-
Use an Internet browser and navigate to the URL http://localhost:18001/scr. The Select Transaction window opens.
-
Use one of the following criteria for monitoring transactions:
-
Select the 10 most recently updated transactions from the drop-down list.
-
Use the domain selector to restrict the transaction list.
-
Search for a transaction with a specific ID.
-
Search for a transaction that contains a message with a specific ID.
-
-
Click the Search button.
Using the SCR as Gatekeeper
Applications sending events to the SCR as Gatekeeper must do two things:
-
Create a message following the input format (as shown in the previous section)
-
Send the message to the JMS queue “qGKeeperIn” in SCR/Gatekeeper. Make sure to add a JMS topic to the message. A code sample is shown below.
com.stc.connectors.jms.Message outMsg =
jmsPublish.createTextMessage();
outMsg.storeUserProperty( "SCRDestination", "DEST1" );
outMsg.setTextMessage( input.getText() );
jmsPublish.send( outMsg );
-
Subscribe to the JMS queue ”qGKeeperOut” in SCR/Gatekeeper.
-
Subscribe to the JMS topic that you used to publish the message.
Note –
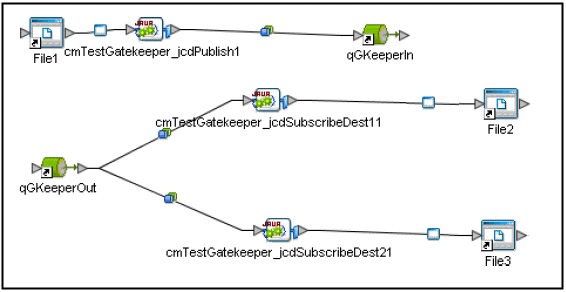
A complete test setup is located in the project TesterGatekeeper.

Using the Viewer to Repair Messages
-
Use an Internet browser and navigate to the URL http://localhost:18001/scr. The Select Transaction window opens.
-
Select the 10 most recently updated transactions from the drop-down list. Messages that have been held for review and resubmittion (e.g. messages that are duplicates, incorrect, or awaiting approval) are displayed.
-
Select the message you wish to examine and click the Repair button. The Message Repair window opens, displaying detailed information regarding the message.
-
You can resolve the message in the following ways:
-
Correct the message error and click the Resubmit button.
-
Examine a message that requires approval and click the Approve button.
-
Delete the message by clicking the Delete button
-
- © 2010, Oracle Corporation and/or its affiliates
