 To Create a GlassFish Cluster
-
If it is not already running, start the GlassFish server you want to configure for clustering.
You can start the server from the command line or from the Services tab in NetBeans.
-
Once the server is started, launch the Admin Console by doing one of the following:
-
On the Services tab in NetBeans, right-click the server and select View Admin Console.
-
Launch a web browser and enter the following URL:
http://hostname:port
-
hostname is the name of the machine where the server is located, and can be localhost.
-
port is the administrative port number, which is 4848 by default.
-
-
-
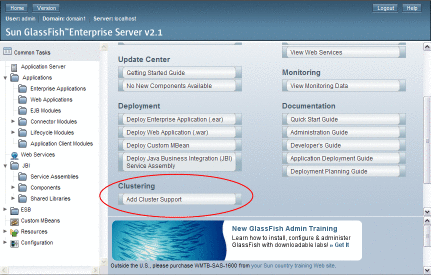
On the main Admin Console page, click Add Cluster Support.

-
Review the information on the Add Cluster Support page, and then click OK.
-
On the Restart Required page, click Stop Instance to stop the GlassFish server.
-
Follow the instructions on the Admin Console to restart the server.
-
Run the following command to create the node agent, using a unique value for the node agent name:
GlassFish_Home/bin/asadmin create-node-agent NodeAgent_Name
-
Run the following command to start the node agent:
GlassFish_Home/bin/asadmin start-node-agent NodeAgent_Name
-
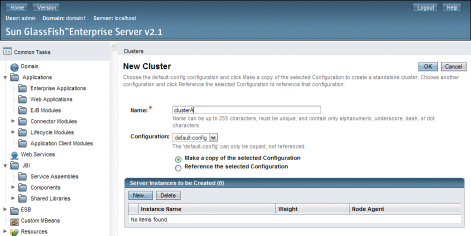
When the node agent is started, log back in to the GlassFish Admin Console and create the cluster:
-
Add instances to the cluster:
-
In the navigation bar on the left, expand Clusters and then select the cluster you just created.
-
Click the Instances tab.
-
Under Server Instances, click New.
-
Enter a name for the instance, select the node agent you just created, and then click OK.

-
Repeat the above steps to add each instance to the cluster.
-
-
To start the cluster, select Clusters in the left navigation bar, select the check box next the cluster you just created, and then click Start Cluster.
-
Click OK on the dialog box that appears.
Tip –Log files for the cluster are located at GlassFish_Home/nodeagents/cluster-nodeagent/agent/logs.
- © 2010, Oracle Corporation and/or its affiliates

