Setting Up the Runtime Environment for the HL7 JCA Adapter
This section provides step-by-step instructions for installing the RAR file for the HL7 JCA Adapter and setting up the GlassFish runtime environment using the Admin Console.
Perform the following steps to set up the runtime environment for the HL7 JCA Adapter:
 To Deploy the Global RAR for
the HL7 JCA Adapter from the Admin Console
-
Start the GlassFish application server.
-
Access Admin Console by pointing your browser at http://localhost:4848
If your application server is running on a remote machine, and/or uses a port other than 4848 for administration, make the appropriate changes to the URL.
-
Log in to Admin Console.
-
In the Common Tasks pane on the left side, expand Applications -> Connector Modules.
If “sun-hl7-adapter” appears in the list, the RAR has already been installed.
-
In the “Deploy Enterprise Applications/Modules” pane, do the following and then click OK.
-
In the “Edit Resource Adapter Properties” pane, you can optionally supply or edit properties. Then click Finish.
Result: Once you have deployed the global RAR onto the application server, you will be able to see it in the NetBeans IDE under Servers -> GlassFish V2 -> Applications -> Connector Module:
 To Add a Connector Connection
Pool for the HL7 JCA Adapter
You will use Admin Console Resources -> Connectors -> Connector Connection Pools to add a new pool for sun-hl7-adapter.
-
If you have not already done so, start GlassFish and log in to Admin Console.
-
In the Common Tasks pane on the left, expand Resources -> Connectors -> Connector Connection Pools.
-
In the Connector Connection Pools pane, click the “New” button.
-
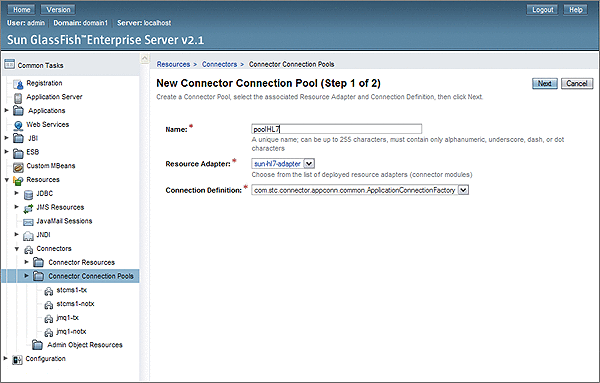
In step 1 of the wizard, supply the following information and then click Next.
-
Name: Supply a name for the HL7 pool, such as poolHL7.
-
Resource Adapter: Choose sun-hl7–adapter.
-
Connection Definition: Retain the default provided when you choose the adapter.

-
-
In step 2 of the wizard, retain or change the settings provided and then click Finish.
Result: The new pool appears in the tree. You can see it in the NetBeans IDE under Servers -> GlassFish V2 -> Resources -> Connectors -> Connector Connection Pools:
 To Add a Connector Resource for
the HL7 JCA Adapter
-
If you have not already done so, start GlassFish and log in to Admin Console.
-
In the Common Tasks pane on the left, expand Resources -> Connectors -> Connector Resources.
-
In the Connector Resources pane on the right, click the “New” button.
-
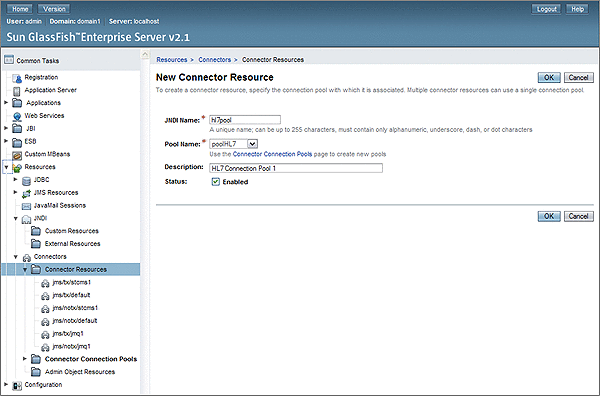
Supply the following information and then click OK.
-
JNDI Name: Supply a name, such as hl7pool by which applications will reference the HL7 pool.
-
Pool Name: Choose a connector connection pool for HL7, such as the one created in the previous procedure.
-
Description: Optionally, supply a meaningful description of this particular JNDI resource.

Result: The new resource appears in the tree. You will be able to see it in the NetBeans IDE under Servers -> GlassFish V2 -> Resources -> Connectors -> Connector Resources:
-
- © 2010, Oracle Corporation and/or its affiliates
