This chapter describes the read, create, modify, delete and search operations that can be performed on directory entries using Deja. Deja offers specific templates for searching for and creating NIS entries. To view the NIS-specific search and create panels you must change the Deja user profile to NIS, as explained in "User Properties" .
Viewing an Entry
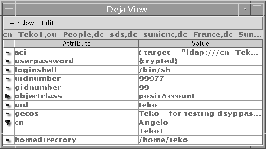
Use View to look at the attributes defined for an entry in the directory. Figure 3.4 shows the Deja View window. You can only open one View window per entry. To refresh a View window after modifying an entry, view the entry again. The original View window is replaced with a new one.
Figure 3.4 Deja View Window
When an attribute has more than one value, an arrow is displayed next to the attribute name in the entry definition: a right arrow when the values are collapsed, and a down arrow when the values are expanded.
The View Window
There are three ways to display the View window:
Closing a View Window
To close a View window, select Close from the Window menu of the View window. Alternatively, you can double click on the Window menu button.
Copying an Entry From a View Window
To copy an entry from a View window, select Copy from the Edit menu of the View Window. The entry is copied to the clipboard.
Highlighting an Entry From a View Window
To highlight an entry in Deja's browser window from the View Window, select Highlight from the Edit menu.
Creating a New Entry
The Deja create panel offers templates that guide you through the creation of an NIS entry. The available templates are Users, Aliases, Hosts, and Groups. These templates respectively represent entries for the passwd, aliases, hosts, and groups maps. When the NIS maps are imported into the LDAP directory, an LDAP subtree is created for each map.
Table 3.2 shows the default templates available in Deja, the corresponding NIS map, and the corresponding subtree in the LDAP directory.
Table 3.2 Deja Templates
To modify the default NIS templates, or create new ones, you can modify the Deja.properties file on the directory server. See "Setting Deja Properties" for information.
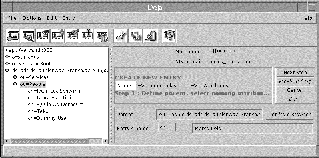
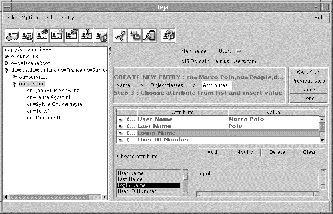
Figure 3.5 shows the Deja Create panel for NIS users.
Figure 3.5 Deja Create Panel for NIS Users
Click on the Create icon or select Create from the Entry menu.
The Create panel is displayed.
There are three steps to creating an NIS directory entry. You must complete each step before you can progress to the next one. Click on Next Step and Previous Step to navigate between the steps.
When you have completed the entry definition, click Done.
Naming an Entry
Provide the DN of the parent entry. There are several ways to achieve this:
Name the entry by selecting a naming attribute with the option button next to the Entry's name field.
The list of naming attributes is defined in the Deja.properties file on the directory server.
Type the Relative Distinguished Name of the entry in the Entry Name text field.
When you are satisfied with the entry name and parent, click the Next Step button to select object classes and attributes.
See "Selecting Object Classes" for information on selecting object classes. The Select Object Classes window is displayed pre-filled with default object classes depending on the selected template. The default object classes are specified in the Deja.properties file on the directory server.
See "Selecting Attributes" for information on selecting attributes for the entry. The attributes available for selection are defined for each object class in the schema.
Selecting Object Classes
You can define one or more object classes for your entry. When the objectclass list is complete, click the Next Step button to select attributes. If you have selected the Users map in the NIS profile, the required object classes are already listed in the Selected Objectclasses pane.
Note.
If the selected object classes do not contain the previously selected naming attribute, a warning message is displayed. You must either specify a different naming attribute by going back to the first step, or add an appropriate object class to the entry.
Adding an Object Class to the Entry
To add an object class to the entry, double click on the object class from the Available Objectclasses list.
Alternatively, you can select an object class from the Available Objectclasses list and click on the right arrow button to add the object class to the entry.
Removing an Object Class From the Entry
To remove an object class from an entry, double click on the object class in the Selected Objectclasses list.
Alternatively, you can select the object class in the Selected Objectclasses list and click on the left arrow button to remove the object class from the entry.
Selecting Attributes
Each object class has a number of mandatory and optional attributes associated with it. An entry definition table, with the current list of attributes and values is displayed in the right pane. Mandatory attributes are marked with (M), optional attributes with (O).
The names of the mandatory attributes are already listed in the entry definition before you assign a value to them. To complete the entry, you must provide values for these attributes. If you try to add an entry to the directory without assigning values to all the mandatory attributes, an error message is displayed.
For example, if you want to create an entry with the person and posixAccount object classes, the mandatory attributes are:
Optional attributes for theses object classes can include description, see also, telephone number and userPassword.
Some attributes accept multiple values, others can only have one value. By default, attributes are multi-valued. Single-valued attributes are identified in the schema by the SINGLE-VALUE keyword. If you try to add more than one value to a single-valued attribute, an error message is displayed.
Assigning a Value to an Attribute
To assign a value to an attribute:
From the Choose Attribute list, or from the entry definition, select the attribute for which you want to add a value.
For example, select Login Name from the Choose Attribute list.
Type the value for the attribute in the text field.
For example, type mpolo in the text field.
Click Add to add the value of the attribute to the entry definition.
The value appears in the entry definition next to the attribute. See Figure 3.6.
To add an additional value for an attribute, repeat steps 1 to 3.
You must add values for all the mandatory attributes displayed in the entry definition table.
Double click on the entry in the browser to display all of its attributes.
Figure 3.6 Example Entry Create Window
Deleting a Value From an Attribute
To delete an attribute value:
Select the value or the attribute name in the entry definition.
Click Delete.
Modifying an Attribute Value
To modify an attribute value:
Select the value of the attribute you want to modify in the entry definition.
The attribute value appears in the text field.
Modify the value and click Modify.
The modified value appears in the entry definition.
Cancel
To cancel a create operation at any time, in the Create panel, click Cancel. The entry definition is cleared.
Deleting an Entry
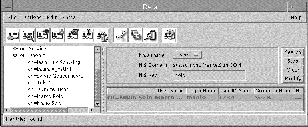
The delete panel of Deja is used to delete entries from the directory. Figure 3.7 shows the Deja Delete panel.
Figure 3.7 Deja Delete Panel

You must have write permission for the entry you want to delete. See "Logging In" for information.
Select the entry you want to delete in the browser window.
You can only delete leaf entries. You cannot delete a root entry such as the root DSe or a parent that still has children.
Click on the Delete icon, or select Delete from the Entry menu.
The Delete panel is displayed.
Click on Delete to remove the entry from the directory.
Click on Cancel to clear the delete panel.
WARNING!
There is no undelete function.
Cut, Copy and Paste
This section explains how to perform cut, copy and paste operations on directory entries using Deja.
Cutting an Entry
Use Cut to remove an entry from the directory and keep a copy of it on the clipboard. The entry can be pasted from the clipboard into the directory in another location.
You must have write permission for the entry you want to cut. See "Logging In" for information.
To cut an entry from the directory:
In the browser, click on the entry you want to cut.
Click on the Cut icon. Alternatively, select Cut from the Edit menu, or press Ctrl-x on the keyboard.
The entry is cut from the directory to the clipboard. You can now paste the entry to a new location in the directory.
If you want to restore the entry to the directory, select Restore from the Edit menu.
The entry is restored to its original position in the directory, if possible. If the parent entry no longer exists, or has been renamed, the paste is not possible and an error message is displayed.
Copying an Entry
Use Copy to copy an existing entry from the directory into the clipboard. The entry can then be pasted from the clipboard into the directory in another location.
To copy an entry in the directory:
In the browser, click on the entry you want to copy to select it.
Click on the Copy icon. Alternatively, select Copy from the Edit menu, or press Ctrl-c on the keyboard.
The entry is copied from the directory to the clipboard.
You can now paste the entry to a new location in the directory.
Pasting an Entry
After a Cut or Copy operation, use Paste to paste an entry from the clipboard into the directory. You can paste at different levels in the directory tree:
You must have write permission to paste an entry into the directory. See "Logging In" for information.
To copy an entry and paste it at the same level in the subtree:
Immediately following the copy operation, click on the Paste icon. Alternatively, select Paste from the Edit menu, or press Ctrl-v on the keyboard.
In the browser window, the pasted entry is displayed. A sequence number is appended to its name to ensure naming remains unique at a given level in the directory tree.
To cut or copy an entry and paste it at a different level:
Select the new parent entry for the entry you want to paste, and click on the Paste icon. Alternatively, select Paste from the Edit menu, or press Ctrl-v on the keyboard.
To copy an entry, and paste it immediately below the copied entry, you must click elsewhere in the directory tree to deselect the copied entry, then click on it again to select it, then perform the paste. If you do not deselect then reselect, the entry in the clipboard is pasted at the same level, not one level below.
Restoring an Entry
If you accidentally cut an entry from the directory, you can restore it, provided that you have not performed any subsequent cut or copy operations.
To restore an entry that you have just cut from the directory, select Restore from the Edit menu. The entry on the clipboard is returned to its original location.
Modifying an Entry
Use Modify to change attributes and object classes in directory entries. The Deja Modify panel is very similar to the attribute selection panel that you use to create an entry. See Figure 3.5.
You must have write permission for the entry that you want to modify. See "Logging In" for information.
In the browser, click on the entry you want to modify.
Click on the Modify icon or select Modify from the Entry menu.
The Modify Attributes window is displayed. Click on the Modify Objectclasses button to display the Modify Objectclasses window.
You can modify the following characteristics of an entry:
When you have finished the modifications, click Done.
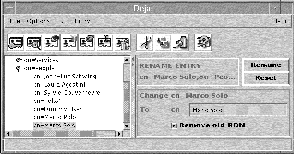
Renaming an Entry
Use Rename to modify the Relative Distinguished Name (RDN) of an entry. Figure 3.8 shows the Deja Rename panel.
Figure 3.8 Deja Rename Panel
You must have write permission for the entry you want to rename. See "Logging In" for information.
Select the entry you want to rename in the browser window.
You can only rename leaf entries. You cannot rename parents that still have children, or the root entry.
Click on the Rename icon, or select Rename from the Entry menu.
The rename panel appears. The name of the parent and the Relative Distinguished Name (RDN) of the selected entry are displayed.
Type the new RDN of the entry in the To text field.
If you want the new RDN to replace the old RDN, check the Remove old RDN check box.
By default the new RDN replaces the old RDN. If the Remove old RDN check box is unchecked, the new RDN is added to the entry as an additional value.
Click the Rename button.
Searching for an Entry
Use Search when you want to find an NIS entry in the directory. By default, you can search four NIS maps with this function; users, aliases, hosts and groups. Figure 3.9 shows the Deja Search panel for NIS users.
The Deja.properties file on the directory server defines the NIS search templates available in Deja. For information on adding or modifying NIS templates see "Setting Deja Properties" .
Figure 3.9 Deja Search Panel for NIS Users
To search for an NIS entry:
Click on the Search icon, or select Search from the Entry menu.
The Search panel is displayed.
Select the map you want to search from the Map Name option button.
Default options are Users, Aliases, Hosts or Groups.
Type the text string you want to search for in the NIS Key text field.
The search can include the wildcard character *.
Click Search to start the search.
The search results are displayed in the search results list and the number of entries found is displayed in the status bar. If there are no matches, the search results list is empty and the status bar indicates that no entries were found.
To stop the search at any time, click the Stop button.
The search is stopped and no results are returned.
Click the Clear button to clear the search text field.
Search Results List
Search results are displayed in a list below the search criteria.
The headings of the search results table depend on the map that is searched. Table 3.3 shows the attribute types displayed in the search result table for each map.
Table 3.3 NIS Search Results Lists
To view an entry from the search results list, double-click on the entry's name. The view entry window is displayed, and the entry is highlighted in the browser window.