Chapter 1 Installation
This chapter guides you in installing Directory Server Enterprise Edition software.
-
Before You Install covers concepts you must understand before installing in a production environment.
-
Directory Server Enterprise Edition Software Distributions contrasts the Directory Server Enterprise Edition software distributions.
-
Installation in Solaris Zones addresses what to consider when installing in a Solaris zone.
-
Software Installation provides step by step instructions on how to install Directory Server Enterprise Edition software.
-
Server Instance Creation provides step by step instructions on how to create server instances after you install the software.
-
Working With Sun Cryptographic Framework on Solaris 10 Systems provides instructions for deployments that use SSL hardware acceleration.
At the end of this chapter, you will have verified that the software that you installed works as expected. You can then continue to configure the software as described in the Sun Java System Directory Server Enterprise Edition 6.0 Administration Guide.
Before You Install
Before installing Directory Server Enterprise Edition software in a production environment, obtain the plans for deployment that were created with the help of Sun Java System Directory Server Enterprise Edition 6.0 Deployment Planning Guide. With the plans in hand, read this section to gauge how to approach installation for your deployment.
This chapter includes the following sections.
-
The Administration Framework and Installation briefly covers administration framework concepts that are key for installation in a production environment.
-
Comparison of Single System And Distributed Installation compares and contrasts installations that involve a single host system with installations that involve multiple systems.
The Administration Framework and Installation
This section highlights key aspects of the administration framework you must understand before installing server software in a production environment. This section does not address the developer and performance tuning tools provided with Directory Server Resource Kit. You can install such tools independently of the administration framework.
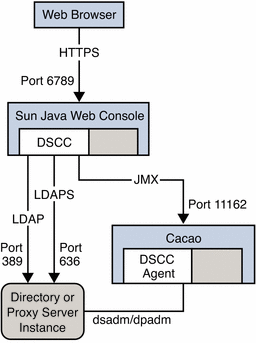
Before you read this section, read Directory Server Enterprise Edition Administration Model in Sun Java System Directory Server Enterprise Edition 6.0 Deployment Planning Guide. In particular, consider the figure in that section which shows the network traffic flows. The figure shows network traffic flows between the configuration management tools, Directory Service Control Center (DSCC), dsconf(1M), and dpconf(1M), the local administration agents, and servers. The figure also shows communication between the local agents, the local command line tools, dsadm(1M) and dpadm(1M), and the servers that you manage.
Notice the command line management and monitoring tools, dsconf(1M) and dpconf(1M), require only LDAP access to the servers that you manage. LDAP traffic typically flows through the default ports, 389 for LDAP and 636 for secure LDAP using SSL. When you create servers as a non-root user, the default ports are 1389 for LDAP, and 1636 for secure LDAP using SSL.
By convention, only root can install software using reserved port numbers less than 1024. Solaris systems allow the administrator to permit non-root users to use privileged ports, using role-based access control (RBAC).
DSCC is a web application. DSCC runs inside the framework known as Sun Java Web Console. You typically install DSCC on only one system in your deployment. You then manage all your servers from that installation of DSCC. You access DSCC through a browser by going to the secure Java Web Console URL, which by default is https://hostname:6789.
DSCC requires LDAP access to the servers for online management operations. DSCC also requires Java Management Extension (JMX) access to agents installed alongside the servers. The agents perform server process management operations on behalf of DSCC, operations that cannot be performed through LDAP on a running server. You can then work through a browser to DSCC to create and to start new servers.
As part of the normal installation process, you install the local DSCC agents alongside server software. DSCC contacts the agents over the network using a specific port number. You must therefore either accept the default port number, 11162, or specify a different port number.
The agents run inside a common agent container on the server system. This common agent container provides its agents with a single external port for management applications. The common agent container also consolidates resources to save resources on systems where multiple local agents share the container. The common agent container is in fact the agent that listens for DSCC on the default port number, 11162, routing management traffic to other agents. DSCC thus communicates with local agents through the common agent container. For troubleshooting purposes, a common agent container can be managed independently using the cacaoadm command.
Figure 1–1 Ports and Protocols
Each time that you install Directory Server Enterprise Edition software from the zip distribution, you also install an instance of the common agent container. Therefore, when you install multiple versions in parallel on the same host system, only one version can use the default port. You can install from the zip distribution where a common agent container instance already uses the default port. You must then specify a different port number for the additional common agent container instance.
-
Install configuration management software.
During this stage, configuration management tools are installed. DSCC is also initialized.
As DSCC stores its configuration data in its own, private Directory Server instance, Directory Server is installed from native packages alongside DSCC.
-
Install server software on the systems where you plan to run server instances.
During this stage, server software, required libraries, local administration tools, and local agents are installed where server instances run.
At the close of this stage, no servers are running. Yet, all the software is in place to allow you to set up directory services.
-
Create and configure server instances on the systems.
During this stage, Directory Server and Directory Proxy Server instances are created. Instances are created either through a web browser with DSCC, or with the local administration tools that are installed alongside the server software. Server instances are then configured either through Directory Service Control Center or through the configuration management command line tools.
Server software installation is a three stage process.
The first two stages are combined when you install everything on a single host system. DSCC nevertheless uses the local agents to perform certain operations on the servers. Thus, the local agents must still be installed in a local common agent container.
Comparison of Single System And Distributed Installation
This section compares and contrasts single host system installations with installations that involve multiple systems.
-
The choice whether to install DSCC and configuration management tools on the same host as the servers that you manage. Alternatively, you can install the tools on a different host from the servers that you manage remotely.
-
The choice whether to create multiple server instances on the same host, or create each server instance on a different host.
This section explains the outcomes of two basic choices about your installation.
Where You Install Directory Service Control Center
Installing DSCC on the same host as the servers that you manage provides a quick and simple solution for evaluation and development. This solution is not recommended for production installations where you rely on redundant systems and on server replica to provide high availability.
When you install DSCC you also install Directory Server software. DSCC uses its own private instance of Directory Server to store configuration information. If you also install the local agent for Directory Server alongside DSCC, you can create Directory Server instances on the system through a web browser to DSCC. You can do so without having to know additional host names and port numbers.
You can install DSCC on a different host from the servers you manage remotely. This solution is recommended for production installations where you rely on redundant systems and on server replica to provide high availability.
Figure 1–2 Administration Host and Server Host on Different Systems
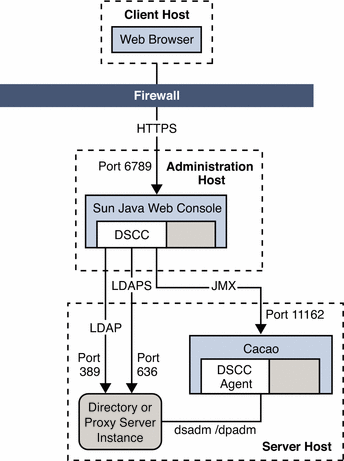
When you install DSCC on the administration host, you must be root. However, you can then use DSCC installed on the administration host to manage server hosts installed as non-root.
For example, you install DSCC on a server or even a suitable workstation outside the data center. You also install server software from the zip distribution on server hosts inside the data center, performing such installations as non-root. Over secure LDAP and JMX, you can then create, configure, and manage all your servers through a web browser to DSCC on the administration host.
Where You Create Server Instances
For production installations, you rely on redundant systems, load balancing, failover capabilities, and server replica to provide high availability. You therefore typically create servers on multiple host systems. Yet, more powerful host systems might each house multiple server instances.
When you create multiple server instances on a single host system, only one server instance can listen on the default ports. As long as you install Directory Server Enterprise Edition software only once, multiple server instances can share the same common agent container.
When you install multiple Directory Server Enterprise Edition versions on a system, each version comes with its own common agent container. Only one of those common agent containers can listen on the default port for JMX management traffic.
Directory Server Enterprise Edition Software Distributions
This section compares the different Directory Server Enterprise Edition software distributions available.
-
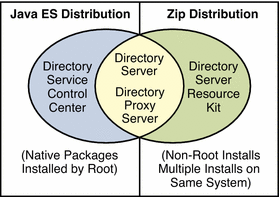
Java Enterprise System Distribution introduces the native package distribution that is provided as part of Sun Java Enterprise System. The Java Enterprise System distribution does include Directory Service Control Center.
You install software from the Java Enterprise System distribution with the Java Enterprise System installer.
-
Zip Distribution introduces the zip distribution, which supports non-root installations. The zip distribution does not include Directory Service Control Center.
-
Comparison of Distributions summarizes the software that is provided in each distribution.
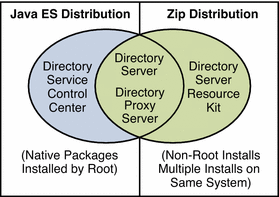
Figure 1–3 The Two Software Distributions
Java Enterprise System Distribution
This section introduces the Java Enterprise System distribution, which comes with the Java ES installer.
The Java ES installer offers a graphical wizard, a command-line interactive wizard, and also silent installation capabilities to add natively packaged software to your system. As this distribution is based on native packages, you must be root to perform the installation with the Java ES installer.
All Java ES software can work together, relying on a common framework of basic components and of libraries. You can therefore install all of the software products together on a single system if you choose to do so.
The Java ES installation software also facilitates patching, and migration from previous Java ES versions, including upgrade of common components. Furthermore, the software that you install integrates with the system, so you can configure directory services to restart automatically when the operating system reboots. With a native package based installation, you benefit from the package versioning and patching tools that are part of the operating system.
This guide does not describe all installation alternatives available using the Java ES installer. This guide does, however, address the key Java ES installer wizard screens related to Directory Server Enterprise Edition software installation. For detailed instructions on using all features of the Java ES installer, see the Java Enterprise System documentation at http://docs.sun.com/coll/1286.2.
Zip Distribution
This section introduces the zip distribution, which provides the dsee_deploy(1M) command-line installer.
This distribution offers self-contained software that you can install anywhere on local disk where you have write permission. You can both install, and also administer zip distribution software as a non-root user.
On Windows systems in order to allow remote management capabilities when installing the zip distribution, you must install either as Administrator, or as a user who belongs directly to the local Administrators group.
As zip distribution software is self-contained, each software installation performed from the zip distribution is independent. You can therefore install software from multiple zip distribution versions on the same system. Your system administrator must manually configure the software that you install to restart when the operating system reboots, however.
Furthermore, with the zip distribution, you must keep careful track of what you have installed, and which patches you have applied.
Comparison of Distributions
This section identifies which software is supported in each distribution.
Both distributions allow you to create and configure Directory Server and Directory Proxy Server instances as non-root.
|
Directory Server Enterprise Edition Software Component |
Java Enterprise System Distribution |
Zip Distribution |
|---|---|---|
|
Directory Service Control Center |
Provided |
Not provided in this distribution |
|
Directory Server |
Provided |
Provided, installable with dsee_deploy |
|
Directory Proxy Server |
Provided |
Provided, installable with dsee_deploy |
|
Directory Editor |
Not provided in this distribution |
Provided, but not installable with dsee_deploy |
|
Identity Synchronization for Windows |
Not provided in this distribution |
Provided, but not installable with dsee_deploy |
|
Directory Server Resource Kit, including Directory SDK for C and Directory SDK for Java |
Not provided in this distribution |
Provided, installable with dsee_deploy |
Identity Synchronization for Windows and Directory Editor software are bundled with the zip distribution, but are not installed using the dsee_deploy command. This guide does cover Identity Synchronization for Windows installation, however. See Part II, Installing Identity Synchronization for Windows.
This guide does not cover installation of Directory Editor software. If you plan to install Directory Editor software, then read instead the installation instructions in the Sun Java System Directory Editor 1 2005Q1 Installation and Configuration Guide.
Installation in Solaris Zones
This section addresses what to consider when installing Directory Server Enterprise Edition in a Solaris zone.
Global and full local Solaris zones present Directory Server Enterprise Edition software with complete systems. Directory Server Enterprise Edition software within a full local zone, as within the global zone, runs as if the zone were an independent physical system. The software does not share services or file locations with other zones. In global zones, and in full local zones, you therefore install as if you were on an independent system.
In sparse zones, you can install some services to be used in system-wide fashion. Single instances of Java Enterprise System common component services can therefore be used by multiple Java ES server instances. For example, Directory Server Enterprise Edition software in sparse zones can use the same Common Agent Container and Java ES Monitoring Framework installed in the global zone. You must, however, install the system-wide services before you can complete installation of sparse zone software that depends on the system-wide services.
Directory Server Enterprise Edition does not, however, require you to use system-wide services when you install in a sparse zone. When you install self-contained software from the zip distribution, you also install the common component services in the sparse zone. Therefore, zip distribution installations in sparse zones resemble installations on independent systems.
The following table outlines constraints for Directory Server Enterprise Edition installations, which pertain essentially to installations in sparse zones.
|
Directory Server Enterprise Edition Software Component |
Software Distribution |
Constraints Installing in Global or Full Local Zone |
Constraints For Sparse Zone Installations |
|---|---|---|---|
|
Directory Service Control Center |
Java Enterprise System distribution |
No constraints |
First install Java Enterprise System common components in the global zone, then install Directory Service Control Center in the sparse zone. |
|
Directory Server |
Java Enterprise System distribution |
No constraints |
First install Java Enterprise System common components in the global zone, then install Directory Server in the sparse zone. |
|
Zip distribution |
No constraints |
No constraints |
|
|
Directory Proxy Server |
Java Enterprise System distribution |
No constraints |
First install Java Enterprise System common components in the global zone, then install Directory Proxy Server in the sparse zone. |
|
Zip distribution |
No constraints |
No constraints |
|
|
Directory Editor |
Zip distribution |
No constraints |
The web application container must allow installation in the sparse zone. |
|
Identity Synchronization for Windows |
Zip distribution |
No constraints |
Not supported |
|
Directory Server Resource Kit |
Zip distribution |
No constraints |
No constraints |
For details about installation from the Java Enterprise System distribution in sparse zones, see the Java Enterprise System documentation, http://docs.sun.com/coll/1286.2.
Software Installation
This section covers basic installation. After you install server software, see Server Instance Creation for instructions on creating server instances.
-
To Install Directory Service Control Center From Native Packages
-
To Install Only Directory Proxy Server From the Zip Distribution
-
To Install Only Directory Server Resource Kit From the Zip Distribution
 To Install Directory Service Control Center From Native Packages
This procedure covers installation of Directory Service Control Center, also known as DSCC, and remote administration command-line tools.
You must be root to perform this procedure.
When you install DSCC, you automatically also install Directory Server from native packages. DSCC uses its own local instance of Directory Server to store information about your directory service configuration. The instance is referred to as the DSCC Registry.
You can use the Directory Server software that is installed alongside DSCC to create your own additional Directory Server instances on the system.
Before You Begin
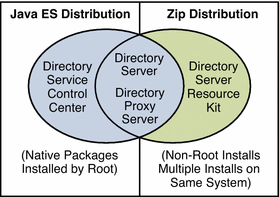
Obtain the Java Enterprise System distribution for this installation, as shown in the following figure.
Complete the worksheet that follows for your installation.
|
Requisite Information |
Hints |
Your Answers |
|---|---|---|
|
Hostname of the system where you install DSCC |
| |
|
root password for the system |
| |
|
Java Web Console URL |
Default: https://localhost:6789 | |
|
Directory Service Manager password |
|
-
Install prerequisite patches or service packs for your platform.
See Operating System Requirements in Sun Java System Directory Server Enterprise Edition 6.0 Release Notes for details.
-
With the Java Enterprise System distribution, run the Java ES installer as root.
# ./installer
-
Select the Directory Service Control Center component for installation.
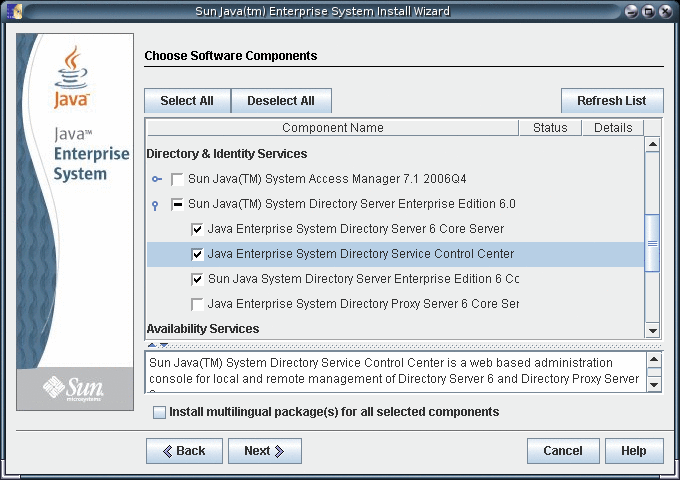
-
Choose to configure the software later, as you will register the software and create server instances after installation.
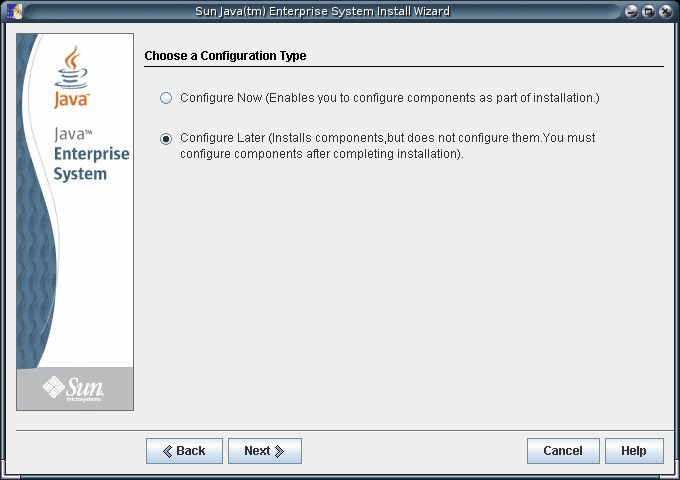
-
Complete installation with the Java ES installer.
After you complete installation, the native packages are installed on the system.
-
Initialize DSCC with the dsccsetup initialize command.
For example, on a Solaris system the following command performs initialization.
root# /opt/SUNWdsee/dscc6/bin/dsccsetup initialize
***
Registering DSCC Application in Sun Java(TM) Web Console
This operation is going to stop Sun Java(TM) Web Console.
Do you want to continue ? [y,n] y
Stopping Sun Java(TM) Web Console...
Registration is on-going. Please wait...
DSCC is registered in Sun Java(TM) Web Console
Restarting Sun Java(TM) Web Console
Please wait : this may take several seconds...
Sun Java(TM) Web Console restarted successfully
***
Registering DSCC Agent in Cacao...
Checking Cacao status...
Starting Cacao...
DSCC agent has been successfully registered in Cacao.
***
Choose password for Directory Service Manager:
Confirm password for Directory Service Manager:
Creating DSCC registry...
DSCC Registry has been created successfully
***
The dsccsetup command is located in install-path/dscc6/bin/dsccsetup. See Default Paths to determine the default install-path for your system.
-
Access DSCC through Java Web Console in your browser.
-
Login to Java Web Console.
By default, the URL to access Java Web Console is of the following form.
https://hostname:6789
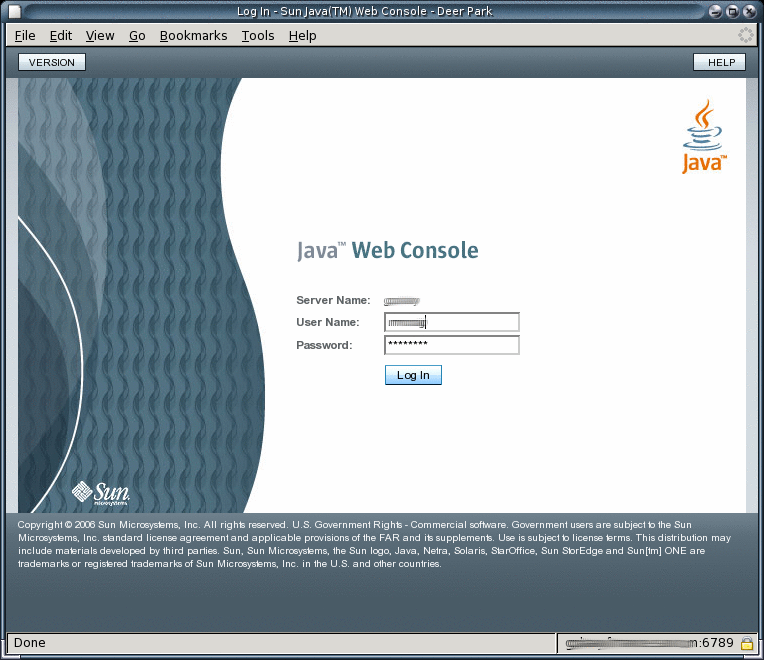
-
Click the Directory Service Control Center link.
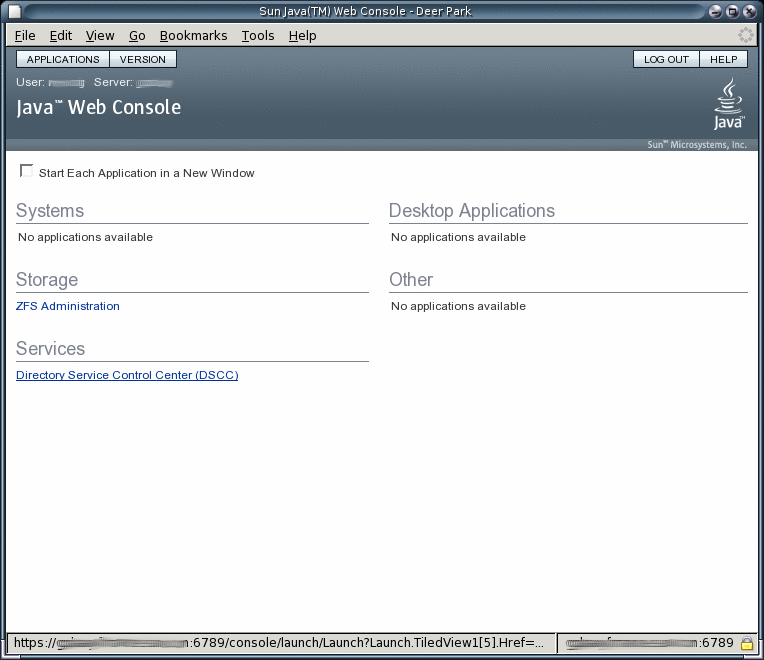
-
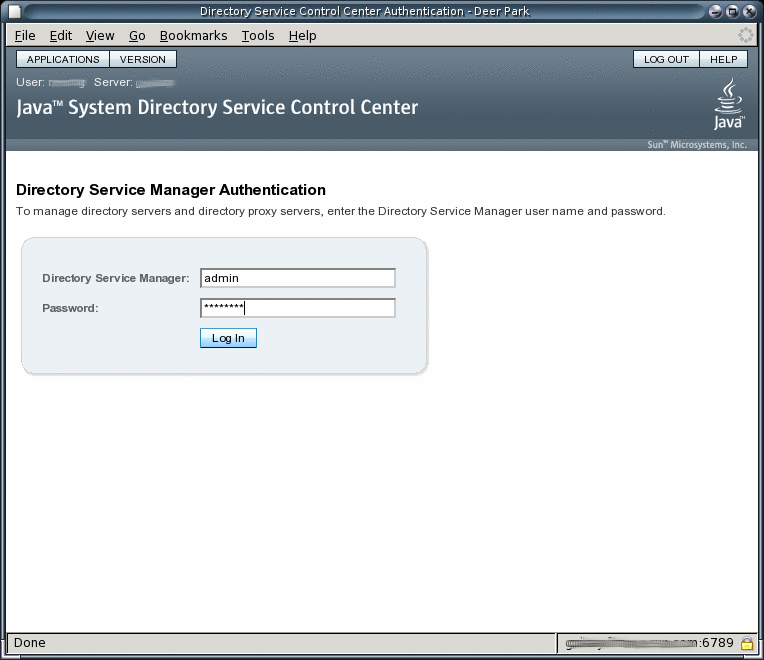
Login as Directory Service Manager.
Directory Service Manager's entry is stored in the Directory Service Control Center registry. Directory Service Manager has administrator access to Directory Service Control Center. Directory Service Manager also has administrator access to the server instances registered with Directory Service Control Center.
-
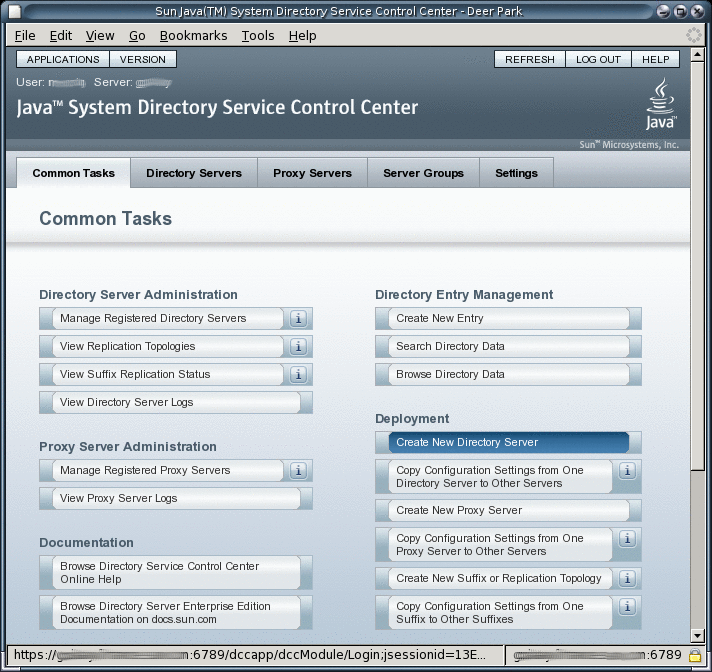
Begin managing your servers through Directory Service Control Center.
-
-
After Directory Service Control Center is working, enable Java Web Console to restart when the system reboots.
On a Solaris system, the following command enables restart upon reboot.
root# /usr/sbin/smcwebserver enable
For the exact location of this command on your system, see Command Locations.
-
(Optional) Enable the Common Agent Container, cacao, to restart when the operating system reboots.
root# cacaoadm enable
Next Steps
After installing the software, see Environment Variables.
 To Troubleshoot Directory Service Control Center Access
Use this procedure on the host where you installed Directory Service Control Center.
You must be root to perform this procedure.
-
Verify that Directory Service Control Center has been initialized properly.
root# /opt/SUNWdsee/dscc6/bin/dsccsetup status
***
DSCC Application is registered in Sun Java (TM) Web Console
***
DSCC Agent is registered in Cacao
***
DSCC Registry has been created
Path of DSCC registry is /var/opt/SUNWdsee/dscc6/dcc/ads
Port of DSCC registry is 3998
***
The default installation path for native packages on Solaris operating systems is /opt/SUNWdsee. For the default installation path on your operating system, see Default Paths.
Fix Directory Service Control Center initialization problems with the dsccsetup(1M) command.
-
Start Java Web Console if necessary with the smcwebserver command.
root# /usr/sbin/smcwebserver status
Sun Java(TM) Web Console is stopped
root# /usr/sbin/smcwebserver start
Starting Sun Java(TM) Web Console Version 3.0.2 ...
The console is running.
-
Check the Common Agent Container if you see errors that pertain to the DSCC Agent.
The cacaoadm(1M) man page describes the error codes that the command returns. For the exact location of this command on your system, see Command Locations.
If you installed Directory Server from the zip distribution, you must run the cacaoadm command as the user who performed the installation. Otherwise, run the command as root.
After installing Directory Server, the Common Agent Container is started automatically. However, when you reboot, you might have to start the Common Agent Container manually.
root# /usr/sbin/cacaoadm status
default instance is DISABLED at system startup.
Smf monitoring process:
26129
Uptime: 0 day(s), 3:16
For more information about the Common Agent Container, see Sun Java Enterprise System 5 Monitoring Guide.
 To Install Only Directory Server From
Native Packages
This procedure covers installation of Directory Server from native packages. You must be root to perform this procedure.
Note –
If you installed Directory Service Control Center, you automatically also installed Directory Server from native packages. You can use the Directory Server software that is installed alongside DSCC to create your own additional Directory Server instances on the system.
You can also install Directory Server as non-root from the zip distribution. See To Install Only Directory Server From the Zip Distribution for details.
Before You Begin
Obtain the Java Enterprise System distribution for this installation, as shown in the following figure.

Complete the worksheet that follows for your installation.
|
Requisite Information |
Hints |
Your Answers |
|---|---|---|
|
Fully qualified hostname of the system where you install Directory Server |
Example: ds.example.com | |
|
(Optional) Cacao common agent container port number to access from Directory Service Control Center |
Default: 11162 | |
|
File system paths where you create Directory Server instances |
Example: /local/ds/ Create instances only on local file systems, never on network–mounted file systems such as NFS. Each path is henceforth referred to as an instance-path. | |
|
LDAP port number |
Default: 389 when installing as root; 1389 for non-root | |
|
LDAP/SSL port number |
Default: 636 when installing as root; 1636 for non-root | |
|
Directory Manager DN |
Default: cn=Directory Manager | |
|
Directory Manager password |
Must be at least 8 characters long | |
|
Base suffix DN |
Example: dc=example,dc=com | |
|
(UNIX systems) Server user (uid) |
Example: noaccess | |
|
(UNIX systems) Server group (gid) |
Example: noaccess |
-
Install prerequisite patches or service packs for your platform.
See Operating System Requirements in Sun Java System Directory Server Enterprise Edition 6.0 Release Notes for details.
-
Using the Java Enterprise System distribution, run the Java ES installer as root.
root# ./installer
-
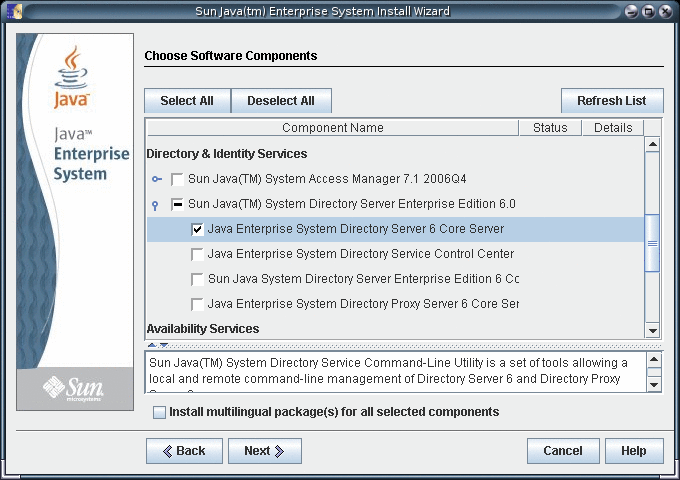
Select the Directory Server component for installation.
-
Choose to configure the software later, as you will register the software and create server instances after installation.

-
Complete installation with the Java ES installer.
At this point, you can now create server instances on the system. See Server Instance Creation for details.
-
(Optional) Enable the Common Agent Container, cacao, to restart when the operating system reboots.
root# cacaoadm enable
Next Steps
After installing the software, see Environment Variables.
 To Install Only Directory Server From
the Zip Distribution
This procedure covers installation of the software required to create Directory Server instances on the system.
Non-root users can install this component from the zip distribution.
On Windows systems in order to allow remote management capabilities when installing the zip distribution, you must install either as Administrator, or as a user who belongs directly to the local Administrators group.
You can also install Directory Server from native packages. See To Install Only Directory Server From Native Packages for details.
Before You Begin
Obtain the zip distribution for this installation.
As shown in the following illustration, the zip distribution does not include Directory Service Control Center. You must install Directory Service Control Center from the native package Java ES distribution, as described in To Install Directory Service Control Center From Native Packages.
Complete the worksheet that follows for your installation.
|
Requisite Information |
Hints |
Your Answers |
|---|---|---|
|
Fully qualified hostname of the system where you install Directory Server |
Example: ds.example.com | |
|
(Optional) Cacao common agent container port number to access from Directory Service Control Center |
Default: 11162 | |
|
File system paths where you create Directory Server instances |
Example: /local/ds/ Create instances only on local file systems, never on network–mounted file systems such as NFS. Each path is henceforth referred to as an instance-path. | |
|
LDAP port number |
Default: 389 when installing as root; 1389 for non-root | |
|
LDAP/SSL port number |
Default: 636 when installing as root; 1636 for non-root | |
|
Directory Manager DN |
Default: cn=Directory Manager | |
|
Directory Manager password |
Must be at least 8 characters long | |
|
Base suffix DN |
Example: dc=example,dc=com | |
|
(UNIX systems) Server user (uid) |
Example: noaccess | |
|
(UNIX systems) Server group (gid) |
Example: noaccess |
The default user and group IDs for zip installations are those of the user performing the installation.
-
Install prerequisite patches or service packs for your platform.
See Operating System Requirements in Sun Java System Directory Server Enterprise Edition 6.0 Release Notes for details.
-
Change to the zip distribution directory containing the dsee_deploy command.
-
Install the software with the dsee_deploy(1M) command.
$ ./dsee_deploy install -c DS -i install-path options
For example, the following command installs the component under /local, assuming you have access to create a file system directory there.
$ ./dsee_deploy install -c DS -i /local
You can also use the --no-inter option to install in non-interactive mode, accepting the license without confirmation. Non-interactive mode is particularly useful for silent installation.
This step installs a Common Agent Container, cacao, with the local Directory Service Control Center agent as well, allowing you to use DSCC to create server instances. The previous command works properly only if you have not yet installed a Common Agent Container using the default port, 11162.
If you installed DSCC from native packages previously on the same system, a Common Agent Container using the default port is already installed. Specify a different port using the -p option.
$ ./dsee_deploy install -c DS -i /local -p 11169
At this point, you can now create server instances on the system. See Server Instance Creation for details.
Next Steps
After installing the software, see Environment Variables.
 To Install Only Directory Proxy Server From
Native Packages
This procedure covers installation of Directory Proxy Server from native packages. You must be root to perform this procedure.
You can also install Directory Proxy Server as non-root from the zip distribution. See To Install Only Directory Proxy Server From the Zip Distribution for details.
Before You Begin
Obtain the Java Enterprise System distribution for this installation, as shown in the following figure.

Complete the worksheet that follows for your installation.
|
Requisite Information |
Hints |
Your Answers |
|---|---|---|
|
Fully qualified hostname of the system where you install Directory Proxy Server |
Example: dps.example.com | |
|
(Optional) Cacao common agent container port number to access from Directory Service Control Center |
Default: 11162 | |
|
File system paths where you create Directory Proxy Server instances |
Example: /local/dps/ Create instances only on local file systems, never on network–mounted file systems such as NFS. Each path is henceforth referred to as an instance-path. | |
|
LDAP port number |
Default: 389 when installing as root; 1389 for non-root | |
|
LDAP/SSL port number |
Default: 636 when installing as root; 1636 for root | |
|
Directory Proxy Manager DN |
Default: cn=Proxy Manager | |
|
Directory Proxy Manager password |
Must be at least 8 characters long | |
|
(UNIX platforms) Server user (uid) |
Example: noaccess | |
|
(UNIX platforms) Server group (gid) |
Example: noaccess | |
|
(Optional) Connection information for each server to access through the proxy |
Example: ds1.example.com:1389, ds2.example.com:1636 |
-
Install prerequisite patches or service packs for your platform.
See Operating System Requirements in Sun Java System Directory Server Enterprise Edition 6.0 Release Notes for details.
-
Using the Java Enterprise System distribution, run the Java ES installer as root.
root# ./installer
-
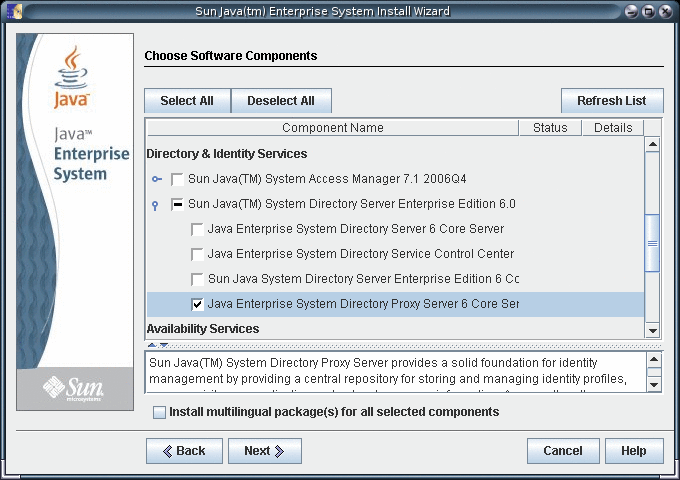
Select the Directory Proxy Server component for installation.
-
Choose to configure the software later, as you will register the software and create server instances after installation.

-
Complete installation with the Java ES installer.
At this point, you can now create server instances on the system. See Server Instance Creation for details.
-
(Optional) Enable the Common Agent Container, cacao, to restart when the operating system reboots.
root# cacaoadm enable
Next Steps
After installing the software, see Environment Variables.
 To Install Only Directory Proxy Server From
the Zip Distribution
This procedure covers installation of the software required to create Directory Proxy Server instances on the system.
Non-root users can install this component from the zip distribution.
On Windows systems in order to allow remote management capabilities when installing the zip distribution, you must install either as Administrator, or as a user who belongs directly to the local Administrators group.
You can also install Directory Proxy Server from native packages. See To Install Only Directory Proxy Server From Native Packages for details.
Before You Begin
Obtain the zip distribution for this installation.
As shown in the following illustration, the zip distribution does not include Directory Service Control Center. You must install Directory Service Control Center from the native package Java ES distribution, as described in To Install Directory Service Control Center From Native Packages.

Complete the worksheet that follows for your installation.
|
Requisite Information |
Hints |
Your Answers |
|---|---|---|
|
Fully qualified hostname of the system where you install Directory Proxy Server |
Example: dps.example.com | |
|
(Optional) Cacao common agent container port number to access from Directory Service Control Center |
Default: 11162 | |
|
File system paths where you create Directory Proxy Server instances |
Example: /local/dps/ Create instances only on local file systems, never on network–mounted file systems such as NFS. Each path is henceforth referred to as an instance-path. | |
|
LDAP port number |
Default: 389 when installing as root; 1389 for non-root | |
|
LDAP/SSL port number |
Default: 636 when installing as root; 1636 for root | |
|
Directory Proxy Manager DN |
Default: cn=Proxy Manager | |
|
Directory Proxy Manager password |
Must be at least 8 characters long | |
|
(UNIX platforms) Server user (uid) |
Example: noaccess | |
|
(UNIX platforms) Server group (gid) |
Example: noaccess | |
|
(Optional) Connection information for each server to access through the proxy |
Example: ds1.example.com:1389, ds2.example.com:1636 |
The default user and group IDs for zip installations are those of the user performing the installation.
-
Install prerequisite patches or service packs for your platform.
See Operating System Requirements in Sun Java System Directory Server Enterprise Edition 6.0 Release Notes for details.
-
Change to the zip distribution directory containing the dsee_deploy command.
-
Install the software with the dsee_deploy(1M) command.
$ ./dsee_deploy install -c DPS -i install-path options
For example, the following command installs the component under /local, assuming you have access to create a file system directory there.
$ ./dsee_deploy install -c DPS -i /local
You can also use the --no-inter option to install in non-interactive mode, accepting the license without confirmation. Non-interactive mode is particularly useful for silent installation.
This step installs a Common Agent Container, cacao, with the local Directory Service Control Center agent as well, allowing you to use DSCC to create server instances. The previous command works properly only if you have not yet installed a Common Agent Container using the default port, 11162.
If you installed DSCC from native packages previously on the same system, a Common Agent Container using the default port is already installed. Specify a different port using the -p option.
$ ./dsee_deploy install -c DPS -i /local -p 11169
At this point, you can now create server instances on the system. See Server Instance Creation for details.
Next Steps
After installing the software, see Environment Variables.
 To Install Only Directory Server Resource Kit From
the Zip Distribution
This procedure covers installation of the software required to use Directory Server Resource Kit tools.
Non-root users can install this component from the zip distribution.
Before You Begin
Obtain the zip distribution for this installation.

Complete the worksheet that follows for your installation.
|
Requisite Information |
Hints |
Your answers |
|---|---|---|
|
File system path where you install developer tools |
This path is henceforth referred to as install-path. | |
|
(Optional) URL to Application Server or Web Server administration interface used to deploy the NameFinder application |
Examples: http://localhost:4848, http://localhost:8888 | |
|
(Optional) Hostname and port number for the LDAP directory or directories queried by the NameFinder application |
Example: ds.example.com:389 | |
|
(Optional) Base DN of suffix queried by the NameFinder application |
Example: dc=example,dc=com |
-
Install prerequisite patches or service packs for your platform.
See Operating System Requirements in Sun Java System Directory Server Enterprise Edition 6.0 Release Notes for details.
-
Change to the zip distribution directory containing the dsee_deploy command.
-
Install the software with the dsee_deploy(1M) command.
$ ./dsee_deploy install -c DSRK -i install-path options
For example, the following command installs the component under /local, assuming you have access to create a file system directory there.
$ ./dsee_deploy install -c DSRK -i /local
You can also use the --no-inter option to install in non-interactive mode, accepting the license without confirmation. Non-interactive mode is particularly useful for silent installation.
-
(Optional) Load sample data in your directory.
Examples that use the command line tools depend on sample data residing under the dc=example,dc=com suffix of your directory.
You can set up part of the data that are required by creating a dc=example,dc=com suffix. You can then populating the suffix with entries from the ldif/Example.ldif file.
Read the Example.ldif file to find bind passwords needed in the examples.
After you load the Example.ldif content into the directory, generate test data for examples with the makeldif(1) command and the following template:
define suffix=dc=example,dc=com
define maildomain=example.com

branch: ou=test,[suffix]
subordinateTemplate: person:100

template: person
rdnAttr: uid
objectclass: top
objectclass: person
objectclass: organizationalPerson
objectclass: inetOrgPerson
givenName: <first>
sn: <last>
cn: {givenName} {sn}
initials: {givenName:1}{sn:1}
employeeNumber: <sequential>
uid: test{employeeNumber}
mail: {uid}@[maildomain]
userPassword: auth{employeeNumber}{employeeNumber}
telephoneNumber: <random>
description: This is the description for {cn}.
First, copy the template content to template.ldif. Next, use commands such as the following to generate the data in test.ldif, and to load the content into the directory.
The following commands generate a test.ldif file and add its content to the directory, as long as the directory already contains the sample entries from Example.ldif.
$ cd install-path/dsrk6/bin/example_files/
$ makeldif -t test.template -o test.ldif
Processing complete.
101 total entries written.
$ ldapmodify -a -D uid=hmiller,dc=example,dc=com -w - -f test.ldif
Enter bind password:
…
If you read Example.ldif, you see that the password for hmiller is hillock.
Next Steps
After installing the software, see Environment Variables.
Environment Variables
This section lists environment variables that you can set to facilitate creating server instances and using Directory Server Resource Kit and software development kits.
|
Environment Variable |
Set to include… |
Applies to… |
|---|---|---|
|
Hostname of Directory Proxy Server for administration tools |
dpconf(1M) command |
|
|
Port number of Directory Proxy Server for administration tools |
dpconf(1M) command |
|
|
Hostname of Directory Server for administration tools |
dsconf(1M) command |
|
|
Port number of Directory Server or for administration tools |
dsconf(1M) command |
|
|
Path to the file that contains the directory administrator password To administer all servers registered with Directory Service Control Center, set this environment variable to a file containing Directory Service Manager password. |
dpconf(1M), dsconf(1M) commands |
|
|
Directory administrator DN To administer all servers registered with Directory Service Control Center, set this environment variable to cn=admin,cn=Administrators,cn=dscc. |
dpconf(1M), dsconf(1M) commands |
|
|
install-path/dsee6/man |
Online manual pages to browse with the man command |
|
|
Add any of the following sections not in your MANSECT environment variable. 1:1m:4:5dsconf:5dpconf:5dssd:5dsat:5dsoc Alternatively, specify the sections to search explicitly when using the man command. |
The man command can use the MANSECT environment variable to identify the sections to search by default. |
|
|
install-path/dps6/bin |
Directory Proxy Server commands |
|
|
install-path/ds6/bin |
Directory Server commands |
|
|
install-path/dscc6/bin |
Directory Service Control Center commands |
|
|
install-path/dsrk6/bin |
Directory Server Resource Kit and LDAP client commands |
Server Instance Creation
After installing server software as described in Software Installation, create server instances according to the procedures in this section.
 To Create a Directory Server Instance
With DSCC
Non-root users can create server instances.
Before You Begin
Install the component software as described in Software Installation.
-
Access Directory Service Control Center through Java Web Console.
The default URL for Java Web Console on the local system is https://localhost:6789.
-
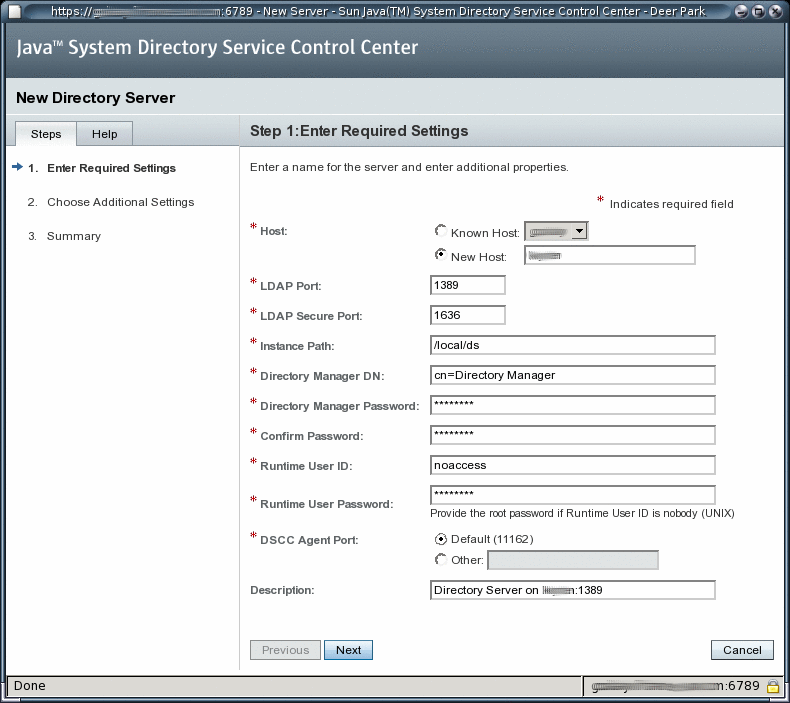
Follow the instructions in the Directory Service Control Center New Server wizard to create the server instance.
 To Create a Directory Server Instance
From the Command Line
In this procedure, you create a server instance on the local host using the dsadm command. You then create a suffix that you populate with data using the dsconf command.
Non-root users can create server instances.
A Directory Server instance contains the configuration and data necessary to respond to directory client applications. When you start or stop an instance, you start or stop the server process. The server process is what serves directory client requests corresponding to the data managed by that instance.
The dsadm command enables you to manage a Directory Server instance and the files belonging to that instance on the local host. The command does not let you administer servers over the network, but only directly on the local host. The dsadm command has subcommands for each key management task. For a complete description, see dsadm(1M).
The dsconf command is an LDAP client. The command enables you to configure nearly all server settings on a running Directory Server instance from the command line. You can configure settings whether the server is on the local host or another host that is accessible across the network. The dsconf command has subcommands for each key configuration task. For a complete description, see dsconf(1M).
Before You Begin
Install the component software, then set your PATH as described in Software Installation.
-
Create a new Directory Server instance.
$ dsadm create -p port -P SSL-port instance-path
For example, the following command creates an instance under the existing directory, /local/, in a new directory, /local/ds/. The new instance has default ports 389 for LDAP, 636 for LDAPS for root, and 1389 for LDAP, 1636 for LDAPS for non-root users.
$ dsadm create /local/ds
Choose the Directory Manager password:
Confirm the Directory Manager password:
Use 'dsadm start /local/ds' to start the instance
Notice that the instance is created in a directory on the local file system, not a network file system.
-
Start the instance.
$ dsadm start instance-path
For example, the following command starts the instance located under /local/ds/.
$ dsadm start /local/ds
Server started: pid=2845
-
Verify that you can read the root DSE of the new instance.
$ ldapsearch -h localhost -p 1389 -b "" -s base "(objectclass=*)"
version: 1
dn:
objectClass: top
…
supportedLDAPVersion: 3
vendorName: Sun Microsystems, Inc.
vendorVersion: Sun-Java(tm)-System-Directory/6.0
…
Note –At this point in the procedure, you have a working server instance. You must further configure the server instance, however. Furthermore, the instance is not yet registered with Directory Service Control Center.
-
(Optional) Use the new password policy mode, unless the instance belongs to a topology with version 5 instances.
Your server instance might be standalone. Alternatively, your instance might belong to a replication topology that has already been migrated to the new password policy mode. In either case, perform this step.
$ dsconf pwd-compat -h localhost -p 1389 to-DS6-migration-mode
Certificate "CN=hostname, CN=1636, CN=Directory Server, O=Sun Microsystems"
 presented by the server is not trusted.
Type "Y" to accept, "y" to accept just once, "n" to refuse, "d" for more details: Y
Enter "cn=Directory Manager" password:
## Beginning password policy compatibility changes.
## Password policy compatibility changes finished.

Task completed (slapd exit code: 0).
$ dsconf pwd-compat -p 1389 to-DS6-mode
Enter "cn=Directory Manager" password:
## Beginning password policy compatibility changes.
## Password policy compatibility changes finished.

Task completed (slapd exit code: 0).
-
(Optional) Prepare an example suffix.
-
Create an empty suffix.
For example, the following command creates a suffix with root dc=example,dc=com.
$ dsconf create-suffix -h localhost -p 1389 dc=example,dc=com
Enter "cn=Directory Manager" password:
$
-
Populate the suffix with LDIF data.
If you plan to populate the suffix with data that is replicated from another Directory Server instance, skip this step.
For example, the following command fills the suffix that you created with sample data from Example.ldif.
$ dsconf import -h localhost -p 1389 install-path/ds6/ldif/Example.ldif dc=example,dc=com
Enter "cn=Directory Manager" password:
New data will override existing data of the suffix "dc=example,dc=com".
Initialization will have to be performed on replicated suffixes.
Do you want to continue [y/n] ?  y
## Index buffering enabled with bucket size 40
## Beginning import job...
## Processing file "install-path/ds6/ldif/Example.ldif"
## Finished scanning file "install-path/ds6/ldif/Example.ldif" (160 entries)
## Workers finished; cleaning up...
## Workers cleaned up.
## Cleaning up producer thread...
## Indexing complete.
## Starting numsubordinates attribute generation.
 This may take a while, please wait for further activity reports.
## Numsubordinates attribute generation complete. Flushing caches...
## Closing files...
## Import complete.  Processed 160 entries in 4 seconds. (40.00 entries/sec)

Task completed (slapd exit code: 0).
-
Verify that you can find an entry in the new instance.
$ ldapsearch -h localhost -p 1389 -b dc=example,dc=com "(uid=bjensen)"
version: 1
dn: uid=bjensen, ou=People, dc=example,dc=com
cn: Barbara Jensen
cn: Babs Jensen
sn: Jensen
givenName: Barbara
objectClass: top
objectClass: person
objectClass: organizationalPerson
objectClass: inetOrgPerson
ou: Product Development
ou: People
l: Cupertino
uid: bjensen
mail: bjensen@example.com
telephoneNumber: +1 408 555 1862
facsimileTelephoneNumber: +1 408 555 1992
roomNumber: 0209
-
-
(Optional) Register the server instance with Directory Service Control Center by using either of the following methods.
-
Login to DSCC, and then use the Register Existing Server action on the Servers tab of the Directory Servers tab.
Access DSCC through the URL https://localhost:6789.
-
Use the command dsccreg add-server.
$ dsccreg add-server -h dscchost --description "My DS" /local/ds
Enter DSCC administrator's password:
/local/ds is an instance of DS
Enter password of "cn=Directory Manager" for /local/ds:
This operation will restart /local/ds.
Do you want to continue ? (y/n) y
Connecting to /local/ds
Enabling DSCC access to /local/ds
Restarting /local/ds
Registering /local/ds in DSCC on dscchost.
See dsccreg(1M) for more information about the command.
-
-
(Optional) If you installed from native packages with the Java Enterprise System distribution, enable the server to restart when the operating system reboots.
On Solaris 10 and Windows systems, use the dsadm enable-service command.
root# dsadm enable-service /local/ds
On Solaris 9, HP-UX, and Red Hat systems, use the dsadm autostart command.
root# dsadm autostart /local/ds
If you installed with the zip distribution, this step must be done manually, with a script run at system startup time, for example.
Next Steps
At this point, you can add more suffixes, configure replication with other server instances, tune the instance, and generally proceed with other configuration operations.
See the online help inside Directory Service Control Center for hints on configuring Directory Server through the graphical user interface.
See Part I, Directory Server Administration, in Sun Java System Directory Server Enterprise Edition 6.0 Administration Guide for instructions on configuring Directory Server with command-line administration tools.
 To Create a Directory Proxy Server Instance
With DSCC
Non-root users can create server instances.
Before You Begin
Install the component software as described in Software Installation.
-
Access Directory Service Control Center through Java Web Console.
The default URL for Java Web Console on the local system is https://localhost:6789.
-
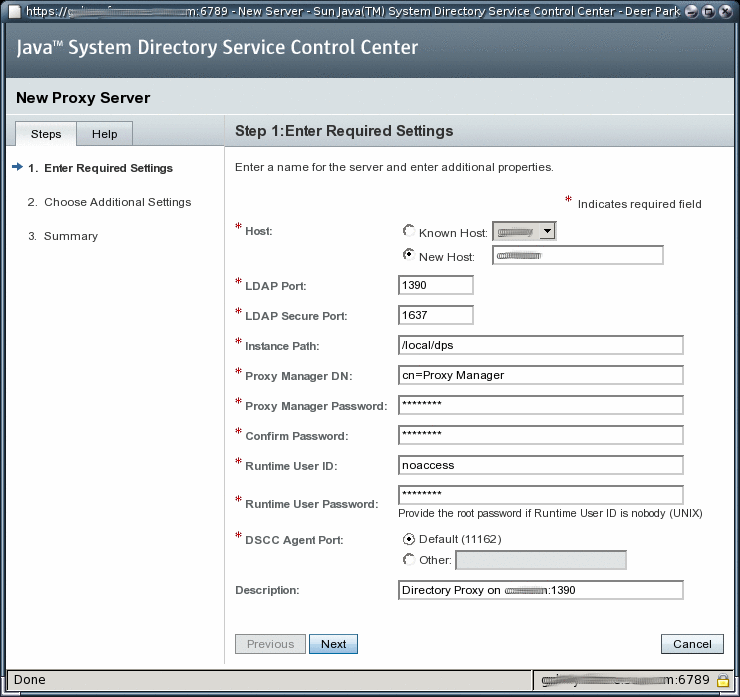
Follow the instructions in the Directory Service Control Center New Server wizard to create the server instance.
 To Create a Directory Proxy Server Instance
From the Command Line
In this procedure, you create a server instance on the local host using the dpadm command. You then configure the instance using the dpconf command.
Non-root users can create server instances.
A Directory Proxy Server instance must be configured to proxy directory client application requests to data sources through data views. When you start or stop an instance, you start or stop the server process that proxies directory client application requests.
The dpadm command enables you to manage a Directory Proxy Server instance and the files belonging to that instance on the local host. The command does not allow you to administer servers over the network, but only directly on the local host. The dpadm command has subcommands for each key management task. For a complete description, see dpadm(1M).
The dpconf command is an LDAP client. The command enables you to configure nearly all server settings on a running Directory Proxy Server instance from the command line. You can configure settings whether the server is on the local host or another host that is accessible across the network. The dpconf command has subcommands for each key configuration task. For a complete description, see dpconf(1M).
Before You Begin
Install the component software, then set your PATH as described in Software Installation.
-
Create a new Directory Proxy Server instance.
$ dpadm create -p port -P SSL-port instance-path
For example, the following command creates an instance under the existing directory, /local/, in a new directory, /local/dps/. The default ports are 389 for LDAP, 636 for LDAPS for root, and 1389 for LDAP, 1636 for LDAPS for non-root users.
$ dpadm create -p 1390 -P 1637 /local/dps
Choose the Proxy Manager password:
Confirm the Proxy Manager password:
Use 'dpadm start /local/dps' to start the instance
Notice that the instance must be created in a directory on the local file system, not a network file system.
-
Start the instance.
$ dpadm start instance-path
For example, the following command starts the instance located under /local/dps/.
$ dpadm start /local/dps
…
Directory Proxy Server instance '/local/dps' started: pid=28732
-
Verify that you can read the root DSE of the new instance.
$ ldapsearch -h localhost -p 1390 -b "" -s base "(objectclass=*)"
version: 1
dn:
objectClass: top
objectClass: extensibleObject
supportedLDAPVersion: 2
supportedLDAPVersion: 3
…
vendorName: Sun Microsystems, Inc
vendorVersion: Directory Proxy Server 6.0
…
Note –At this point in the procedure, you have a working server instance. You must further configure the server instance, however. Furthermore, the instance is not yet registered with Directory Service Control Center.
-
(Optional) Enable the Directory Proxy Server instance to function as an LDAP proxy.
-
Create an LDAP data source.
For example, the following command creates a data source, My DS, pointing to the directory instance created on the local host in To Create a Directory Server Instance From the Command Line.
$ dpconf create-ldap-data-source -h localhost -p 1390 "My DS" localhost:1389
Certificate "CN=hostname:1390" presented by the server is not trusted.
Type "Y" to accept, "y" to accept just once, "n" to refuse, "d" for more details: Y
Enter "cn=Proxy Manager" password:
-
Create an LDAP data source pool.
$ dpconf create-ldap-data-source-pool -h localhost -p 1390 "My Pool"
Enter "cn=Proxy Manager" password:
-
Attach the LDAP data source to the LDAP data source pool.
$ dpconf attach-ldap-data-source -h localhost -p 1390 "My Pool" "My DS"
Enter "cn=Proxy Manager" password:
-
Create an LDAP data view into the LDAP data source pool.
For example, the following command creates a data view, My View, which allows client applications to view the suffix dc=example,dc=com:
$ dpconf create-ldap-data-view -h localhost -p 1390 "My View" \
 "My Pool" dc=example,dc=com
Enter "cn=Proxy Manager" password:
-
Enable the LDAP data source, then restart the server for the change to take effect.
$ dpconf set-ldap-data-source-prop -h localhost -p 1390 "My DS" is-enabled:true
Enter "cn=Proxy Manager" password:
$ dpadm restart /local/dps
Directory Proxy Server instance '/local/dps' stopped
[31/Aug/2006:11:32:26 +0200] - STARTUP    - INFO  -
 Sun Java(TM) System Directory Proxy Server/6.0 (Build 0824060144) starting up
Directory Proxy Server instance '/local/dps' started: pid=28901
-
Enable searches on the LDAP data source.
$ dpconf set-attached-ldap-data-source-prop -h localhost -p 1390 \
 "My Pool" "My DS" search-weight:100
Enter "cn=Proxy Manager" password:
-
Verify that you can read directory data through the new instance.
$ ldapsearch -h localhost -p 1390 -b dc=example,dc=com "(uid=bjensen)"
version: 1
dn: uid=bjensen, ou=People, dc=example,dc=com
cn: Barbara Jensen
cn: Babs Jensen
sn: Jensen
givenName: Barbara
objectClass: top
objectClass: person
objectClass: organizationalPerson
objectClass: inetOrgPerson
ou: Product Development
ou: People
l: Cupertino
uid: bjensen
mail: bjensen@example.com
telephoneNumber: +1 408 555 1862
facsimileTelephoneNumber: +1 408 555 1992
roomNumber: 0209
Note –Notice that LDAP search operations work for the suffix handled by your data view, but do not work for other suffixes. If you search a suffix for which no data view is configured, the server returns an error.
$ ldapsearch -h localhost -p 1390 -b o=example.com "(uid=bjensen)"
ldap_search: Operations error
ldap_search: additional info: Unable to retrieve a backend SEARCH
 connection to process the search request
For instructions detailed instructions on configuring Directory Proxy Server, see Part II, Directory Proxy Server Administration, in Sun Java System Directory Server Enterprise Edition 6.0 Administration Guide.
-
-
(Optional) Register the server instance with Directory Service Control Center by using either of the following methods.
-
Login to DSCC, and then use the Register Existing Server action on the Proxy Servers tab.
Access DSCC through the URL https://localhost:6789.
-
Use the command dsccreg add-server.
$ dsccreg add-server -h dscchost --description "My Proxy" /local/dps
Enter DSCC administrator's password:
/local/dps is an instance of DPS
Enter password of "cn=Proxy Manager" for /local/dps:
Connecting to /local/dps
Enabling DSCC access to /local/dps
Registering /local/dps in DSCC on dscchost.
See dsccreg(1M) for more information about the command.
-
-
(Optional) If you installed from native packages with the Java Enterprise System distribution, enable the server to restart when the operating system reboots.
On Solaris 10 and Windows systems, use the dpadm enable-service command.
root# dpadm enable-service /local/dps
On Solaris 9, HP-UX, and Red Hat systems, use the dpadm autostart command.
root# dpadm autostart /local/dps
If you installed with the zip distribution, this step must be done manually, with a script run at system startup time, for example.
Next Steps
At this point, you can continue to configure further data sources and data views. You can also configure load balancing, data distribution, and other server capabilities.
See the online help inside Directory Service Control Center for hints on configuring Directory Proxy Server through the graphical user interface.
See Part II, Directory Proxy Server Administration, in Sun Java System Directory Server Enterprise Edition 6.0 Administration Guide for instructions on configuring Directory Proxy Server with command-line administration tools.
Working With Sun Cryptographic Framework on Solaris 10 Systems
This section explains briefly how to use Sun Crypto Accelerator cards through the Sun cryptographic framework on Solaris 10 systems with Directory Server, and Directory Proxy Server. See Chapter 13, Solaris Cryptographic Framework (Overview), in System Administration Guide: Security Services for more information about the framework.
 To Use Directory Server With Cryptographic Hardware on a Solaris
10 System
Before You Begin
This procedure is designed for use with Sun Crypto Accelerator hardware. Perform the following procedure as the same user who runs the Directory Server instance.
-
Set the PIN used to access the cryptographic framework with the pktool setpin command.
-
Export the current Directory Server certificate to a PKCS#12 file.
The following command shows how to perform this step if the Directory Server instance is located under /local/ds/.
$ dsadm export-cert -o cert-file /local/ds defaultCert
-
Configure Directory Server to use the appropriate token when accessing the key material.
Typically, the token is Sun Metaslot.
$ dsconf set-server-prop 'ssl-rsa-security-device:Sun Metaslot'
-
Stop Directory Server.
$ dsadm stop /local/ds
-
(Optional) If you have no other certificates in the existing certificate database for the Directory Server instance, remove the certificate database.
$ rm -f /local/ds/alias/*.db
This optional step ensures that no certificates are stored in the software database.
-
Create a new certificate database backed by the Solaris cryptographic framework.
If you did not remove the certificate database, you do not need to run the modutil -create line in this example.
$ /usr/sfw/bin/64/modutil -create -dbdir /local/ds/alias -dbprefix slapd-
$ /usr/sfw/bin/64/modutil -add "Solaris Kernel Crypto Driver" -libfile \
 /usr/lib/64/libpkcs11.so -dbdir /local/ds/alias -dbprefix slapd-
$ /usr/sfw/bin/64/modutil -enable "Solaris Kernel Crypto Driver" \
 -dbdir /local/ds/alias -dbprefix slapd-
-
Import the PKCS#12 certificate that you exported.
$ /usr/sfw/bin/64/pk12util -i cert-file \
 -d /local/ds/alias -P slapd- -h "Sun Metaslot"
$ /usr/sfw/bin/64/certutil -M -n "Sun Metaslot:defaultCert" -t CTu \
 -d /local/ds/alias -P slapd-
If your accelerator board has a FIPS 140-2 keystore, make sure the private key is generated on the device. Sun Crypto Accelerator 4000 and 6000 boards have FIPS 140-2 keystores, for example. The exact process depends on the board.
-
Create a password file that contains the PIN needed to access the cryptographic framework.
$ echo "Sun Metaslot:password" > /local/ds/alias/slapd-pin.txt
-
Start Directory Server.
$ dsadm start /local/ds
 To Use Directory Proxy Server With Cryptographic Hardware on a Solaris
10 System
Before You Begin
This procedure is designed for use with Sun Crypto Accelerator hardware. Perform the following procedure as the same user who runs the Directory Proxy Server instance.
-
Stop Directory Proxy Server.
$ dpadm stop /local/dps
-
Turn off certificate database password storage.
$ dpadm set-flags /local/dps cert-pwd-prompt=on
Choose the certificate database password:
Confirm the certificate database password:
-
Set the PIN used to access the cryptographic framework with the pktool setpin command.
Use the same password that you entered when turning off certificate database password storage.
-
Generate a key pair, using the cryptographic framework as the key store.
$ keytool -genkeypair -alias defaultDPScert
 -dname "ou=dps server,dc=example,dc=com" -keyalg RSA -sigalg MD5withRSA
 -validity 3652 -storetype PKCS11 -keystore NONE -storepass pin-password
Here, pin-password is the password you set as the PIN with the pktool setpin command.
-
Edit the Directory Proxy Server configuration file, adding the following attributes to the base entry, cn=config.
serverCertificateNickName: defaultDPScert
certificateKeyStore: NONE
certificateKeyStoreType: PKCS11
-
Start Directory Proxy Server.
$ dpadm start /local/dps
- © 2010, Oracle Corporation and/or its affiliates
