Working With Brokers
This section describes how to use the Administration Console to connect to and manage message brokers.
Starting a Broker
You cannot start a broker using the Administration Console. Instead, use one of the following methods:
-
On Solaris, enter this command:
/usr/bin/imqbrokerd
-
On Linux, enter this command:
/opt/sun/mq/bin/imqbrokerd
-
On Windows, choose Start > Programs > Sun Microsystems > Sun Java System Message Queue 3.6 > Message Broker.
If you used the Windows Start menu, the command window will appear, indicating that the broker is ready by displaying lines like the following:
Loading persistent data...
Broker “imqbroker@stan:7676 ready.
Reactivate the Administration Console window. You are now ready to add the broker to the Console and connect to it. You do not have to start the broker before adding a reference to it in the Administration Console, but you must start it before you can connect to it.
Adding a Broker to the Administration Console
Adding a broker creates a reference to that broker in the Administration Console. After adding the broker, you can connect to it.
 To Add a Broker to the Administration Console
-
Click on the Brokers item in the Administration Console window’s navigation pane and choose Add Broker from the Actions menu.
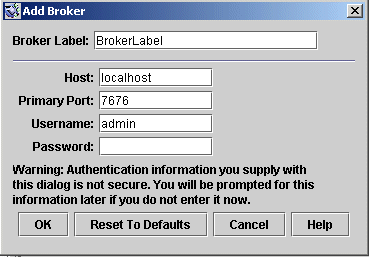
Alternatively, you can right-click on Brokers and choose Add Broker from the pop-up context menu. In either case, the Add Broker dialog box (Figure 2–3) will appear.
Figure 2–3 Add Broker Dialog Box
-
Enter a name for the broker in the Broker Label field.
This provides a label that identifies the broker in the Administration Console.
Note the default host name (localhost) and primary port ( 7676) specified in the dialog box. These are the values you must specify later, when you configure the connection factory that the client will use to create connections to this broker.
For this exercise, type the name MyBroker into the Broker Label field. Leave the Password field blank; your password will be more secure if you specify it at connection time.
-
Click OK to add the broker and dismiss the dialog box.
The new broker will appear under Brokers in the navigation pane, as shown in Figure 2–4. The red X over the broker’s icon indicates that it is not currently connected to the Administration Console.
Figure 2–4 Broker Displayed in Administration Console Window
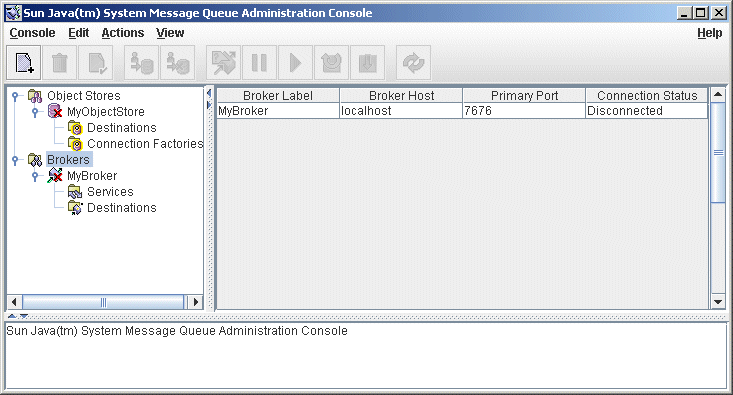
Once you have added a broker, you can use the Properties command on the Actions menu (or the pop-up context menu) to display a Broker Properties dialog box, similar to the Add Broker dialog shown in Adding a Broker to the Administration Console, to view or modify any of its properties.
Connecting to a Broker
Now that you have added a broker to the Administration Console, you can proceed to connect to it.
 To Connect to a Broker
-
Click on the broker’s name in the Administration Console window’s navigation pane and choose Connect to Broker from the Actions menu.
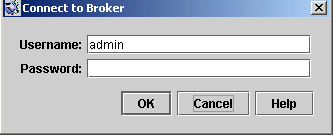
Alternatively, you can right-click on the broker’s name and choose Connect to Broker from the pop-up context menu. In either case, the Connect to Broker dialog box ( Figure 2–5) will appear.
Figure 2–5 Connect to Broker Dialog Box
-
Enter the user name and password with which to connect to the broker.
The dialog box initially displays the default user name, admin . In a real-world environment, you should establish secure user names and passwords as soon as possible (see User Authentication); for this exercise, simply use the default value.
The password associated with the default user name is also admin; type it into the Password field in the dialog box. This will connect you to the broker with administrative privileges.
-
Click OK to connect to the broker and dismiss the dialog box.
Once you have connected to the broker, you can use the commands on the Actions menu (or the context menu) to perform the following operations on a selected broker:
-
Pause Broker temporarily suspends the operation of a running broker.
-
Resume Broker resumes the operation of a paused broker.
-
Restart Broker reinitializes and restarts a broker.
-
Shut Down Broker terminates the operation of a broker.
-
Query/Update Broker displays or modifies a broker’s configuration properties.
-
Disconnect from Broker terminates the connection between a broker and the Administration Console.
-
Viewing Connection Services
A broker is distinguished by the connection services it provides and the physical destinations it supports.
 To View Available Connection Services
-
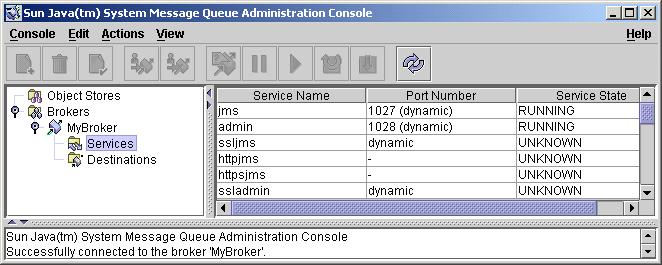
Select Services under the broker’s name in the Administration Console window’s navigation pane.
A list of the available services will appear in the result pane (see Figure 2–6), showing the name, port number, and current state of each service.
Figure 2–6 Viewing Connection Services
-
Select a service by clicking on its name in the result pane.
For this exercise, select the name jms.
-
Choose Properties from the Actions menu.
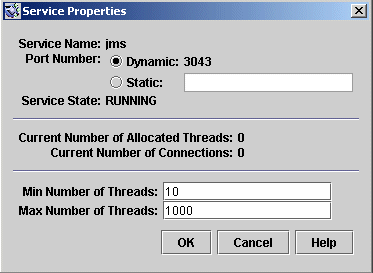
The Service Properties dialog box (Figure 2–7) will appear. You can use this dialog box to assign the service a static port number and to change the minimum and maximum number of threads allocated for it.
Figure 2–7 Service Properties Dialog Box
For this exercise, do not change any of the connection service’s properties.
-
Click OK to accept the new property values and dismiss the dialog box.
The Actions menu also contains commands for pausing and resuming a service. If you select the admin service and pull down the Actions menu, however, you will see that the Pause Service command is disabled. This is because the admin service is the Administration Console’s link to the broker: if you paused it, you would no longer be able to access the broker.
- © 2010, Oracle Corporation and/or its affiliates
