Creating a Sun Java System Directory Source
Each Sun Java System directory source is associated with a Connector and set of Plug-ins that can be deployed in a replication scenario involving multiple servers. The Directory Server Connector is capable of synchronizing changes from Windows directory source to the preferred server (master). In case, the preferred server is down, the changes will failover to the secondary server in the configured secondary servers list in a sequential manner till the preferred server comes up. Directory Server replication will replicate changes made from the preferred server (master) to other preferred secondary servers configured in the topology. Any Directory Server Plug-in can handle password validity checks from Windows directory sources and users can change passwords at any server.
 To Create a New Sun Java System Directory Source
-
Click the New Sun Directory Source button to invoke the Define Sun Java System Directory Source wizard.
Figure 7–8 Selecting a Root Suffix
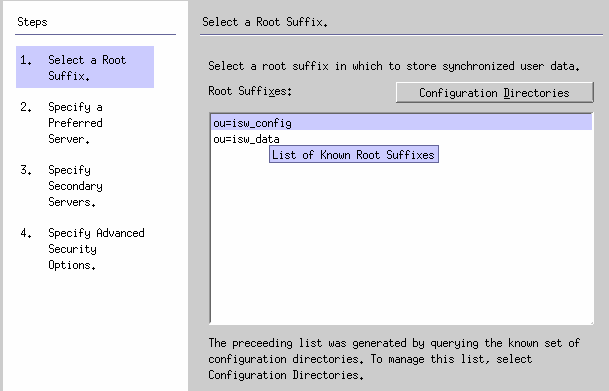
The program queries a known set of configuration directory sources and displays existing root suffix (also referred to as naming contexts ) in the list pane.
By default, the program knows about the configuration directory where you installed the product, and the root suffixes known by the configuration directory will be listed in the list pane.
-
Select the root suffix where your users are located from the list pane. (If several root suffixes are listed, select the one where your users are located.) Click Next.
If the root suffix you want to synchronize with is not affiliated with a configuration directory registered with Identity Synchronization for Windows, then you must specify a new configuration directory, as follows:
-
Click the Configuration Directories button to specify a new configuration directory.
-
When the Configuration Directories dialog box is displayed ( Step 3), click the New button to open the New Configuration Directories dialog box.
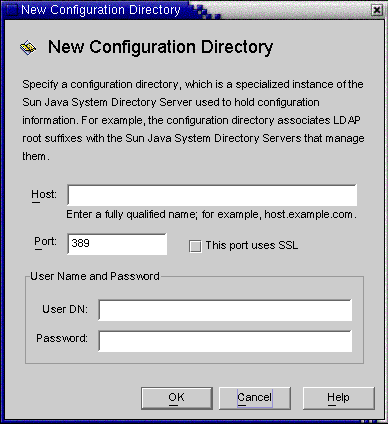
Figure 7–9 Selecting a New Configuration Directory
-
Enter the following information, and then click OK to save your changes and close the dialog box.
-
Host: Enter the fully qualified host name.
For example: machine1.example.com
-
Port: Enter a valid, unused LDAP port number. (Default is 389)
Enable the This port uses SSL box if Identity Synchronization for Windows is using an SSL (Secure Socket Layer) port to communicate with the configuration directory.
-
User DN: Enter your Administrator’s (bind) distinguished name. For example, uid=admin,ou=Administrators,ou=TopologyManagement,o=NetscapeRoot
-
Password: Enter your Administrator’s password.
The wizard will query the specified configuration directory to determine all of the directory servers managed by that directory.
Note –Identity Synchronization for Windows only supports one root suffix per Sun Java System Directory Server source.
Editing and Removing Configuration Directories
You can also use the Configuration Directories dialog box to manage your list of configuration directories, as follows:
-
Select a configuration directory from the list pane, and then click the Edit button. When the Edit Configuration Directories dialog is displayed, you can change the Host, Port, Secure Port, User Name, and Password parameters.
-
Select a configuration directory from the list pane, and then click Remove to delete the directory from the list.
-
-
Click OK to close the Configuration Directories dialog box and the newly selected configuration directory’s root suffixes are displayed in the list pane.
By default, Directory Server creates a root suffix whose prefix corresponds to the components of the machine’s DNS domain entry. It uses the following suffix:
dc=your_machine’s_DNS_domain_name
That is, if your machine domain is example.com, then you should configure the suffix dc=example, dc=com for your server. The entry named by the chosen suffix must already exist in the directory.
-
Select the root suffix, and click Next.
The Specify Preferred Servers panel is displayed (see Creating a Sun Java System Directory Source).
Figure 7–10 Specifying a Preferred Server
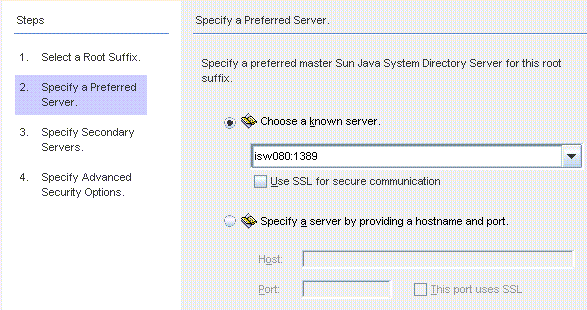
Identity Synchronization for Windows uses the preferred Directory Server to detect changes made at any Directory Server master. The preferred server also acts as the primary location where changes made on Windows systems are applied to the Sun Java System Directory Server system.
If the preferred master server fails, the secondary server can store these changes until the preferred server (master) comes back online.
-
-
Use one of the following methods to select a preferred server:
-
Select the Choose a Known Server option, and then select a server name from the drop-down list.
Note –The Directory Server must be running to appear in the list. If the server is down temporarily, select the Specify a Server by Providing a Hostname and Port option, and then enter the server information manually.
Enable the Use SSL for secure communication box if you want the Directory Server to communicate using SSL. However, if you enable this feature there are some additional setup steps you must perform after installation. For more information, see Enabling SSL in Directory Server
-
Select the Specify a Server By Providing a Hostname and Port option, and then type the server’s Host name and Port into the text fields.
Select the This Port Uses SSL checkbox if the port you specified uses SSL.
-
-
Click Next and the Specify a Secondary Server panel is displayed.
Figure 7–11 Specifying the Secondary Servers for Failover Support
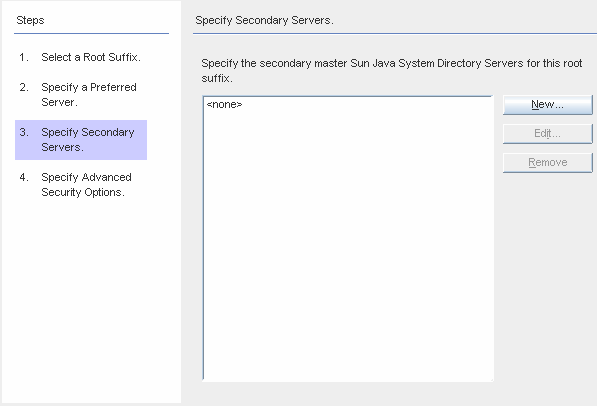
You can add, edit, or delete the Secondary Servers:
-
Click the New button to display the Add Sun Directory Source dialog box. Enter the host name, port, user DN, password, and then click OK. For more information on these fields, see Step c.
-
Click the Edit button to display the Edit Sun Directory Source dialog box. Enter the host name, port, user DN, password, and then click OK. For more information on these fields, see Step c.
-
From the Secondary Servers list, select the server you want to delete and click the Remove button.
-
-
To specify the secondary Directory Servers, select a server name from list, and then click Next.
Note –-
The Directory Server must be running or the server name will not appear in list.
-
Do not use the same host name and port for both the preferred and the secondary servers in a Sun directory source.
-
If you enable the Secure Port feature, there are additional setup steps you must perform after installation. For more information, see Enabling SSL in Directory Server
If you do not want to specify a secondary server, click Next.
-
-
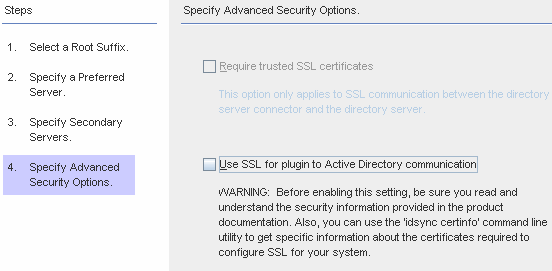
If you want to use secure SSL communication, read the notes below, and then enable one or both of the following options:
Figure 7–12 Specifying Advanced Security Options
Note –You must install the Directory Server Plug-in on each Directory Server (any master, replica, or hub) where users will bind or where passwords will be changed.
When the Directory Server Plug-in synchronizes passwords and attributes to Active Directory, it must bind to Active Directory to search for users and their passwords. In addition, the Plug-in writes log messages to the central log and into the Directory Server’s log. By default these communications are not accomplished over SSL.
-
To encrypt channel communication only or to encrypt channel communication and use certificates to ensure participants’ identity verification between Directory Server and the Directory Server Connector, enable the Require Certificates for SSL box.
Clear the checkbox if you do not want to trust certificates.
-
To use secure SSL communication between the Directory Server Plug-in and Active Directory, enable the Use SSL for Plug-in to Active Directory communication box.
If you enable these features, then additional setup is required after installation. See Enabling SSL in Directory Server
-
You can use the use the idsync certinfo command line utility to determine which certificates you must add for each Directory Server Plug-in and/or Connector certificate database. See Using certinfo
-
If your primary and secondary Directory Servers are part of a multimaster replication (MMR) deployment, refer to Appendix E, Identity Synchronization for Windows Installation Notes for Replicated Environments
-
-
When you are finished with the Specify Advanced Security Options panel, click Finish.
The program adds the selected directory sources to the navigation tree under Directory Sources, and the Prepare Directory Server Now? dialog is displayed.
You must prepare the Directory Server to be used by Identity Synchronization for Windows. You can choose to perform this task now, or you can do it later — but you must prepare the Directory Server before you install the Connectors. (Instructions for installing Connectors are provided in Chapter 8, Installing Connectors).
-
If you want to prepare the Directory Server now, click Yes to open the wizard, and then proceed to the next section, Preparing Sun Directory Source
-
If you prefer to perform this process later, click No and proceed to Creating an Active Directory Source.
-
- © 2010, Oracle Corporation and/or its affiliates
