Chapter 1 Installing Sun Java System Portal Server 7.2
Sun JavaTM Sun Java System Portal Server 7.2 can be installed using the Open Portal installer in two modes: Configure Now mode or Configure Later mode. If you install in the Configure Now mode, the installation and configuration take place in the same install session. You can also invoke the installer in Command-Line Interface (CLI) mode.
Note –
For the default installation of Portal Server, the user should be the root user. A non-root user can install Portal Server in the Configure Later mode.
This chapter contains information about installing Sun Java System Portal Server 7.2 in the Configure Now mode. For installing Portal Server 7.2 in Configure Later mode, refer Chapter 2, Configuring Sun Java System Portal Server in the Configure Later Mode After Installation
This chapter contains the following topics:
Checking Hardware and Software Requirements Before Installing Portal Server 7.2
This section contains the requirements for installing Sun Java System Portal Server 7.2.
Note –
The installation instructions are specific to the Solaris and Linux platforms.
This section includes the following sections:
Hardware and Operating System Requirements
The following table lists hardware and operating system requirements:
Table 1–1 Hardware and Operating System Requirements|
Component |
Platform Requirement |
|---|---|
|
Supported platforms |
Sun BladeTM or comparable workstation or server |
|
Operating system |
SolarisTM 9 or Solaris 10 on SPARC® Solaris 9 or Solaris 10 on x86 Red Hat Enterprise Linux 4.0 on x86 |
|
RAM |
2.0 Gbytes for regular deployment on Sun Java System Application Server. |
|
Disk space |
1 Gbyte for Portal Server and associated applications. |
|
Swap space |
Twice the amount of physical memory. For example, if your machine has 2.0 Gbytes RAM, the swap space should be 4.0 Gbytes swap space. For Application Server 9.1, memory and disk space should be a minimum of 256 MB and 250 MB respectively. |
Browser Requirements
Portal Server 7.2 web-based user interfaces are supported on all web browsers that support the following standards on recent major versions:
-
HTML 4
-
Frames
-
CSS 2
-
Java 1.4
-
XMLHttpRequest
-
JavaScriptTM 1.5
-
DOM 1
The following features in Portal Server 7.2 are dependent on specific browser capabilities.
-
Proxylet — Requires specific proxy configuration manipulation functions. Supported on the most recent major versions of Internet Explorer (IE) 7 and Firefox 2.
-
Applets (Netlet, NetFile, and Proxylet) — Requires the most recent major versions of Java 1.4 support. Microsoft Cabinet (.cab) file formats are not supported.
-
AJAXTableContainerProvider — Requires the most recent major versions of HTML 4, JavaScript 1.5, and CSS 2. Supported on the most recent major versions of Firefox 2 and IE 7 web browsers.
-
Console — Requires the most recent major versions of CSS 2, HTML 4.0, JavaScript 1.5. Supported on the most recent major versions of Firefox 2 and IE 7 web browsers.
-
FCKeditor — Requires the most recent major versions of IE 7 (Windows), Firefox 2, Mozilla 1.3, and NetscapeTM 7.1.
-
Themes — Requires CSS 2. Supported on the most recent major versions of Firefox 2 and IE 7.
The following web browser / OS combinations are known to support the above standards and the special capabilities that are required for all Portal Server 7.2 features:
-
The most recent major versions of Firefox 2 on Windows 2000, XP (and later versions), Solaris 10 (SPARC and x86), and Red Hat Linux 4.0.
Before Installing on Linux
-
Remove the link /usr/share/bdb/db.jar before installation, if it exists.
-
Check that ant already exists on the system by running the following command:
rpm -qa | grep ant
If a version of ant below 1.6 is installed, remove it by running the following command:
rpm -e ant-older-version ant-libs-older-version
You need to use the version of ant sun-ant-1.6.5-2 to install or deploy Portal Server. When you run the installer, it is automatically installed at /opt/sun/bin/ant.
Software Requirements
Before you begin installing Portal Server 7.2, you need to have the following requirements:
-
You need to have Java SETM 5 or Java SE 6 Update 5 or above pre-installed, before installing Portal Server 7.2.
The installer checks for the available Java SE version and prompts you to install the required version.
-
If you are using Solaris 5.9, you need to download and install the following patches from http://www.sunsolve.sun.com/, before installing Portal Server 7.2.
-
Patch id — 114677-05
-
Patch id — 114678-05
Note –The above patches are required for Solaris 5.9 version on SPARC and x86 systems. There is no need to install these patches, if you use Solaris 10 or Red Hat Enterprise Linux.
-
-
You need an installed web container. You can use Sun Java System Application Server 9.1 as the web container for installing Portal Server 7.2. The web container must be installed and running, before you run Portal Server 7.2 installer.
Note –You can also use GlassFishTM V2 as a web container only for evaluation purpose.
Note –If you are using Application Server 9.1 as the web container, you can have the Application Server 9.1 installer install a JDKTM for you. For GlassFish V2 installation, you must manually install a JDK. Moreover, the installed JDK has to be package based. Otherwise, the Common Agent Container will not start.
-
Portal Server 7.2 requires Sun Java System Access Manager 7.1 and Sun Java System Directory Server 6. These need to be pre-installed and running. It is recommended that these components are installed from the Java ES 5 Update 1 distribution.
Note –If you are installing Portal Server 7.2 in a multi-node environment and using Directory Server 6.2, you must first upgrade to Directory Server 6.3 before installing Portal Server 7.2. For more information, refer the Portal Server 7.2 Bugs in this Release in Sun Java System Portal Server 7.2 Release Notes.
-
If you are using the Java ES 5 Update 1 installer, install Access Manager 7.1 and Directory Server 6 on Application Server 9.1 in the Configure Now mode. Whereas, if you are using the Java ES 5 installer, install Access Manager 7.1 and Directory Server 6 in the Configure Later mode on Application Server 9.1.
Note –If you are using the Java ES 5 Update 1 installer with Portal Server 7.2 on a single machine, do the following:
-
Install Application Server 9.1.
Note –If you are installing Portal Server 7.2 with GlassFish V2, then you should set the Master Password to match the Administrator Password, using the command asadmin change-master-password.
-
Start Application Server 9.1. The command to start Application Server 9.1 is /opt/SUNWappserver/appserver/bin/asadmin start-domain --user admin domain1
-
Invoke the Java ES 5 Update 1 installer and install Access Manager 7.1 and Directory Server 6 in the Configure Now mode.
-
Ensure that you select Application Server 9.1 instance in the Access Manager web container panel and provide appropriate values.
Note –If you are running the Java ES 5 Update 1 installer in text mode, choose Option 2 (Application Server Enterprise Edition 8.2 Patch 2). Though it is mentioned as Application Server Enterprise Edition 8.2, the Java ES 5 Update 1 installer will pick the values of Application Server 9.1 that you have installed.
-
Ensure that the instance directory and DocRoot values are correct. The default values are /opt/SUNWappserver/appserver/domains/domain1 and /opt/SUNWappserver/appserver/domains/domain1/docroot.
-
Ensure that the administration port is correct. The default value is 4848.
-
Start Directory Server after the installation is complete. The command to start Directory Server is /opt/SUNWdsee/ds6/bin/dsadm start /var/opt/SUNWdsee/dsins1
-
Stop and restart Application Server 9.1 after the Access Manager configuration is complete. The command to start Application Server 9.1 is /opt/SUNWappserver/appserver/bin/asadmin start-domain --user admin domain1
Note –If you are using Java ES 5 installer with Portal Server 7.2 on a single machine, do the following:
-
Invoke the Java ES 5 installer and install Directory Server 6 in the Configure Now mode. Do not select any of the shared components. Select the run time user for Directory Server as root.
-
Start Directory Server.
-
Install Access Manager 7.1 in the Configure Later mode.
-
Install Application Server 9.1.
-
Start Application Server 9.1. The command to start Application Server 9.1 is /opt/SUNWappserver/appserver/bin/asadmin start-domain --user admin domain1
-
Modify the /opt/SUNWam/bin/amsamplesilent file (Access Manager silent installation file) with appropriate values. Use Application Server 9.1 as the web container property value.
-
Run the ./amconfig -s amsamplesilent command to configure Access Manager.
-
Start Application Server 9.1 after the Access Manager configuration is complete.
Note –You can also install Sun Java System Access Manager 7.1 in realm mode with Sun Java System Directory Server 6 as datastore.
-
Miscellaneous Checks
-
If the system on which you installed Portal Server does not have direct connectivity to the internet, an HTTP proxy needs to be specified. For example, for Application Server 9.1, specify the following in the domain.xml file:
<jvm-options>-Dhttp.proxyHost=proxy-host</jvm-options>
<jvm-options>-Dhttp.proxyPort=proxy-port</jvm-options>
<jvm-options>-Dhttp.nonProxyHosts="portalserver-host"</jvm-options>
Where, proxy-host is the fully qualified domain name of the proxy host, proxy-port is the port on which the proxy is run, and portalserver-host is the fully qualified domain name of the Portal Server software host.
-
Execute the command prtconf | grep Memory to check RAM.
-
For Linux, you can check the memory and swap size form the meminfo file. Use the vi /proc/meminfo command to view the meminfo file.
-
Use the command swap -l to see how much swap space your machine has. To temporarily increase your swap space by 4 Gbytes, you can use the following instructions:
 mkfile 4g /swap-filename
 swap -a /swap-filename
where swap-filename is an empty file to be used as a swap area.
-
To increase the swap size on Linux, use the following instructions:
-
Create a swap file by using the mkswap /directory-name/swap-filename command.
Note –You can create the swap file on any directory, where the disk space is available.
-
Mention the swap file name where you need to increase the swap size by using the swapon /directory-name/swap-filename command.
-
Increase the swap size by using the /directory-name/dd if=/dev/zero of=/directory-name/swap-filename bs=1024 count=x command.
where x is a variable that depends on the amount of swap you need to increase. The variable can be in the multiples of blocksize (bs), which is 1024.
-
Remove the swap file by using the rm —rf /directory-name/swap-filename, since the swap file consumes huge disk space.
-
The amconfig script and other configure later utilities, require the JDK to be installed and linked to /usr/jdk/entsys-j2se. This looks like the following:
lrwxrwxrwx 1 root root 27 Jan 17 09:28 entsys-j2se -> /usr/jdk/instances/jdk1.5.0
-
Installing Portal Server 7.2
Some post installation configuration tasks require you to use values that you entered during the installation. Keep these values available for configuration.
 To Install Sun Java System Portal Server 7.2 on Application Server 9.1
Using Portal Server 7.2 GUI Installer
-
From the installation location, go to the OS-arch directory, where OS-arch can be Solaris_sparc, Solaris_x86, or Linux_x86.
-
Run ./installer -j $JAVA_HOME to invoke the Portal Server 7.2 GUI installation wizard to install the software.
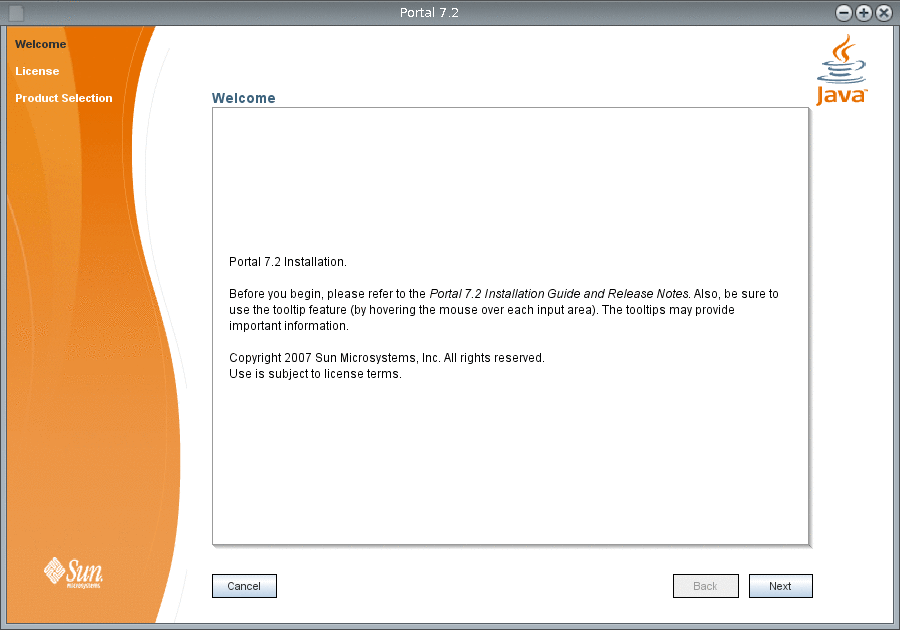
The Portal Server 7.2 installation wizard is invoked and the Welcome screen appears.
Figure 1–1 Portal Server 7.2 Installation Wizard Welcome Screen
-
In the Welcome screen, click Next.
The License screen appears. Read the terms provided in the license agreement.
Figure 1–2 Portal Server 7.2 Installation Wizard License Screen

-
By default, the option to accept license agreement is not selected. If you accept the terms of the license agreement, choose the other option. Click Next.
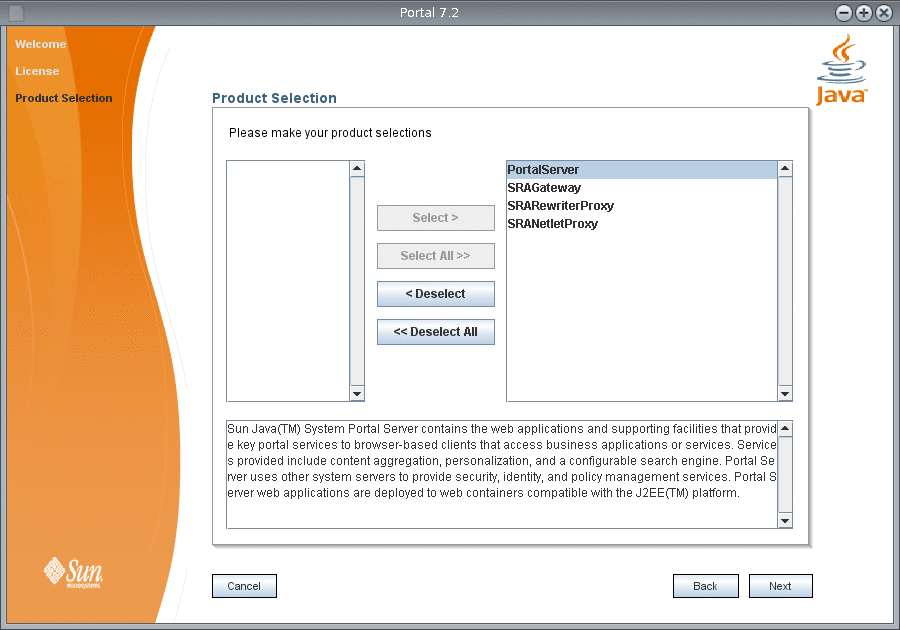
The Product Selection screen appears.
Figure 1–3 Portal Server 7.2 Installation Wizard Product Selection Screen
-
If you want to install all the products listed in the left pane, Click Select All. If you want to install a particular product, choose the product and Click Select.
The products that you have selected are listed in the right pane. Select a product and click Deselect, if you do not want to install any product. To start-over your selection, click Deselect All.
-
Click Next.
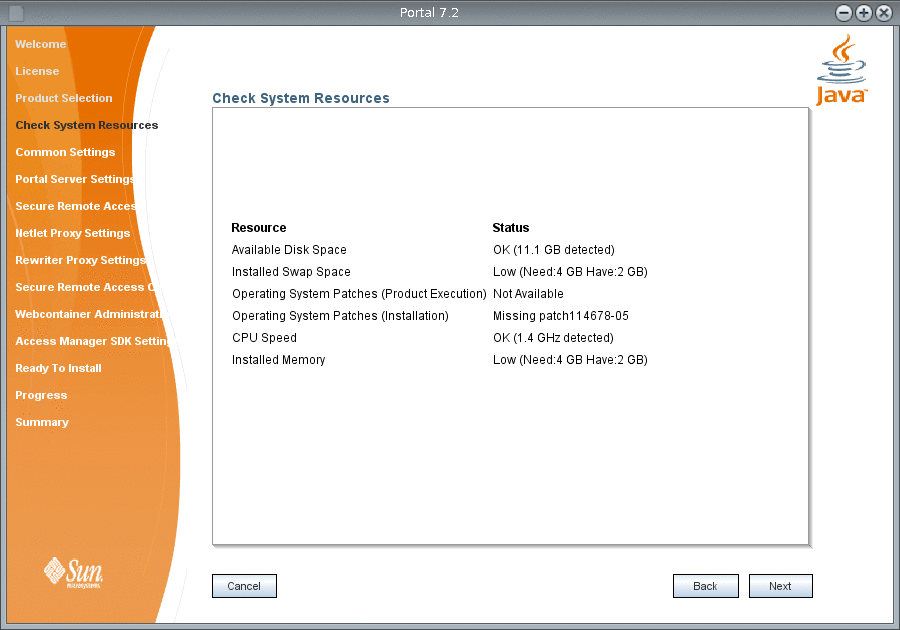
The Check System Resources screen appears. The necessary resources for Portal Server installation are listed in the left pane and the status of the resources are listed in the right pane. The installer checks whether the necessary resources are available for installation and displays the status against each resource.
Figure 1–4 Portal Server 7.2 Installation Wizard Check System Resources Screen
-
Click Next.
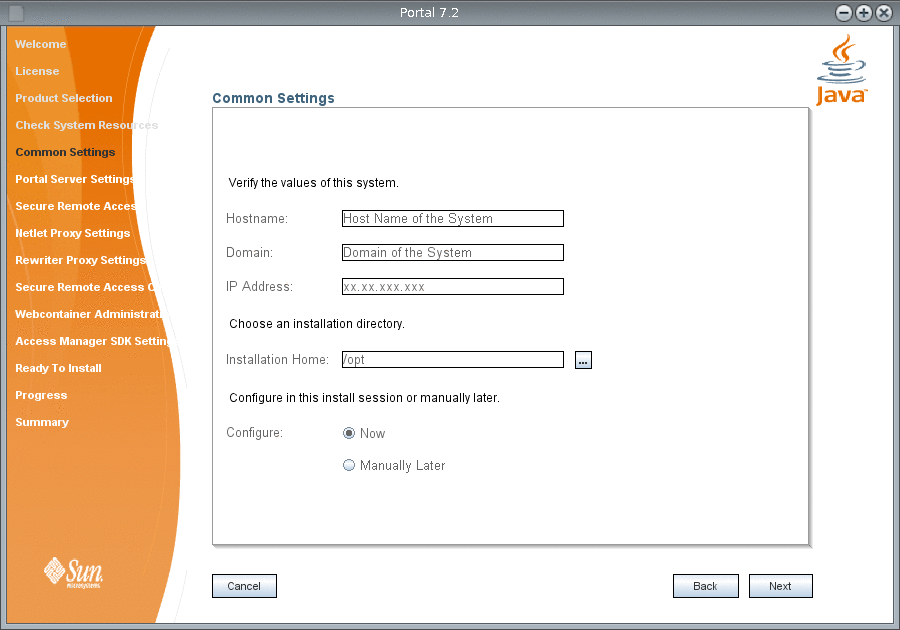
The Common Settings screen appears.
Figure 1–5 Portal Server 7.2 Installation Wizard Common Settings Screen
-
Verify the following details and click Next.
- Hostname
-
Name of the machine where you want to install Portal Server. For example, machine1.
- Domain
-
Domain name of the host. For example: country.sun.com
- IP Address
-
The IP address of the host machine, where you install Portal Server.
All the above host details are picked by the installer and displayed for your reference.
- Choose an installation directory
-
The default installation home directory is /opt. Click the button provided against the text field to choose the home directory in which you want to install Portal Server.
- Configure in this install session manually or later
-
By default, Configure Now option is selected. If you want to configure Portal Server later, choose Configure Later option. For more information on how to configure later, see Chapter 2, Configuring Sun Java System Portal Server in the Configure Later Mode After Installation
The Portal Server Settings screen appears. This screen contains four sections to enter information such as access to Portal Server, the web container in which you deploy Portal Server, Portal Server components, and support for Secure Remote Access.
Figure 1–6 Portal Server 7.2 Installation Wizard Portal Server Settings Screen

-
In the How Will Portal Server Be Accessed? section, verify the following information.
- Protocol
-
HTTP is selected as the default protocol. This protocol is valid, if you use Application Server 9.1 as the web container.
- Port
-
The default port is 8080.
- DeployURI
-
Type the URI to deploy Portal Server. The default deploy URI is /portal.
-
In the Values For The Web Container That Portal Server Will Deploy Into. section, verify the following information about the web container on which, you deploy Portal Server.
- Install Directory
-
If you use Application Server 9.1 as web container, then the default web container installation directory is /opt/SUNWappserver/appserver. Click the button next to this text field, to change the installation directory of web container.
- DocRoot
-
If you use Application Server 9.1 as web container, then the default DocRoot directory is /opt/SUNWappserver/appserver/domains/domain1/docroot. Click the button next to this text field, to change the DocRoot directory of web container.
- Instance Directory
-
If you use Application Server 9.1 as web container, then specify the Application Server 9.1 Instance directory as /opt/SUNWappserver/appserver/domains/domain1. Click the button next to this text field, to change the Instance directory of web container.
- Instance Name
-
Type the Instance name of the web container that you use to install Portal Server. The default instance name for Application Server 9.1 is server.
- Cluster Id
-
Type the Cluster Id, if you install Portal Server on Application Server 9.1 cluster.
-
In the Portal Server Components section, verify the following information.
- Portal Server Id
-
Type the Id for Portal Server component installation. The default value is portal1.
- Search Server Id
-
Type the Id for Search Server component installation. The default value is search1.
- Portal Server Instance name
-
Type a name for Portal Server instance.
-
In the Secure Remote Access Support section, verify the following information.
- Log User Password
-
Type the password for log user to provide Secure Remote Access support.
Based on the web container that you installed to deploy Portal Server, the installer displays the above necessary information. Accept the default values or modify and click Next.
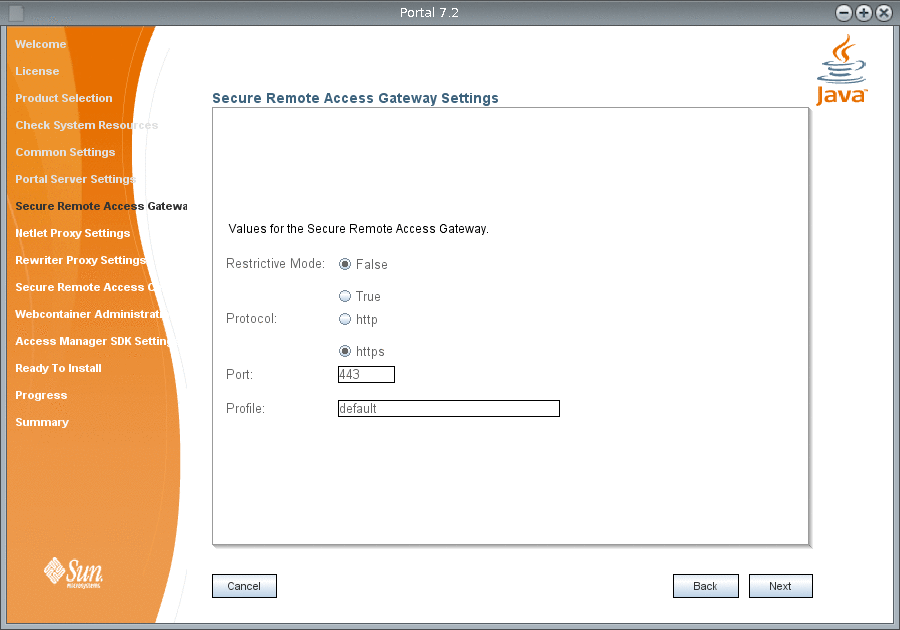
The Secure Remote Access Gateway Settings screen appears.
Figure 1–7 Portal Server 7.2 Installation Wizard Secure Remote Access Gateway Settings Screen
-
Type the following Gateway information for Secure Remote Access and click Next.
- Restrictive Mode
-
The default value is False. Set the Restrictive Mode option to True, if you want to start the Gateway without accessing Monitoring Framework in a remote machine.
- Gateway Protocol
-
The default value is https.
- Gateway Port
-
The default value is 443.
- Gateway Profile
-
The default value is default.
The Netlet Proxy Settings screen appears.
Figure 1–8 Portal Server 7.2 Installation Wizard Netlet Proxy Settings Screen

-
Type the proxy details for Netlet and click Next.
- Restrictive Mode
-
The default value is False. Set the Restrictive Mode option to True, if you want to start the Gateway without accessing Monitoring Framework in a remote machine.
- Netlet Proxy Port
-
The default value is 10555.
- Netlet Proxy Gateway Profile
-
The default value is default.
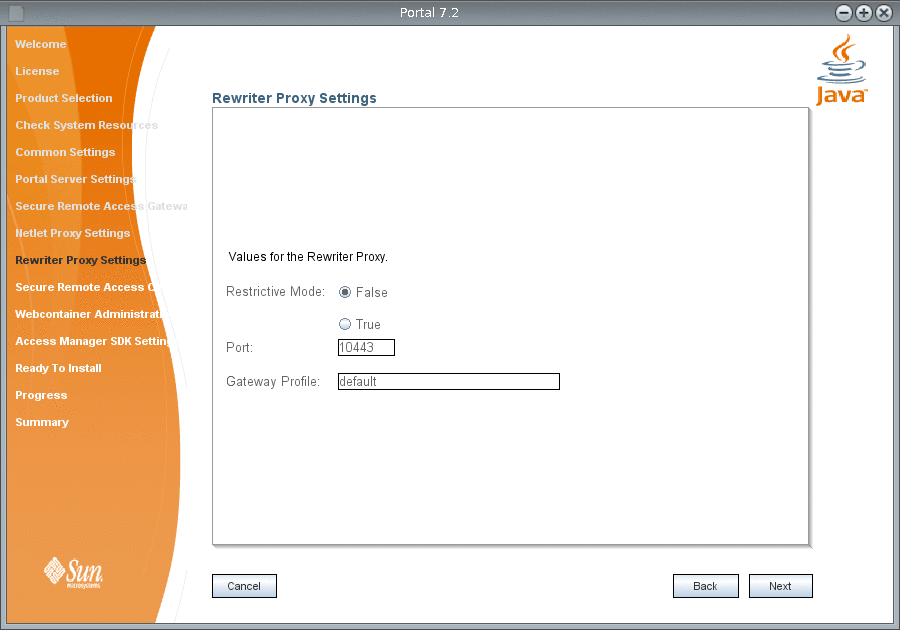
The Rewriter Proxy Settings screen appears.
Figure 1–9 Portal Server 7.2 Installation Wizard Rewriter Proxy Settings Screen
-
Type the proxy settings for Rewriter in the following options and click Next.
- Restrictive Mode
-
The default value is False. Set the Restrictive Mode option to True, if you want to start the Gateway without accessing Monitoring Framework in a remote machine.
- Rewriter Proxy Port
-
The default value is 10443.
- Rewriter Proxy Gateway Profile
-
The default value is default.
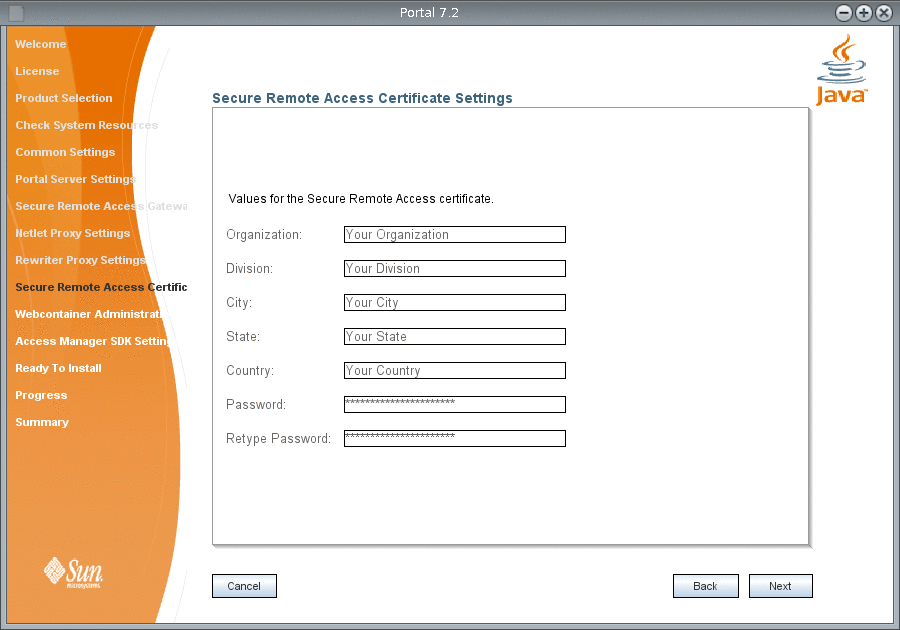
The Secure Remote Access Certificate Settings screen appears.
Figure 1–10 Portal Server 7.2 Installation Wizard Secure Remote Access Certificate Settings Screen
-
Type the following details for Secure Remote Access certificate and click Next.
- Organization
-
Type the name of your organization.
- Division
-
Type the name of your division.
- City
-
Type the name of your city.
- State
-
Type the name of your state.
- Country
-
Type the name of your country.
- Password
-
Type the password that you want to use for Secure Remote Access certificate.
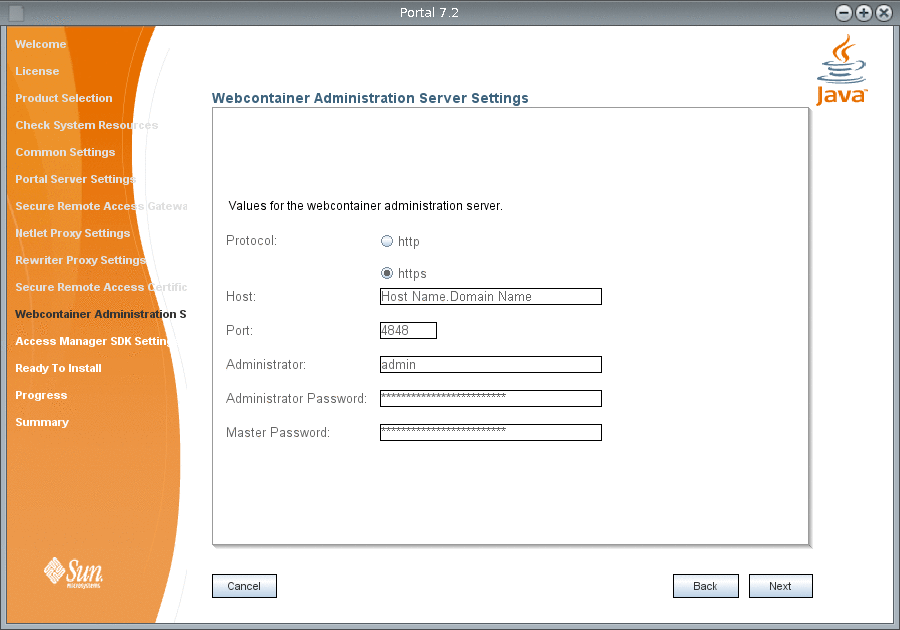
The Web Container Administration Server Settings screen appears.
Figure 1–11 Portal Server 7.2 Installation Wizard Web Container Administration Server Settings Screen
-
Type the values for the web container Administration Server on which, you want to install Portal Server and click Next.
- Protocol
-
Type the administration protocol for web container that you use. By default, Application Server 9.1 is considered as a web container and the corresponding protocol is https.
Note –If you install Portal Server 7.2 on GlassFish V2, the default Administration Protocol is http.
- Host
-
The default value is localhost. Type the fully qualified domain name of the machine where you installed Application Server 9.1. For example, machine1.country.sun.com
- Port
-
The default value is 4848.
- Administrator
-
Type the user name for Administrator. The default value is admin.
- Administrator Password
-
Type the administration password for web container server.
- Master Password
-
Type the administration master password for web container server.
Note –If you are installing Portal Server 7.2 with GlassFish V2, then you should set the Master Password to match the Administrator Password, using the command asadmin change-master-password.
The Portal Server 7.2 GUI installer displays the required configuration screens based on your installation setup. If you are installing Portal Server 7.2 with Access Manager installed on a separate machine, then you need to specify Directory Server settings .
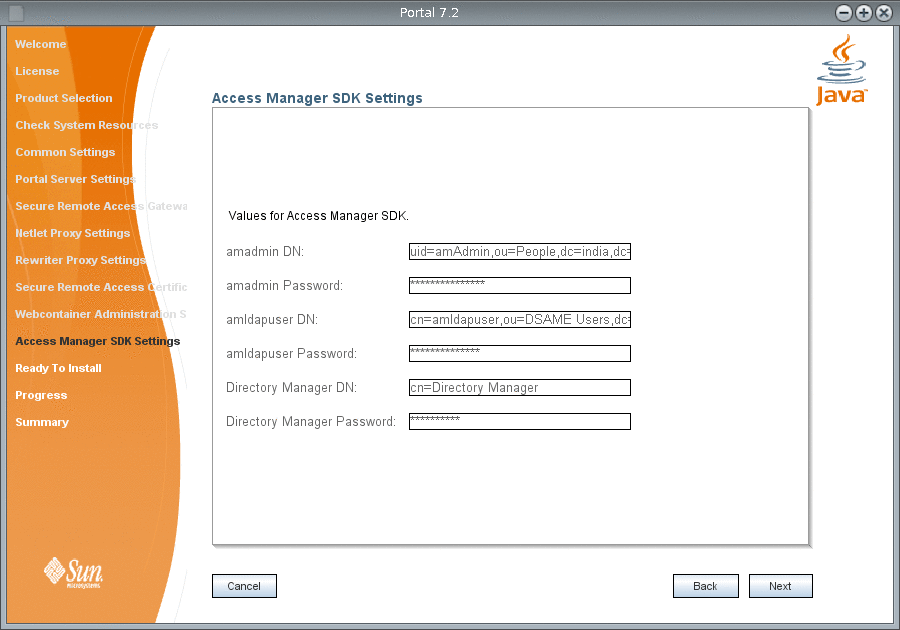
Access Manager SDK Settings screen appears.
Figure 1–12 Portal Server 7.2 Installation Wizard Access Manager SDK Settings Screen
-
Type the Access Manager SDK information in the following options and click Next.
- amadmin DN
-
The Access Manager Domain Name. The default value is uid=amAdmin,ou=People,dc=india,dc=sun,dc=com.
- amadmin Password
-
The Access Manager Administrator password.
- amldapuser DN
-
The Access Manager LDAP user Domain Name. The default value is cn=amldapuser,ou=DSAME Users,dc=india,dc=sun,dc=com.
- amldapuser User Password
-
The Access Manager LDAP user password.
- Directory Manager DN
-
The Directory Manager Domain Name. The default value is cn=Directory Manager.
- Directory Manager Password
-
The Directory Manager password.
The Ready to Install screen appears.
Figure 1–13 Portal Server 7.2 Installation Wizard Ready to Install Screen

-
Click Install to install Portal Server 7.2.
The Progress screen appears.
Figure 1–14 Portal Server 7.2 Installation Wizard Progress Screen

Note –The wizard may display INCOMPLETE or FAILED message, if the configuration of your machine does not meet the recommended software requirements. This is because, Portal Server 7.2 GUI installer is based on OpenInstaller framework that exits after 1000 seconds, assuming that the configurator is hanging. The psconfig process that runs in the background eventually completes the installation successfully. Therefore, tail the configuration logs and wait for psconfig completion.
Portal install logs are available at /var/opt/SUNWportal/logs/install
Portal configuration logs are available at /var/opt/SUNWportal/logs/config
-
After the installation progress reaches 100 %, click Next.
The Summary screen appears and displays that the installation is Complete. You can view the overall status of the products that are installed.
Figure 1–15 Portal Server 7.2 Installation Wizard Summary Screen

-
In the Summary screen, click the next steps URL.
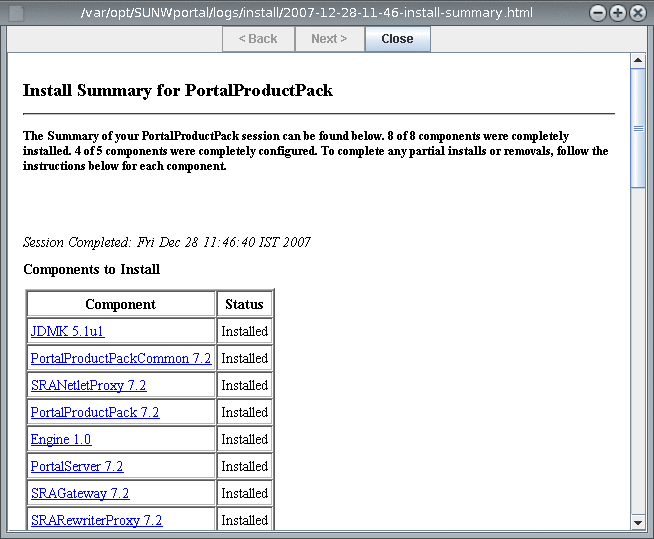
The Install Summary for PortalProductPack HTML page appears. You can also access this page from the /var/opt/SUNWportal/logs/install/ directory.
Figure 1–16 Portal Server 7.2 Install Summary for PortalProductPack Screen
-
Ensure that the Derby is up and running, using the netstat -an | grep -i 1527 and ps -aef | grep -i derby commands. If the Derby is not running, restart it using the ANT_HOME/bin/ant -DPS_CONFIG=/etc/opt/SUNWportal/PSConfig.properties -f /opt/SUNWportal/lib/derby.xml start-instance command, before you install sample portals.
-
Configure Enterprise, Sandbox, and Welcome sample portals manually. For more information on how to configure sample portals, see Configuring Sample Portals.
-
Restart the web container and access Portal desktop to access the latest sample portals at http://server:port/portal/dt.
-
Configure add-on features in Portal Server 7.2 such as Content Management System (CMS), Simple API for Workflow (SAW), and SharePoint portlets..
-
For more information on Installing and Configuring CMS Portlet, refer the article Adding the Content Management System Portlet to the Sun Java System Portal Server 7.2 Desktop.
-
For more information on how to create portlets using SAW plug-in in NetBeansTM IDE, refer the article Adding the Workflow Portlet to the Sun Java System Portal Server 7.2 Desktop.
-
For more information on Deploying SharePoint Membership Portlet, refer the article Adding the SharePoint Portlet to the Sun Java System Portal Server 7.2 Desktop.
-
Configuring Sample Portals
After installing Portal Server 7.2, you need to manually configure sample portals. By default, sample portals such as Enterprise, Sandbox, and Welcome are not installed with the Portal Server 7.2 GUI installer. You can install these default sample portals to access Portal Server 7.2. The easiest way to install samples it to use psconfig. If you use psconfig to install samples, set the Samples parameter in the configuration XML file to true. For information on configuring sample portals, refer the Configuring a Sample Portal section.
To install default sample portals, do the following:
 To Configure Sample Portals
-
Copy the /PortalServer-base/SUNWportal/samples/portals/shared/input.properties.template file to the /var/opt/SUNWportal/tmp/input.properties file.
In the Linux platform, copy to the /var/opt/sun/portal/tmp/input.properties file.
Note –You can copy the input.properties file to any directory. However, the input.properties and the password.properties files must exist in the same directory.
-
Edit the input.properties file that you created in the /var/opt/SUNWportal/tmp directory with the following values that begin and end with “%”.
-
ps.config.location=%PS_CONFIG_LOCATION%
-
ps.portal.id=%PORTAL_ID%
-
ps.access.url=%PORTAL_ACCESS_URL%
-
ps.webapp.uri=%PORTAL_WEBAPP_URI%
-
search.access.url=%SEARCH_ACCESS_URL%
-
search.id=%SEARCH_ID%
-
am.admin.dn=%AM_ADMIN_DN%
-
default.org.dn=%DEFAULT_ORG_DN%
-
portlet.dn=%PORTLET_DN%
-
ps.profiler.email=%PROFILER_EMAIL%
-
ps.profiler.smtp.host=%PROFILER_SMTP_HOST%
-
-
Copy the /PortalServer-base/SUNWportal/samples/portals/shared/password.properties.template file to the /var/opt/SUNWportal/tmp/password.properties file.
In the Linux platform copy the file to the /var/opt/sun/portal/tmp/password.properties directory.
-
Edit the /var/opt/SUNWportal/tmp/password.properties file and replace the following values that begin and end with “%” with proper passwords.
-
amadminPassword=%AMADMIN_PASSWORD%
-
amldapuserPassword=%AMLDAPUSER_PASSWORD%
-
userManagementPassword=%USER_MANAGEMENT_PASSWORD%
-
-
Run the following command to deploy the Enterprise, Sandbox, and Welcome sample portals.
/usr/sfw/bin/ant -buildfile /PortalServer-base/SUNWportal/samples/portals/build.xml -Dconfig.location /var/opt/SUNWportal/tmp/ -logfile /var/opt/SUNWportal/tmp/log-file.txt
Installing Portal Server 7.2 on Application Server 9.1 Using Portal Server 7.2 GUI Installer in Your Preferred Language
Portal Server 7.2 is localized in German (de), Spanish (es), French (fr), Japanese (ja), Korean (ko), Simplified Chinese (zh_CN), and Tranditional Chinese (zh_TW) languages. You can install Portal Server 7.2 in any of the languages by changing the system locale before you start installing. The following procedure explains how to change the system locale in UNIX system.
 To Change the System Locale in UNIX System Before
Installing Portal Server 7.2
-
Run the locale command to know the default locale in your UNIX system.
-
Change the default locale by setting the LC_ALL and LC_LANG environment variables. For example, to set the French locale with UTF-8 encoding, run the following commands.
$ LC_ALL=fr_FR.UTF-8
$ export LC_ALL
$ LC_LANG=fr_FR.UTF-8
$ export LC_LANG
-
From the installation location, change to the OS arch directory.
OS arch directory can be the directory for your operating system such as Solaris_sparc, Solaris_x86, or Linux_86.
-
Run the ./installer --j $JAVA_HOME to invoke the Portal Server 7.2 GUI installation wizard.
-
Install Portal Server 7.2 by following the steps in To Install Sun Java System Portal Server 7.2 on Application Server 9.1 Using Portal Server 7.2 GUI Installer section.
-
After successful installation, configure the sample portals by following the steps in Configuring a Sample Portal section.
You can notice that samples are also localized in German (de), Spanish (es), French (fr), Japanese (ja), Korean (ko), Simplified Chinese (zh_CN), and Tranditional Chinese (zh_TW) languages.
Verifying the Portal Server 7.2 Installation
Verify the Portal Server 7.2 installation by doing the following:
-
Accessing the Portal Server Administration Console.
-
Verifying the Gateway port and running the Portal Server in secure mode.
 To Verify Sun Java System Portal Server 7.2 Installation
-
Start Directory Server, web container, and Gateway.
-
Access Portal Server. For example, type the URL in the browser.
http://host.domain-name:port/portal-URI
The Welcome page appears. The page displays a short description of Portal server and links to sample portals that you selected for installation. Click on one of the links and access the anonymous portal desktop for the sample portal. If the sample portal desktop displays without exception, your Portal Server installation was successful.
-
Type http://host.domain-name:port/psconsole.
-
Verify whether Java DB process is running.
netsatat -an | grep 1527
If Java DB is not running, start Java DB. For more information, refer to To Start and Stop Java DB
-
Check whether the Common Agent Container is running.
On the Solaris platform, type the following:
/usr/sbin/cacaoadm status
This command should return the PIDs for running the Common Agent Container processes.
On the Linux platform, type the following:
/opt/sun/cacao/bin/cacaoadm status
If the Common Agent Container is not running, restart it.
On the Solaris platform, type the following:
/usr/sbin/cacaoadm stop
/usr/sbin/cacaoadm start
On the Linux platform, type the following:
/opt/sun/cacao/bin/cacaoadm stop
/opt/sun/cacao/bin/cacaoadm start
Note –By default, Common Agent Container creates a self-signed CA certificate and uses it to sign the server certificate of the Common Agent Container agent. The subject DN of this server certificate is CN=hostname_agent (or CN=hostname_default_agent on Microsoft Windows). When this default server certificate is to be replaced by another server certificate signed by the CA of the user's choice, the subject DN of the new server certificate must be kept the same as the original one for Portal Server administration to continue function without interruption.
-
Verify whether Directory Server is running using the following commands:
netstat -an | grep 389
If it is not running, start the Directory Server using the following command:
cd /opt/SUNWdsee/ds6/bin
./dsadm start /var/opt/SUNWdsee/dsins1
-
Verify whether the Application Server 9.1 is running using the following command:
netstat -an | grep 8080
If it is not running, start the server using the following command:
/opt/SUNWappserver/appserver/bin/asadmin start-domain --user admin domain1 -
Run the following command to check if the Gateway is running on the specified port (the default port is 443):
netstat -an | grep 443
If the Gateway is not running, do the following:
psadmin switch-sra-status -u amadmin -f password-file on
PortalServer-base/bin/psadmin provision-sra -u amadmin -f amadmin-password-file --gateway-profile gateway-profile -p portal-id --enable
PortalServer-base/bin/psadmin start-sra-instance -u amadmin -f amadmin-password-file --instance-type gateway --instance-name gateway-instance-name
-
Access Portal Server in secure mode by typing the Gateway URL in your browser:
https://gateway-machine-name:443
If you chose a different port number other than the default port (443) during installation, you need not specify that port number.
Accessing Portal Server 7.2 in Your Preferred Locale
This section explains how to set language preferences in a web browser to access Portal Server 7.2 in your preferred locale. Currently Portal Server 7.2 is localized in German (de), Spanish (es), French (fr), Japanese (ja), Korean (ko), Simplified Chinese (zh_CN), and Tranditional Chinese (zh_TW) languages. To view Portal Server 7.2 in specific language, you need to set the browser locale. Following these steps to set browser language for Internet Explorer and Firefox.
-
Click Tools and select Internet Options
-
Click the General tab and click Languages
-
In the Language Preference dialog box, click Add
-
In the Add Language dialog box, select a language from the list, and then click OK
-
Move the selected language to the top of the list and click OK
-
Click OK and return to the browser
On Internet Explorer browser:
-
Click Tools and select Preferences
-
Click Advanced
-
Click the General tab and select Languages
-
In the Language dialog box, select your language and click Add
-
Move the selected language to the top of the list
-
Click OK twice
On Firefox browser:
Note –
The steps are similar with Firefox on Solaris except that the Preferences is available under Edit menu.
Once you set the browser locale, you can access Portal Server and Portal Server Console in a browser with the selected locale.
Installing Portal Server 7.2 in Other Modes
This section provides procedures to install Portal Server 7.2 in Command-Line and Silent modes and on a Non-Global zone.
Installing Portal Server 7.2 in Command Line Mode
To install Portal Server 7.2 using Command Line (CLI), type the following command: ./installer -t -j /usr/jdk/jdk1.5.0_12. Refer to To Install Sun Java System Portal Server 7.2 on Application Server 9.1 Using Portal Server 7.2 GUI Installer for more information on installation panels.
If you run ./installer -h command, you will get the following options available in the installer:
- -t
-
Text mode.
- -s input answer file
-
Silent mode. The input answer file contains configuration values and can be generated with the -n option.
- -n output answer file
-
Dry run mode. In this mode, the configuration values are written to output answer file. This file can be used with the -s option.
- -j directory
-
To specify the location of JDK install. Replace the directory with the location where you have installed JDK.
- -v
-
Verbose mode.
- -h
-
Show help.
In the Command Line installer, use Tab to move focus, up or down arrows to select when multiple choices are available and Enter to confirm.
Note –
In the Product Selection screen, only the currently available actions are highlighted. You need to use the Tab to select the actions. To install only one or more products, select the product by using the up or down arrows and press Enter to confirm the selection.
If you are using a gnome editor, follow the below steps as a workaround to make the Back Space and Delete keys functional.
-
Click Edit —> Profiles —> Default —> Edit Compatibility.
-
Change the Backspace Key Generates option to Control-H.
-
Change the Delete Key Generates option to Escape Sequence.
-
Click Close.
Installing Portal Server 7.2 in Silent Mode
-
Type the command ./installer -n filename -j /usr/jdk/jdk1.5.0_12, where filename is the name of the output answer file that will be created. For example, /tmp/filename.
The -n option invokes the Portal Server 7.2 GUI installer.
-
Enter the required values in the specific configuration fields in all the installer screens. All the configuration values that you enter in the install screens are written to the filename file.
For more information on instructions and installation panels to install Portal Server 7.2, refer To Install Sun Java System Portal Server 7.2 on Application Server 9.1 Using Portal Server 7.2 GUI Installer.
-
Type the command ./installer -s filename.
This command installs Portal Server 7.2 in Silent mode.
There are silent install files located in the silent_install_samples directory. These files are for common install scenarios. For more information on each silent install file, refer the ReadMe.txt.
Note –The values for two properties have prefixes. The prefixes are required. The PortalServerWithoutGateway.data.PROTOCOL property can be either protocol_http or protocol_https and the PortalServerWithoutGateway.data.GATEWAY_PROTOCOL property can be either gateway_protocol_http or gateway_protocol_https.
Note –The value for License.license.ACCEPT_LICENSE property must be 0.
If you run ./installer -h command, you will get the following options available in the installer:
- -t
-
Text mode.
- -s input answer file
-
Silent mode. The input answer file contains configuration values.
Note –The filename must include full path and not the relative path.
- -n output answer file
-
Dry run mode. In this mode, the configuration values are written to the output answer file.
Note –The filename must include full path and not the relative path.
- -j directory
-
To specify the location of JDK install. Replace the directory with the location where you have installed JDK.
- -v
-
Verbose mode.
To install Portal Server 7.2 using Silent mode, do the following:
Installing Portal Server 7.2 on a Non-Global Zone
To install Portal Server on a non-global zone, install Application Server 9.1 on the non-global (local) zone. Then install Access Manager, Directory Server, and Portal Server on the non-globa zone.
 To Install Portal Server 7.2 on a Non-Global Zone
-
In the non-global zone, install Application Server 9.1.
-
In the non-global zone, using Java ES Update 1 installer, install Access Manager and Directory Server.
-
Start Directory Server.
-
Start Application Server 9.1.
-
Install Portal Server 7.2.
Uninstalling Portal Server 7.2
Use the following procedure to uninstall Portal Server 7.2.
 To Uninstall Portal Server 7.2
-
As a root user, login to the machine where you installed Portal Server.
-
Change directories to /PortalServer-install-dir/opt/SUNWportal/uninstaller/uninstaller.
-
Type ./uninstaller -j java-home-dir to uninstall Portal Server.
On the Solaris platform, the default Java home directory is /usr/jdk/jdk1.5.
-
Select the components to uninstall and select Next.
-
Select Uninstall to uninstall the software.
Next Steps
After unconfiguring Portal Server 7.2, there may be still be some artifacts that you need to remove manually. The artifacts that remain after unconfiguration are:
-
The connector module jacrabbit-jca.rar need to be removed manually from application server during unconfiguration. This happens due to the FileNotFound exception, which occurs during CMS unconfiguration. However, configuring Portal Server 7.2 again after unconfiguration will not cause any issues.
-
In domain.xml, the following JVM options need to be removed manually.
-
-Xms512m
-
-Xss128k
-
-XX:NewSize=168M
-
-XX:MaxNewSize=168M
-
-XX:PermSize=192M
-
-XX:MaxPermSize=192M
-
-XX:+DisableExplicitGC
-
-XX:SoftRefLRUPolicyMSPerMB=0
-
-XX:+PrintGCTimeStamps
-
-XX:+PrintHeapAtGC
-
-XX:+PrintClassHistogram
-
-Xloggc:/opt/SUNWappserver/appserver/domains/domain1/logs/gc.log
-
-Dorg.jackrabbit.useDataStore=false
-
-
The Sandbox Sample need to be removed manually by logging in to the Access Manager Administration Console and removing the Sandbox Sample org.
-
The default Access Manager Administrator (amadmin) user will have the attributes that are corresponding to various Portal services. These attributes should be removed manually by using the LDAP Browser.
Note –The presence of these amadmin user attributes will not cause any issue during reconfiguration of Portal Server 7.2.
-
sunPortalportal1DesktopDpLastModifiedUser: -1
-
sunPortalNetletProxyType: DIRECT
-
sunPortalNetletLaunchMode: Applet
-
sunPortalNetletPassword: srap-netlet
-
sunPortalNetletJSSEDefaultCipher: SSL_RSA_WITH_RC4_128_MD5
-
sunPortalNetletKSSLDefaultCipher: KSSL_SSL3_RSA_WITH_RC4_128_MD5
-
sunPortalProxyletLaunchMode: Applet
-
sunPortalProxyletRefreshDesktop: false
-
objectClass: sunportalnetletservice
-
objectClass: sunportalportal1desktopperson
-
objectClass: sunportalproxyletservice
-
objectClass: sunportalgatewayaccessservice
-
objectClass: sunportalnetfileservice
-
sunPortalGatewayAccessAllowList: *
-
sunPortalGatewayAllowedAuthLevel: *
-
sunPortalGatewayWWWDoSSOPerSession: false
-
sunPortalNetFileAccessFTP: true
-
sunPortalNetFileAccessNetware: true
-
sunPortalNetFileAccessNFS: true
-
sunPortalNetFileAccessWin: true
-
sunPortalNetFileAllowChangeDomain: true
-
sunPortalNetFileAllowChangeUserId: true
-
sunPortalNetFileAllowCompression: true
-
sunPortalNetFileAllowDelete: true
-
sunPortalNetFileAllowDownload: true
-
sunPortalNetFileAllowedHostList: *
-
sunPortalNetFileAllowMail: true
-
sunPortalNetFileAllowRename: true
-
sunPortalNetFileAllowSearch: true
-
sunPortalNetFileAllowUpload: true
-
sunPortalNetFileCompressionLevel: 6
-
sunPortalNetFileCompressionType: zip
-
sunPortalNetFileDefaultDomain: india.sun.com
-
sunPortalNetFileDeniedHostList:
-
sunPortalNetFileFileUploadLimit: 5
-
sunPortalNetFileHostDetectOrder:: V0lOCk5FVFdBUkUKRlRQCk5GUw==
-
sunPortalNetFileMaxSearchDir: 100
-
sunPortalNetFileMimetypesConfigFileLocation: %PS_BASEDIR%/%PS_PRODUCT_DIR%/sam
-
sunPortalNetFileNTDomain:
-
sunPortalNetFileOSCharSet: Unicode(UTF-8)
-
sunPortalNetFileTempDir: /tmp
-
sunPortalNetFileWindowLocation: 100|50
-
sunPortalNetFileWindowSize: 700|400
-
sunPortalNetFileWINSServer:
-
sunPortalNetletAccessHosts: *
-
sunPortalNetletAccessRules: *
-
sunPortalNetletClientBindIP: 127.0.0.1
-
sunPortalNetletClientLoopbackPort: 58000
-
sunPortalNetletDenyHosts:
-
sunPortalNetletDenyRules:
-
sunPortalNetletDoReauth: false
-
sunPortalNetletKeepAliveInterval: 0
-
sunPortalNetletPortWarn: true
-
sunPortalNetletPortWarnCheckbox: true
-
sunPortalNetletRules: Telnet^ALGO^KSSL_SSL3_RSA_WITH_3DES_EDE_CBC_SHA+SSL_RSA_
-
sunPortalNetletRules: FTP^ALGO^KSSL_SSL3_RSA_WITH_3DES_EDE_CBC_SHA+SSL_RSA_WIT
-
sunPortalNetletRules: IMAP^ALGO^KSSL_SSL3_RSA_WITH_3DES_EDE_CBC_SHA+SSL_RSA_WI
-
sunPortalNetletTerminateAtLogout: true
-
sunPortalportal1DesktopDefaultChannelName: DefaultChannel
-
sunPortalportal1DesktopEditProviderContainerName: JSPEditContainer
-
sunPortalportal1DesktopType: default
-
sunPortalProxyletBindIP: 127.0.0.1
-
sunPortalProxyletDownloadDefault: false
-
sunPortalProxyletPacLocation:
-
sunPortalProxyletPort: 58081
-
sunPortalProxyletRules: india.sun.com:proxylethost:proxyletport
-
Migrating to Sun Java System Portal Server 7.2
You can migrate from earlier versions of Portal Server to Portal Server 7.2. For more information on how to migrate from Sun Java System Portal Server 2005 Q4 (part of Java ES4, also known as Portal Server 6.3.1) to Portal Server 7.2, refer the migration guide.
- © 2010, Oracle Corporation and/or its affiliates
