Sun ONE™ Identity Synchronization for Windows Release Notes
Version 1.0 SP1
Part Number 817-6262
These release notes contain important information available at the time of the release of Sun ONE™ Identity Synchronization for Windows Version 1.0 SP1. New features and enhancements, known limitations and problems, technical notes, and other information are addressed here. Read this document before you begin using Sun ONE Identity Synchronization for Windows Version 1.0 SP1 (Identity Synchronization for Windows).
The most up-to-date version of these release notes can be found at the Sun ONE documentation web site: http://docs.sun.com/prod/sunone. Check the web site prior to installing and setting up your software and then periodically thereafter to view the most up-to-date release notes and product documentation.
These release notes contain the following sections:
Third-party URLs are referenced in this document and provide additional, related information.
Revision History
| Date |
Description of Changes |
|---|---|
| June 21, 2004 |
Minor corrections to content. Added note to Installing the Service Pack and removed reference to Calendar Server tool in How to Report Problems and Provide Feedback section. |
| April 26, 2004 |
Initial version of these Service Pack 1 release notes. |
About Identity Synchronization for Windows, Version 1.0 SP1
Identity Synchronization for Windows provides bidirectional password synchronization between the following directories:
When synchronizing Sun Java™ System Directory Server (formerly Sun ONE™ Directory Server) and Windows 2000 Active Directory, you can install and run all Identity Synchronization for Windows components in the Solaris™ operating system or Windows 2000 operating system environments. When synchronizing Sun Java System Directory Server (Directory Server) and Windows NT, you must run the Windows NT components in the Windows NT environment.
|
| |
| Note |
Identity Synchronization for Windows 1.0 SP1 supports synchronization with the Windows 2003 platform, but cannot be installed on a Windows 2003 server (see Known Issues and Limitations). Active Directory connectors and subcomponents must be installed on Solaris or on Windows 2000 Server or Advanced Server. For more information about synchronizing with Active Directory, refer to the Sun ONE Identity Synchronization for Windows 1.0 Installation and Configuration Guide. |
|
| |
This section includes:
What’s New in This Release
Identity Synchronization for Windows 1.0 SP1 is provided to fix several known product issues.
For a detailed description of these issues, see Bugs Fixed in This Release.
This service pack does not contain any new features or performance enhancements.
Hardware and Software Requirements
The hardware requirements for this release of Identity Synchronization for Windows are as follows:
The operating system requirements are provided in the following tables:
Synchronizing with Active Directory on Windows 2003
The following installation information is important if you will be synchronizing passwords with Active Directory on Windows 2003 Standard or Enterprise Edition:
- You cannot install any of the Identity Synchronization for Windows components on a Windows 2003 operating system.
- You must install an Active Directory connector using the Identity Synchronization for Windows graphical user interface-based (GUI) installer.
- You use the same procedures to create directory sources, global catalogs, and synchronization scopes for Windows 2003 that you used for Active Directory on Windows 2000.
- You must install the Active Directory Certificate manually for each Active Directory connector synchronizing a source on Windows 2003. Use the instructions provided in the “Retrieving the Active Directory CA Certificate Using certutil” section of the “Configuring Security” chapter in the Sun ONE Identity Synchronization for Windows Version 1.0 Installation and Configuration Guide.
- On Windows 2003, the default password policy enforces strict passwords, which is not the default password policy on Windows 2000.
|
| |
| Note |
If you do not have to enforce password policies, instructions for disabling the Windows 2003 password policy are provided in Changing Password Policies on Active Directory. If you enforce password policies on Windows or on Directory Server, read the information provided in Compatibility Issues: Password Policies to understand how password policies can affect synchronization results between Active Directory and Directory Server. |
|
| |
Bugs Fixed in This Release
The following table describes the bugs fixed in Identity Synchronization for Windows 1.0 SP1:
Identity Synchronization for Windows maps wrong attribute. (4995351)
This service pack corrects a problem that occurred when like values were not mapped to each other, such as cn <--> displayname and uid <--> cn.
The following example illustrates this problem:
This problem occurred when you transferred attributes from Active Directory to Directory Server. The mappings would become mismatched so the displayname would be mapped to uid instead of the stated cn attribute.
resync can miss entries due to race condition. (4987742)
This service pack corrects a situation in which the resync source connector was occasionally sending refresh actions before the destination connector was ready to receive them, which was causing the first few entries to be missed.
linkusers command may never exit. (4939484)
This service pack fixes the linkusers command so it exits appropriately.
Important Information
This section contains the latest information that is not contained in the core product documentation, and it includes the following topics:
Installing the Service Pack
This section explains how to install Identity Synchronization for Windows1.0 SP1. The information is organized into the following sections:
Overview
For this service pack, each installation must have one (or can have a combination of two) of the following sections (core and/or instance), where each section refers to a specific part of the deployed file system’s topology:
The easiest way to find the precise location of the <core> section is to use the system Console.
When you start the Console and select the Identity Synchronization for Windows (isw-<hostname>) task, the associated panel reveals the <core> section’s “server root.” In addition, the <core> section’s host name will be shown in the task name (which is the text to the right of the literal beginning with “isw-”). You deploy (tar or unzip) the service pack’s core file on the core machine, within its <server_root> file system.
It is important to recognize that Identity Synchronization for Windows 1.0 SP1 packaging processes do not know the <instance> name.
For example, if a machine named dirserver.example.com possessed an installed instance of Identity Synchronization for Windows, a path named <server_root>/isw-dirserver (where dirserver.sun is the instance directory under <server_root>) would exist in the dirserver.example.com’s file system. This area of the file system is called (collectively) the installation’s <instance> directory. The <instance> directory must be the current working directory when you deploy (tar or unzip) the service pack’s instance files.
Installing the Software
Use the following procedure to install Identity Synchronization for Windows 1.0 SP1:
- Download the Identity Synchronization for Windows service pack (into a temporary location) from:
- Unpack the patch file as follows:
- On Windows: unzip IdentitySyncForWindows_1.0_SP1-Windows.zip
- On Solaris: tar -xvf IdentitySyncForWindows_1.0_SP1-Solaris.tar
- Check one level below the <server_root> and verify that all of the files unpacked successfully (compare to the listings in Table 5 and Table 6).
- Stop synchronization using one of the following methods.
- Stop all services (daemons) on each machine in your deployment topology (Active Directory, NT, and Solaris) as follows:
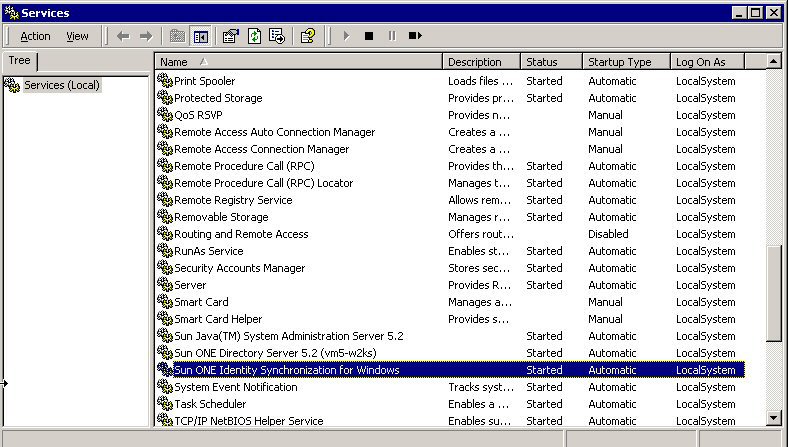
- On Windows: Select Start -> Settings -> Control Panel -> Administrative Tools -> Services to open the Services dialog box. Select Sun ONE Identity Synchronization for Windows from the list and click the Stop icon on the toolbar to stop all corresponding services. (See Figure 1.)
- On Solaris: From the command line, type the following command to stop the system manager:
- Use the db2ldiff utility to backup the existing configuration directory and all file systems on which you have Identity Synchronization for Windows installed.
- Backup the contents of the Identity Synchronization for Windows configuration directory. Be sure to include o=NetscapeRoot and the ou=services,<SUL suffix> of the managed Synchronized Users List(s).
- Backup the Sun ONE Directory Server and Windows Active Directory and/or NT SAM Registry.
- Backup all files that reside at the core's <server-root>.
- Backup all files that reside at every instance root.
- For the installation where core is installed, deploy the core zip (or tar) file from the current working directory (core’s <server_root>) using one of the following methods:
- On Windows:
- On Solaris:
- For all other instance installations (any machine on which Identity Synchronization for Windows connectors or subcomponents are installed), deploy the instance zip (or tar) file only from the instance working directory (<server_root>/isw-<hostname>) using one of the following methods:
- On Windows:
- On Solaris:
http://www.sun.com/software/download/inter_ecom.html
The patch file contents will be unpacked into a subdirectory called idsync_1.0_sp1, which will be created in the location where you unpacked the file. (See Table 5 and Table 6 for a list of the patch file contents provided in the zip and tar files, respectively.)
|
| |
| Note |
The following files are common to all zip/tar files:
COPYRIGHT.txt |
|
| |
/etc/init.d/isw stop
Figure 1 Services Dialog Box
|
| |
| Note |
For detailed information about the db2ldiff utility, refer to Chapter 4 of the Sun ONE Directory Server 5.2 Administration Guide. |
|
| |
This service pack and the setBuild utility both make changes to the configuration directory during installation, so be sure to backup and preserve your current configuration.
If you need to revert the system’s state to its condition prior to the service pack installation, perform the following backups before you proceed to the next step:
cd C:\Program Files\Sun\MPS
unzip <path_to_idsync_1.0_sp1>\IdentitySyncForWindows_1.0_SP1-Windows.core.zip
|
| |
| Note |
If you use a zip utility, unzip the Windows core files into the <server_root> directory for that system. |
|
| |
cd /var/Sun/mps/
tar -xvf <path_to_idsync_1.0_sp1>/IdentitySyncForWindows_1.0_SP1-Solaris.core.tar
If you are asked whether to replace all files, select Yes to All to extract the service pack files and place them under /var/Sun/mps//isw-<hostname>. (See Solaris Patch Files (IdentitySyncForWindows_1.0_SP1-Solaris.tar) for more information.)
cd C:\Program Files\Sun\MPS\isw-<hostname>
unzip <path_to_idsync_1.0_sp1>\IdentitySyncForWindows_1.0_SP1-Windows.instance.zip
|
| |
| Note |
If you use a zip utility, unzip the Windows core files into the <server_root>/isw-<hostname> directory for that system. |
|
| |
cd /var/Sun/mps/isw-<hostname>
tar -xvf <path_to_idsync_1.0_sp1>/IdentitySyncForWindows_1.0_SP1-Solaris.instance.tar
If you are asked whether to replace all files, select Yes to All.
You are now ready to run the setBuild utility. Continue to the next section for instructions.
Using the setBuild Utility
After installing the Identity Synchronization for Windows 1.0 SP1 files, you must modify the system’s configuration so it will start using the new files. Some of these files employ a naming nomenclature that embeds a build number into the file name. You use the setBuild command line utility to tell the synchronization system to start using the newer versioned files. The utility locates the new files and subsequently changes the configuration to reflect those new names.
Because the setBuild utility modifies the configuration, the utility requires credentials that permit you to modify the configuration registry. Generally, these credentials are the same credentials used to configure the system through the GUI (such as the credentials specified to start the Console). In addition, you must tell the utility where the configuration registry resides. For example,
ou=services, o=example.com
|
| |
| Note |
You must run the setBuild utility from the server that hosts the Identity Synchronization for Windows’ core and you must start the configuration directory server. |
|
| |
- Run the setBuild command as follows:
- If prompted, provide the Directory Manager or Administrative password.
- Restart the Admin Server on the core machine.
- To start services (daemons), use one of the following methods:
- For Windows: Return to the Services dialog (Select Start -> Settings -> Control Panel -> Administrative Tools -> Services) and start services on all of the instance machines.
- For Solaris: When services are running on all instance machines, then you can start services on the core machine(s). (Usually done by typing /etc/initial/isw start or from the Services dialog box.)
- To verify a successful installation, open the Identity Synchronization for Windows Console. From the Console tree, select Identity Synchronization for Windows, click the Open button, and log in.
- Select the Tasks tab and click Start Synchronization Task.
- Select the Status tab and check the logs to verify that synchronization is working properly.
cd isw-<hostname>/lib
java -jar setBuild.jar -h <hostname> -D <bind dn> -w <password>
[-p <port number> [-v]
[-x <localInstanceHostname>]
Where:
From this point, you should see that the product’s version title now contains the SP1 suffix.
Uninstalling the Service Pack
If necessary, you can use the following procedure to remove this service pack from a machine:
- Stop synchronization. (See Step 4.)
- Stop all services (daemons). (See Step 5.)
- Restore the back-ups you made of the file system during the service pack installation process onto the core machine.
- Restore the configuration repository from the back-up you made during the installation process.
- Restart all services (daemons). (See Step 4.)
- Verify the version number in the Identity Synchronization for Windows Console.
- Restart synchronization. (See Step 6.)
Compatibility Issues: Password Policies
As mentioned previously, the default password policy on Windows 2003 has been changed to enforce strict passwords by default, which was not the default for Windows 2000.
Identity Synchronization for Windows services must occasionally create entries that do not require passwords. Consequently, if you have password policies enabled on Active Directory (on Windows 2003 or 2000) or on Directory Server, user creation errors can result.
Although you do not have to disable password policies on Active Directory or Directory Server, you should understand the issues associated with enforcing password policies on the different systems.
This section is organized as follows:
- Enforcing Password Policies: If you must enforce password policies on Windows or on Directory Server, read the information provided in this section to understand how password policies can affect synchronization results between Active Directory and Directory Server.
- Changing Password Policies on Active Directory: If you do not have to enforce password policies, skip to this section for the instructions you need to disable the Windows 2003 default password policy.
Enforcing Password Policies
This section explains how the password policies for Active Directory on Windows 2003, Windows 2000, and Sun ONE Directory Server version 5.2 can affect synchronization results.
The information is organized as follows:
Overview
If you create users on Active Directory (or Directory Server) that meet the required password policies for that system, the users will be created and synchronized properly between the two systems. If you have password policies enabled on both systems, the passwords must meet the policies of both systems or the user creations will fail.
- If you enable the password policy features on Active Directory, you should enable a similarly configured or matched password policy on Directory Server.
- If you cannot create a consistent password policy on both Active Directory and Directory Server, you should enable password policies on the side that you consider the authoritative source for passwords and user creations. However, there are some cases in which user creations will not work as expected because of certain password policy configurations.
The next three sections contain tables that describe some different scenarios you might encounter. You can use this information as a guideline to help ensure that passwords will remain synchronized. (These tables do not attempt to describe all possible configuration scenarios because system configurations differ.)
Enforcing Password Policies on Active Directory Only
Table 7 describes different scenarios for an Active Directory only password policy using the following specifications:
- Enforce Password History: 20
- Max Password Age: 30
- Min Password Age: 0
- Min Password Length: 7
- Passwords must meet complexity requirements: Enabled
|
Scenario |
Password Meets Policy Requirements |
Results |
|---|---|---|
|
From Active Directory |
Yes |
Users are created on Active Directory and Directory Server, and link properly. |
|
From Active Directory |
No |
Users are created on Directory Server but cannot be created on Active Directory. Users are not linked. See Important Notes for more information. |
|
From Active Directory |
Not |
Users that exist on Active Directory are created on Directory Server and the passwords are invalidated to force on-demand synchronization. The user passwords will be updated in Directory Server the next time those users log into Directory Server. |
|
From Directory Server |
Yes |
Users are created on Directory Server and Active Directory, and link properly. |
|
From Directory Server |
No |
Users are created on Directory Server but cannot be created on Active Directory. |
| From Directory Server to Active Directory during idsync resync -c |
Not |
Users that exist on Directory Server cannot be created on Active Directory because the entries do not contain a password. To create users, the entries must contain passwords and the passwords must meet the Active Directory password policy. See Important Notes for more information. |
Enforcing Password Policies on Active Directory and Directory Server
Table 8 describes different scenarios for Active Directory and Directory Server password policy examples using the following specifications:
- For Active Directory:
- For Directory Server:
- User must change password after reset
- User May Change Password
- Keep 20 passwords in history
- Password expires in 30 days
- Send warning 5 days before password expires
- Check password syntax: Password min length is 7
|
Scenario |
Password Meets Policy Requirements |
Results |
|---|---|---|
|
From Active Directory |
Yes |
Users are created on Active Directory and Directory Server, and link properly. |
|
From Active Directory |
No |
Users are created on Directory Server with no password but cannot be created on Active Directory. Users are not linked. See Important Notes for more information. |
|
From Active Directory |
Not |
Users that exist on Active Directory are created in Directory Server and the passwords are invalidated to force on-demand synchronization. The user passwords will be updated in Directory Server the next time those users log into Directory Server — if the passwords meet the password policy requirements on both Active Directory and Directory Server. Note: If you create users on Active Directory but do not select the User must change password at next login option, the users will be created on Directory Server. However, their passwords will be invalidated immediately because the users will not be forced to change their passwords the next time they log into Active Directory. |
|
From Directory Server |
Yes |
Users are created on Directory Server and Active Directory, and link properly. |
|
From Directory Server |
No |
Users are not created on Directory Server or Active Directory. |
|
From Directory Server to Active Directory |
Not |
Users that exist on Directory Server will not be created on Active Directory because the entry you are trying to create on Active Directory does not contain a password and does not comply with the password policy. |
Enforcing Password Policies on Directory Server Only
Table 9 describes different scenarios for a Directory Server only password policy using the following specifications:
- User must change password after reset
- User May Change Password
- Keep 20 passwords in history
- Password expires in 30 days
- Send warning 5 days before password expires
- Check password syntax: Password min length set to 7
Important Notes
If you create users on Active Directory that do not match the Active Directory password policy, those users will be created on Directory Server.
- Active Directory actually creates users “temporarily” and then deletes the entries if the password does not meet the password policy requirements. Consequently, the Active Directory connector sees this temporary ADD and creates users on the Directory Server side. The users will not have a password in Directory Server, so no one will be able to log in as the user. In addition, these entries will not be linked to a valid entry in Active Directory. If you try to run the idsync resync -c command, the entries will not be created in Active Directory because they do not have a password.
- If you specify a password policy on Directory Server, user entries are still created without a password. Directory Server does not enforce the password policy for user creations unless the entries contain a password.
There are several ways to recover from this situation.The preferred method is to remove the user from Directory Server and then add them to Active Directory with a valid password for the Active Directory password policies. This method ensures that the users are created on Directory Server and linked properly. Users on Directory Server will have their password invalidated when they log into Active Directory for the first time and change their passwords.
- If you do not delete the user from Directory Server, and then try to add the Active Directory user again with a new password, the ADD to Directory Server will fail because the user already exists on Directory Server. The entries will not be linked together and you will have to run a idsync linkusers command to link the two separate accounts.
- If you run the idsync linkusers command, you must be sure to reset the passwords for the accounts on Active Directory that were linked to entries on Directory Server. Resetting the passwords invalidates those passwords on Directory Server, which then forces on-demand synchronization to update the Directory Server password the next time the user authenticates to Directory Server with their new Active Directory password.
- If you run idsync resync with the -c option, the users that exist on Directory Server will not be created on Active Directory because there are no passwords available and the entry you are trying to create does not comply with the Active Directory password policy.
- Set the Active Directory password policy’s Minimum Password Length to 0.
- Disable the Password must meet complexity requirements option.
- Run the following command to create existing Directory Server users on Active Directory with no passwords:
- Set your Active Directory password policy back to their default settings.
- Reset the user passwords on Active Directory, and set the flag that requires users to change their passwords the next time they log in. When the users log into Active Directory and change their passwords, the passwords will be invalid on Directory Server and force the on-demand synchronization the next time the users authenticate to Directory Server.
To work around this problem,
idsync resync -h <hostname> -p port -D {directory manager} -w {password} -s o=idsconfig -q {configuration password} -o Sun -c
Error Messages
Check the central logger audit.log file on the core system for the following error messages:
- User not created on AD from DS with password policy:
- Unable to update password on DS due to password policy during on-demand synchronization:
Changing Password Policies on Active Directory
To change the Active Directory Windows 2003 password policy so Identity Synchronization will work correctly, you must change the Windows password policies as follows:
- Change Minimum Password Length to 0 (zero) characters.
- Change Password must meet complexity requirements to Disabled.
|
| |
| Note |
For Windows 2000 Active Directory environments, the system's default values for these rules are already compatible with Identity Synchronization for Windows' requirements. The Active Directory connectors provided by Identity Synchronization for Windows 1.0 SP1 can be used for synchronization with Active Directory on Windows 2003. |
|
| |
Use the following procedure to change the complexity and minimum password length rules:
- Select Start -> Settings -> Administrative Tools -> Active Directory Users and Computers to open the Active Directory Users and Computers window. (See Figure 2.)
- Right-click on your domain name in the left pane and select Properties from the pop-up menu.
- When the <domain_name> Properties dialog box is displayed, select the Default Domain Policy (as shown in Figure 3) and then click Edit.
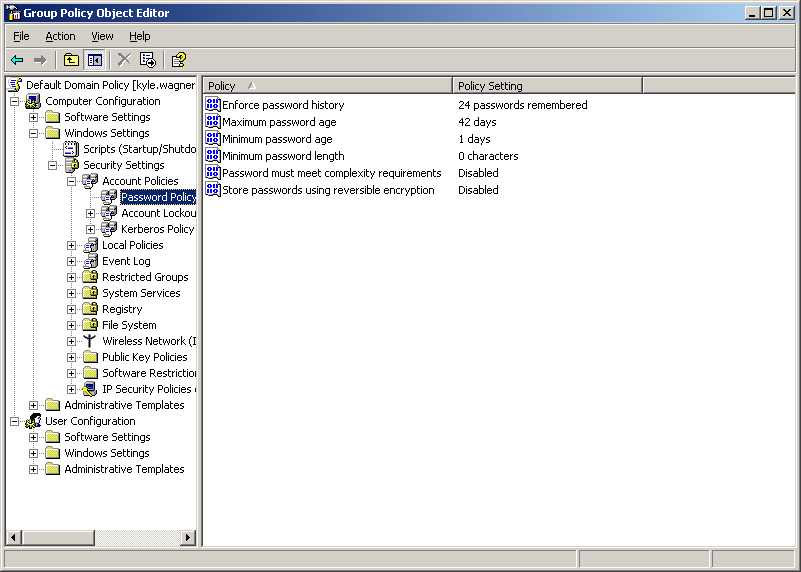
- When the Group Object Policy window displays (Figure 4), select Computer Configuration -> Windows Settings -> Security Settings -> Account Policies -> Password Policy.
- Click the Password Policy icon located in the right pane (see Figure 4).
- In the left pane, change the following policies so Identity Synchronization for Windows services can create entries that do not require passwords:
- Close all windows and dialog boxes.
- Run one of the following applications, which force the policy changes to take effect immediately:
- For a Windows 2003 operating system: gpupdate.exe
- For a Windows 2000 operating system:
secedit /refreshpolicy machine_policy /enforce
Figure 2 Active Directory Users and Computers Window
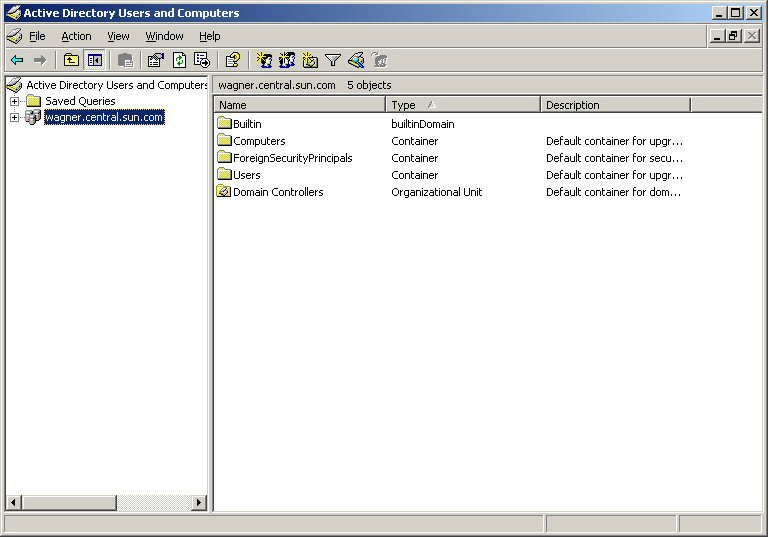
Figure 3 <domain_name> Properties Dialog Box
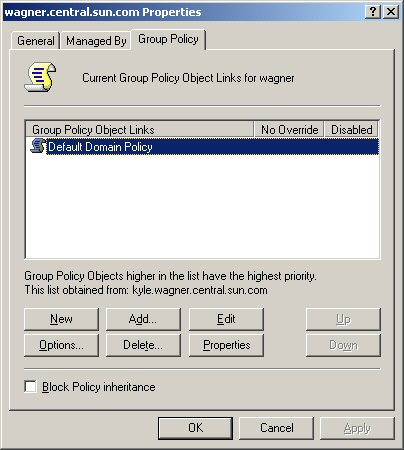
Figure 4 Group Object Policy Window
|
| |
| Note |
For additional information about Windows Password Policies, refer to the following sources:
Apply or Modify Password/Group Policy in Windows 2003 http://www.microsoft.com/resources/documentation/windowsserv/2003/standard/ Using Secedit.exe to Force Group Policy to Be Applied Again - Windows 2000 Servers Microsoft KB #227448
A Description of the Group Policy Update Utility - Windows 2003 Servers |
|
| |
Running Identity Synchronization for Windows in a Firewalled Environment
You can run Identity Synchronization for Windows in a firewalled environment. This section describes which server ports you must expose through the firewall, as follows:
Message Queue Requirements
By default, Message Queue uses dynamic ports for all services except for its port mapper. To access the Message Queue broker through a firewall, the broker should use fixed ports for all services.
After installing the core, you must set the imq.<service_name>.<protocol_type>.port broker configuration properties. Specifically, you must set the imq.ssljms.tls.port option. Refer to the Sun ONE™ Message Queue Administrator’s Guide for more information.
Installer Requirements
The Identity Synchronization for Windows installer must be able to communicate with the Directory Server acting as the configuration directory.
- If you are installing an Active Directory connector, the installer must be able to contact Active Directory’s LDAP port (port 389).
- If you are installing a Directory Server connector or a Directory Server plugin (subcomponent), the installer must be able to contact Directory Server’s LDAP port (default port 389).
Core Component Requirements
The Message Queue, system manager, and command line interface must be able to reach the Directory Server where the Identity Synchronization for Windows configuration is stored.
Console Requirements
The Identity Synchronization for Windows Console must be able to reach the following:
Connector Requirements
All connectors must be able to communicate with Message Queue. In addition:
Directory Server Plugin Requirements
Each Directory Server plugin must be able to reach the Directory Server connector’s server port, which was chosen when the connector was installed. Plugins running in Directory Server Master replicas must be able to connect to Active Directory’s LDAP (port 389) or LDAPS (port 636). The plugins running in other Directory Server replicas must be able to reach the Sun ONE Master’s Directory Server LDAP or LDAPS ports.
Documentation Updates for Identity Synchronization for Windows 1.0 SP1
Detailed instructions for uninstalling Identity Synchronization for Windows version 1.0 manually are provided in the following three sections:
Manually Uninstalling Core and Instances from Windows 2000
Use the instructions provided in this section to manually uninstall Core from a Windows 2000 machine.
|
| |
| Note |
In this section, Identity Synchronization for Windows locations are described in the following manner: <server_root>\isw-<hostname> Where <server_root> represents the parent directory of the Identity Synchronization for Windows installation location. For example, if you installed Identity Synchronization for Windows in C:\Program Files\Sun\mps\isw-example, the <server_root> would be C:\Program Files\Sun\mps. |
|
| |
- Stop all Identity Synchronization for Windows java processes using one of the following methods:
- Select Start -> Settings -> Control Panel -> Administrative Tools -> Services to open the Services window. In the right pane, right-click on Sun ONE Identity Synchronization for Windows and select Stop.
- Open a Command Prompt window and type the following command:
- If the preceding methods do not work, you can use the following steps to stop the java processes manually:
- Open the Services window, right-click on Sun ONE Identity Synchronization for Windows, and select Properties.
- From the General tab in the Properties window, select Manual from the Startup type drop-down menu.
- Stop the Message Queue (for a Core uninstallation only) using one of the following methods:
- In the Services window, right-click on iMQ Broker in the right pane and select Stop.
- Open a Command Prompt window and type the following command:
- If the preceding methods do not work, you can use the following steps to stop Message Queue manually:
- Open the Services window, right-click on iMQ Broker and select Properties.
- From the General tab in the Properties window, select Manual from the Startup type drop-down menu.
- Remove the Directory Server plugin as follows:
- Open the Directory Server Console and select the Configuration tab.
- In the left pane, expand the Plugins node and select the pswsync node.
- In the right pane, uncheck the Enable plug-in check box.
- Click Save to save your changes.
- From the Console, locate and remove the following entry from the Configuration Directory:
- Stop Directory Server, using one of the following methods:
- Open the Windows Explorer to locate and remove the plugin binary:
- Restart Directory Server.
- Open a Command Prompt window and type regedit to open the Registry Editor window.
- In the Registry Editor, select Edit -> Delete from the menu bar and remove the following Identity Synchronization for Windows keys from the Windows Registry:
- All entries under HKEY_LOCAL_MACHINE\SOFTWARE\Microsoft\Windows\
CurrentVersion\Uninstall\Identity Synchronization for Windows - All CurrentControlSet and ControlSet (such as ControlSet001, ControlSet002, and so forth) entries under HKEY_LOCAL_MACHINE\SYSTEM\*, which includes the following entries (if they exist):
- Back-up (copy and rename) the current productregistry file located in C:\WINNT\system32.
- Edit the C:\WINNT\system32 productregistry file to remove the following tags:
- For best results, use an XML editor. Alternatively, you can use a standard text editor.
- Some of the following components may not be included in your file.
- You must delete the beginning tag (<compid>), ending tag (<\compid>), and all contents in-between both tags). Ellipses are used in the following list to represent any additional text and/or tags that are included as part of these tags. (See the example (more...).)
- <compid>Identity Synchronization for Windows . . . </compid>
- <compid>Core . . . </compid>
- <compid>unistaller . . . </compid>
- <compid>wpsyncwatchdog . . . </compid>
- <compid>sentenv . . . </compid>
- <compid>Create DIT . . . </compid>
- <compid>Extend Schema . . . </compid>
- <compid>resources . . . </compid>
- <compid>CoreComponents . . . </compid>
- <compid>Connector . . . </compid>
- <compid>DSConnector . . . </compid>
- <compid>Directory Server Plugin . . . </compid>
- <compid>DSSubcomponents . . . </compid>
- <compid>ObjectCache . . . </compid>
- <compid>ObjectCacheDLLs . . . </compid>
- <compid>ADConnector . . . </compid>
- Remove the Identity Synchronization for Windows installation folder located at <server_root>\isw-<hostname>.
- Clean up the configuration directory as follows:
- From a Command Prompt window, run the ldapsearch command against the configuration directory where Identity Synchronization for Windows Core is installed to locate the Identity Synchronization for Windows Console subtree.
- Use the Directory Server Console to remove the Identity Synchronization for Windows Console subtree you found and all subtrees below it.
- Clean up the Identity Synchronization for Windows configuration registry as follows:
- From a a Command Prompt window, run the following ldapsearch command to locate the Identity Synchronization for Windows configuration registry in Directory Server:
- Use the Directory Server Console to remove the configuration registry subtree you found, including all subtrees below it.
- Clean up all other Console-related files as follows:
- Restart your machine for all changes to take effect.
net stop “Sun ONE Identity Synchronization for Windows”
net stop “iMQ Broker”
cn=pswsync,cn=plugins,cn=config
<server_root>\lib\psw-plugin.so
Important – Back up your current registry file before proceeding to Step 5.
|
| |
| Note |
|
|
| |
The following is a <compid> tag sample. Remove <compid>, </compid>, and all text and tags in-between.
|
For example, C:\Program Files\Sun\mps\isw-example
|
| |
| Note |
ldapsearch is located in <server_root>\shared\bin\ldapsearch. For example, C:\Program Files\Sun\mps\shared\bin\ldapsearch |
|
| |
ldapsearch -D "cn=directory manager" -w <my_password> -b o=netscaperoot "(nsnickname=isw)" dn
The resulting entry should be similar to the following (note that the entry will always end with o=NetscapeRoot):
"cn=Sun ONE Identity Synchronization for Windows,cn=server group,
cn=myhost.mydomain.com,ou=mydomain.com,o=NetscapeRoot"
ldapsearch -D "cn=directory manager" -w <my_password> -b "dc=my,dc=domain" "(&(objectclass=iplanetservice)(ou=IdentitySynchronization))" dn
The resulting entry should be similar to the following:
"ou=IdentitySynchronization,ou=Services,dc=my,dc=domain"
Manually Uninstalling Core and Instances from Solaris
Use the instructions provided in this section to manually uninstall Core from a Solaris machine.
|
| |
| Note |
In this section, Identity Synchronization for Windows locations are described in the following manner: <server_root>/isw-<hostname> Where <server_root> represents the parent directory of the Identity Synchronization for Windows installation location. For example, if you installed Identity Synchronization for Windows in /var/Sun/mps/isw-example, the <server_root> would be /var/Sun/mps. |
|
| |
- Stop all Identity Synchronization for Windows java processes by typing /etc/init.d/isw stop into a terminal window.
- Stop Message Queue as follows:
- At the prompt, type the following command to stop the Message Queue broker:
- To stop any remaining imq processes, type:
- Use one of the following methods to uninstall the broker packages and directories:
- Use the Message Queue broker uninstall script (located in the Identity Synchronization for Windows instance directory on the host where you installed core) to uninstall the broker. Type the following:
- Manually uninstall the packages and directories as follows:
- To remove the Identity Synchronization for Windows Solaris packages run pkgrm <packageName> for each of the packages listed in Table 10.
(For example, pkgrm SUNWidscm SUNWidscn SUNWidscr SUNWidsct SUNWidsoc) - Remove Director Server plugin as follows:
- Open the Directory Server Console and select the Configuration tab.
- In the left pane, expand the Plugins node and select the pswsync node.
- In the right pane, uncheck the Enable plug-in check box.
- Click Save to save your changes.
- From the Directory Server Console, locate and remove the following entry from the Configuration Directory:
- Stop Directory Server.
- To remove the plugin binary, type
- Restart Directory Server.
- Back-up (copy and rename) the current productregistry file located in /var/sadm/install/productregistry.
- Manually edit the productregistry file in /var/sadm/install/productregistry to remove the following entries (if present):
- For best results, use an XML editor. Alternatively, you can use a standard text editor.
- Some of the following components may not be included in your file.
- You must delete the beginning tag (<compid>), ending tag (<\compid>), and all contents in-between both tags). Ellipses are used in the following list to represent any additional text and/or tags that are included as part of these tags. (See the example on (more...).)
- <compid>Identity Synchronization for Windows . . . </compid>
- <compid>Core . . . </compid>
- <compid>unistaller . . . </compid>
- <compid>wpsyncwatchdog . . . </compid>
- <compid>sentenv . . . </compid>
- <compid>Create DIT . . . </compid>
- <compid>Extend Schema . . . </compid>
- <compid>resources . . . </compid>
- <compid>CoreComponents . . . </compid>
- <compid>Connector . . . </compid>
- <compid>DSConnector . . . </compid>
- <compid>Directory Server Plugin . . . </compid>
- <compid>DSSubcomponents . . . </compid>
- <compid>ObjectCache . . . </compid>
- <compid>ObjectCacheDLLs . . . </compid>
- <compid>SUNWidscr . . . </compid>
- <compid>SUNWidscm . . . </compid>
- <compid>SUNWidsct . . . </compid>
- <compid>SUNWidscn . . . </compid>
- <compid>SUNWidsoc . . . </compid>
- <compid>ADConnector . . . </compid>
- Remove the following Identity Synchronization for Windows directories and files:
- Clean up the configuration directory as follows:
- Run the following ldapsearch command against the configuration directory where Identity Synchronization for Windows core is installed to locate the Identity Synchronization for Windows Console subtree:
- Use the Directory Server Console to remove the Identity Synchronization for Windows Console subtree and all subtrees below it.
- Clean up the Identity Synchronization for Windows configuration registry as follows:
- Run the following ldapsearch command to locate the Identity Synchronization for Windows configuration registry in Directory Server:
- Use the Directory Server Console to remove the Identity Synchronization for Windows configuration registry and all subtrees below it.
- Clean up all other Console-related files as follows:
- Restart your machine for all changes to take effect.
If the preceding command does not stop all of the java processes, type the following:
/usr/ucb/ps -gauxwww | grep java
kill -s SIGTERM <process IDs from preceding command>
/etc/init.d/imq stop
* ps -ef | grep imqbroker
* kill -s SIGTERM <process IDs from preceding command>
/<server_root>/isw-<hostname>/imq_uninstall
Use the pkgrm: command to remove these packages:
| SUNWaclg |
SUNWiqum |
SUNWiqjx |
| SUNWiqlen |
SUNWxsrt |
SUNWiqu |
| SUNWjaf |
SUNWiqfs |
SUNWjhrt |
| SUNWiqdoc |
SUNWiquc |
SUNWiqsup |
| SUNWiqr |
SUNWjmail |
|
Use the rm -rf command to remove these directories:
| Package Name |
Description |
|---|---|
| SUNWidscm |
Sun ONE Directory Server Identity Synchronization package for Core components and Connectors. |
| SUNWidscn |
Sun ONE Directory Server Identity Synchronization package for Console help files. |
| SUNWidscr |
Sun ONE Directory Server Identity Synchronization package for Core Components. |
| SUNWidsct |
Sun ONE Directory Server Identity Synchronization package for Connectors. |
| SUNWidsoc |
Sun ONE Directory Server Identity Synchronization package for Object Cache. |
To verify that all of the packages were removed, type the following:
pkginfo | grep -i "Identity Synchronization"
|
| |
| Note |
Run the pkgrm <packageName> command again if there are still existing packages due to dependencies. |
|
| |
cn=pswsync,cn=plugins,cn=config
rm -f /<server_root>/lib/psw-plugin.so
|
| |
| Note |
|
|
| |
The following is a example <compid> tag. Remove <compid>, </compid>, and all text and tags in-between.
|
ldapsearch -D "cn=directory manager" -w <my_password> -b o=netscaperoot "(nsnickname=isw)" dn
|
| |
| Note |
ldapsearch is located in Directory Server’s <server_root>/shared/ |
|
| |
The resulting entry should be similar to the following (note that the entry will always end with o=NetscapeRoot):
"cn=Sun ONE Identity Synchronization for Windows,cn=server group,
cn=myhost.mydomain.com,ou=mydomain.com,o=NetscapeRoot"
ldapsearch -D "cn=directory manager" -w <my_password> -b "dc=my,dc=domain" "(&(objectclass=iplanetservice)(ou=IdentitySynchronization))" dn
The resulting entry should be similar to the following:
"ou=IdentitySynchronization,ou=Services,dc=my,dc=domain"
Manually Uninstalling an Instance from Windows NT
Use the instructions provided in this section to manually uninstall an instance from a Windows NT machine.
|
| |
| Note |
In this section, Identity Synchronization for Windows locations are described in the following manner: <server_root>\isw-<hostname> Where <server_root> represents the parent directory of the Identity Synchronization for Windows installation location. For example, if you installed Identity Synchronization for Windows in C:\Program Files\Sun\mps\isw-example, the <server_root> would be C:\Program Files\Sun\mps. |
|
| |
- Stop all Identity Synchronization for Windows java processes (core and instance installations) using one of the following methods:
- Select Start -> Settings -> Control Panel -> Administrative Tools -> Services to open the Services window. In the right pane, right-click on Sun ONE Identity Synchronization for Windows and select Stop.
- Open a Command Prompt window and type the following command:
- If the preceding methods do not work, use the following steps to stop the java processes manually:
- Open the Services window, right-click on Sun ONE Identity Synchronization for Windows, and select Properties.
- From the General tab in the Properties window, select Manual from the Startup type drop-down menu.
- Stop the Change Detector service using one of the following methods:
- In the Services window, right-click on Sun ONE NT Change Detector Service in the right pane and select Stop.
- Open a Command Prompt window and type the following command:
- If the preceding methods do not work, use the following steps to stop the Change Detector Service manually:
- Open the Services window, right-click on Change Detector Service and select Properties.
- From the General tab in the Properties window, select Manual from the Startup type drop-down menu.
- Restart your Windows NT computer.
- You must remove Identity Synchronization for Windows registry keys. Open a Command Prompt window and type regedit to open the Registry Editor window.
- In the Registry Editor, select Edit -> Delete from the menu bar and remove the following Identity Synchronization for Windows keys from the Windows Registry:
- All entries under HKEY_LOCAL_MACHINE\SOFTWARE\Microsoft\Windows\
CurrentVersion\Uninstall\Identity Synchronization for Windows - All CurrentControlSet and ControlSet (such as ControlSet001, ControlSet002, and so forth) entries under HKEY_LOCAL_MACHINE\SYSTEM\*, which includes the following entries (if they exist):
- The HKEY_LOCAL_MACHINE\SOFTWARE\Sun Microsystems\PSW
- Modify (do not delete) the following registry key:
- Back-up (copy and rename) the current productregistry file located in C:\WINNT\system32.
- Edit the C:\WINNT\system32 productregistry file to remove the following tags:
- For best results, use an XML editor. Alternatively, you can use a standard text editor.
- Some of the following components may not be included in your file.
- You must delete the beginning tag (<compid>), ending tag (<\compid>), and all contents in-between both tags). Ellipses are used in the following list to represent any additional text and/or tags that are included as part of these tags. (See the example on (more...).)
- <compid>Identity Synchronization for Windows . . . </compid>
- <compid>Core . . . </compid>
- <compid>unistaller . . . </compid>
- <compid>wpsyncwatchdog . . . </compid>
- <compid>sentenv . . . </compid>
- <compid>Create DIT . . . </compid>
- <compid>Extend Schema . . . </compid>
- <compid>resources . . . </compid>
- <compid>CoreComponents . . . </compid>
- <compid>Connector . . . </compid>
- <compid>DSConnector . . . </compid>
- <compid>Directory Server Plugin . . . </compid>
- <compid>DSSubcomponents . . . </compid>
- <compid>ObjectCache . . . </compid>
- <compid>ObjectCacheDLLs . . . </compid>
- <compid>ADConnector . . . </compid>
- Remove the Identity Synchronization for Windows installation folder located at <server_root>\isw-<hostname>.
- Remove the Password Filter DLL.
- Restart your machine for all changes to take effect.
net stop “Sun ONE Identity Synchronization for Windows”
net stop “Sun ONE NT Change Detector Service”
Important – Back up your current Windows registry file before proceeding to Step 5.
|
| |
| Note |
|
|
| |
The following is a example <compid> tag. Remove <compid>, </compid>, and all text and tags in-between.
|
For example, C:\Program Files\Sun\mps\isw-example
Locate the passflt.dll file in the C:\winnt\system32 folder, and rename the file to passflt.dll.old.
Known Issues and Limitations
This section explains issues and limitations identified after the initial release of Identity Synchronization for Windows version 1.0.
|
| |
| Note |
For a description of previously reported issues and limitations (and available workarounds) for Identity Synchronization for Windows version 1.0, refer to the “Known Issues” section of the Sun ONE Identity Synchronization for Windows Version 1.0 Release Notes, which are available at the following Internet location: |
|
| |
Avoid using the deny (all) ACI on entries that are subordinate to an SUL’s Base DN. (5009673)
It is important to be aware of the use and impact of access control instructions (ACIs) on a directory branch that is subordinate to the Directory Server suffix (such as, dc=mydomain,dc=com) that is targeted for user synchronization.
You use the Identity Synchronization for Windows prepds command to add a special user (uid=PSWConnector,dc=mydomain,dc=com) to the base directory suffix; however, this command does not override existing ACIs that are subordinate to the directory suffix if the ACIs are more restrictive.
For example, if DN dc=mydomain,dc=com is the database suffix targeted for user synchronization, then all users under this suffix will normally be available for synchronization. However, if a branch DN such as dc=myusers,dc=mydomain,dc=com has a more-restrictive ACI, these users may not be available for synchronization.
Specifically, a more-restrictive ACI could be in the following form:
aci: (targetattr=*) (version 3.0;acl "my aci"; deny(all) (userdn="ldap:///all");)
Workaround:
You must reduce the level restriction or add the PSWConnector user as an exception to the rule.
For example,
aci: (targetattr=*) (version 3.0;acl "my aci"; deny(all) (userdn="ldap:///all" and not userdn="uid=PSWConnector,dc=mydomain,dc=com");)
|
| |
| Note |
For more information about troubleshooting ACIs, read the “Managing Access Control” and “Managing Log Files” chapters in the Sun ONE Directory Server 5.2 Administration Guide. |
|
| |
Message Queue will not start with “bad file magic number.” (4997872)
If Message Queue will not start, check the log files for an entry similar to the following:
|
Workaround:
Invoke the following command:
imqbrokerd.exe -name psw-broker -reset store -reset messages
Because some synchronization events will be removed from the system, you are advised to perform a resync operation after executing this command.
A rename operation will fail on Directory Server if the RDN differs in case only. (4985027)
During a user rename operation, if the only difference between the old Relative Distinguished Name (RDN) component and the new RDN is the case, Active Directory will rename the user, but Directory Server will not.
For example, if you try to rename cn=Upper Case, dc=somesuffix to cn=upper case, dc=somesuffix, the operation will fail on Directory Server. There must be some other difference in the RDN for the operation to complete successfully on Directory Server.
Missing the -P option in certutil examples. (4960968)
The certutil examples provided in Chapter 10: “Configuring Security” of the Sun ONE Identity Synchronization for Windows Installation and Configuration Guide Version 1.0, should include the -P option, as follows:
|
Redistributable Files
Sun ONE Identity Synchronization for Windows 1.0 SP1 does not contain any files that can be redistributed.
How to Report Problems and Provide Feedback
If you have problems with Sun ONE Identity Synchronization for Windows, contact Sun customer support using one of the following mechanisms:
http://www.sun.com/service/sunone/software
This site has links to the Knowledge Base, Online Support Center, and ProductTracker, as well as to maintenance programs and support contact numbers.
So that we can best assist you in resolving problems, please have the following information available when you contact support:
- Description of the problem, including the situation where the problem occurs and its impact on your operation
- Machine type, operating system version, and product version, including any patches and other software that might be affecting the problem
- Detailed steps on the methods you have used to reproduce the problem
- Any error logs or core dumps
Sun Welcomes Your Comments
Sun is interested in improving its documentation and welcomes your comments and suggestions. Use the web-based form to provide feedback to Sun:
http://www.sun.com/hwdocs/feedback/
Please provide the full document title and part number in the appropriate fields. The part number can be found on the title page of the book or at the top of the document, and is usually a seven or nine digit number. For example, the part number of these Identity Synchronization for Windows Version 1.0 SP1 Release Notes is 817-6262.
Additional Sun Resources
Useful Sun ONE information can be found at the following Internet locations:
- Documentation for Sun ONE Identity Synchronization for Windows
http://docs.sun.com/coll/S1_IdSyncForWin_1.0 - Sun ONE Documentation
http://docs.sun.com/prod/sunone - Sun ONE Professional Services
http://www.sun.com/service/sunps/sunone - Sun ONE Software Products and Service
http://www.sun.com/software - Sun ONE Software Support Services
http://www.sun.com/service/sunone/software - Sun ONE Support and Knowledge Base
http://www.sun.com/service/support/software - Sun Support and Training Services
http://training.sun.com - Sun ONE Consulting and Professional Services
http://www.sun.com/service/sunps/sunone - Sun ONE Developer Information
http://sunonedev.sun.com - Sun Developer Support Services
http://www.sun.com/developers/support - Sun ONE Software Training
http://www.sun.com/software/training - Sun Software Data Sheets
http://wwws.sun.com/software
Copyright © 2003-2004 Sun Microsystems, Inc. All rights reserved.
Sun Microsystems, Inc. has intellectual property rights relating to technology embodied in the product that is described in this document. In particular, and without limitation, these intellectual property rights may include one or more of the U.S. patents listed at http://www.sun.com/patents and one or more additional patents or pending patent applications in the U.S. and in other countries.
SUN PROPRIETARY/CONFIDENTIAL.
U.S. Government Rights - Commercial software. Government users are subject to the Sun Microsystems, Inc. standard license agreement and applicable provisions of the FAR and its supplements.
Use is subject to license terms.
This distribution may include materials developed by third parties.
Portions may be derived from Berkeley BSD systems, licensed from U. of CA.
Sun, Sun Microsystems, the Sun logo, Java and Solaris are trademarks or registered trademarks of Sun Microsystems, Inc. in the U.S. and other countries. All SPARC trademarks are used under license and are trademarks or registered trademarks of SPARC International, Inc. in the U.S. and other countries.
Copyright © 2003-2004 Sun Microsystems, Inc. Tous droits réservés.
Sun Microsystems, Inc. détient les droits de propriété intellectuels relatifs à la technologie incorporée dans le produit qui est décrit dans ce document. En particulier, et ce sans limitation, ces droits de propriété intellectuelle peuvent inclure un ou plus des brevets américains listés à l'adresse http://www.sun.com/patents et un ou les brevets supplémentaires ou les applications de brevet en attente aux Etats - Unis et dans les autres pays.
Propriété de SUN/CONFIDENTIEL.
L'utilisation est soumise aux termes du contrat de licence.
Cette distribution peut comprendre des composants développés par des tierces parties.
Des parties de ce produit pourront être dérivées des systèmes Berkeley BSD licenciés par l'Université de Californie.
Sun, Sun Microsystems, le logo Sun, Java et Solaris sont des marques de fabrique ou des marques déposées de Sun Microsystems, Inc. aux Etats-Unis et dans d'autres pays.
Toutes les marques SPARC sont utilisées sous licence et sont des marques de fabrique ou des marques déposées de SPARC International, Inc. aux Etats-Unis et dans d'autres pays.