Chapter 3 Application Notes for Special Circumstances
The chapter explains how to deploy Sun Java System Connector for Microsoft Outlook under certain special circumstances or network configurations.
“Push” Method Deployment, If End Users Lack Installation Privileges
The Deployment Configuration Program lets an administrator create installation packages that end users can run to install and configure their own local desktop copies of the Connector for Microsoft Outlook software. Software installation, however, requires access privileges that often are disallowed to many or most end users. Most enterprises therefore implement a “push” method for software distribution from the system administrator to user desktops that bypasses the requirement for user access privileges. If your network serves “locked-down” Windows environments where end users cannot install software, we strongly recommend this sort of automated configuration management as a way to avoid many individual desktop visits.
This section describes a “push” method for distributing the Sun Java System Connector for Microsoft Outlook to user desktops using Microsoft's SMS administration tools. Remember that the Deployment Configuration program can prepare desktop installation packages that both install the Connector for Microsoft Outlook software and convert existing Outlook profiles and data files for use with the new software. If your users had sufficient administrator privileges to install new software on their own desktops, you could prepare a single installation package that would perform both the installation and conversion functions in a single pass. But if the user who runs the installation package lacks the administrator privileges to install software, then the installation portion of the package would be unable to run and the conversion would fail.
When users cannot install their own software, we have to separate those two tasks so that the installation function can be facilitated separately by an SMS installation package. The SMS installation package can then be run on each user desktop by a local SMS account that has full administrator rights, and is therefore authorized to install new software on the local desktop. After the necessary software for the Connector for Microsoft Outlook has been installed, we use the Deployment Configuration Program to prepare a second installation package to convert any existing Outlook profiles and data files for use with the new Connector for Microsoft Outlook.
The conversion functions will convert any existing Outlook profiles and data files associated with the specific user who is running the desktop installation program. But the SMS account that will run the first installation package is a generic account, with administrator privileges so that it can install software, but not associated with any particular user. The installation tasks and conversion tasks must therefore be performed by two separate installation packages, because the generic SMS account necessary to physically install the software lacks the user specificity necessary to convert a user’s existing profile and data files.
A typical SMS “push” scenario consists of the five steps detailed below.
 To Deploy the Push Method
-
Prepare the necessary shared folders.
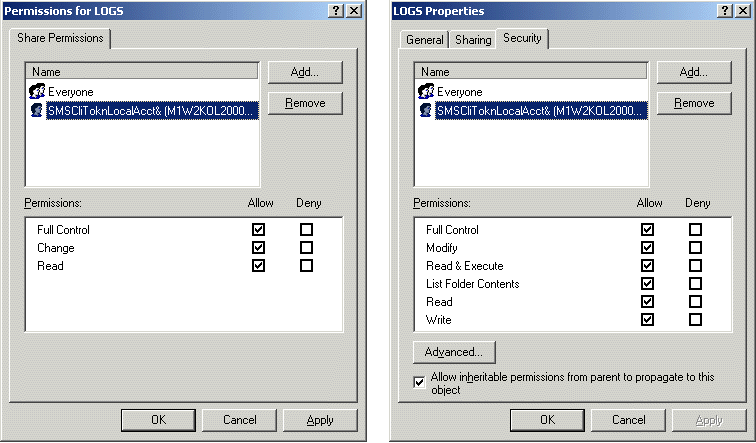
Create three new shared directories, named LOGS, SJSC, and WPW, on a computer that is part of the same SMS site as the end-user desktops. The nature of Windows NT local accounts requires that you assign full control share permissions for all three folders for the SMSCliToknLocalAcct$ account, as shown in the Permissions window (left) in Figure 3–1 below.
These assignments will provide the necessary read/write access to these directories for the SMS local account (which requires a password), and lets you avoid having to open the system to guest access. Also, assign full control permissions for all three of the NTFS folders to SMSCliToknLocalAcct$, as shown for the LOGS folder in the Properties window (right) in Figure 3–1.
Figure 3–1 Permission Settings (left) and Properties (right) for the LOGS Shared Folder

-
Prepare an installation package to install the necessary software.
Use the Sun Java System Connector Deployment Configuration program ( Admin.exe) to create an installation package that will only install the necessary software to each user's desktop, but not convert existing Outlook profiles and data files. The Admin.exe program is described inChapter 2, Configuring End-User Packages, but note these special requirements, on the Processes tab, for preparing this package for SMS distribution:
-
Be sure the User mode is set to Silent.
-
Be sure to uncheck the option to Create/convert/upgrade user profile.
-
Use UNC paths (\servername\sharename) for all three of the path fields.
-
-
Push the first installation package to user desktops via an SMS installation package.
Use Microsoft's SMS Packaging Wizard to prepare an installation package that will contain the Sun Java System Connector installation package you created in step 2, and then “push” the package to run automatically on user desktops— without any user initiative or interaction.
-
Launch the SMS 2.0 Management console. Right-click on the collection to which you want to push the Connector for Microsoft Outlook, and click Distribute Software. SMS then launches its Distribute Software Wizard.
-
On the Distribute Software Wizard’s Welcome screen: Click Next to begin.
-
On the Package screen: Click the option to Create a new package and program, and click Next.
-
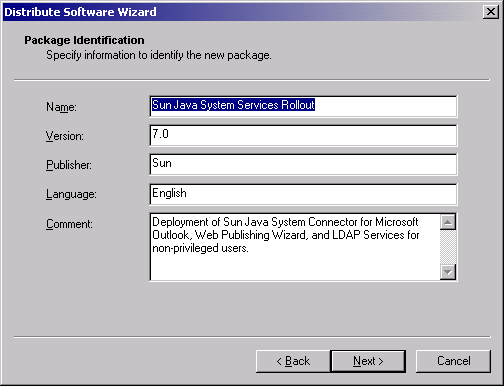
On the Package Identification screen: Enter the appropriate values as shown in Figure 3–2, and click Next.
Figure 3–2 SMS Distribute Software Wizard: Package Identification

-
On the Source Files screen: Select Create a compressed version of this source, and click Next.
-
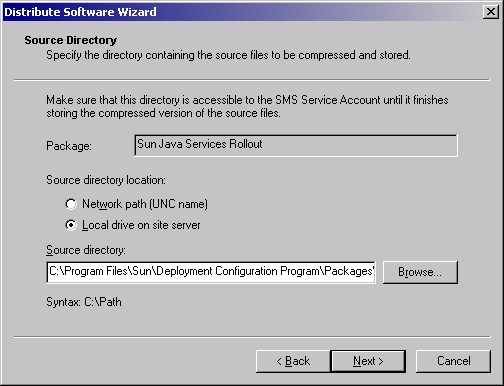
On the Source Directory screen: Click the Browse button to locate and specify the directory where the Connector for Microsoft Outlook installation package was created, as shown in Figure 3–3. The path specification can be either local or UNC. When you have specified the correct path, click Next.
Figure 3–3 SMS Distribute Software Wizard: Source Directory Screen

-
On the Program Identification screen: Click the Browse button to locate and specify the name of the program .exe file for the Command line, and click Next.
-
On the Program Properties screen: Make sure the program will Run with administrative rights, and click Next.
-
Specify whether and how you want to advertise the program on the next five screens, titled: Advertise a Program, Advertisement Target, Advertisement Name, Advertise to Sub collections, and Advertisement Schedule. As you enter your choices, click Next to advance to each next screen.
-
On the Assign Program screen: Select Yes to assign the program, specify the date and time of assignment, and click Next.
-
On the Completing... screen: Review your settings for the creation of this installation package. You may use the Back button to go back and change any settings now, before you actually create the package. When the settings appear as you want them, click Finish to create the package, which will then be pushed to user desktops according to the Assignment and other parameters you have specified in this Wizard.
A user’s Advertised Programs Monitor will report the package as shown in Figure 3–4.
Figure 3–4 A User’s Advertised Programs Monitor

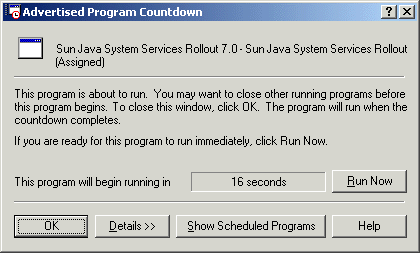
In any case, every user will be alerted to the imminent run of the package by a Countdown dialog box, as shown in Figure 3–5.
Figure 3–5 A User’s Countdown Dialog Box

Because the desktop installation program (desktop.exe) will be run by the SMS administrator program, as a local user, access to network shares will require a password, even if the shares are made available to the group “everyone.” If the network denies access to log directories and install directories during a user run of the installation package, enable guest access on the computer hosting the log files and installation media, to allow the local account from one system to access the data from another system.
-
-
Prepare a second installation package to convert existing Outlook profiles and data files.
Use the Sun Java System Deployment Configuration program (Admin.exe) to create a second installation package for the Connector for Microsoft Outlook— this time to only convert any existing Outlook profiles and data files for use with the new Connector for Microsoft Outlook software. The Admin.exe program is described in Chapter 2, Configuring End-User Packages, but note these special requirements in the Processes tab for preparing this package:
-
Push the second installation package to user desktops via an SMS installation package.
Use Microsoft's SMS Packaging Wizard to prepare another SMS installation package—this one to contain the Sun Java System installation package you created in step 4. Use the same settings you used in step 3 above to prepare the first SMS installation package, except for these differences on the Program Properties screen:
-
Program can run: Select the option Only when a user is logged on.
-
Mark the User input required option, and be sure that Run with administrative rights is unmarked.
This final SMS package will require some user interaction, to reply to password prompts, but will not require administrator privileges since this package does not install any new software to the desktop. The passwords will authorize the conversion program’s access to password-protected Outlook Personal Folders (.pst) files.
Alternatively, this step 5 can be accomplished by running the installation package from the command line, with an SMS script, as explained below under Command-Line Switches for the User Installation Package
-
Command-Line Switches for the User Installation Package
Step 5 of the “push” method described above (see “Push” Method Deployment, If End Users Lack Installation Privileges) can also be accomplished by running the installation package from an SMS script, with command-line switches to pass the necessary user passwords to the conversion program as it runs. This would make possible a truly silent installation and configuration, requiring no user interaction whatsoever.
For example, you might create an SMS package that runs a conversion package, and have the SMS services issue the following commands when it is run:
DT_Package.exe
    /USERNAME=bcarpenter
    /FULLNAME="Burns Carpenter"
    /EMAILADDRESS="burns.carpenter@florizel.com"
    /DN="uid=bcarpenter,ou=people,o=florizel.com,o=florizel.com"
|
Note –
This and other command-line samples are formatted here for ease of reading, but all of the switches must be typed in one continuous string— which is likely to wrap to multiple lines of its own accord.
You could then substitute environment variables for the users (assuming that the NT usernames and the Sun usernames match):
DT_Package.exe
    /USERNAME=%username%
    /FULLNAME="Change This"
    /EMAILADDRESS=%username%@florizel.com
    /DN=uid=%username%,ou=people,o=florizel.com,o=florizel.com
|
This command-line approach would permit a silent (or minimally interactive) installation from SMS, which would probably generate far fewer Help desk calls than asking users to click a link in an email and requiring users to enter data.
The installation package will support these command-line switches:
-
/USERNAME=xxx, where xxx is the username on the Sun servers.
-
/FULLNAME=xxx, where xxx is the display name of the user.
-
/EMAILADDRESS=xxx, where xxx is the email address of the user.
-
/DN=xxx, where xxx is the user DN on the Sun servers.
-
/NEWPROFILENAME=xxx, where xxx is the name of the created profile.
-
/SAVEPASSWORD=n, where n = 1 (save) or 0 (don't save).
-
/ALTPSTDIR=dir, where dir is the directory where the local cache is created. If this switch is not present, the default value is Documents and Settings\%username%\Local Settings\Application Data\Sun\Outlook Connector
These switches will be useful if you are converting an Exchange profile:
-
/OLDDOMAIN=xxx, where xxx is the Exchange domain
-
/OLDUSERNAME=xxx, where xxx is the Exchange user name
Migrating Terminal Service Users from Exchange to the Sun Java System
The Connector for Microsoft Outlook administrator’s tools can also be used to migrate existing Outlook users of Windows terminal service from Exchange to a Sun Java System server. The method described below assumes the following environment:
-
Windows 2000 Server with Terminal Services.
-
Office 2000 installed with Terminal Services install file from Office 2000 Resource Kit CD (ORK) onto the Windows server.
-
Outlook 2000 configured as the default mail client.
 To Migrate Terminal Service Users from Exchange to Sun Java System
-
Prepare the server.
Log onto the server's local console as an administrator, and configure Outlook to be the default mail client (if it is not already). Then install Web Publishing Wizard and the Connector for Microsoft Outlook.
-
Create an appropriate desktop installation package.
Use the Deployment Configuration Program to create a desktop package that does not install any services, but simply converts profiles from Exchange to Sun Java System services. (If the user has been in a non-Exchange environment, there will be no profile to convert, so you must configure the desktop package to create a new Sun Java System profile instead.)
-
Update the user's desktop.
Log on to a terminal session as a regular user, and run the desktop installation package that you created in step 2 above— that only converts or creates a user profile, but does not attempt to install or update any services. Then open Outlook and verify that the conversion is complete.
Designating Outlook as the Default Client
Sun Java System Connector for Microsoft Outlook can be installed only at workstations where Microsoft Outlook is set to be the default email client. If Outlook is not set as a user’s default email client, the Setup Wizard will not install the software, and will prompt the user to correct the problem and run the Setup Wizard again.
 To Designate Microsoft Outlook as a User's Default Email Client
-
Open the Windows Control Panel. If you are running Windows XP (only): Select “Switch to Classic View.”
-
Double-click on Internet Options.
-
Select the Programs tab from the Internet Properties window.
-
Select Microsoft Outlook from the E-mail pull-down menu.
-
Click OK.
Removing Sun Java System Synchronization
The MAPI services for the Connector for Microsoft Outlook are a required component of the Connector installation, but cannot coexist with the Sun Java System Synchronization program (previously known as the Sun ONE Sync program). If one of these Sun synchronization programs is installed on a user’s workstation, the Setup Wizard will notify the user of the problem (in an error message after the Welcome screen), and prompt him or her to acknowledge the notice and exit the program. The user may then rerun the Setup Wizard after the synchronization program has been removed.
 To Remove a Synchronization Program from a User's Workstation
-
From the Start menu: Select the Uninstall... option for the program you want to uninstall. Choose one of:
-
Programs-> Sun Java System Synchronization->Uninstall Sun Java System Synchronization
-
Programs-> Sun ONE Synchronization->Uninstall Sun ONE Synchronization
-
-
In the Uninstallation window: Follow the prompts to uninstall the software.
-
Click Finish to complete the uninstallation process.
To synchronize a Palm device, WinCE device or Pocket PC device with Outlook, we strongly recommend that users use the sync software distributed with their devices, rather than the Sun synchronization software. Changing to the sync software distributed with a device may require uninstalling and reinstalling the Palm Desktop software.
If a user wants to continue using the Sun synchronization software to sync to the data of the other device, he or she can reinstall the software, but not select the checkbox for the Microsoft Outlook 98/2000 translator during the installation.
Undoing (Reversing) a User’s Migration
To abandon a user’s connection to the new Sun Java System server and restore the user’s mailbox to service with the old Exchange server:
 To Reverse a User's Migration
-
Delete the profile “Xxx (old).”
-
Copy the profile “Xxx” to “ Xxx Sun“— or some other name, like “ Xxx (new) ,” etc.
-
Delete the profile “Xxx.”
-
Copy the profile “Xxx (Backup)“ to “ Xxx.”
-
Delete the profile “Xxx (Backup).”
-
Determine where the .pst's are located by viewing Properties on the profile.
There is no standard location for .pst files, so the only reliable way to find them is to open the profile (now named “ Xxx”) and, for each .pst service, click on Properties and note the path.
-
For each pst file: Rename Yyy.pst to Yyy.new , and rename Yyy.bak to Yyy.pst.
-
Determine where the .pab's are located by viewing Properties on the profile.
There is no standard location for .pab files, so the only reliable way to find them is to open the profile (now named “ Xxx”) and, for each .pab service, click on Properties and note the path.
-
For each pab file: Rename Zzz.pab to Zzz.new , and rename Zzz.bak to Zzz.pab.
The Yyy.bak and Zzz.bak files will be in the same directory.
To remove the Sun Java System profile and leave the Exchange profile resident on the system, skip step 2 (and combine steps 1 and 3).
- © 2010, Oracle Corporation and/or its affiliates
