 To Make Configuration Changes for Authentication Mode
-
Navigate to glassfish-dir\domains\domain1\applications\j2ee-modules\webspace\WEB-INF\classes folder on the machine on which Web Space Server is installed, and open the portal-ext.properties file using any text editor. The portal-ext.properties file contains the following lines:
login.events.post=com.liferay.portal.events.LoginPostAction,com.liferay.portal.events.DefaultLandingPageAction
#login.events.post=com.liferay.portal.events.LoginPostAction,com.liferay.portal.events.DefaultLandingPageAction,
com.sun.portal.events.CallUserLoginAction
Comment the first line, and uncomment the second line. The changed contents of the portal-ext.properties file look as follows:
#login.events.post=com.liferay.portal.events.LoginPostAction,com.liferay.portal.events.DefaultLandingPageAction
login.events.post=com.liferay.portal.events.LoginPostAction,com.liferay.portal.events.DefaultLandingPageAction,
com.sun.portal.events.CallUserLoginAction
Save the portal-ext.properties file.
-
Restart GlassFish.
-
On the machine on which call-registrar is deployed on SailFin, navigate to webspace-dir/webspace/call-registrar/distribution/deploy/call-registrar/WEB-INF folder. Open the sip.xml file, and uncomment the following lines:
<!-- <security-constraint> <display-name>UserConstraint</display-name> <resource-collection> <servlet-name>RegistrarServlet</servlet-name> <sip-method>REGISTER</sip-method> </resource-collection> <auth-constraint> <description>authentication-configuration</description> <role-name>1234</role-name> </auth-constraint> </security-constraint> <login-config> <auth-method>DIGEST</auth-method> <realm-name>PortalRealm</realm-name> </login-config> <security-role> <description/> <role-name>1234</role-name> </security-role> --> -
Open the sun-sip.xml file, and uncomment the following lines.
<!-- <security-role-mapping> <role-name>1234</role-name> <group-name>1234</group-name> </security-role-mapping> --> -
Login to Sailfin admin console.
-
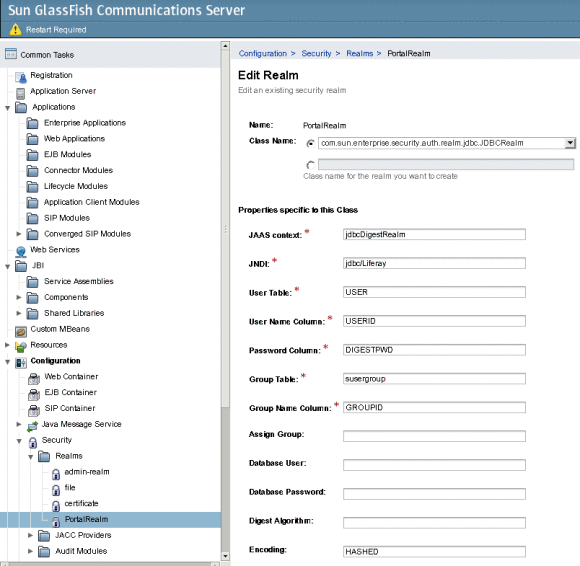
Navigate to Configuration -> Security -> Realms, and create PortalRealm.
Figure 3–1 Creating PortalRealm

You need to select com.sun.enterprise.security.auth.realm.jdbc.JDBCRealm as the Class Name. In the Properties specific to this Class, Encoding need to be set to HASHED.
-
Save the changes.
-
Create a JDBC connection pool. To create the JDBC connection pool, navigate to Resources -> JDBC -> Connection Pools, and click New.
You are prompted to create a new JDBC connection pool.
-
Select Javax.sql.DataSource as the Resource Type, and MySQL as the Database Vendor. Specify a name for the connection pool, and click Next.
For example, we are creating a connection pool named webspace.
-
Click Finish to complete creating the new JDBC connection pool.
-
Select the JDBC connection pool, and navigate to the Additional Properties tab.
Add properties with the following values, and remove all the remaining properties:
Property Name
Vaule
Description
User
root
Database username
Port
3306
MySQL port
Url
jdbc:mysql://machine ip address/lportal
IP address of the machine on which the portal is running
Password
abc123
Database password
-
Save the changes.
-
Navigate to the General tab, and click the Ping button to test the connection.
-
Navigate to Resources -> JDBC -> JDBC Resources, and click New to create a new jdbc resource.
Figure 3–2 Creating a JDBC Resource

-
Specify a JNDI Name, and select a Pool Name.
In the earlier example, a connection pool named webspace is created. You can select that connection pool.
-
Click OK to create the JDBC resource.
-
Navigate to the General tab, and click the Ping button to test the connection.
-
Login to MySQL, and type grant all privileges on *.* to root@machine-name identified 'abc123'; in the command prompt, where root is the database username, and abc123 is the password.
-
Restart GlassFish and Sailfin. Now the X-Lite client requires password authentication.
-
Configure the X-Lite client using the steps in To Configure X-Lite for a Web Space Server User.
- © 2010, Oracle Corporation and/or its affiliates
