|
|
| Sun ONE Integration Server, Secure Trading Agent 1.0 Tutorial |
Secure Trading Agent TutorialThis tutorial is part of the documentation set for Sun™ Open Net Environment (Sun ONE) Integration Server, Secure Trading Agent. The tutorial provides a quick introduction to Secure Trading Agent. After you complete this tutorial you will be able to do the following:
- Create an ebXML agreement using the ebXML Agreement Editor
- Exchange "proposed" agreements with a trading partner to arrive at an "agreed" agreement
- Deploy ebXML agreements using the ebXML Communications Center
- Send and receive ebXML messages, based on the agreement you create
- Close a conversation and take an agreement out of service
- Create and deploy an agreement that specifies secure transport for messages
Tutorial Overview
The tutorial illustrates how one trading partner (Secure Trader) creates an ebXML agreement and then negotiates the details with another trading partner (ebXML Partner). Both trading partners then deploy the agreement and exchange messages.
You should allow about two hours to complete this tutorial.
You must be a Secure Trading Agent administrator to run this tutorial.
About Agreements
An ebXML agreement contains a sequence of actions that model a business process between two trading partners. The sequence of actions outlined in the agreement represent a conversation. When the actions have been completed in sequence, the conversation is completed. A conversation can be executed multiple times during the lifetime of the agreement. Additionally, multiple conversations specified in an agreement can occur concurrently.
Actions in an ebXML agreement represent messages sent from one partner to the other, typically with attached business documents. Actions always occur as SendAction/ReceiveAction pairs between the partners. This means that if the agreement defines a SendAction for Partner A, then it must also define a corresponding ReceiveAction for Partner B.
HelloEbXML
This tutorial executes a trivial "HelloEbxml" process that illustrates the essential parts of an ebXML agreement and how to use Secure Trading Agent to exchange messages based on the agreement.
In this process, the Secure Trader party sends a text document (HelloQuery.text) to the ebXML Partner party. ebXML Partner responds by sending a text document (HelloResponse.text) to Secure Trader.
Tutorial Requirements
To perform the ebXML message exchange outlined in this tutorial, you must install Secure Trading Agent on two separate servers, one to represent Secure Trader and the other to represent ebXML Partner.
This tutorial assumes that you have successfully installed Secure Trading Agent on two servers according to the instructions in the Secure Trading Agent Installation Guide. It also assumes that you have used the ebregister command to register and verify your installation, as explained in the Secure Trading Agent Installation Guide.
The tutorial uses the server winterpark to represent the trading partner Secure Trader and the server artlu to represent the trading partner ebXML Partner. When performing the procedures in the tutorial, substitute the names of the servers on your system.
The text files representing the "business documents" HelloQuery.text and HelloResponse.text are provided with your installation at the following location:
<InstallDirectory>/docs/manuals/tutorial
InstallDirectory refers to the root directory of your Secure Trading Agent installation. The default location is:
/opt/SUNWebXML/S1ISSTA (Solaris)
C:\Sun\S1ISSTA (Windows platforms)
Remember to use the Back button provided in the application interface and not your browser's Back button.
Note If the tutorial instructs you to use a Back button, use the Back button provided by the application and not the Browser's Back button.
Lesson One, Create an ebXML Agreement
In this lesson, you learn how to use the ebXML Agreement Editor to create an agreement. Before you create the agreement, you must first identify yourself as a local party to your Secure Trading Agent installation.
Local Parties and Other Parties
An ebXML agreement is between two trading partners, known as parties in the agreement. Before you can create an agreement, and later deploy the agreement, each party must identify themselves to their installation of Secure Trading Agent as the local party to the agreement. Secure Trading Agent cannot determine from the agreement itself who is the local party. Each Secure Trading Agent installation needs this information before you create and later deploy an agreement so it can determine which actions belong to you (the local party) and which actions belong to the other party.
In the following procedure, the Secure Trader partner identifies itself as a local party on the server winterpark.
To add yourself as local party to your Secure Trading Agent installation
- Open the Sun Management Center on the server winterpark by navigating to the following URL:
https://winterpark:6789
- Enter the administrator Id and password to log on to the Sun Management Center.
The administrator Id is the user name you used during the installation of Secure Trading Agent. The password is the system password for that user.
- From the Sun Management Center, select the Secure Trading Agent Communications Center.
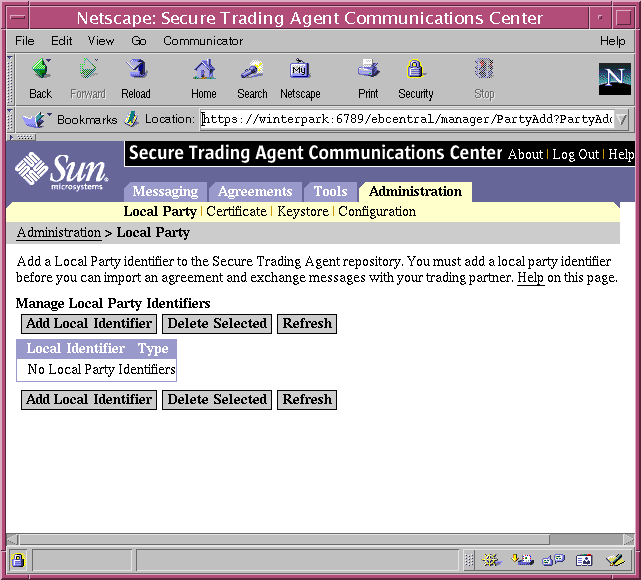
- Select Local Party from the Administration tab.
Figure 1 Communications Center, Local Party Ids
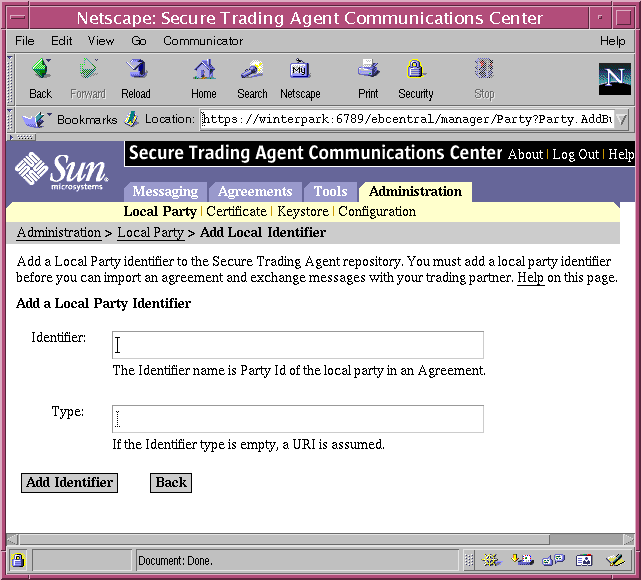
- Select Add Local Identifier.
Figure 2 Communications Center, Adding a Local Party Id
- Specify the following to add the local party Id.
- Type the following in the Identifier text field:
SecureTrader
This is the party Id you will use for the Secure Trader party when you later create the agreement.
- Leave the type field blank.
- Select Add Identifier.
- Select Back to return to the Local Party page and view the newly added local party Id.
You can now begin creating the HelloEbxml agreement.
To create a new agreement
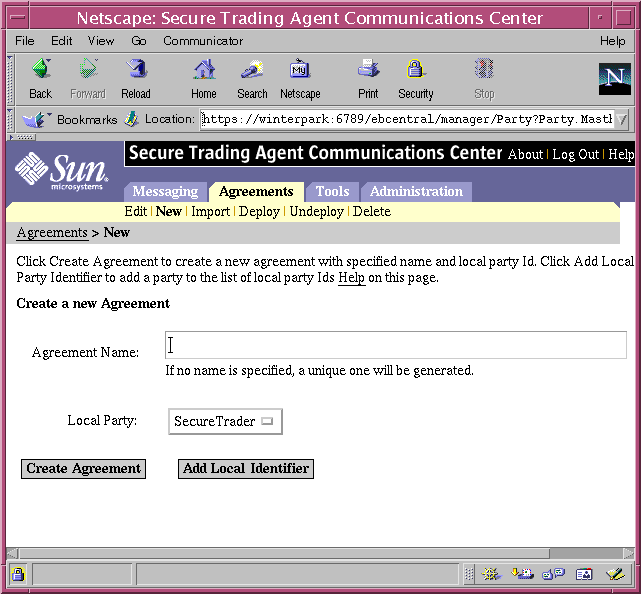
- From the Agreements tab of the Communications Center, select New.
Figure 3 Communications Center, Create New Agreement
- Specify an Agreement name and a Local Party Id as follows:
- Specify HelloEbxmlCPA for the agreement name.
- Select SecureTrader from the Local Party Id droplist.
- Select Create Agreement to create the new agreement.
- From the Agreements tab, select Edit.
The Communications Center displays the newly created HelloEbxmlCPA agreement in the list of agreements.
Figure 4 Communications Center, Agreements List
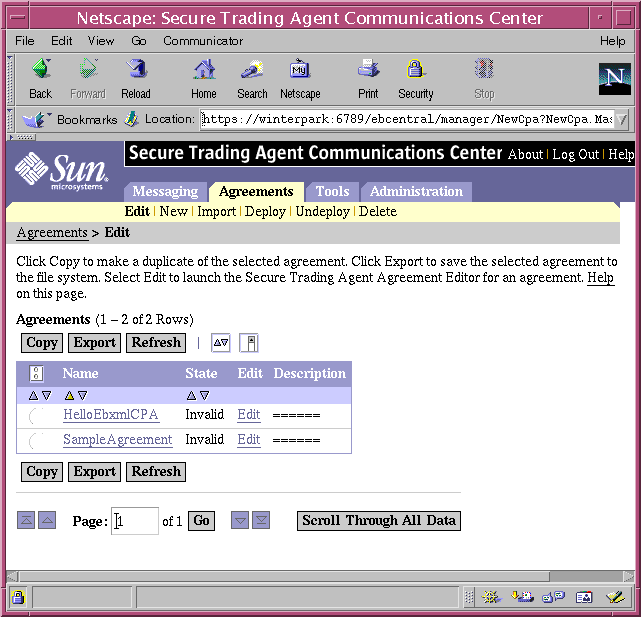
- In the Agreements list, select Edit for the HelloEbxmlCPA agreement to launch the Agreement Editor.
Figure 5 Agreement Editor, Agreement Information
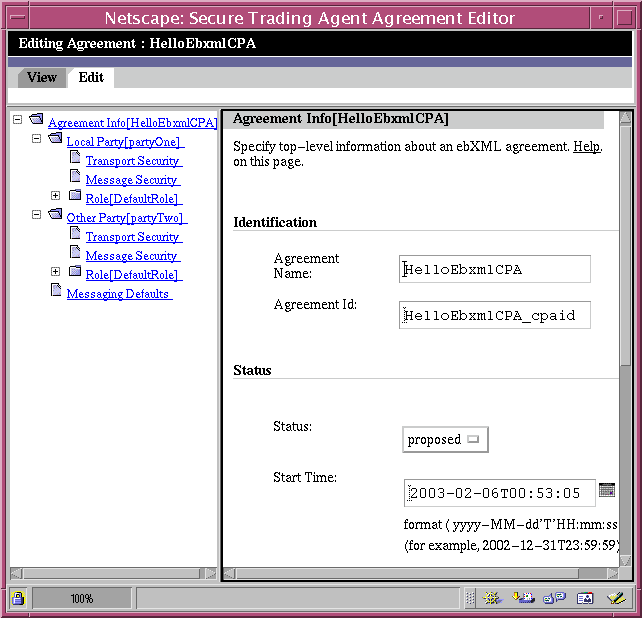
- In the Agreement Info page, make the following edits:
- Leave the Agreement Name and Id as generated by the Agreement Editor. Agreement Ids should be globally unique. The Agreement Name is an alias for the Agreement Id that your installation of Secure Trading Agent uses to identify the agreement.
- Leave the status as "proposed." Later, both you and your trading partner change this to "agreed."
- The Start and End time define how long the agreement is valid. Accept the default values, which is one year.
- Type Send and receive text documents into the Comment field. The Communications Center displays this description when listing the agreement.
- Select Save to preserve your edits.
When using the Agreement Editor, if you switch editing pages in the editor and have not selected Save, you lose your edits.
The following procedure shows how to continue editing the agreement to provide local party information and specify actions.
To provide local party information and specify actions to an agreement
- While still in the Agreement Editor, select LocalParty from the Agreements tree in the left frame.
The Agreements tree provides a quick way to navigate through the editing pages for the agreement.
Figure 6 Agreement Editor, Local Party Information
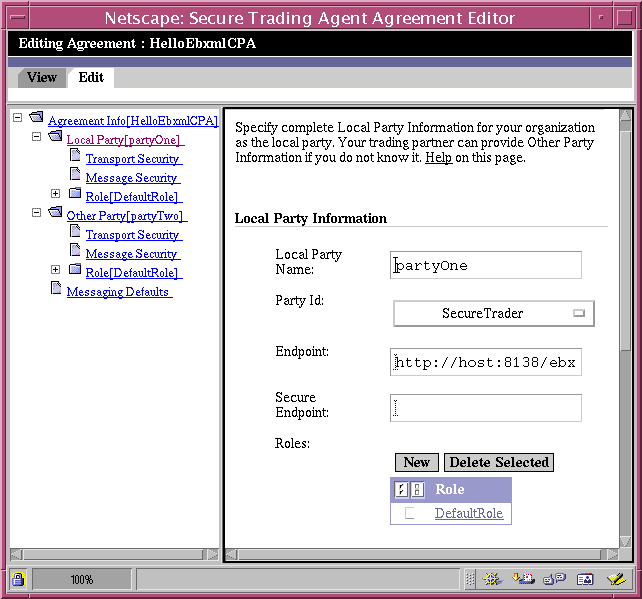
- Edit the Local Party Information fields as described below:
- Specify Secure Trader for the Local Party Name.
- The Party Id should be SecureTrader, which is the local Party Id you previously specified.
- In the Endpoint text field, replace "host" with the name of your server. For the Secure Trader party, this tutorial is using the following endpoint:
http://winterpark:8138/ebxml/msh
- Leave the Secure Endpoint text field blank.
- Select Save.
Do not edit the Other Party Information. The agreement will later be sent to your trading partner to fill out these fields.
- In the table listing Roles, select the name DefaultRole (or expand the Agreements Tree and select DefaultRole for the local party).
The editor displays the Default Role page.
Figure 7 Agreement Editor, Editing Roles

- Rename DefaultRole to Administrator and select Save.
The role name "Administrator" is arbitrary—it can be any name you like. Although the Agreement Editor allows you to specify role names, this release does not enforce agreement roles. Any Secure Trading Agent user can perform actions assigned to any agreement role.
- In the table listing Send Actions, select the name for the default Send Action (or expand the Agreements Tree and select the default SendAction for the local party).
The editor displays the Send Action editing page.
Figure 8 Agreement Editor, Editing Actions
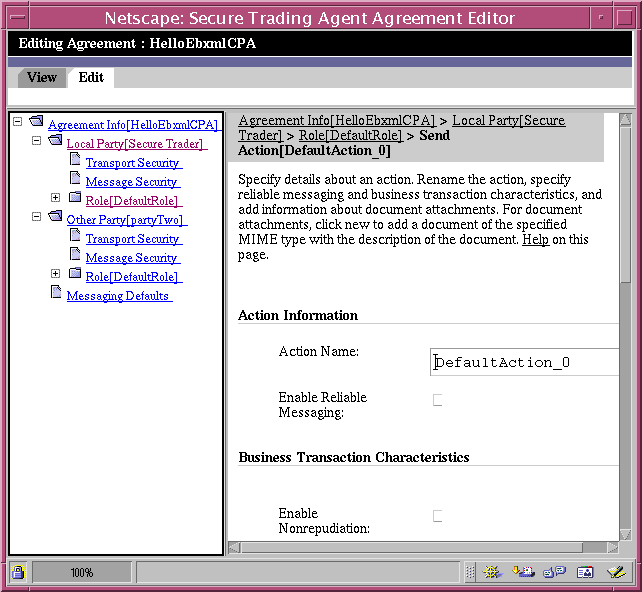
- Edit the Action Information as follows:
- Rename the action to HelloQuery.
- Leave the default values for Business Transaction Characteristics.
- Select text from the Specify Document Types list, specify Text query document in the Description field, then select Add.
This specifies that the message will have a single document attachment of MIME type text/plain.
- Select Save.
When you create a SendAction, the Agreement Editor automatically generates the corresponding ReceiveAction for the other party. Using the Agreements Tree, navigate to the Receive Action for the other party and verify that the action name and text document attachment specifications are the same.
- In the Agreements Tree in the left frame, return to the Local Party Role node and select the default ReceiveAction (available under the Role node).
The editor displays the Receive Action editing page, which is similar to Figure 8.
- Edit the Action Information as follows:
- Rename the action to HelloResponse.
- Leave the default values for Business Transaction Characteristics.
- Select text from the Available Document Types list, specify Text response document in the Description field, then select Add.
This specifies that the message will have a single document attachment of MIME type text/plain.
- Select Save.
This creates a corresponding SendAction for the other party, indicating that the other party will send you a text document. You can now close the Agreement Editor.
You have now completed a proposed agreement as the local party. The next lesson shows how to send the agreement to the other party to complete the agreement, and mark it as Agreed.
Lesson Two, Negotiate the Agreement
In this lesson, you learn how to export the agreement to the file system and send it to your trading partner so the partner can supply its local information. Your trading partner, ebXML Partner, imports the agreement, provides the relevant information, and then saves the agreement with Agreed status.
During negotiation, you send the agreement to your trading partner. After negotiation is complete, the trading partner returns the agreement to you. This tutorial assumes that the trading partners use FTP to send agreements to each other. However, use whatever file transfer system is appropriate for your setup.
To export an agreement to the file system
- Select Edit from the Agreements tab in the Communications Center.
- In the Agreements List, select the radio button for the HelloEbxmlCPA agreement, then select Export.
The Communications Center prompts you for a location to save the document.
- Navigate to a location on your file system to save the file.
The agreement is saved as an XML file on your system.
At this point, you can use FTP to send the agreement to your partner, Ebxml Partner. Ebxml Partner then imports the agreement into the Agreement Editor.
The following procedures in this section should be done from the perspective of the Ebxml Partner using the installation of Secure Trading Agent on their server. As Ebxml Partner, you provide your local information to the agreement and mark it as Agreed. Before you can import the agreement, you must first add the local party Id for Ebxml Partner.
To add a local party Id for the Ebxml Partner party
- In the Ebxml Partner installation of Secure Trading Agent (on artlu in this tutorial), open the Communications Center.
- Select Local Party from the Administration tab, and then select Add Local Identifier.
- Specify EbxmlPartner for the local party Id (leave the Type field blank, as before) and select Add Identifier.
Now you can import the agreement received from the Secure Trader party.
To import an agreement from the file system to the Agreement Editor
- In the Communications Center on artlu, select Import from the Agreements tab.
Figure 9 Communications Center, Importing an Agreement
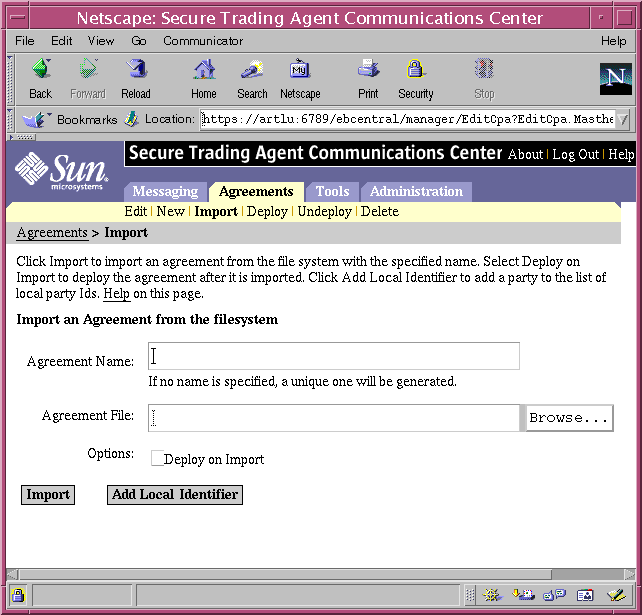
- Specify a name for the agreement and browse to the location of the agreement on your file system.
The name you provide for the agreement must be unique to your Secure Trading Agent installation—it does not have to match the name used by the Secure Trader partner. However, for simplicity, enter the name previously used, HelloEbxmlCPA.
Do not specify Deploy on import. You deploy the agreement later, after you edit the agreement and set its status to "Agreed."
- Select Import to import the agreement.
The Agreement Editor cannot determine which party is the local party so it issues a validation error.
Figure 10 Communications Center, Create New Agreement
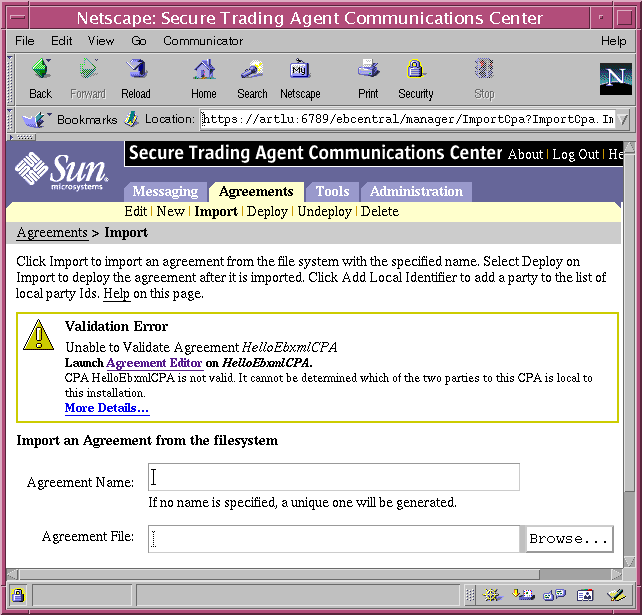
- Click the Launch Agreement Editor link.
The Agreement Editor opens, asking you to specify which of the parties in the agreement is the local party.
Figure 11 Agreement Editor, Selecting the Local Party
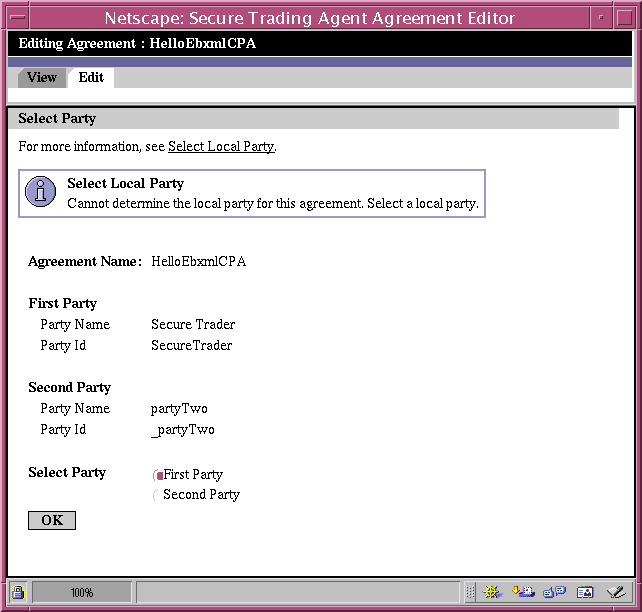
- Select the Second Party as the local party. Then select OK.
You later edit the agreement to specify your own local party Id. The Agreement Editor opens to the Agreement Information page.
- On the Agreement Information page, change the status to "Agreed" and select Save.
- Select the LocalParty from the Agreement Tree and make the following edits in the Local Party Information fields:
- Change the Party Name to Ebxml Partner.
- Change the Party Id to EbxmlPartner, which should be available from the drop list.
- Edit the Endpoint to reflect your server, by changing "host" to the name of your server. For the Ebxml Partner party, this tutorial is using the following endpoint:
http://artlu:8138/ebxml/msh
- Select Save.
- In the Agreement Tree in the left frame, select the DefaultRole for the local party.
- On the Role Information page, rename the Role to Manager and select Save.
The role name here is arbitrary—it can be whatever you like. You can now close the Agreement Editor.
You are now finished providing local information for the EbxmlPartner party. The agreement is negotiated between the two parties and now has a status of Agreed. The next lesson shows you how both partners deploy the agreement.
Lesson Three, Deploy the Agreement
In this lesson you learn how to deploy an agreement. Ebxml Partner now exports the negotiated agreement, which has been changed from proposed to agreed, to the file system. Ebxml Partner then sends a copy of the agreement to the Secure Trader party. Both partners now have identical copies of the agreement which they can deploy.
The Ebxml Partner party uses the Agreement Editor to deploy the agreement. The Secure Trader party deploys the agreement using the Communications Center.
To send the negotiated agreement to your trading partner
- As Ebxml Partner on artlu, in the Communications Center, select Edit from the Agreements tab.
- In the Agreements List, select the radio button for the HelloEbxmlCPA agreement, then select Export.
The Communications Center prompts you for a location to save the document.
- Navigate to a location on your file system to save the file.
The agreement is saved as an XML file on your system.
- Send the agreement to the Secure Trader partner.
Use FTP or whatever file transport system that is convenient for you to send the file to your trading partner.
Now, Ebxml Partner is ready to deploy the agreement.
To deploy an agreement
- As Ebxml Partner on artlu, in the Communications Center, select Deploy from the Agreements tab.
The Communications Center displays a list of undeployed agreements.
Figure 12 Communications Center, Deploying an Agreement
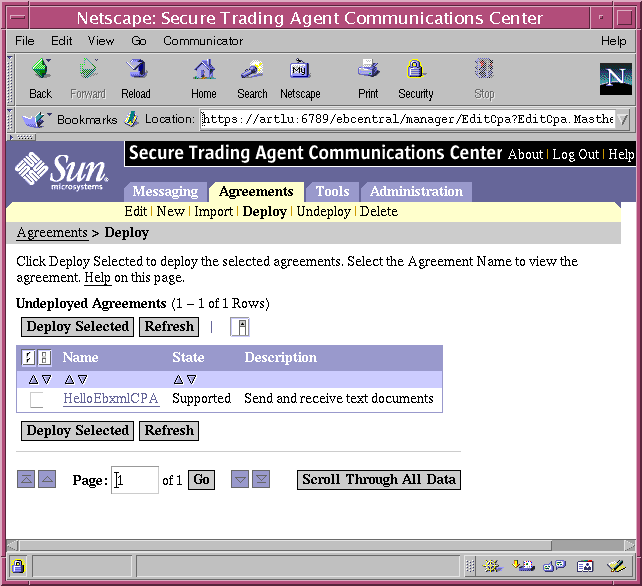
- Select the check box for the HelloEbxmlCPA agreement and then select Deploy Selected.
The agreement is now deployed by Ebxml Partner.
- From the Messaging tab, select Send to view a list of deployed agreements.
The HelloEbxmlCPA agreement appears in the list.
Figure 13 Communications Center, View Deployed Agreements
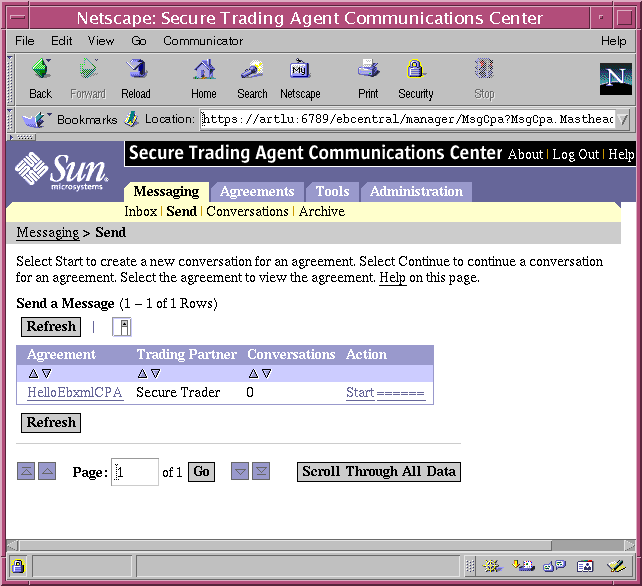
After Secure Trader deploys an identical copy of the agreement, the two parties can exchange messages. The following procedure shows how Secure Trader deploys the agreement using the Communications Center.
To import and deploy an agreement
- As Secure Trader on winterpark, open the Communications Center.
- From the Agreements tab, select Delete.
For this release of Secure Trading Agent, you must delete your previous copy of the agreement (with status Proposed) before you can import the newly created version with Agreed status.
- Select the check box for the HelloEbxmlCPA agreement, select Delete Selected, and then select OK.
You can now import the newer version of the agreement.
- Select Import from the Agreements tab.
- Specify the following on the Import Agreement page.
- For Agreement Name, specify HelloEbxmlCPA as before.
- Select Browse and navigate to the location where you saved the negotiated agreement received from Ebxml Partner.
- Select Deploy on Import.
- Select Import.
The agreement is now deployed for both Ebxml Partner and Secure Trader. The two parties can now begin exchanging messages, as described in the next lesson.
Lesson Four, Send and Receive ebXML Messages
In this lesson, you learn how to send and receive ebXML messages, based on actions defined in the deployed HelloEbxml Agreement. The agreement specifies two actions that make up a conversation. Secure Trader starts the conversation using the first action, HelloQuery, to send a text document to Ebxml Partner. Ebxml Partner continues the conversation using the second action, HelloResponse, to send a text document to Secure Trader.
To start a conversation
- As the Secure Trader party on winterpark, open the Communications Center and select Send from the Messaging tab.
The Communications Center lists deployed agreements that you can use to start a conversation.
Figure 14 Communications Center, Start a Conversation
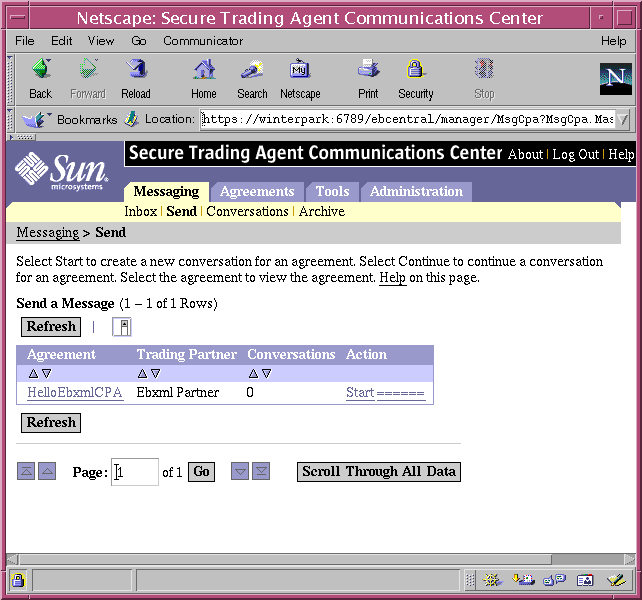
- For the HelloEbxmlCPA in the list of agreements, select Start.
The Communications Center opens the Message Details page, which displays a field for a Conversation Id, a drop list for roles, a text field and Browse button to attach documents, and a table listing required documents for the selected action.
Figure 15 Communications Center, Message Details
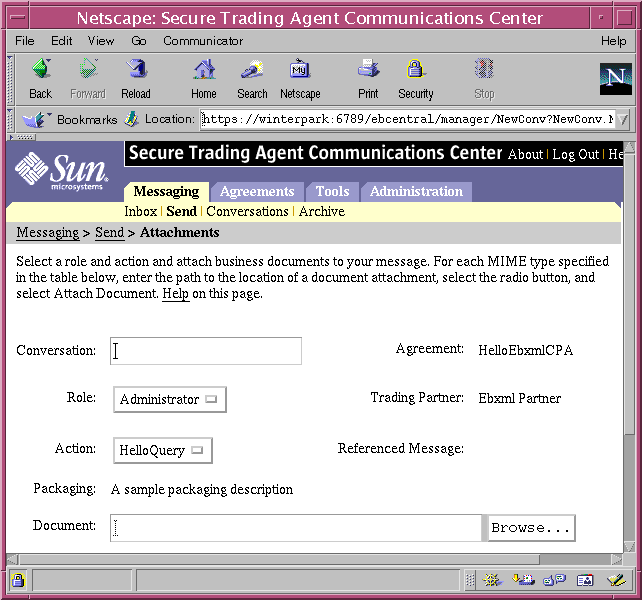
- Specify the following on the Send Message page:
- Specify Hello:001 for the Conversation Id.
- Select Administrator from the Roles list (which should be the only role available).
- Select the HelloQuery action from the Action droplist (which should be the only action available).
- Select Browse and navigate to the HelloQuery.text document in your installation, as described in the section "Tutorial Requirements".
- Note that the radio button for a document of text/plain MIME type is selected, which associates the document specified above with the expected document for the action.
- Select Attach Document to add the specified document.
- Select Send to send the message.
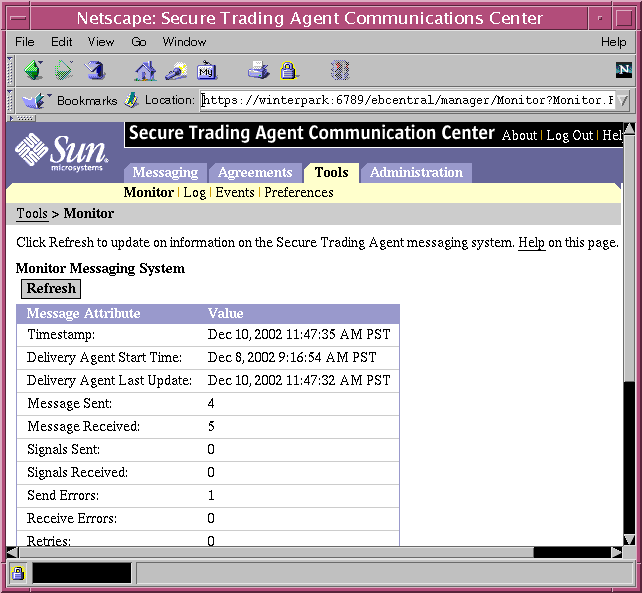
- Select Monitor from the Tools tab to view information from the messaging system to verify that your message was sent.
You may have to wait a few moments and select Refresh from the Monitor page before it displays information about your message.
Figure 16 Communications Center, Monitor the Messaging System
Now that the message has been sent, the Ebxml Partner party can retrieve the message. The following procedure uses the Ebxml Partner's installation of Secure Trading Agent.
To retrieve an ebXML message
- As Ebxml Partner on artlu, open the Communications Center.
If the Inbox page is not displayed, select Inbox from the Messaging tab. This page displays agreements with pending messages.
Figure 17 Communications Center, Pending Messages

- Select the HelloQuery action for the HelloEbxmlCPA agreement.
The Communications Center displays a table that lists all conversations that include this action.
Figure 18 Communications Center, Conversations for an Action
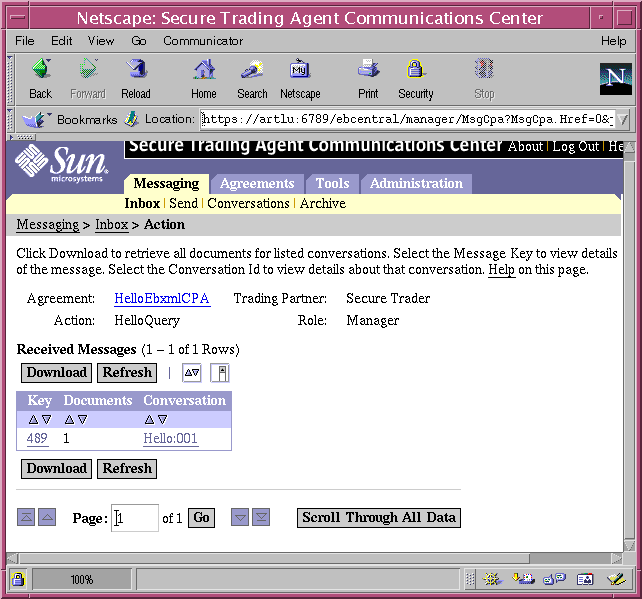
- Select Download to save information about the message, along with attached documents, to your file system.
The message is downloaded in a messages.zip file. When saving the message, you may want to rename the file to a more meaningful name. You can extract the contents of the file to a local directory, and open the message_index.html file. This manifest file displays information about the message with links to attached documents.
This method of downloading retrieves documents and message information for all the messages in the list. As an alternative, you could have done the following to download documents and information for a single message.
- Select the Message Key Id (leftmost column) in the Retrieved Messages list to view information about the message.
- Select Mark Delivered
Marking a message as delivered means the agreement will no longer appear in the list of agreements with pending messages (unless new messages arrive). Select Back to view the Pending Messages page to verify that the agreement is no longer listed.
The Ebxml Partner can now continue the conversation by sending a message for the HelloResponse action, as specified in the agreement.
To continue a conversation
- As Ebxml Partner on artlu, select Conversations from the Messaging tab.
The Communications Center lists active conservations.
Figure 19 Communications Center, Active Conversations
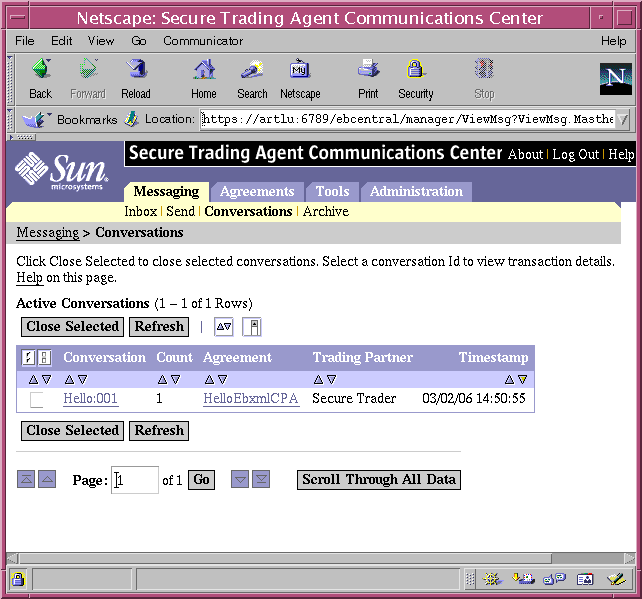
- Select the Conversation Id, Hello:001, for the HelloEbxmlCPA agreement.
This is the Conversation Id you previously specified for the conversation. The Communications Center displays a list of actions that were sent for that conversation.
Figure 20 Communications Center, Conversation Actions
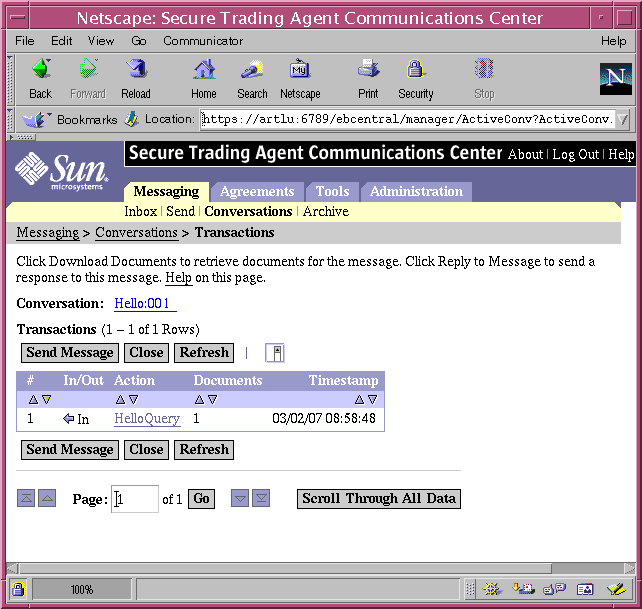
- Select Send Message to continue the conversation.
- Specify the following in the Send Message page:
- Select Manager from the Roles list (which should be the only role available).
- Select the HelloResponse action from the Action droplist (which should be the only action available).
- Select Browse and navigate to the HelloResponse.text document in your installation, as described in the section "Tutorial Requirements".
- Note that the radio button for a document of text/plain MIME type is selected, which associates the document specified above with the expected document for the action.
- Select Attach Document to add the specified document.
- Select Send to send the message.
The conversation has been completed from the Ebxml Partner perspective. As the Secure Trader party, retrieve the message sent by Ebxml Partner to complete the conversation from the Secure Trader perspective. The procedure for retrieving the conversation is the same as listed above for Ebxml Partner.
The next lesson shows the administration tasks of closing a conversation and taking an agreement out of service.
Lesson Five, Administer an Agreement
In this lesson you learn how to close a conversation after all the actions in an agreement have been sent and received. It also shows you how to take agreements out of service that are no longer being used.
It is a good idea to close conversations when all actions have been completed. Otherwise, conversations that are no longer active will appear in the list of active conversations. Additionally, there may be a performance hit if the system has to continually access information that is no longer being used.
The administrative procedures in this section are shown from the perspective of the Ebxml Partner party on artlu. The Secure Trader party on winterpark would also perform these tasks.
To close a conversation
- As Ebxml Partner party on artlu, open the Communications Center and select Conversations from the Messaging tab.
The Communications Center displays all the conversations that are active.
- Select the check box for the conversation that was just completed in this tutorial.
If you want to view transaction details for the conversation, select the Conversation Id. If you want to view a text version of the agreement, select the agreement name.
- Select Close Selected, and then select OK when asked to confirm.
The conversation is removed from the list of active conversations.
- Select Archive from the Conversations tab.
The conversation you have just closed has been added to the Conversation History list. You can access details about closed conversations from this list.
You typically take agreements out of service that are no longer being used. For example, when the expiration date for the agreement has passed or you and your trading partner have decided not to use the agreement any more. All conversations in an agreement should be marked closed before you take an agreement out of service.
To take an agreement out of service
- As the Ebxml Partner party on artlu, select Undeploy from the Agreements tab.
The Communications Center lists all deployed agreements.
Figure 21 Communications Center, Undeploying an Agreement
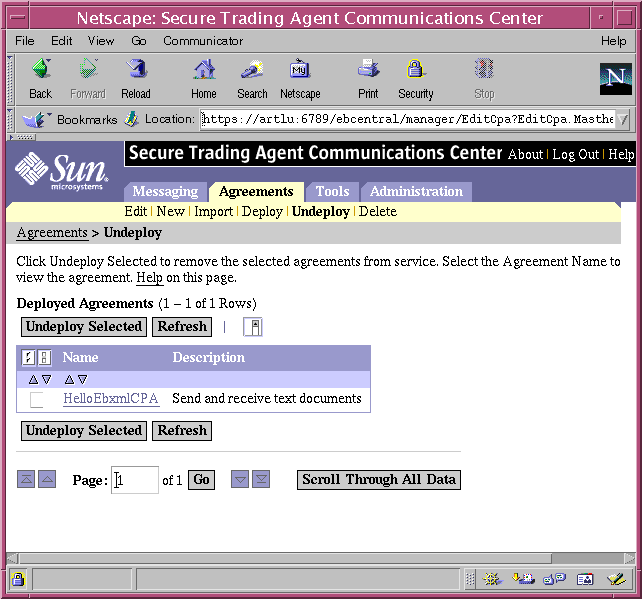
- Select the check box for the HelloEbxml agreement, select Undeploy Selected, and then select OK.
The agreement is removed from the list of deployed agreements.
Typically, you would use an existing agreement as a basis for making new agreements. Thus, after undeploying an agreement, you can still copy the agreement in the Agreement Editor to make new agreements.
Lesson Six, Create an Agreement That Uses a Secure Transport
In this lesson you learn how to copy a previously deployed agreement to create an agreement that uses a secure transport. When you create the new agreement in the Agreement Editor, you modify the agreement to specify secure transport for the agreement's actions. You also specify keynames for the required security certificates. You then import the agreement into the Communications Center, resolve the keynames to the actual certificate files, and deploy the agreement. Then, you exchange messages over the secure transport.
This lesson assumes that you ran the complete registration process on both winterpark and artlu, as explained in the Secure Trading Agent Release Notes. The registration process creates a certificate and keystore for your installation and then uses ebScript to import them into the Secure Trading Agent repository. The certificate is a self-signing certificate that can be used for the server certificate required for this tutorial. Typically, you create your own certificate, trust anchor, and keystore files using third party software. However, the certificate and keystore created by the registration process are sufficient for this lesson.
Before proceeding with this lesson, the trading partners should first exchange certificates files, which contain their public keys.
To exchange certificate files
- For the winterpark installation, navigate to the following directory:
/opt/SUNWebXML/S1ISSTA/etc/ (Solaris platforms)
C:\Sun\S1ISSTA\etc\ (Windows platforms)
These are the default installation locations for Secure Trading Agent. If you chose an alternate location, use the appropriate path.
- List the contents of the etc directory to view the names of the certificate files generated by the Secure Trading Agent registration process.
The following two files represent a certificate with your public key (.cer file) and a certificate with your private key (.jks file). The IP address of your server is embedded in the certificate names and differs from the names used in this tutorial. The public key certificate is a self-signed trust certificate. Here are some example of certificate filenames:
installation_dsig_and_ssl_key_129_149_74_125.cer
installation_dsig_and_ssl_key_129_149_74_125.jks
- Send a copy of the self-signed trust certificate file (the above .cer file) to your trading partner on artlu.
Use FTP or whatever file transport system that is convenient for you to send the file to your trading partner. Save the file to a convenient location on artlu.
- Now, from the artlu installation, send a copy of the self-signed trust certificate file for artlu to winterpark.
These certificates are used in later procedures in this lesson.
In the previous lesson, you undeployed the HelloEbxmlCPA agreement. The following procedure shows you how to copy this agreement. When you copy an agreement, the new agreement has the exact contents of the original agreement except it has a new name and CPA Id and the status of the agreement is "Proposed."
To copy an agreement
- As Secure Trader on winterpark, in the Communications Center, select Edit from the Agreements tab.
- Select the radio button for HelloEbxmlCPA and then select Copy.
The Communications Center creates a copy of the agreement. You may have to select Refresh to view the agreement in the list of agreements.
Figure 22 Communications Center, Copying an Agreement
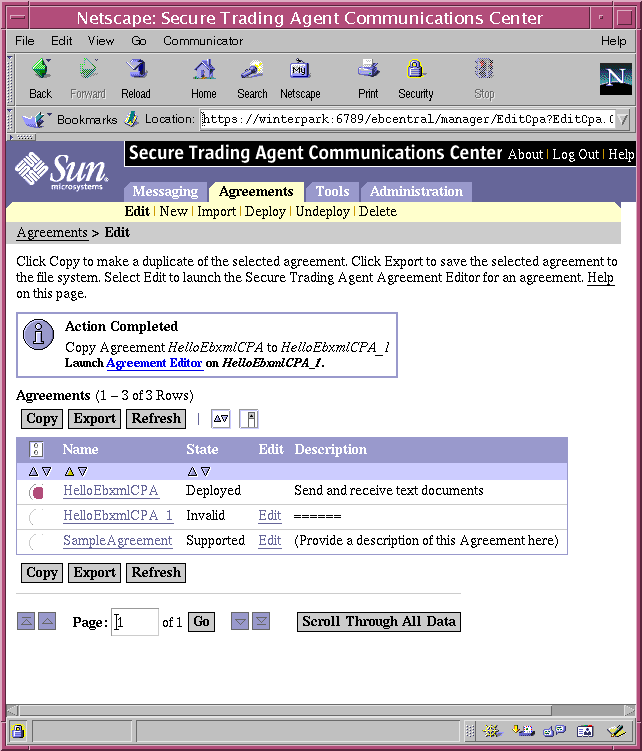
- In the list of agreements, for the HelloEbxmlCPA_1 agreement, select Edit to launch the Agreement Editor.
- Edit the Agreement Information as follows:
- Specify HelloEbxmlSSL for the Agreement Name.
- Specify HelloEbxmlSSL_cpaid for the Agreement Id.
- Change the status to agreed.
- Edit the comments to say Send and receive text documents over SSL.
- Select Save.
The following procedure shows how to edit the HelloEbxmlSSL agreement to specify secure endpoints for both you and the local party, and also how to specify the required certificate information for both parties.
Typically, you provide your own information for a secure endpoint and the required certificates. You then send the agreement, along with your certificate files, to the other party during negotiation. The other party supplies their own secure information and returns the agreement to you with their certificate files.
However, in this tutorial assume you know the other party's secure endpoints and also have their certificate information. The tutorial uses the default certificate files provided with this release of Secure Trading Agent, which were exchanged between the trading partners in the previous procedure.
To provide secure endpoint and certificate keynames
- In the Agreement Editor that is still open on winterpark, select Local Party from the Agreement Tree in the left frame.
The Agreement Editor displays the Local Party Information page.
- Specify the secure endpoints for both the local and other party.
The certificates generated during the Secure Trading Agent registration process use the IP address as the common name. Thus, you must specify the IP address for the secure endpoint.
The port number is the default port number used by Secure Trading Agent for secure transport. If you changed the default configuration to use a different port, then you should make the appropriate adjustments in the secure endpoints.
The endpoints for your servers will differ from the following examples.
The secure endpoint for the local party, winterpark, is:
https://129.149.74.125:8444/ebxml/msh
The secure endpoint for the other party, artlu, is:
https://129.149.74.180:8444/ebxml/msh
- Select Save to preserve your edits.
- In the Agreement Tree, expand the Roles node and select the HelloQuery Send Action.
- Under Business Transactions Characteristics, for Confidential select transient and then select Save.
This specifies to send the messages over SSL. It does not specify that the documents are signed.
- Select the HelloResponse Receive Action from the Agreement Tree, make the same edit for the HelloResponse action, and then select Save to preserve your edits.
- In the Agreement Tree, under the Local Party node, select the Transport Security node.
The editor displays the Transport Security page.
Figure 23 Agreement Editor, Transport Security Page
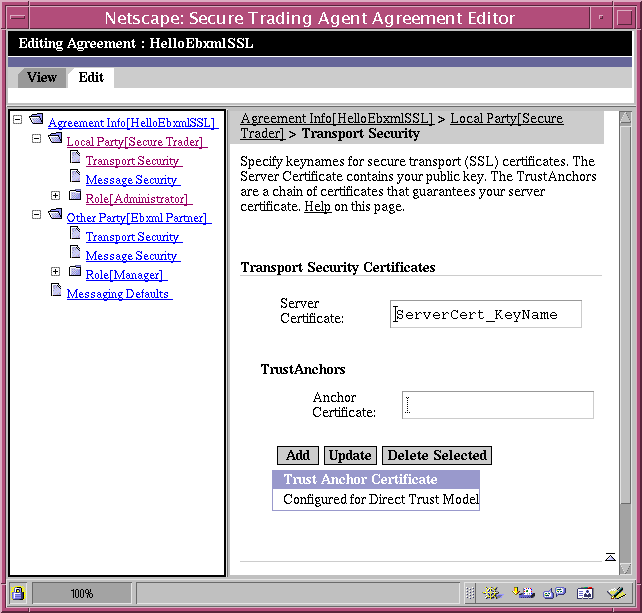
- Modify the Server Certificate keyname to use the name of the actual certificate you are using and select Save.
For winterpark the keyname is:
installation_dsig_and_ssl_key_129_149_74_125
Leave the TrustAnchors section blank. These certificates are self-signed and do not need trust anchors.
- In the Transport Security node for the other party, specify the keyname for the other party's certificates and select Save.
For artlu the keyname is:
installation_dsig_and_ssl_key_129_149_74_29
Leave the TrustAnchors section blank. These certificates are self-signed and do not need trust anchors.
You now have an agreement that specifies actions that are sent over a secure transport, specifies secure endpoints for each of the parties, and specifies keynames for the certificates. Each party now must resolve the certificate keynames specified in the agreement to the actual binary file that they reference. If you do not resolve the certificate keynames, you cannot deploy the agreement.
Use the same method of file transfer you used in "Lesson Two, Negotiate the Agreement" to send the exported agreement to the other party, and then import the agreement. Use the following procedure to resolve the keynames to the certificate files.
To resolve certificate keynames to the certificate files
- Open the Communications Center on winterpark and select Certificate from the Administration tab.
Figure 24 Communications Center, Manage Certificates
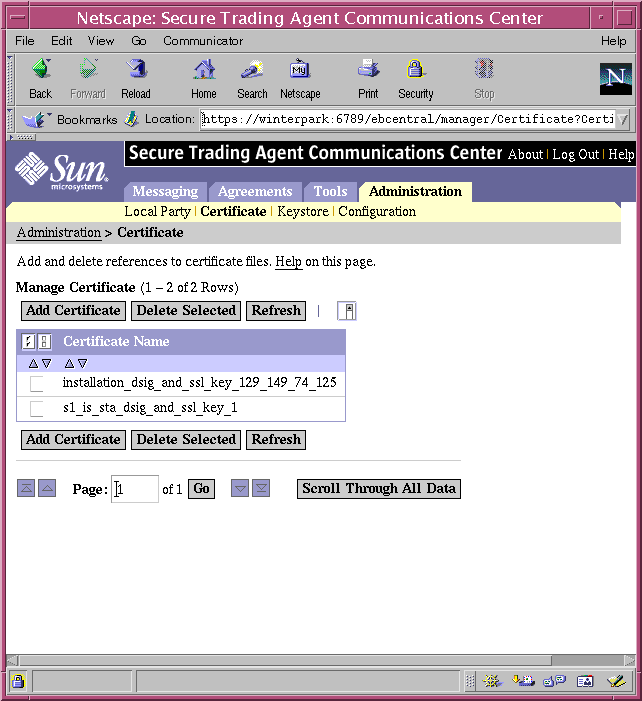
When you ran the registration process, the generated certificate for your installation was imported into the Secure Trading Agent repository. However, you must still import the certificate received from your trading partner (when you exchanged certificate files in the first procedure of this lesson).
- On the Certificate page, select Add Certificate.
Figure 25 Communications Center, Conversation Details
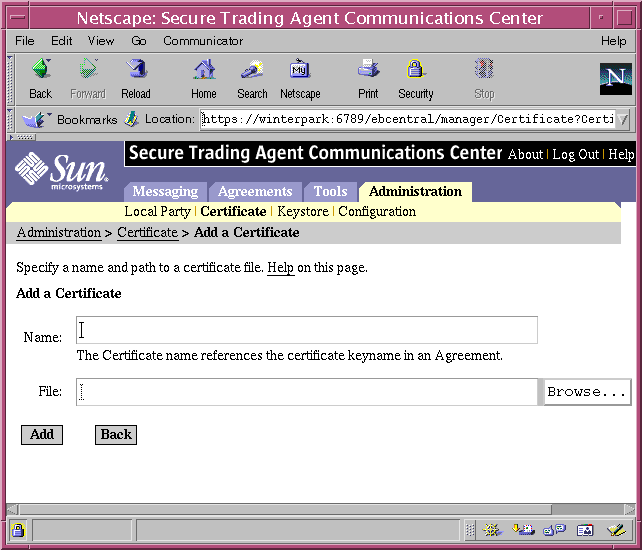
- On the Add a Certificate page, specify the following:
- Specify the keyname exactly as specified in the Agreement Editor.
- Browse to the location where you saved the certificate file and select the file.
- Select Add.
- Select Back to view the list of certificates.
Now you must add the keystore representing your private key.
- Select Keystore from the Administration tab.
When you ran the registration process, the generated keystore holding your private key for your installation was imported into the Secure Trading Agent repository. You do not have to make any specification here.
- Repeat Step 1 through Step 4 for the installation on artlu.
Once certificate and keystore names are resolved on both servers, the trading partners can deploy the HelloEbxmlSSL agreement.
- Deploy the agreement using the Communications Center, as described in the procedure "To import and deploy an agreement".
- Exchange messages over a secure transport, as described in "Lesson Four, Send and Receive ebXML Messages".