| Sun StorageTek Enterprise PCI-X 4 Gb FC Single and Dual Port Emulex Host Bus Adapters Insallation and Basic Interoperability Guide |
| Sun StorageTek Enterprise PCI-X 4 Gb FC Single and Dual Port Emulex Host Bus Adapters Insallation and Basic Interoperability Guide |
| C H A P T E R 3 |
|
Hardware Installation |
This chapter provides instructions for installing the Sun StorageTek Enterprise PCI-X 4 Gb FC Single and Dual Port Emulex HBAs (henceforth referred to as single and dual port HBAs) in your system. It contains the following topics:

|
Caution - Damage to the HBA can occur as the result of careless handling or electrostatic discharge (ESD). Always handle the HBA with care to avoid damage to electrostatic sensitive components. |
To minimize the possibility of ESD-related damage, Sun strongly recommends using both a workstation anti-static mat and an ESD wrist strap. You can get an ESD wrist strap from any reputable electronics store or from Sun as part number #250-1007. Observe the following precautions to avoid ESD-related problems:
|
 Confirm that the single or dual port HBAs are shipped with the following items:
|
To install the single and dual port HBAs, you must open the system and identify an empty PCI or PCI-X slot. The single and dual port HBAs are keyed to prevent installation in +5.0-V signaling PCI slot types. If necessary, consult your system manual for instructions on removing the system cover.
1. Record IEEE and serial numbers.
Each HBA is shipped with at least one unique 64-bit identifier called the IEEE address. The Fibre Channel industry uses a World Wide Name (WWN) derived from the IEEE address. This number is needed for FC connectivity. Because the dual-port HBA has two ports, it has two IEEE addresses. The IEEE address is used for configuring your system. The serial number is used for communicating with Sun. All numbers are clearly marked on the board. Record these numbers before installation.
2. Shut down, power off, and unplug the system.
4. Remove the blank panel from an empty PCI or PCI-X slot.
5. If needed, replace the low-profile PCI bracket with the standard mounting bracket by performing the following steps:
a. Remove the mounting bracket screws from the single and dual port HBAs (see FIGURE 3-1).
FIGURE 3-1 Removing the Bracket Screws

b. Remove the bracket and store it for future use.
c. Align the new mounting bracket tabs with the holes in the HBA.
| Note - Be careful not to push the bracket past the transceiver housing's grounding tabs. Ensure that the LEDs are properly aligned with the holes in the bracket. |
d. Replace the screws that attach the HBA to the bracket.
6. Insert the HBA into the empty PCI or PCI-X slot. Press firmly until the adapter is seated. See FIGURE 3-2.
7. Secure the HBA mounting bracket to the case with the panel screw or clip.
8. Replace the system case and tighten the case screws.
The HBA is now installed in the system and is ready for the optical cable attachment.
FIGURE 3-2 Installing the Single and Dual Port HBAs
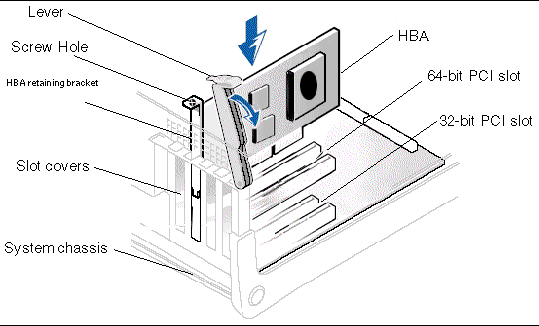
| Note - FIGURE 3-2 is a typical installation, which may differ from your installation. |
|
Use multimode fiber-optic cable, intended for short-wave lasers, that adheres to the specifications in TABLE 3-1.
Follow these steps when attaching the optical cable:
1. Connect the fiber-optic cable to an LC connector on the dual port HBA (see FIGURE 3-3).
FIGURE 3-3 Attaching the Optical Cable
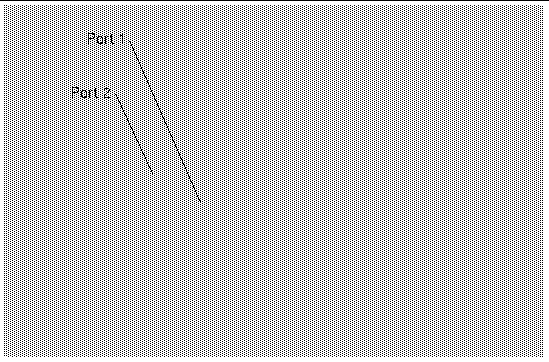
2. Connect the other end of the cable to the Fibre Channel device.
After the optical cable is connected to the HBA, you are ready to apply power to the system.
|
1. Verify that the HBA is securely installed in the system.
2. Verify that the correct optical cable is attached.
3. Plug in and power on the system.
4. Observe the status of light-emitting diodes (LEDs) for the power-on self-test (POST) results as shown in TABLE 3-2.
TABLE 3-2 summarizes LED indicator combinations. The LEDs can be seen through the openings in the HBA's mounting bracket. Each port has a corresponding set of LEDs that provide a visual indication of the operating state.
The slow blink rate is 1 Hz; the fast blink rate is 4 Hz; the flashing state is an irregular on/off appearance reflecting program activity. For the Link Rate, between each group of fast blinks (1, 2, or 3), there is a 1-Hz pause when the LED is off. You should observe the LED sequence for several seconds to ensure that the pause is correctly identified.
|
1. Enter the show-devs command at the ok prompt to list the installed devices.
The single and dual port HBAs can be identified in the output containing the SUNW,emlxs@n and SUNW,emlxs@n,1 node names, where n is usually a single-digit number from 0 to 9.
2. To positively identify the port as a Sun StorageTek 4 Gb FC port, access the SUNW,emlxs@N entries and enter .properties as shown in the example that follows.
In this example, there is one Dual Channel SG-XPCI2FC-EM4-Z adapter installed:
|
If online storage is connected to the HBA installed in a SPARC system, use the apply show-children command to list the attached storage.
In the example that follows, a storage JBOD has twelve targets attached to one port of the dual-ported HBA.
| Note - You may need to use the reset-all command before entering apply show-children. |
|
Follow the instructions in the BIOS documentation provided with your system.
If you need help installing or using this product, call 1-800-USA-4SUN, or go to:
http://www.sun.com/service/contacting/
| Sun StorageTek Enterprise PCI-X 4 Gb FC Single and Dual Port Emulex Host Bus Adapters Insallation and Basic Interoperability Guide | 819-5532-12 |
Copyright © 2007, Sun Microsystems, Inc. All Rights Reserved.
 To Verify the Packaging Contents
 m (multimode)