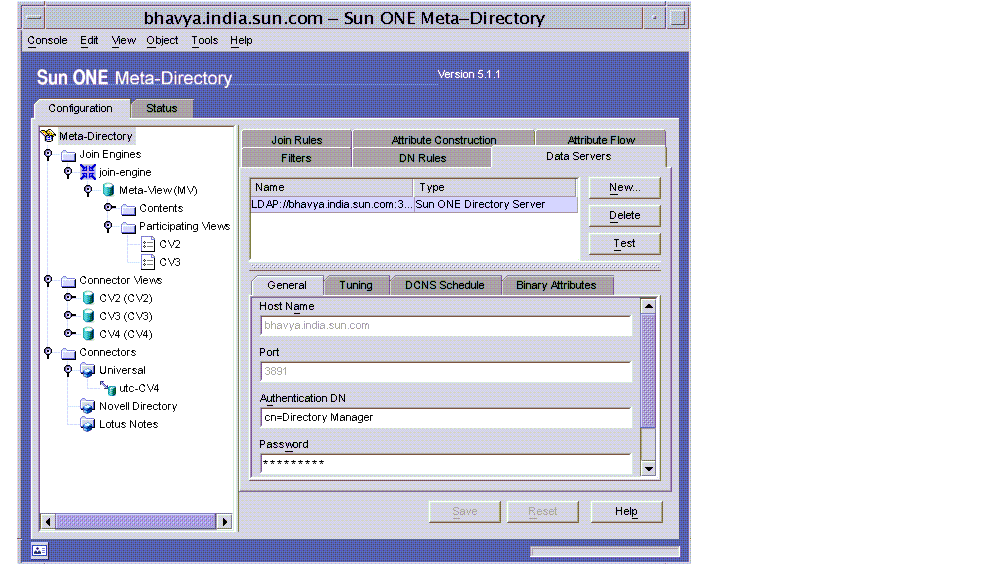
- In the Data Servers window, click New. The Data Server Type dialog box appears.
- Select the type of server (Directory Server or Oracle) you want to add and click OK.
The server appears in the list box and, by default, it is selected. Depending on the type of server being added, either four (Directory Server) or five (Oracle) additional tabs appear at the bottom of the panel. These tabs enable you to name and configure the new server.
- On the General tab, provide values or change the defaults as needed for the following fields:
Table 16-1 List of options and the description of the action to perform
|
Host Name
|
Enter the fully-qualified name of the machine where the data source is stored, such as Server.company22.com. This is a required field.
|
|
Port
|
Enter the port on which the Join Engine connects to the host machine (normally port 389). This is a required field.
|
|
Authentication DN
|
Enter the DN of a user that has full administrator access to the Directory Server, such as cn=directory manager. This is a required field.
|
|
Password
|
Enter the administrator password. This is a required field.
|
|
Description
|
Enter a brief description to inform other users of the purpose of this data server. This is an optional field.
|
- Click Save.
The name of the new server appears under the Name column in the top window of the panel.
- Select the new server, and click Test to test the connection.
A Test Connect Succeeded message appears if the connection was successful. If the test was unsuccessful, make sure the connection information is correct.
- From the Tuning tab, provide values or change the defaults as needed for the following operational fields:
Table 16-2 List of options and the description of the action to perform
|
Maximum Operation Result Time
|
Enter the maximum amount of time allowed before timing-out an LDAP search with no LDAP results. The suggested minimum value is 3600.
|
|
Maximum Number of Retries
|
Enter the maximum number of times you want the server to attempt to connect after an initial failure. A value of 0 indicates an infinite number of times. This field is associated with the Retry Intervals field.
|
|
Retry Intervals
|
Enter a comma-separated list of numbers, each representing the number of seconds to wait before the next retry should begin. For example, if you provided a value of 10 for Maximum Number of Retries, and 30,300,600,3600 for Retry Intervals, the system would respond as follows:
“If the LDAP server or database becomes unavailable, retry at most 10 times, beginning 30 seconds after the loss of connection is noted, then 5 minutes later, then 10 minutes later, then hourly. If the 10th retry fails, report an error.”
|
|
Idle Timeout
|
Enter the time, in seconds, that should pass before retries are abandoned if the server is idle.
|
- Click the Data Change Notification System (DCNS) Schedule tab. This option allows you to schedule when the Join Engine will look for changes in the changelog.
Provide values or change the defaults for the following fields:
Table 16-3 List of options and the description of the action to perform
|
Field
|
Value
|
Example
|
|
Second Specifier
|
Accepts data in x/y format. x represents the ‘second’ at which schedule should start.
x is interpreted as ‘start x seconds past minute’.
y represents the repeat frequency of schedule in seconds.
- ’*’ is allowed as a valid value for either x or y.
- ’*’ in x is interpreted as ‘start at 0 seconds past minute’.
- ’*’ in y is interpreted as repeat every second.
Value of x should be between 0 and 59.
- y can have any numeric value.
|
2/15 means start 2 seconds past the minute and run every 15 seconds.
*/15 means start 0 seconds past the minute and run every 15 seconds.
2/* means start 2 seconds past the minute and run every second.
|
|
Minute Specifier
|
Accepts data in x/y format. x represents the’ minute’ at which schedule should start. x is interpreted as ‘start x minutes past the hour.
y represents the repeat frequency of schedule in minutes.
- ‘*’ is allowed as a valid value for either x or y.
- ‘*’ in x is interpreted as ‘start at 0 minutes past the hour.
- ‘*’ in y is interpreted as repeat every minute.
- Value of x should be between 0 and 59.
- y can have any numeric value.
Frequency of the schedule should be specified either in second specifier or minute specifier. If frequency is entered in both seconds and minute specifier, seconds frequency takes precedence over minutes frequency and minutes frequency is ignored.
|
2/15 means start 2 minutes past the hour and run every 15 minutes.
*/15 means start 0 minute past the hour and run every 15 minutes.
2/* means start 2 minutes past the hour and run every minute.
|
|
Hour Specifier
|
Accepts data in a regular expression format.
Valid numeric values that can be entered are 0 to 23.
Valid data formats are
- x
- x-y
- x-y/z
- a-b, x-y
- x,y,z
Interpretation of data in various formats:
x: Is interpreted as run at x hour.
‘*’ in x is interpreted as 0-23.
x-y: Is interpreted as begin at x hours and end at y hours.
- ‘*’ is not a valid value in a range.
- If x > y in hour range then the effective range is considered as x-23:59.
that is, start at x hour and run till 23 hour 59 minutes.
x-y/z: Is interpreted as begin at x hours and end at y hours at z step.
This means valid hours to run are x, x+z, x+(2*z), x+(3*z).... till x+(n*z) < y.
a-b, x-y: Is interpreted as multiple ranges.
Multiple hour ranges can be specified in the hour specifier. Ranges specified should be in ascending order.
x, y, z: Is interpreted as run at x, y, and z hours.
Any of the above combinations can be used in hour specifier.
|
Sample:
9-4 is interpreted as 19-23:59
Sample:
10-16/2 is interpreted as run at 10, 12, 14 hours.
Sample:
8-10, 12-18, 20-22 is a valid schedule.
8-10, 2-3, 12-18 is invalid as the ranges are not in ascending order.
Sample:
2,10-12,16-22/3 is a valid value in hour specifier.
|
|
Day Specifier
|
Accepts data in a regular expression format.
Valid numeric values that can be entered are 1 to 31.
Valid data formats are
- x
- x-y
- x-y/z
- a-b, x-y
- x,y,z
Interpretation of data in various formats:
x: Is interpreted as run on x day.
’*’ in x is interpreted as 1-31.
x-y: Is interpreted as run between x and y days.
- ‘*’ is not a valid value in a range.
- x should be less than y in the range.
x-y/z: Is interpreted as begin on x day and end on y day every z days.
This means valid days to run are x, x+z, x+(2*z), x+(3*z).... till x+(n*z) < y.
a-b, x-y: Is interpreted as multiple ranges.
Multiple day ranges can be specified in the day specifier. Ranges specified
should be in ascending order.
x, y, z: Is interpreted as run on x, y, and z days.
Any of the above combinations can be used in day specifier.
|
10-16/2 means run on 10th, 12th, 14th, 16th day of the month.
Sample:
8-10, 12-18, 20-22 is a valid schedule.
8-10, 2-3, 12-18 is invalid as the ranges are not in ascending order.
Sample:
2,10-12,16-22/3 is a valid value in day specifier.
|
|
Month Specifier
|
Accepts data in a regular expression format.
Valid numeric values that can be entered are 1 to 12.
Valid data formats are
- x
- x-y
- x-y/z
- a-b, x-y
- x,y,z
Interpretation of data in various formats:
x: Is interpreted as run in x month.
’*’ in x is interpreted as 1-12.
x-y: Is interpreted as run between x and y months.
- ‘*’ is not a valid value in a range.
x should be less than y in the range.
- x-y/z: Is interpreted as begin in x month and end in y month every z months.
This means valid months to run are x, x+z, x+(2*z), x+(3*z).... till x+(n*z) < y.
a-b, x-y: Is interpreted as multiple ranges.
Multiple month ranges can be specified in the month specifier.
Ranges specified should be in ascending order.
x, y, z: Is interpreted as run in x, y, and z months.
Any of the above combinations can be used in day specifier.
|
Sample:
1-8/2 means run in 1,3,5,7 months. (Run in Jan, Mar, May, and Jul)
Sample:
1-2,6-9 is a valid schedule.
6-9, 1-2 is invalid as the ranges are not in ascending order.
|
|
Day of the Week Specifier
|
Accepts data in a regular expression format. Valid numeric values that can be entered are 0 to 6. 0 stands for sunday. 6 stands for saturday.
Valid data formats are:
- x
- x-y
- x-y/z
- a-b, x-y
- x, y, z
Interpretation of data in various formats:
x: Is interpreted as run on x weekday.
’*’ in x is interpreted as 0-6.
x-y: Is interpreted as run between x and y weekdays.
- ’*’ is not a valid value in a range.
- x should be less than y in the range.
x-y/z: Is interpreted as begin on x weekday and end on y weekday every z days.
This means valid weekdays to run are x, x+z, x+(2*z), x+(3*z).... till x+(n*z) < y.
a-b, x-y: Is interpreted as multiple ranges.
Multiple weekday ranges can be specified in the day of week specifier. Ranges specified should be in ascending order.
x, y, z: Is interpreted as run on x, y, and z weekdays.
Any of the above combinations can be used in weekday specifier.
|
Sample:
0-5/2 means run on 0,2,4 weekdays. (Run on sunday, tuesday, thursday)
Sample:
0-2,4-6 is a valid schedule.
4-6, 1-2 is invalid as the ranges are not in ascending order.
|
Sample data in different fields and their interpretation:
Example 1:
second specifier:12/30
minute specifier:5/15
hour specifier :7-9
day specifier:*
month specifier:*
day of week specifier:0-6
Schedule starts at 5 minutes 12 seconds past 7 and runs every 30 seconds. Schedule ends at 9. This schedule runs every day. As both seconds and minute frequency were specified minute frequency was ignored.
Example 2:
second specifier:*
minute specifier:*/45
hour specifier :7-10
day specifier: *
month specifier:*
day of week specifier:0-6
Schedule starts at 0 minutes past 7 and runs every 45 minutes till 10 every day. Schedule runs at 7:00, 7:45, 8:30, 9:15
Example 3:
second specifier:*
minute specifier:*/30
hour specifier :7-9, 15-17
day specifier:*
month specifier:*
day of week specifier:0
Schedule runs at 7:00, 7:30, 8:00, 8:30,15:00,15:30,16:00,16:30 every sunday.
Example 4:
second specifier: *
minute specifier:10/15
hour specifier :22-3
day specifier:*
month specifier:*
day of week specifier:0-6
Schedule runs at 22:10, 22:25,22:40,22:55,23:10,23:25,23:40,23:55 every day. 22-3 in hour range was rounded off to 22-23:59 as x > y in the hour range.
- On the Binary Attribute window, check the binary list and, if necessary, make changes to specify which binaries you want the Join Engine to recognize. These are the changes you can make:
- To create a new attribute, click New. A blank field appears at the bottom of the drop-down list. Type in the name of the attribute in this field.
- To edit an attribute, select the attribute from the drop-down list and type over the name.
- To delete an attribute, select the attribute from the drop-down list and click Delete.
- Click Save to save the configuration.