Setting Up Systems to Be Installed Over the Network
After you've created an install server and possibly a boot server, you are ready to install the Solaris software on other systems over the network. However, to be installed over the network, a system needs to know where to:
-
Install from (install server)
-
Boot from (install server or boot server)
-
Find its profile during a custom JumpStart installation (JumpStart directory on the profile server)
Because a system looks for this information in the name service (bootparams database in the /etc files, NIS, or NIS+) when it installs over the network, you must add this information into the name service for every system that is going to be installed over the network. You can do this by using Solstice Host Manager or the add_install_client command.
Note -
If you use the /etc files to store network installation information, the information must reside on the install server or the boot server (if a boot server is required).
How to Set Up Systems to Be Installed Over the Network With Host Manager
You should use Host Manager if you want:
-
A centralized way to set up systems to be installed over the network
-
An easy-to-use graphical user interface
-
To use the NIS or NIS+ name service to store network installation information
Note -
If you want to preconfigure system configuration information by using a remote sysidcfg file, you must use the add_install_client command to set up systems to be installed over the network.
This procedure assumes that you have already installed Host Manager at your site and have the required permissions to use it. For detailed information about setting up Host Manager, refer to the Host Manager documentation.
-
Log in to a system that has access to Host Manager.
-
Start the Solstice AdminSuite with the following command.
$ /usr/bin/solstice &
-
After the Solstice AdminSuite main window appears, click on the Host Manager icon.
-
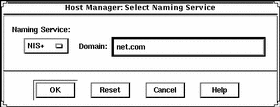
On the Host Manager: Select Naming Service screen, select a naming service and click on the OK button. See the sample Naming Service screen below.
If the Name Service Is ...
Then Select ...
NIS+
NIS+. Host Manager will update the NIS+ tables.
NIS
NIS. Host Manager will update the NIS maps.
None
None. Host Manager will store the information you provide in the /etc files on the appropriate systems. This will provide enough information for systems to boot and to install Solaris software over the network.

-
On the Host Manager main window, choose Add... from the Edit menu.
-
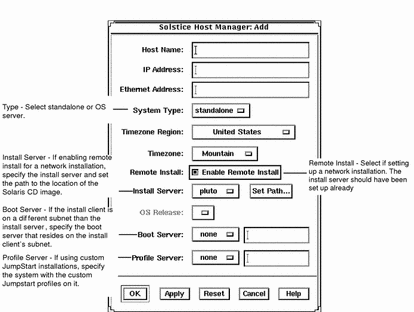
On the Host Manager: Add screen, complete all fields and click on the OK or Apply button.

-
On the Host Manager main window, choose Save Changes from the File menu.
Where to Go Next
The system is now ready to be installed over the network. To install the system, see Chapter 3, Performing a Custom JumpStart Installation.
How to Set Up Systems to be Installed Over the Network With add_install_client
If Host Manager is not available, you can use the add_install_client command to set up systems to be installed over the network. The add_install_client updates only the /etc files.
-
Become root on the install server (or the boot server if a system requires one).
-
Make sure the following information about the system to be installed has been added to the name service (/etc files, NIS, or NIS+).
-
Host name
-
IP address
-
Ethernet address
-
-
Change directory to the Tools directory on the install server's Solaris CD image or the boot server's boot directory.
# cd Solaris_2.7/Tools
-
Set up a system to be installed over the network with the add_install_client command.
# ./add_install_client [-c server:jumpstart_dir_path]
  [-s install_server:install_path] [-p server:path] host_name platform_group
Specifies a JumpStart directory for custom JumpStart installations. This option and its arguments are required only for custom JumpStart installations.
server is the host name of the server on which the JumpStart directory is located. jumpstart_dir_path is the absolute path to the JumpStart directory.
-s install_server:install_dir_path
Specifies the install server. This option is required only when you are using add_install_client on a boot server.
install_server is the host name of the install server. install_dir_path is the absolute path to the Solaris CD image.
-p server:path
Specifies the sysidcfg file for preconfiguring system information. server is either a valid host name or IP address for the server that contains the file. path is the absolute path to the sysidcfg file.
Is the host name of the system to be installed over the network. (This is not the host name of the install server). The host must be in the name service for this command to work.
Is the platform group of the system to be installed. (For a detailed list of platform groups, see Appendix C, Platform Names and Groups.)
SPARC: Example: Adding Systems to Be Installed Over the Network With add_install_client
The following example adds a system named basil, which is a SPARCstation 10, to be installed over the network. The system requires a boot server, so the command is run on the boot server; the -s option is used to specify the install server named install_server1, which contains a Solaris CD image in /export/install.
# cd /export/boot/Solaris_2.7/Tools # ./add_install_client -s install_server1:/export/install basil sun4m |
Where to Go Next
The system is now ready to be installed over the network. To install the system, see Chapter 3, Performing a Custom JumpStart Installation.
- © 2010, Oracle Corporation and/or its affiliates
