Chapter 15 Using Audio
Audio is a CDE Motif application for playing, recording, or saving audio data in AU (Sun), WAV (PC), or AIFF (Macintosh) format.
Starting and Quitting Audio
There are several ways to start Audio:
-
From the Front Panel
-
From the command line
-
From the Workspace Programs menu
To Start Audio From the Front Panel
-
Click the Voice Note control on the Applications subpanel to start the application.
Audio runs in note mode, and automatically starts recording.
-
Click the Stop button to stop recording.
To install Audio in the Front Panel, see "To Put an Application Icon in the Front Panel" for instructions.
To Start Audio From the Command Line
You can start Audio and open files directly from the command line.
Or:
Type sdtaudio filename to start Audio and open a specific file.
To Start Audio From the Workspace Programs Menu
-
Place the mouse pointer anywhere on the background of the desktop (the workspace) and click mouse button 3.
The Workspace menu appears.
-
Choose Programs, and then choose Audio from the Programs submenu.
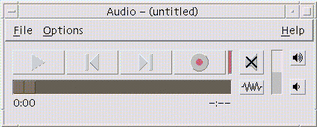
The Audio main window is displayed.
To Exit Audio
Choose Exit from the File menu or Close from the Window menu, or hold down the Alt key and press the F4 key with the mouse cursor over the Audio main window to exit Audio.
Audio Main Window
All Audio functions start with the main window. Open an audio file by choosing Open from the File menu; record by choosing New from the File menu and clicking the Record Audio button; set startup, recording, or playing options by choosing the appropriate item from the Options menu.

Voice Notes
In the same way as Text Note allows you to rapidly create small text files and display them on the desktop, Voice Note allows you to record an audio message and save it on the desktop for playing later. For example, you might want to record the pronunciation of a foreign name, or a useful quotation which you don't want to type.
The Voice Note control is located on the Applications subpanel of the Front Panel. When you click the Voice Note control it runs the Audio application, which immediately starts recording from your host's microphone. To stop recording, you click the Stop button or exit the Audio application.
The sound file that is created is displayed on your desktop when you exit the Audio application. You can remove it by choosing Remove From Workspace from the right-mouse button popup menu. You can remove it from your file system by deleting it from your home directory.
If you click the Voice Note control and neglect to stop Audio, it can record and save a huge file that may eventually use up all your disk space.
Displaying the Waveform Window
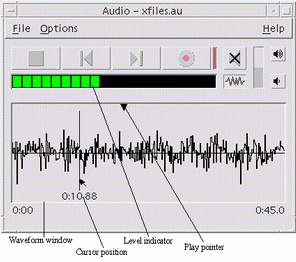
An audio file can be displayed with or without a waveform displayed. The waveform is a graphic depiction of the relative sound levels of the audio file.
To Display the Waveform Window
-
To show the waveform window, click the Show Wave Window button.
-
To hide the waveform window, click the button again.
The button is a toggle, changing from Show Wave Window to Hide Wave Window to Show Wave Window as it is clicked.
To Start Audio With the Waveform Displayed
-
Choose Startup from the Options menu.
The Options dialog box is displayed, with Startup selected as the Category. If the Options dialog box is already displayed, choose Startup from the Category menu.
-
Click Waveform View.
-
Click OK.
The Options dialog box closes. The next time you start Audio the waveform will be displayed.
Opening and Playing Audio Files
You can open an audio file from the Audio File menu or by dragging and dropping it from File Manager onto Audio. Once you have opened an audio file or recorded something, you can play it from the beginning or from any point in the file. You can specify whether an audio file will be played automatically when it is opened.
To Open an Audio File
-
Choose Open from the File menu or hold down the Control key and press ``o'' with the mouse cursor over the Audio main window.
The Audio-Open File dialog box is displayed..
-
Navigate to the folder where the audio file is located.
Navigate by selecting a folder in the Folders list or by entering a folder name in the Enter path or folder name text field.
-
Optional. Type an audio-file suffix (au, wav, aiff) after the asterisk (*) in the Filter field.
Only files with the specified suffix will be listed in the Files field.
-
Press Return or click Update to update the change in the folder location or filter field.
-
Select a file from the Files list.
-
Double-click the file in the Files list or select it and click OK.
The selected file is opened. If Automatically play audio file on Open is selected in the Options-Play dialog box, the audio file starts playing.
To Open an Audio File With Drag and Drop
-
Open File Manager and navigate to the folder where the audio file is located.
-
Drag the audio file icon from File Manager and drop it on the Audio main window.
The Selected file is opened. If Automatically play audio file on Open is selected in the Options-Play dialog box, the audio file starts playing.
To Specify Play Options
-
Choose Play from the Options menu.
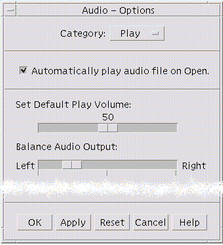
The Options dialog box is displayed, with Play selected as the Category. If the Options dialog box is already displayed, choose Play from the Category menu.
-
Determine whether files should automatically play when they are opened.
-
Click Automatically play audio file on Open to automatically play files when they are opened.
-
Deselect Automatically play audio file on Open if you do not want files to automatically start playing when opened.
-
-
Move the Set Default Play Volume and Balance Audio Output sliders to desired positions.
Position the mouse pointer over the slider and press mouse button 1 as you move the mouse to change slider positions.
-
Click OK to apply the specified values and close the Options dialog box.
To Play an Audio File
Once you have recorded something or opened an audio file, you can play it, as follows. You can play AU, WAV, or AIFF files.
-
Click the Play Audio button.
When you click Play Audio, play begins at the play pointer position. The file is played from the beginning if it has just been opened or if you have just created the recording. If you click the Stop Playing button during play and then click Play Audio, play begins at the previous stop point.
See "To Specify Input and Output Device Options" for instructions for specifying a different output device.
Note that the Play Audio button is a toggle: before play, it is Play Audio; during play, it is Stop Playing.
-
Optional. Move the play pointer to a new start play position.
To move the play pointer to the beginning of the file, click the Go to Start button.
To move the play pointer to the end of the file, click the Go to End button.
To move the play pointer to a position within the file:
-
If the waveform is not displayed, drag the slider with mouse button 1.
-
If the waveform is displayed, click anywhere in the waveform window.
-
-
Optional. Adjust the output volume by clicking on the Increase Volume or Decrease Volume buttons.
To mute the output, click the Turn Sound Off button.
-
To stop playing the file, click the Stop Playing button.
Note -The Play buttons are inactive when no file has been loaded or recorded.
Recording With Audio
You can record and save audio files in three formats and three quality levels from three input sources.
To Specify Record Options
You can specify audio quality, audio format, record volume, and input balance in the Options dialog box. You can also specify whether the set values will automatically be used when recording or if you will specify the values when you start recording. If the options are already set as you want them, go to "To Create a Recording".
-
Choose Record from the Options menu.
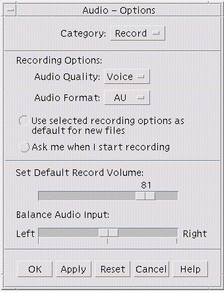
The Options dialog box is displayed, with Record selected as the Category. If the Options dialog box is already displayed, choose Record from the Category menu.
-
Choose Voice, CD, or DAT from the Audio Quality menu.
Voice, which is the default, is the lowest quality: 8000 Hz sample rate, u-law encoding. CD has compact disc quality: 44100 Hz sample rate, linear encoding. DAT has digital audio tape quality: 48000 Hz sample rate, linear encoding.
-
Choose AU, WAV, or AIFF from the Audio Format menu.
AU, which is the default, is Sun audio format. WAV is Microsoft PC format. AIFF is Macintosh audio format.
-
Determine whether to use the selected recording options as the default for new files.
-
To use the selected recording options as the default, click Use selected recording options as default for new files.
-
To specify recording options when you click Record Audio, click Ask me when I start recording.
-
-
Set default record volume and balance the audio input.
Position the mouse pointer over the slider and press mouse button 1 as you move the mouse to set the Default Record Volume and Balance Audio Input sliders to desired positions.
-
Click OK to apply the specified values and close the Options dialog box.
To Create a Recording
You can record Audio files from a microphone, line-in, or CD source.
-
Specify recording options.
See "To Specify Record Options" and "To Specify Input and Output Device Options" for instructions.
-
Choose New from the File menu or hold down the Control key and press ``n'' with the mouse cursor over the Audio main window.
If a previous recording has not been saved, you are asked if you want to save it.
-
Prepare to record.
Be sure that the selected input device is connected to your computer and ready for transmission, and that the microphone or other input device is on.
-
Click Record Audio button and start recording.
Speak, sing, or play into the microphone or start transmission of audio from a line-in or CD source. Recording starts as soon as you click Record Audio unless you have specified Ask me when I start recording in the Options-Record dialog box.
-
When recording is complete, click the Stop Recording button.
-
Click Play Audio button to play what you have just recorded.
See "To Save an Audio File or a Recording" for instructions for saving the recording.
Note -
The Record Audio button, which becomes the Stop Recording button during recording, is inactive if a file is open; the button's function is not displayed in the current function area when it is inactive. Similarly, the Play and Go to buttons are inactive when no audio file has been opened or recorded.
To Save an Audio File or a Recording
You can save an existing audio file or a new recording in AU, AIFF, or WAV format.
-
Choose Save As from the File menu or hold down the Control key and press ``a'' with the mouse cursor over the Audio main window.
The Audio - Save As dialog box will be displayed.
-
Specify the folder in which you want to save the file.
Change to a different folder, if you wish. Press Return or click Update to update the folder location.
-
Choose a format (AU, WAV, or AIFF) from the Audio Format menu.
AU, which is the default, is Sun audio format. WAV is Microsoft PC format. AIFF is Macintosh audio format.
-
Type a name in the Enter file name field.
Audio files are usually named with .au, .wav, or .aiff suffixes for easy identification. To overwrite an existing file, select the file in the Files list.
-
Click OK to save the audio file or recording.
To Specify Input and Output Device Options
You can specify output (play) and input (record) devices for playing and recording.
-
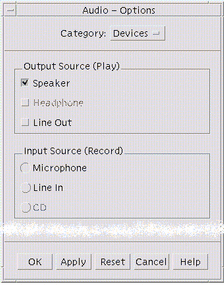
Choose Devices from the Options menu.
The Options dialog box is displayed, with Devices selected as the Category. If the Options dialog box is already displayed, choose Devices from the Category menu.
-
Select Speaker, Headphone, or Line Out as Output Sources.
Note that you can select more than one output source. Only devices that are installed on your computer are active.
-
Select Microphone, Line In, or CD as the Input Source.
Only devices that are installed on your computer are active.
-
Click OK to apply the specified values and close the Options dialog box.
To Display Information About an Audio File
To view file information, choose Get Info from the File menu.
The File Information dialog box is displayed.
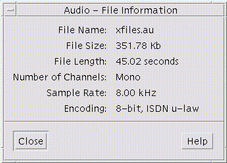
Audio provides the following information about the current file:
-
File name
-
File size in kilobytes
-
File length in seconds
-
Number of channels
-
Sample rate (in kiloherz)
-
Encoding (how many bits, what standard, etc.)
- © 2010, Oracle Corporation and/or its affiliates
