Chapter 19 Using the AnswerBook Software
The AnswerBook Navigator and Viewer are a pair of windows for browsing, searching, bookmarking, and printing on-line document collections, also known as an AnswerBook.
To start the AnswerBook Navigator to see AnswerBook products that may be available to you:
Note -
AnswerBooks are available to you if your system or site administrator has installed them and configured them for your use.
Choose Workspace -> Programs -> AnswerBook.
The Contents of Your On-Line Library
When the AnswerBook Navigator opens, it displays the contents of your on-line Library. Your on-line Library may contain the Solaris 2.6 User AnswerBook, a collection of basic manuals to help get you started using your Sun system. Your library may also contain more than one AnswerBook, provided that:
-
Your system/site administrator has installed them and configured them for your use, and
-
You or your administrator has included them in your Library (see "Modifying Your Library").
AnswerBook Navigator and Viewer
Together the AnswerBook Navigator and Viewer give you access to your Library. You locate what you want to read in the Navigator, and then read it in the Viewer, where it appears page for page as it would in a printed book.
Figure 19-1 Documentation in the Navigator and Viewer
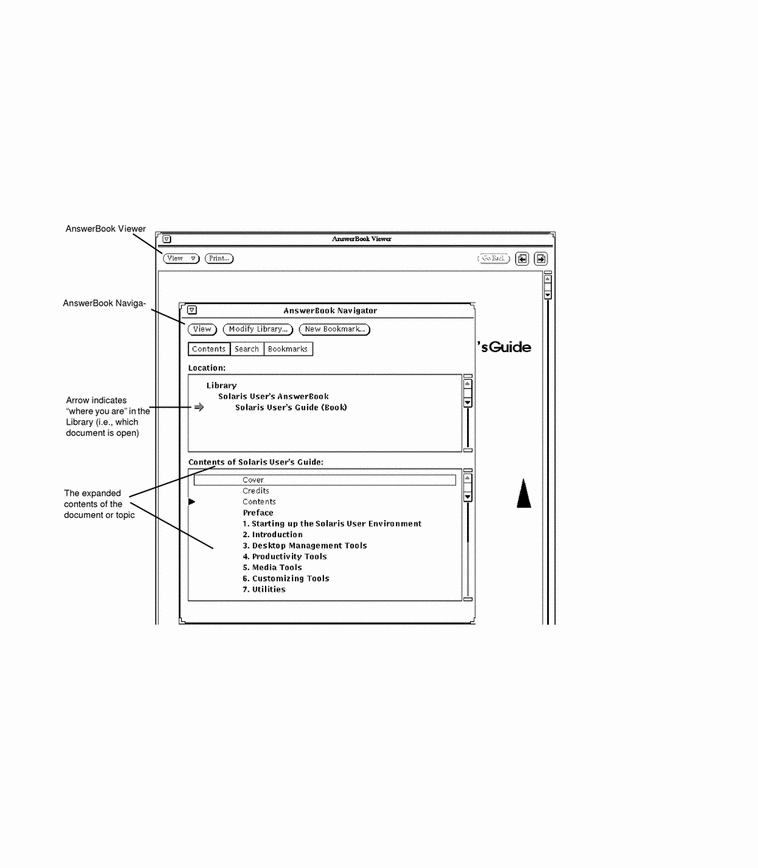
The AnswerBook Navigator acts as a kind of remote control for the Viewer. Using the controls in the Navigator, you locate the information you want and display it in the Viewer.
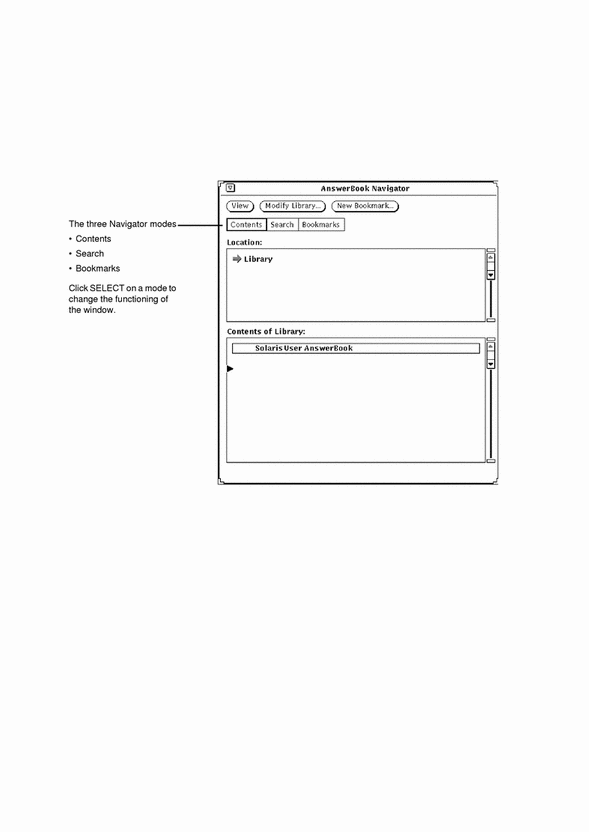
The Navigator provides three ways of finding on-line information:
-
In Contents mode you can select an AnswerBook, and then browse through it, opening and closing books, chapters, and sections, as needed.
-
In Search mode you can enter a search phrase describing what you're looking for, and the Navigator displays a list of documents found, ranked by relevance.
-
In Bookmarks mode, you can go directly to pages where you previously created electronic bookmarks and edit them.
Figure 19-2 AnswerBook Navigator in Contents Mode
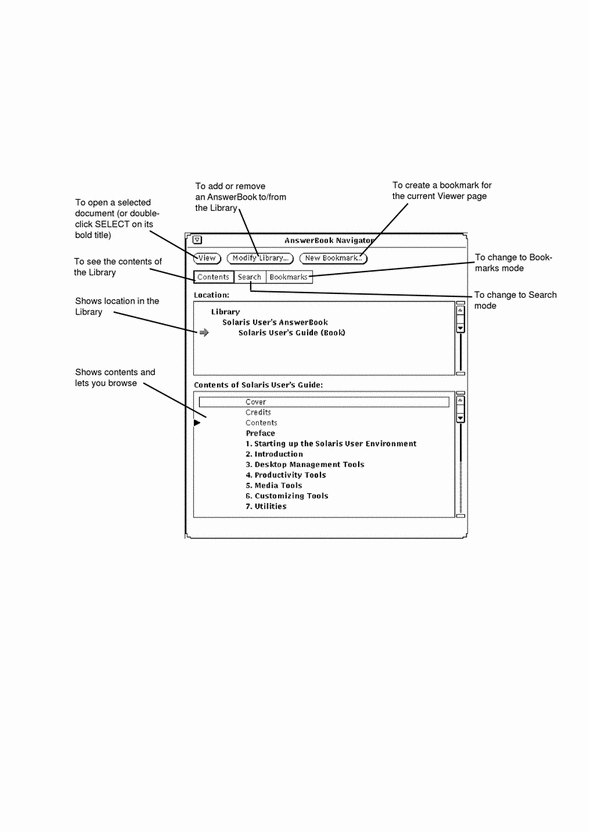
Use the AnswerBook Navigator window to:
-
Search for topics of interest
-
Modify your Library (by adding or removing an available AnswerBook)
-
Select and open an AnswerBook
-
Select topics for display in the Viewer
-
Browse through tables of contents
-
Leave bookmarks and comments on pages within a Library
Figure 19-3 AnswerBook Navigator Functions
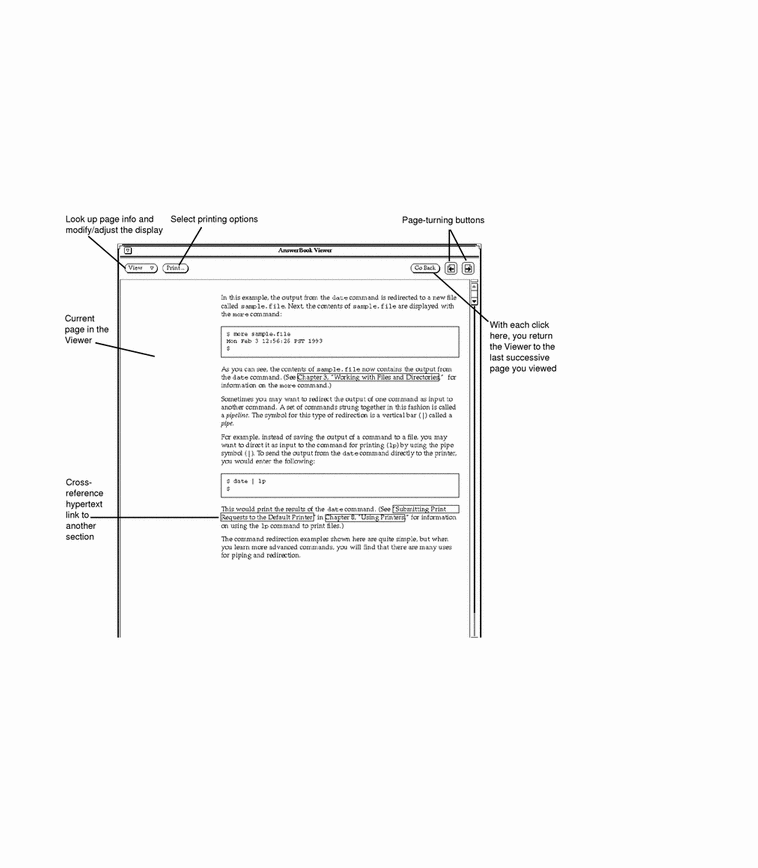
Use the AnswerBook Viewer to read the documents you select in the Navigator and to print them. You can read pages sequentially or follow hypertext cross-reference links from topic to topic.
Figure 19-4 AnswerBook Viewer Functions
Closing or Quitting the AnswerBook Navigator and Viewer
You can close the Navigator and Viewer windows separately. The closed Navigator and Viewer windows are represented by the icons in Figure 19-5.
Figure 19-5 AnswerBook Navigator and Viewer Icons
Close each window by choosing Close from its window menu or by pressing the Open key on your keyboard (which toggles Open/Close).
You can quit each window, or its icon, by choosing Quit from its window menu. When you quit the Navigator, you quit both the Navigator and the Viewer; quitting the Viewer quits only the Viewer.
You can also use the keyboard equivalents that apply to all DeskSet applications to close or quit the Navigator and Viewer. For more information, see Chapter 17, Customizing the Solaris Environment.
Finding and Displaying a Document
The default mode in the AnswerBook Navigator is Contents. In Contents mode, the Navigator has two panes: Location and Contents. Initially, the Location pane lists your Library, and the lower Contents pane lists the AnswerBook sets in the Library.
Opening an AnswerBook
To see more of the contents of an AnswerBook:
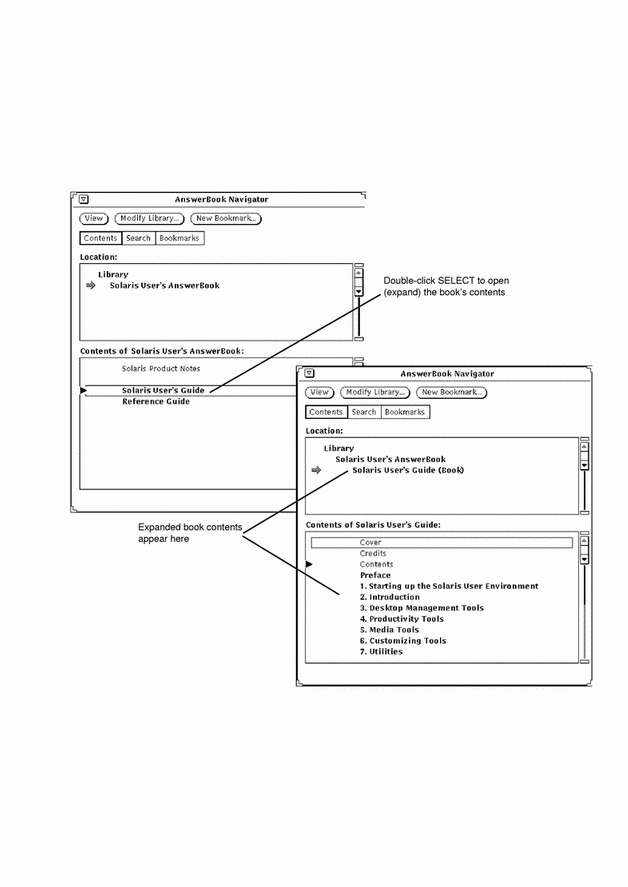
In the lower Contents pane, double-click SELECT on a bold AnswerBook title.
The title expands to show more contents.
Figure 19-6 Opening (Expanding) a Title in the Navigator
Navigating Through Sets and Books in an AnswerBook
With the AnswerBook contents expanded, you can browse its sets and books. Some books appear in more than one set.
To expand any boldface listing, double-click SELECT on it. When you do so, the listing expands to show more of its contents.
Figure 19-7 Expanding the Contents of a Book in the AnswerBook Navigator
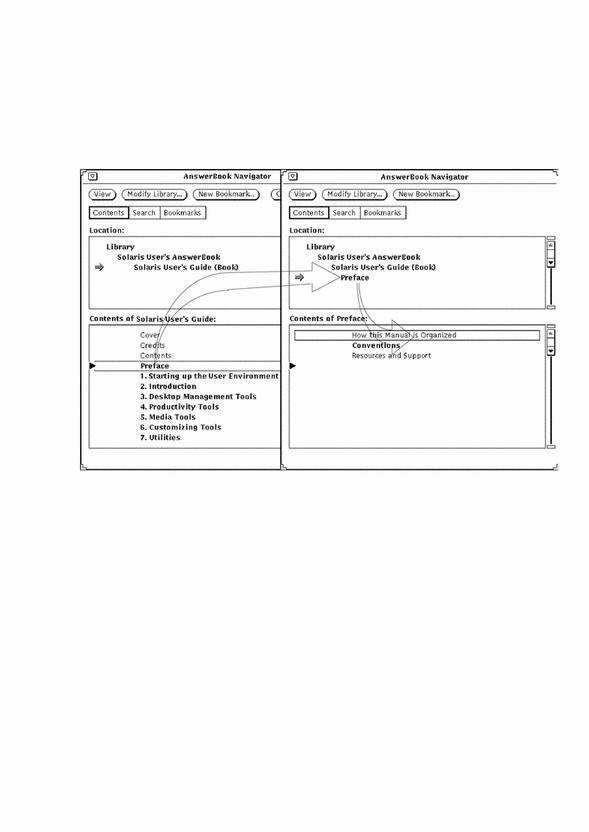
With each expansion, the Contents list grows to reflect deeper levels of the documentation--sets, books, chapters, and headings. For example, if you double-click on a set title, the title moves up into the Location pane, and the list of books contained in that set is displayed in the Contents pane below.
When you double-click SELECT on any listing at or below the book level, the first page of that topic or document opens in the AnswerBook Viewer.
To display entries that have scrolled out of sight, use the scrollbar or Scrolling List menu (displayed by pressing MENU) in either pane to locate it, as shown in Figure 19-8.
Figure 19-8 Scrolling in the Location or Contents Pane

Viewing a Book
In the AnswerBook Viewer, you can turn the pages of a book, chapter, or section almost as if you were reading a printed book. You can also follow hypertext cross-reference links between sections, chapters, and books.
Turning Pages
To turn pages, click SELECT on the page-turning buttons at the top of the AnswerBook Viewer, or click SELECT on the Go Back button to retrace your steps successively, page by page. See Figure 19-4.
Keyboard Shortcuts
You can use keyboard shortcuts for the paging commands.
-
PgUp works like the
previous-pagebutton. -
PgDn works like the
next-pagebutton. -
Undo works like the
Go Backbutton. -
Home displays the first page of the chapter you're in. If you're already at the first page of a chapter, Home displays the first page of the previous chapter.
-
End displays the first page of the next chapter.
Checking Your Location in the AnswerBook
Choose Page Info from the View button menu in the Viewer to look up the origin of the page currently on display. The Page Info window, shown in Figure 19-9, is displayed.
Figure 19-9 Page Info Window

Each time you choose the Page Info option, you see an update of the information for the current page.
Following Hypertext Cross-Reference Links
Hypertext cross-reference links appear as text boxed with a thin outline.
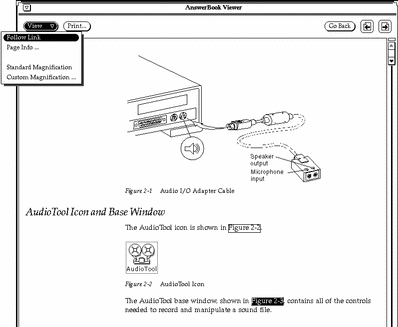
You can follow hypertext cross-reference links within or between books. The quickest way to follow a cross-reference link is to double-click SELECT on the boxed link. Or, you can click SELECT on the hypertext link, then press MENU on the View button and choose Follow Link, as shown in Figure 19-10.
Figure 19-10 Following a Link
Note -
If, when you attempt to follow a link, you see the message, "Can't follow hypertext link" at the bottom of the Viewer window, probably the link points to a document that is not in any of the currently selected AnswerBooks in the Library. See "Modifying Your Library".
Searching with the Navigator
In Search mode, the Navigator can match your requests by searching through the text and titles of all documents you have included in your Library. You can enter search phrases in your own words, and enhance your searches (see "Advanced Search Techniques").
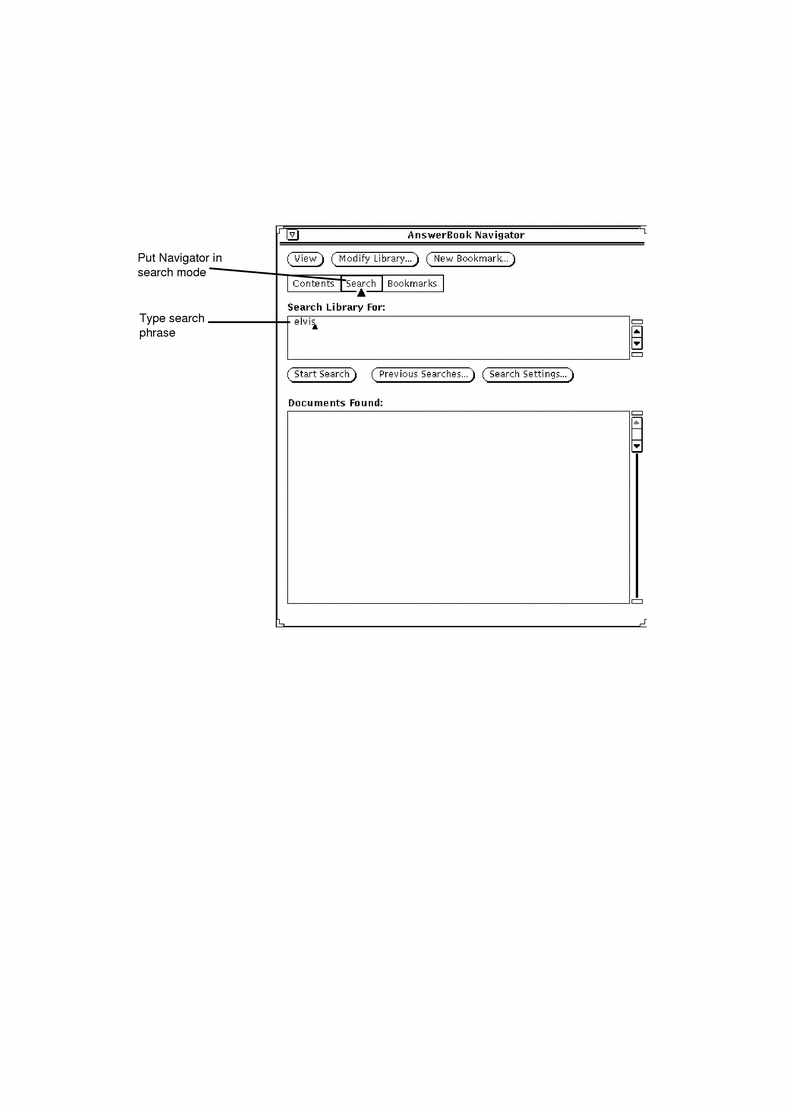
To change to Search mode, click SELECT on the Search setting in the control area.
Figure 19-11 AnswerBook Navigator in Search Mode
To search for a topic of interest:
-
Begin a search by typing a search phrase--a word, phrase, or sentence--in the pane marked "Search Library For."
Type any text up to 1024 characters including spaces and punctuation. Edit the search phrase as you would in any text window.
-
To start the search, press Return at the end of the search phrase.
Or, you can click SELECT on the
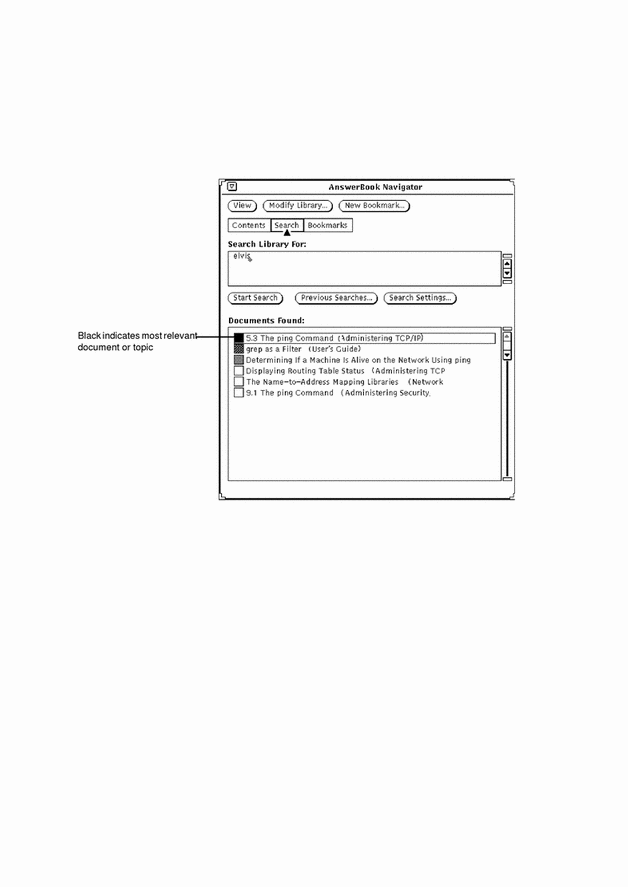
Start Searchbutton.When the search is complete, relevant topics are listed in the Documents Found pane. The topics are coded with squares, starting with black (most relevant) to white (least relevant), with shades of gray in between.
Figure 19-12 shows the result of a search. Each item points to a location in the Library where a document that matches your request was found.
Figure 19-12 Documents Found in a Search
To see a topic found in the search:
-
Double-click SELECT on an item in the Documents Found pane.
That page is then displayed in the Viewer.
Scroll the list in the Documents Found pane of the Navigator to see more items in the list.
Reusing and Changing Search Phrases
Your search phrases dating from the last time you started the Navigator are saved so you can reuse them. You can reuse a search phrase as is, or you can edit it before starting a new search. Click SELECT on the Previous Searches button. The Previous Searches window is displayed.
Your search phrases are listed with the most recent at bottom. You can copy and paste a phrase from the Previous Searches window into the Search For pane. Press Return or click SELECT on the Start Search button.
Customizing Searches
To change search settings, click SELECT on the Search Settings button. In the Search Settings window you can specify various options to control the results of your searches.
Search Library by: Text and Titles searches all text included in your Library, while Titles Only searches only book and chapter titles, and section and subsection headings.
Sort Findings by: Relevance Only simply lists all documents found in order of relevance, regardless of the books they appear in. Relevance and Book means the documents found will be listed grouped by book, with topics within a given book listed by relevance.
Limit Findings to: Click SELECT to increase or decrease the default number of 30 findings per search.
Click SELECT on Apply to preserve your settings, or click SELECT on Reset to undo your choices and restore the previous ones.
Advanced Search Techniques
To make your searches more precise and more productive, you can:
-
Restrict (modify) the contents of your Library to constrain the scope of the search.
-
Choose the search setting "Titles Only" to search through book, chapter, and section titles rather than searching through the full text of documents.
-
Use special characters to mark your search phrases for literal, suffix-expansion, and "nearness" matching.
Scoping the Search by Modifying the Library Contents
By adding or removing an AnswerBook from your Library, you can widen or narrow the scope of your search. See "Modifying Your Library".
Titles Only Searches
The Titles Only option restricts searches to book titles and chapter and section headings. This search method is useful if you already know terms used in the titles or headings of documents you are looking for.
Using Special Characters in Search Phrases
By adding special characters--quotation marks, parentheses, and asterisks--to your search phrases, you can make searching more precise. You can combine the characters to further refine your search.
Quotation Marks: Searching for Literal Phrases
Place the search phrase between double quotation marks to find documents that contain that literal phrase. For example, the search phrase "reading mail" finds documents containing that phrase. On the other hand, if you type reading mail, you will find documents containing one or both words.
Parentheses: Searching for Words in Proximity
Place words between parentheses to find documents with those words in proximity to each other. For example, the search phrase (reading mail) will find all documents that have "reading" and "mail" within a few lines of each other, in either order.
Asterisks and Hyphens: Searching for Variations on a Word
Place an asterisk at the end of a word to match all possible endings of the word. For example, the search phrase chang* will expand to "change," "changed," "changes," "changing," and so on.
If you do not know whether a term is one word, two words, or hyphenated in the documentation, you can insert the hyphen to look for all three forms. For example, to search for "mail tool," "mailtool," and "mail-tool," type mail-tool in the Search For pane.
Connecting Punctuation
Words connected by punctuation other than a hyphen are treated character for character as literal phrases, for example: /usr/local/bin, win_client_data, and in.rlogind.
Combining Advanced Search Techniques
You can combine any or all of the above search techniques to further refine your search. For example:
"chang* mail-tool" finds documents containing literal phrases such as "change mailtool," "change mail tool," "change mail tool," "change mail-tool," "changing mailtool," "changing mail tool," "changing mail-tool," and so on.
"display button" viewer searches for "display button" and "viewer" in proximity to each other.
Using Bookmarks Mode
Placing bookmarks helps you relocate pages of interest quickly. You can also use bookmarks to annotate a page with your comments. Note that bookmarks do not appear on the marked pages. When you put the Navigator in Bookmarks mode, you'll see a list of all the bookmarks you've created to date.
You can create a bookmark in any Navigator mode, but you must change the Navigator to Bookmarks mode if you want to read, edit, or delete bookmarks or print or display bookmarked pages. See "Viewing and Editing Your Bookmarks".
Creating a New Bookmark
To create a new bookmark for the page currently displayed in the Viewer, click SELECT on the New Bookmark button at the top of the Navigator.
Figure 19-13 New Bookmark Window

In the New Bookmark window, the text at the top specifies the current page. You can edit the text in the "Bookmark for" field, which is used in the Existing Bookmarks list when the Navigator is in Bookmarks mode. You can also type an annotation in the Comment pane.
Click SELECT on the Create button to create the new bookmark. Or, if you decide not to create a bookmark, dismiss the New Bookmark window.
Viewing and Editing Your Bookmarks
To see your list of bookmarks, click SELECT on Bookmarks.
Figure 19-14 AnswerBook Navigator in Bookmarks Mode
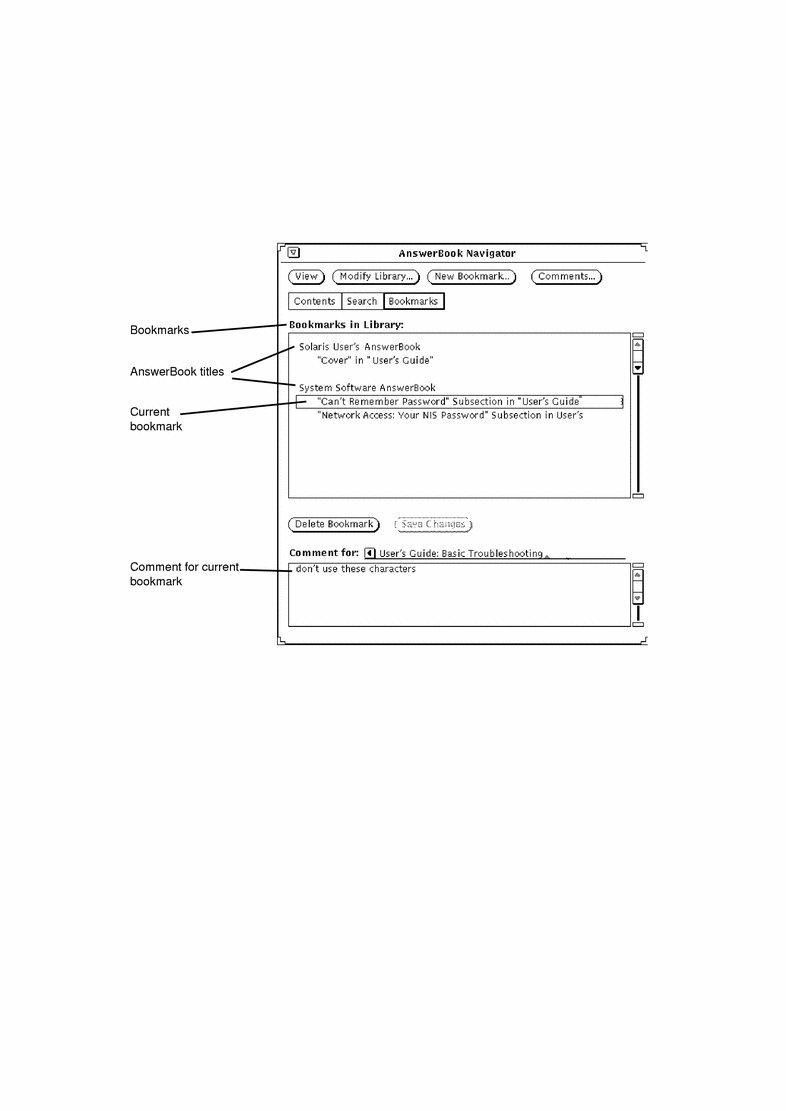
The Bookmarks list shows the Bookmark titles listed under the associated AnswerBook. To see the comment for a particular bookmark, select (highlight) it in the Bookmarks list.
Editing a Bookmark
You can edit a bookmark directly in the Bookmarks list. When you're done, save the bookmark changes.
Deleting a Bookmark
To delete a bookmark, select it and then click on the Delete Bookmark button. The Navigator asks for your confirmation before deleting. Note that you cannot undelete a deleted bookmark.
Accessing a Bookmarked Page
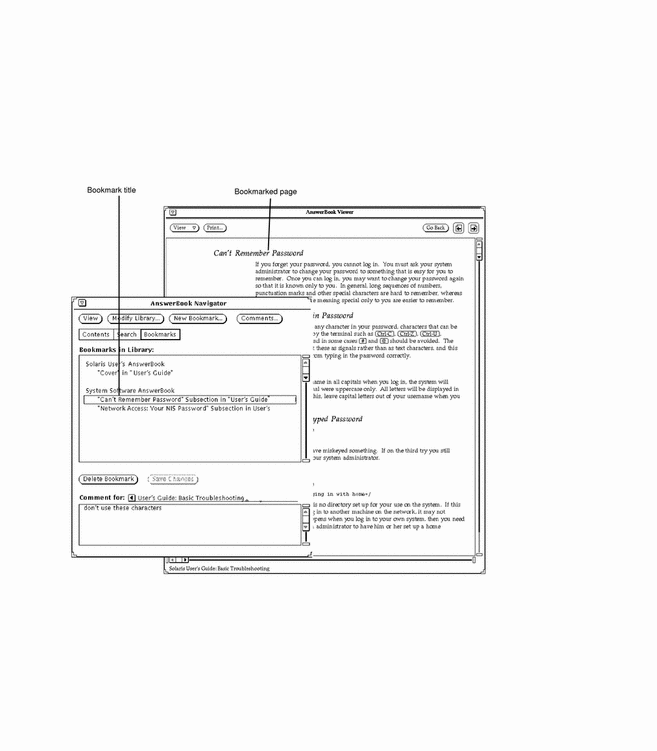
Bookmarks serve as links to pages you've marked in the AnswerBook Viewer. Double-click SELECT on a bookmark to display the bookmarked page.
Figure 19-15 Using a Bookmark to Go to a Page in the Viewer
Modifying Your Library
You can add AnswerBooks to your Library, provided they have been installed and configured for your use. You can also remove AnswerBooks from your Library to constrain browsing and searching.
Note -
The System Administration Guide provides information for system administrators on how to make an AnswerBook available to users.
-
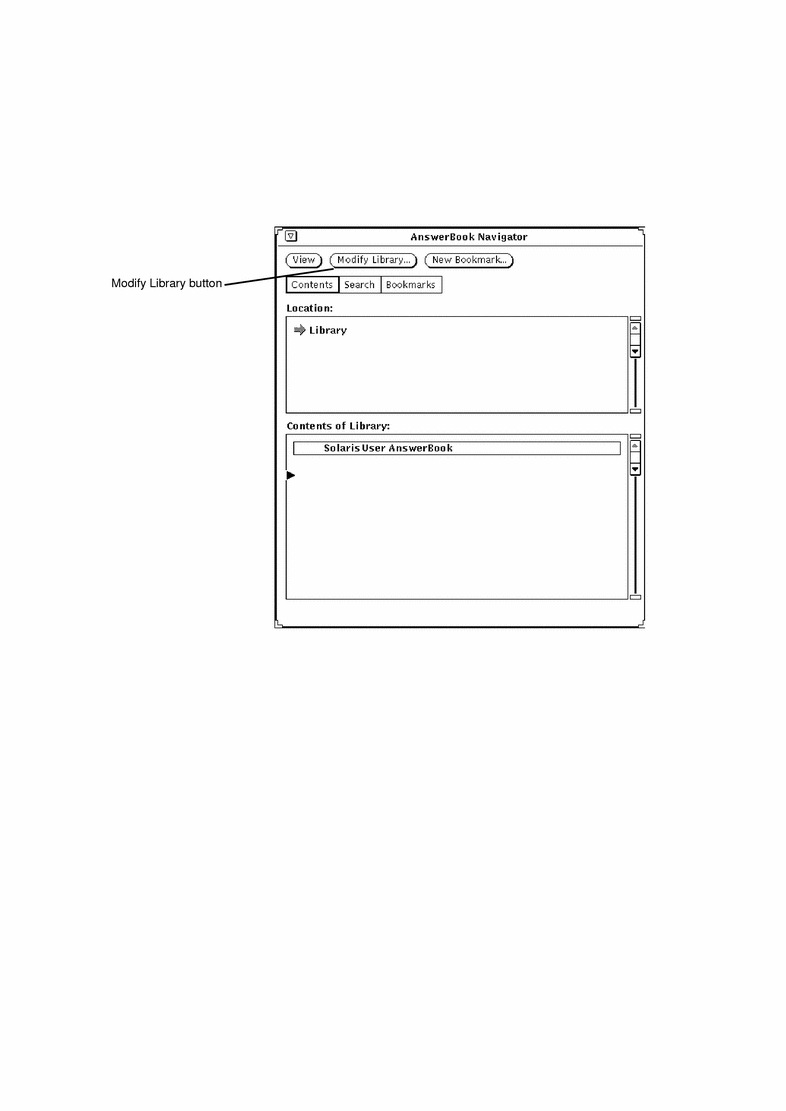
Click SELECT on the Modify Library button at the top of the Navigator.
Figure 19-16 Modifying the Contents of Your Library
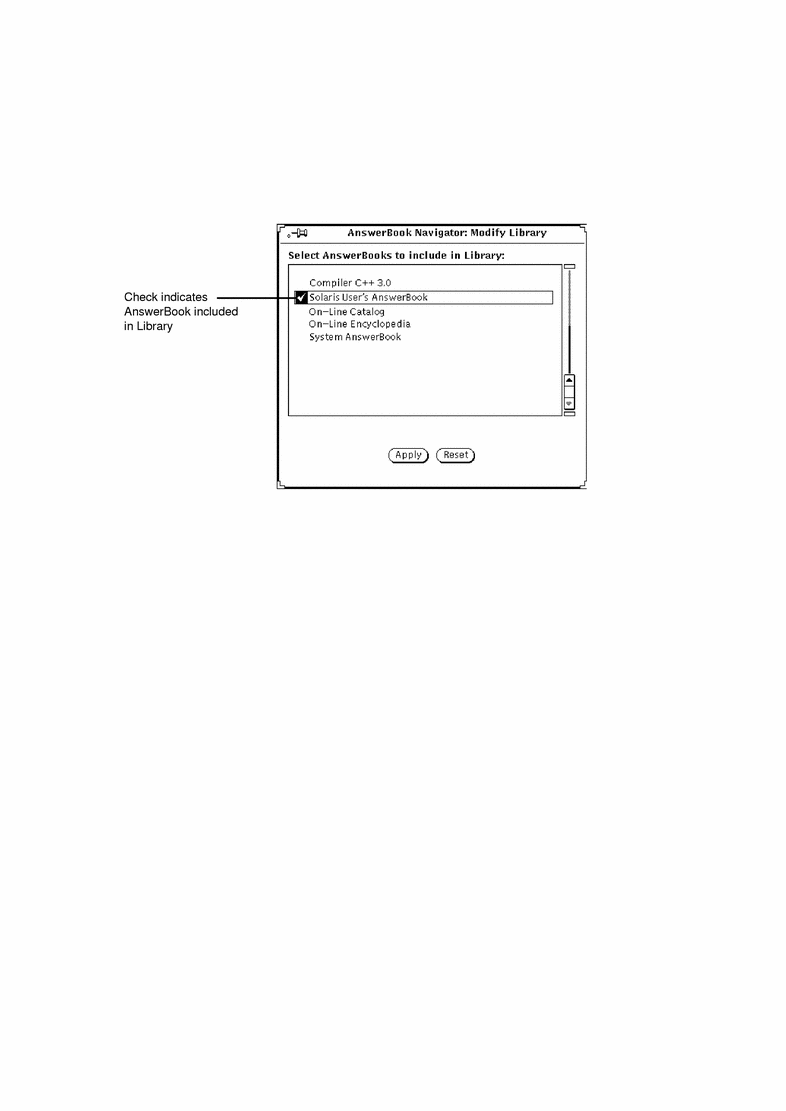
The AnswerBook browser opens and displays a list of available AnswerBook products.
Figure 19-17 Choosing an AnswerBook for the Library
-
Click SELECT on each AnswerBook you want to add.
A check mark appears next to each title you select. To deselect (uncheck) an AnswerBook, click SELECT on it again. If an AnswerBook title is not checked, it means it is not included in your Library.
When you're ready, save your selections.
-
Click on Apply.
This updates the Library to include each newly selected AnswerBook.
Any AnswerBook you add to the Library will be included in the Navigator Contents listing and in your searches.
Note -If you deselect AnswerBooks to constrain searching, don't forget to reselect those AnswerBooks for future browsing.
Customizing the Viewer
The View button menu provides two options for setting the display magnification of the Viewer page. Press MENU on the View button to see these menu options: Standard Magnification and Custom Magnification.
Magnifying the Viewer
Standard Magnification is the magnification determined by the publisher of the documents--that is, the default. You can set other magnification values by choosing Custom Magnification. This opens the Custom Magnification window.
Figure 19-18 Custom Magnification Window

-
Drag the slider to the desired value.
Press SELECT on the slider control as you move it. The amount of magnification is specified in the Magnification Percentage field.
-
Click SELECT on
Apply.This puts the new page magnification into effect.
Clicking SELECT on
Resetreverts to the previous setting. Single clicks on the left or right of the slider cause one-percent increments up or down the scale.
Printing
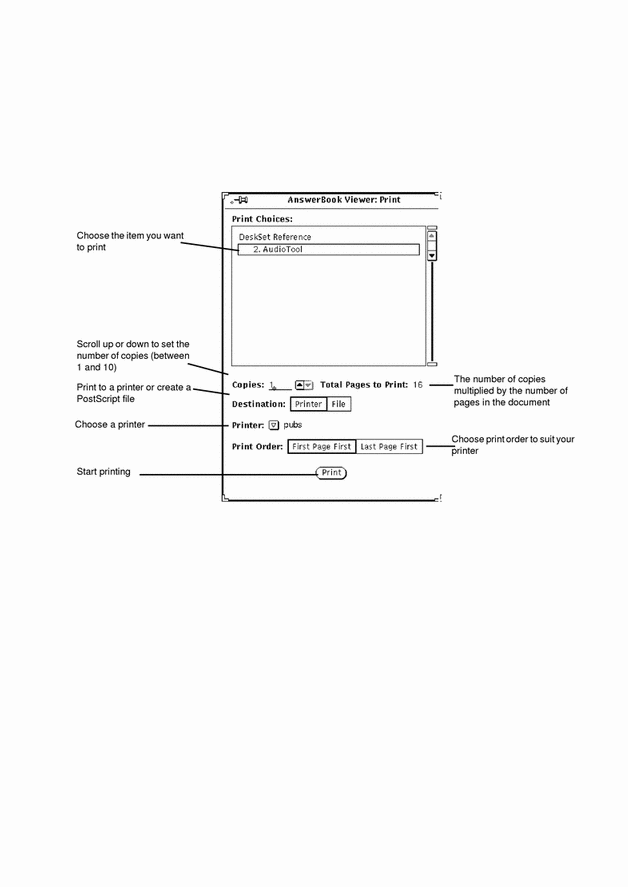
Use the Print button in the Viewer when you want to print books, chapters, sections, subsections, or single pages.
In the Print window that is displayed, you can choose printing options (Figure 19-19). The default printing option is Current Viewer Page, which prints just the page you see in the Viewer.
Figure 19-19 Print Window
- © 2010, Oracle Corporation and/or its affiliates
