Establishing Drag and Drop Behavior
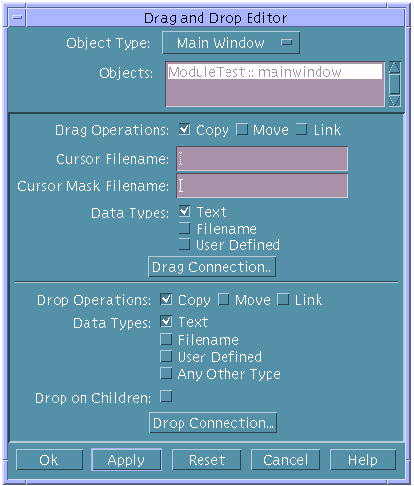
Use the Drag and Drop Editor to establish drag and drop behavior for interface objects. See "To Establish Drag and Drop Behavior" for instructions.

- Object Type
-
An option menu for choosing the type of object (Control Pane, Custom Dialog, Draw Area Pane, Label, or Main Window) for which you wish to establish drag and drop behavior.
- Objects
-
A scrolling list for selecting a specific object for which you wish to establish drag and drop behavior.
- Drag Operations
-
Check boxes for specifying which types of operations (Copy, Move, Link) will be legal for the selected object.
- Cursor Filename
-
A text field for typing the name of the graphics file that contains the graphical representation of the cursor that will be displayed as a drag from the selected object is being performed.
- Cursor Mask Filename
-
A text field for typing the name of the graphics file that contains the bitmap which determines the shape of the visible representation of the cursor beneath the cursor mask. The cursor mask acts like a stencil, allowing only the pixels in the cursor that correspond to pixels in the mask to be visible.
- Data Types
-
Check boxes for specifying Text, Filename, and User Defined as legal data types for drag operations.
- Drag Connection
-
A push button to display the Connections Editor for creating the Call Function connection that makes the dragged-from operation functional.
- Drop Operations
-
Check boxes for specifying which types of operations (Copy, Move, Link) will be legal for the selected object.
- Data Types
-
Check boxes for specifying Text, Filename, User Defined, and Any Other Type as legal data types for drop operations.
- Drop on Children
-
A check box for specifying whether a child of the selected object will be a legal drop site; this is relevant only if the child object is specified as a legal drop site.
- Drop Connection
-
A push button to display the Connections Editor for creating the Call Function connection that makes the dropped-on operation functional.
To Establish Drag and Drop Behavior
-
Choose Drag and Drop from the Editors menu of the App Builder primary window.
-
Choose an Object Type.
-
Select an object in the Objects list.
-
Select the Drag Operations you want to be legal for the selected object.
-
To display a special cursor when a drag operation is being performed from the selected object, type the names of graphics files in the Cursor Filename and Cursor Mask Filename fields.
-
Select the Data Types that will be legal for drag operations.
-
Click Drag Connection.
The Connections Editor is displayed.
-
Choose Dragged From as the When action in the Connections Editor.
-
Choose Call Function as the Action Type in the Connections Editor.
-
Type a name for the called function in the Function text field in the Connections Editor.
This is the name of the function that will be called when a drag operation is performed. You will have to edit the stubs.c file to make the called function do something useful. See "Adding User Code to Generated Code" for information.
-
Click Connect in the Connections Editor.
-
Click Cancel to dismiss the Connections Editor.
-
Select the Data Types that will be legal for drop operations.
-
Check Drop on Children if you want a drop operation on a child of the selected object to be legal.
This is relevant only if the selected object has a child which is designated as a legal drop site.
-
Click Drop Connection to display the Connections Editor.
-
Choose Dropped On as the When action in the Connections Editor.
-
Choose Call Function as the Action Type in the Connections Editor.
-
Type a name for the called function in the Function text field in the Connections Editor.
This is the name of the function that will be called when a drop operation is performed. You will have to edit the stubs.c file to make the called function do something useful. See "Adding User Code to Generated Code" for information.
-
Click Connect in the Connections Editor.
-
Click Cancel to dismiss the Connections Editor.
-
Click OK or Apply in the Drag and Drop Editor to apply the changes.
The Drag and Drop Editor will be dismissed if you click OK.
- © 2010, Oracle Corporation and/or its affiliates
