Adding a Hot-Pluggable Disk Drive
This section contains information on how to configure your system when you add a disk drive while the power is on and the operating system is running.
The way in which you add a disk drive depends on the application you are using. Each application requires that you decide where to install the new disk drive, add the drive, and then reconfigure the operating environment.
In all cases, you must select a slot, physically install the disk drive, and configure the Solaris environment to recognize the drive. Then you must configure your application to accept the new disk drive.
Selecting a Slot for the New Disk Drive
The system's internal disk array can accommodate up to 20 low-profile UltraSCSI disk drives. The basic system configuration includes support for one to four disk drives connected to a four-slot backplane.
Note -
To support five to twelve internal disk drives, you must install an optional 8-bay storage expansion kit, which includes an eight-slot backplane, UltraSCSI PCI controller card, and all necessary cabling. A second 8-bay storage expansion kit is required to support any more than twelve internal disk drives. These kits may be factory-installed when you purchase your system, or installed later as an upgrade.
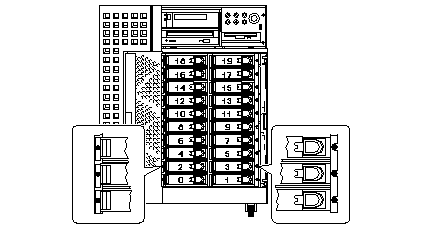
Figure 3-1 shows the system's 20 internal disk slots. Disk slots are numbered from 0 to 19. When adding a new disk drive to the system, you should install the drive in the lowest available slot number.
Figure 3-1 Slot Numbers for Internal Disk Array

Adding the Disk Drive
Refer to the Sun Ultra 450 Workstation Owner's Guide or Ultra Enterprise 450 Server Owner's Guide for drive installation instructions.
Configuring the Solaris Environment
After physically installing the disk drive, you must create a new device entry for the drive in the /devices, /dev/dsk, and /dev/rdsk hierarchies. The new drive is assigned a logical device name of the form cwtxdysz, where:
-
w corresponds to the SCSI controller for the disk drive
-
x corresponds to the SCSI target for the disk drive
-
y is the logical unit number for the disk drive (always 0)
-
z is the slice (or partition) on the disk
The logical device name assigned to the drive depends on the disk slot number where the drive is installed as well as the PCI slot number that contains the disk's associated UltraSCSI controller card.
-
Use the drvconfig and disks commands to add the new device:
# drvconfig
# disks
-
To verify that the new disk has been created, type:
# ls -lt /dev/dsk | more
lrwxrwxrwx   1 root     root          41 Jan 30 09:07 c0t3d0s0 -> ../../devices/pci@1f,4000/scsi@3/sd@3,0:a
lrwxrwxrwx   1 root     root          41 Jan 30 09:07 c0t3d0s1 -> ../../devices/pci@1f,4000/scsi@3/sd@3,0:b
lrwxrwxrwx   1 root     root          41 Jan 30 09:07 c0t3d0s2 -> ../../devices/pci@1f,4000/scsi@3/sd@3,0:c
lrwxrwxrwx   1 root     root          41 Jan 30 09:07 c0t3d0s3 -> ../../devices/pci@1f,4000/scsi@3/sd@3,0:d
lrwxrwxrwx   1 root     root          41 Jan 30 09:07 c0t3d0s4 -> ../../devices/pci@1f,4000/scsi@3/sd@3,0:e
lrwxrwxrwx   1 root     root          41 Jan 30 09:07 c0t3d0s5 -> ../../devices/pci@1f,4000/scsi@3/sd@3,0:f
lrwxrwxrwx   1 root     root          41 Jan 30 09:07 c0t3d0s6 -> ../../devices/pci@1f,4000/scsi@3/sd@3,0:g
lrwxrwxrwx   1 root     root          41 Jan 30 09:07 c0t3d0s7 -> ../../devices/pci@1f,4000/scsi@3/sd@3,0:h
--More--(13%)
The new disk and its logical device name appear at the top of the list. Check the file creation date to make sure it matches the current time and date. In the example above, the logical device name for the new disk is c0t3d0.
Configuring the New Disk Drive In Your Application
Continue adding the disk by following the instructions for your specific application:
These procedures should be performed only by a qualified system administrator. Performing hot-plug operations on an active disk drive may result in data loss if performed incorrectly.
Configuring the New Disk Drive for a UNIX File System (UFS)
Use the following procedure to configure a slice (single physical partition) on a disk to be used with a UFS file system. For instructions about adding a file system to a Solstice(TM) DiskSuite(TM) (SDS) logical disk, refer to the documentation that came with your application.
-
Verify that the device label meets your requirements.
You can use the prtvtoc command to inspect the label for your disk. To modify the label, use the format command. Refer to the prtvtoc(1M) and format(1M) man pages for more information.
-
Select a disk slice for your UFS file system and create a new file system on the slice:
# newfs /dev/rdsk/cwtxdysz
For example: newfs /dev/rdsk/c0t3d0s2
Refer to the newfs(1M) man page for more information.
-
If necessary, create a mount point for the new file system:
# mkdir mount_point
where mount_point is a fully qualified path name. Refer to the mount(1M) man page for more information.
-
After the file system and mount point have been created, modify the /etc/vfstab file to reflect the new file system.
See the vfstab(4) man page for more details.
-
Mount the new file system using the mount command:
# mount mount_point
where mount_point is the directory you created.
The file system is ready to be used.
Adding a Disk to a Solstice DiskSuite Disk Set
You can use any disk you add to the system for Solstice DiskSuite (SDS) new or existing metadevices.
Refer to the Solstice DiskSuite documentation for information on configuring the disk drive.
- © 2010, Oracle Corporation and/or its affiliates
