How to Turn the Power On
Turning on your system for the first time is different from what will probably become your normal procedure. You must be ready to install software and configure your machine.
-
Plug the power cord into the AC input connector in the power supply and to the wall socket.
See the SPARCstation Voyager User's Guide for information on the different ways to configure the power source for your SPARCstation Voyager.
-
Connect a CD drive to your system.
See the SPARCstation Voyager User's Guide for details.
-
Insert the Solaris CD-ROM into the CD-ROM caddy and insert the caddy into the CD drive.
-
Turn on the power to any external devices (for example, the Desktop Storage Module). Refer to the documentation that comes with your drive; for example, the Desktop Storage Module Installation Guide.
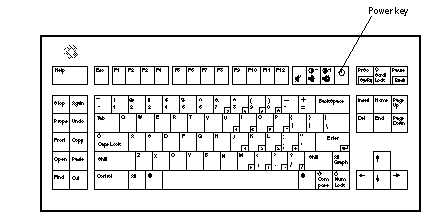
Figure 1-1 Power Key Location: Sun Compact 1 Keyboard

Figure 1-2 Power Key Location: Sun Type 5 Keyboard

-
Turn on the power to the system unit.
Press the power key on the keyboard. For the power key location, see Figure 1-1 or Figure 1-2.
If your SPARCstation Voyager system is operating properly, your monitor displays a banner screen within 15 seconds after the system is turned on.
SPARCstation Voyager X 390Z50), Keyboard Present
ROM Rev. X.XY, XX MB memory installed, Serial #XXX
Ethernet address X:X:YY:Z:A:BB, Host ID:72XXXXXX
If you are doing an interactive installation, press Stop-a and follow the instructions under "Interactive Installation".
If you are doing an automatic installation, you don't have to do anything else now. At this point, the installation process begins.
- © 2010, Oracle Corporation and/or its affiliates
