|
| |
| Sun Java System Directory Editor 1 2004Q4 Installation and Configuration Guide | |
Chapter 5
Working With FormsThis chapter explains how to customize the default Directory Editor forms and how to create new forms for your site. The information is organized as follows:
OverviewDirectory Editor provides the following forms, which you can customize by incorporating business logic and manipulating data before presenting them to your end users:
Note
- You cannot edit the standard forms (those forms beginning with “Default”), but you can create a customized version of these forms by clicking the Customize button to open the form editor.
- For information about the specific HTML components that define the default Directory Editor forms, see “Appendix A, "HTML Components Used to Define Directory Editor Forms."
How Do Forms Work?
Directory Editor forms contain rules that govern how the browser displays user view attributes on a application’s web page. These forms control:
- How data is used on a page. Captures data dynamically from a resource (such as a Directory Server) or calculates the data from other fields.
- How data comes into the system. Interfaces with web pages or non-interactive systems. In this role, the form has no visual fields, but still provides rules to set default values and other field values.
For example, the Full Name field may not be visible to an administrator using the page, but the field value can be set based on values the end-user enters into the First Name, Middle Name, and Last Name fields.
Populating fields from other fields reduces the amount of data entry that users and administrators must perform, consequently reducing potential data entry errors. Similarly, by providing option menus instead of text input fields, an administrator can select a department from a list instead of having to type the department name.
Various factors affect how the browser displays a form. However, form behavior within a browser is primarily determined by how display components are used in the form. You can associate form fields with a display component that determines how the field is displayed in the browser.
Why Edit the Forms?
Why customize the default Directory Editor forms, which already provide all the fields that you need to perform actions within the product? Customizing the default forms allow you to better enforce your company's policies and processes:
Customizing the default fields in forms allows you to extend and customize the application for your environment. Specifically, you can customize the default forms to:
This type of customization is particularly important when different types of administrators must access user data, but it is not appropriate for all of the administrators to have access to all of the user account attributes. For example, a human resources administrator will need to view different subset of user account attributes than a help desk administrator.
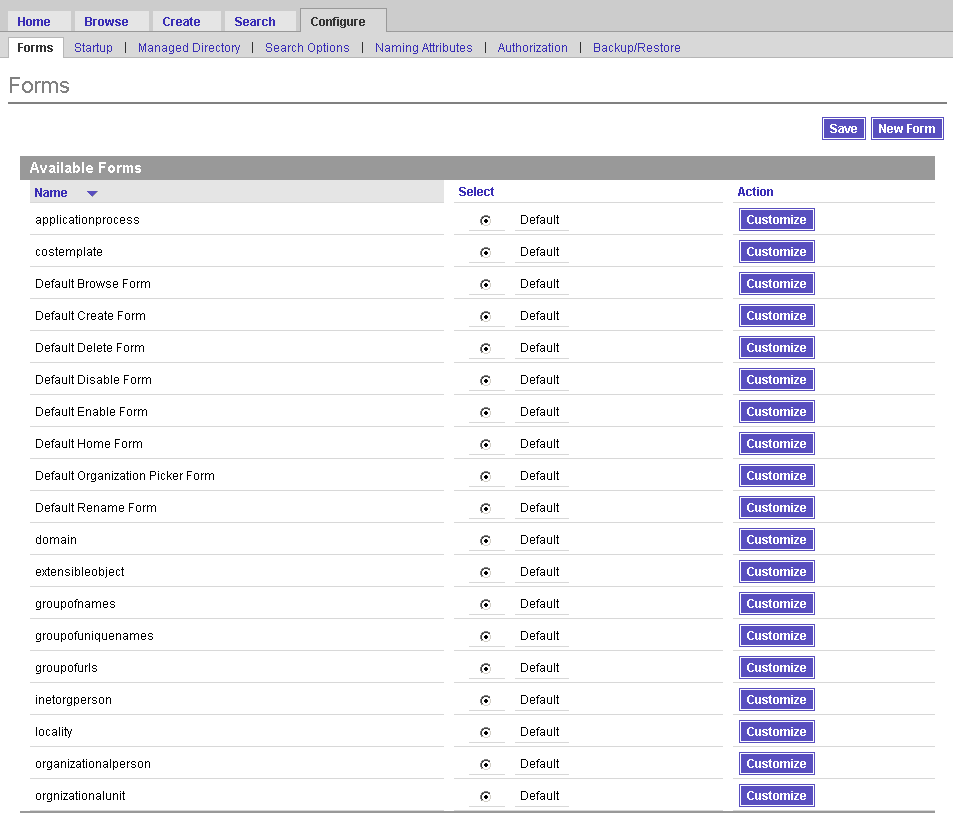
Accessing the Forms PageIf you want to customize or design a form, select the Configure tab, and then click the Forms tab. (See the following figure.)
Figure 5-1 Forms Tab
This page contains:
Instructions for using this page to customize the default Directory Editor forms or to create new forms for your site are provided in the following sections:
Customizing FormsThis section provides instructions and examples for customizing forms, and is organized as follows:
Opening a Form
To open a form for customizing, click the Customize or Edit button in the Action column on the Available Forms page.
A Forms page is displayed, which consists of two views:
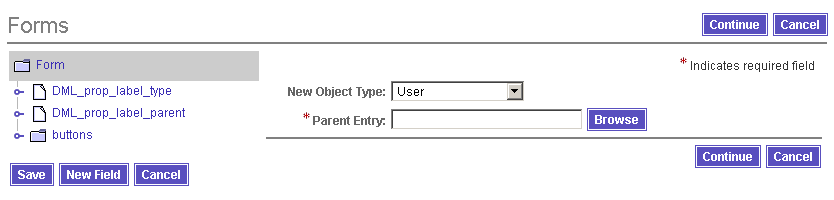
For example, if you decided to customize the Default Create Form, the following page would display:
Figure 5-2 Default Create Form
When you select elements in the Forms tree to edit, the property view interface changes so you can edit the properties associated with that element.
For more detailed information, continue to the next section.Working with the Forms Page
This section provides instructions for working with the Forms page.
Working in Tree View
The tree view (located on the left side of the Forms page) shows a hierarchical view of the form elements. The tree lists each element in order, nesting children under their parent.
Figure 5-3 Tree View Display (Expanded)
The node icons used in the tree are based on whether the form has children, and include the following:
The tree also contains the following icons:
To customize the properties associated with each form or field element, click the node label, and the right side of the Forms page changes as follows:
- Click Form
to specify a name, description, title, and/or a subtitle for the form (see Identifying the Form).
- Click any other named element
to specify the field properties and location (see Customizing Field Properties and Changing Field Locations).
- Click the New Field button to create a new field for the form (see Creating New Fields).
Working in Property View
The property view (located on the right side of the Forms page) provides a graphical representation of the form you are customizing.
When you initially open a form for editing, the property view displays the form as it is currently configured. However, when you select an element in tree view, the property view changes so you can edit properties associated with that element.
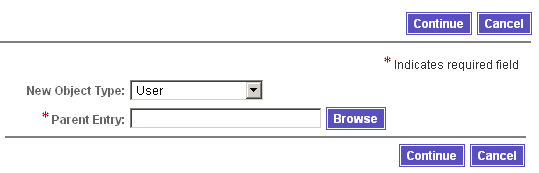
For example, if you select the Default Create Form, the initial property view is shown in Figure 5-4.
Figure 5-4 Initial Property View: Create Form
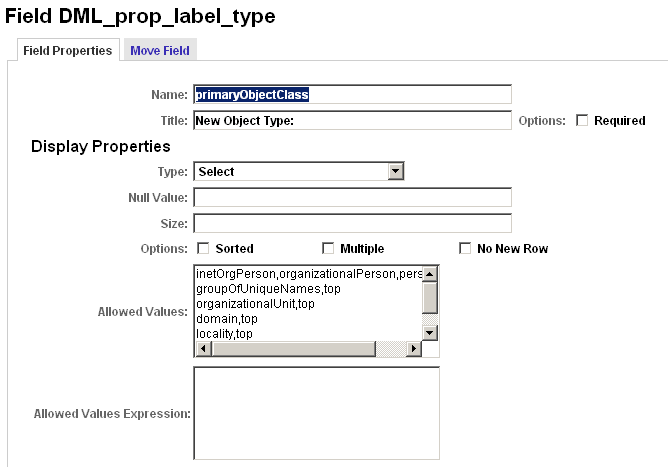
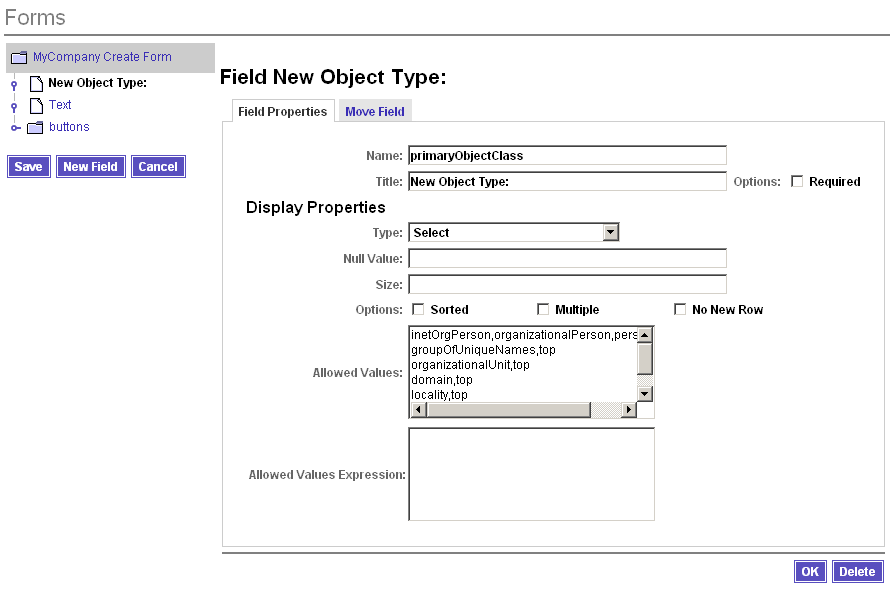
Then, if you select the New Object Type node in tree view, the property view changes as shown in Figure 5-5.
Figure 5-5 Property View: Editing New Object Type Element
When you are editing elements, the property view contains two tabs:
After changing form elements in property view, if you select the Form node in tree view, the property view changes to reflect your changes (if your changes affected the visible features of the form).
Performing Common Tasks
This section describes how to perform the common tasks associated with customizing Directory Editor forms. The information is organized as follows:
Identifying the Form
To identify your customized form, you can specify a name, description, title, and/or subtitle as follows:
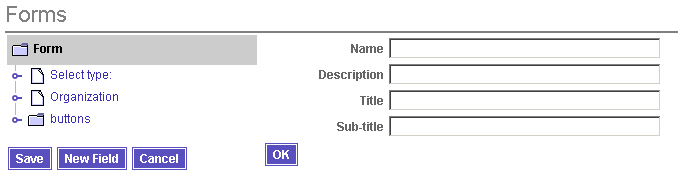
- If the Form node is not already selected, click the Form folder icon (top node in the Forms tree) and the page changes as follows:
Figure 5-6 Identifying a Default Create Forms
- Complete one or more of the following fields (all optional):
- Name: Enter a name for this form.
- Description: Enter a meaningful description of the form.
- Title: Enter the text you want to display at the top of the form.
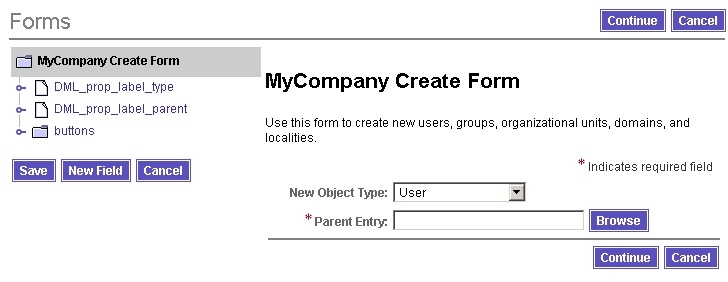
For example, MyCompany Create Form.- Subtitle: Enter the text you want to display beneath the form’s title.
For example, you might indicate the form’s purpose: Use this form to create new users, groups, and organizational units.- When you are finished, click OK.
The Form node in tree view changes to use the Title you specified, and the new form displays on the right side of the page. For example:
Figure 5-7 New Form Page
- Continue as follows:
- If you have other changes to make to the current form, select another node in the tree.
- If you want to add one or more new fields, click the New Field button and proceed to Creating New Fields.
- If you have no other changes to make, click Save.
Customizing Field Properties
To customize properties for a particular field on your form, use the following steps:
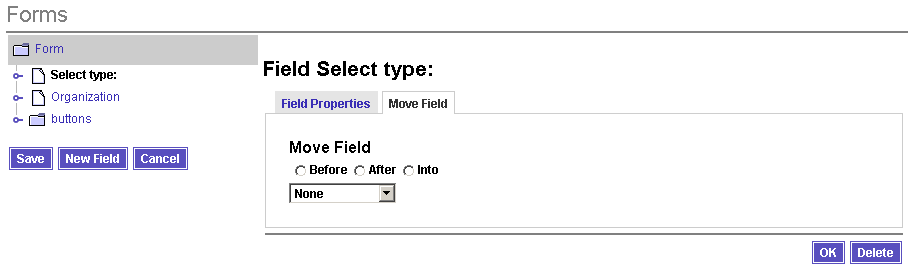
- In the Form tree, click the field element you want to customize.
For example, click Select type and the following page is displayed:Figure 5-8 Customizing Field Properties
The content of the Field Properties tab will change, depending on which field element you select. The following table lists all of the different Field Properties parameters you might encounter as you work.
- On the Field Properties tab, you can
- When you are finished customizing the properties for this field, you can:
- Select the Move Field tab to change the field’s location on this form.
(Proceed to Changing Field Locations.)- Add or remove a field (Proceed to Creating New Fields or Deleting Fields respectively.)
- Select a different field to customize that field’s properties.
- Save or Cancel your changes and return to the Available Forms page.
(Proceed to Saving Changes.)Changing Field Locations
Use the following steps to change the location of a particular field on your form:
- In the Form tree, click the field element you want to move.
- When the Properties tabs are displayed, select the Move Field tab.
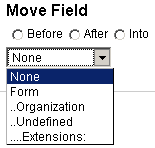
Figure 5-9 Move Field Tab
The Move Field tab contains three radio buttons and a drop-down menu. Elements displayed in the drop-down menu are indented to indicate whether they are tabs, fields, or nested children.
For example, in the following figure, Form is the form, Organization and Undefined are field elements, and Extensions: is a child of Undefined.
Figure 5-10 Move Field Menu
- Decide where to move the selected field, enable one of the following buttons, and then make a selection from the drop-down menu:
- When you are finished with the Move Field tab, you can:
- Select a different field to customize.
- Add or remove a field (Proceed to Creating New Fields or Deleting Fields respectively.)
- Save or Cancel your changes and return to the Available Forms page.
(Proceed to Saving Changes.)
Creating New Fields
To Create a new field for your form:
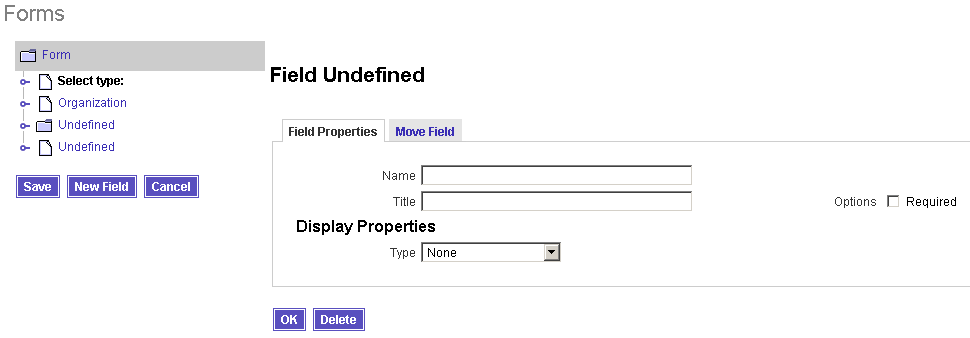
- Click the New Field button, located under the Form tree.
Directory Editor adds an undefined node to the Form tree, and the property view changes as follows:
Figure 5-11 Creating a New Field
- Complete the Field Properties tab as described in Customizing Field Properties.
- Use the Move Field tab to position the new field on your form as described in Changing Field Locations.
- When you are finished, click Save save your change(s) to the directory.
Deleting Fields
To Delete a field element from your form, click the Delete button that is located at the bottom of the Field Properties tab. Directory Editor will remove that field element from the form (and tree view).
Note
You must click the Save button located under the Form tree to save your change(s) to the directory.
Canceling Changes
If you make a mistake while customizing a form or decide you do not want to use the form you customized, click the Cancel button located at the bottom of the Form tree.
Directory Editor will cancel any unsaved changes made to that form and immediately return you to the Available Forms page.
Saving Changes
You can save your customization changes at any time by clicking the Save button located at the bottom of the Form tree. Directory Editor will immediately save all changes made to that form.
Creating New FormsTo create a new form, use the following instructions:
- Click the New Form button (located at the top and bottom of the Forms page).
A new page displays (see the following figure).
Figure 5-12 Creating a New Form
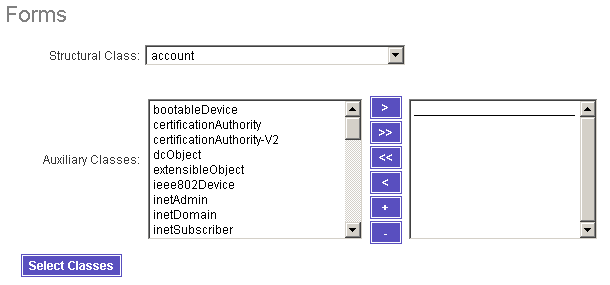
- Select a structural class from the drop-down menu.
- If applicable, use the Auxiliary Classes selection tool buttons to select one or more auxiliary classes for your new form, as follows:
- Select one or more auxiliary classes from the available list and click the
button to move them to the selected list. (Press your Shift key and click on items in the list to select multiple auxiliary classes.)
- Click the
button to move all available auxiliary classes to the selected list.
- Click the
button to move all auxiliary classes from the selected list back to the available list.
- Select auxiliary classes from the selected list and click the
button to move them back to the available list.
- Use the
(move up) and
(move down) buttons to change the order of auxiliary classes in the selected list
- After making your selections, click the Select Classes button to add the classes to your new form.
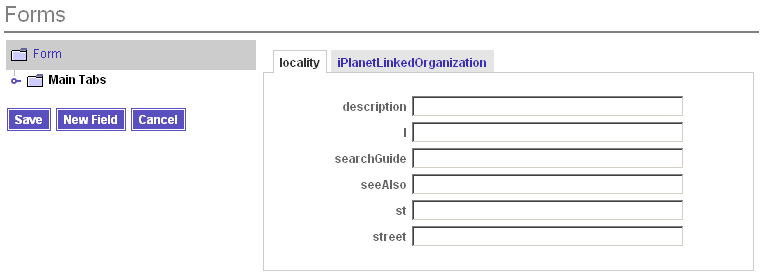
Another page displays, containing a tab for the structural class and one tab for each auxiliary class you selected.
For example, if you specified the locality structural class and the added
iPlanetLinkedOrganization Auxiliary class, the new page would look like the following figure:Figure 5-13 Adding Classes to a Form
The tab names, and the content of each tab, will differ with each structural class and auxiliary class selection.
- Complete the sub-element text boxes on each tab, being certain to provide all required information (identified by a red asterisk).
- Select the Form, Tab, and field element nodes to specify the field properties (see page 5-79) and to specify the field locations (see page 5-74) for each.
Figure 5-14 Specify Properties for Each Node in the Tree
- When you are finished, click Save to save your new form to the directory.
Testing Your FormThe best way to test your form before loading it into your production environment, is to preview the form while you are editing it.
In addition, you may want to create a staging or test environment that you can use when you are developing new forms. You can export the staged forms (select Configuration -> Import/Export), and then import them into your production environment.
Note
For importing and exporting instructions, see Backing Up and Restoring Configurations.
 The folder icon displays if the form item has children.
 The page icon displays if the form item does not have children.
 to view any nested children in that form item node.
  to collapse the form item.