How to Disconnect and Reconnect a Node from Shared Storage
Use this procedure to temporarily disconnect a node from shared storage. You need to temporarily disconnect a node from shared storage if you intend to replace an HBA.
This procedure relies on the following assumptions.
-
You intend to reconnect the shared storage to the same host adapter that the storage array was connected before you disconnected the SCSI cable.
-
This procedure defines Node A as the node you want to disconnect from the shared storage. Node B is the remaining node.
-
This procedure assumes that you might have more than one storage array connected to Node A.
 Disconnect the Node from Shared Storage
You must maintain proper SCSI-bus termination during this procedure. The process by which you disconnect the node from shared storage depends on whether you have host adapters available on Node B. If you do not have host adapters available on Node B and your storage device does not have auto-termination, you must use terminators.
Note –
To determine the specific terminator that your storage array supports, see your storage documentation. For a list of storage documentation, see Related Documentation.
Steps
-
Determine the resource groups and device groups that are running on Node A.
Record this information because you use this information in Step 6 to return resource groups and device groups to these nodes.
# scstat
-
Identify the submirrors on the storage array that is connected to Node A.
-
Move all resource groups and device groups off Node A.
# scswitch -S -h nodename
-
(Optional) If necessary, detach the submirrors on the storage array that is connected to Node A.
For more information, see your Solstice DiskSuite/Solaris Volume Manager or VERITAS Volume Manager documentation.
-
Shut down Node A.
For the procedure about how to shut down and power off a node, see your Sun Cluster system administration documentation.
-
To maintain proper SCSI-bus termination during this procedure, perform one of the following steps. The approach you choose depends on whether you have an available host adapter on Node B.
-
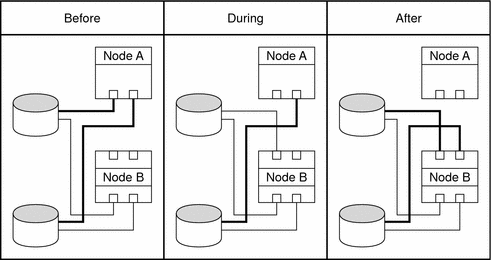
Disconnect the SCSI cable between Node A and the storage array. Attach this SCSI cable to Node B on the storage array. For an illustration, see Figure 2–1.
Figure 2–1 Disconnecting the Node from Shared Storage by Using Host Adapters on Node B

-
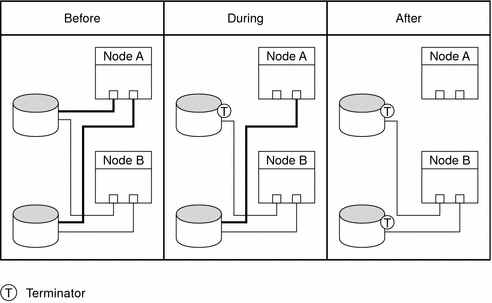
Disconnect the SCSI cable between Node A and the storage array. Install an appropriate SCSI terminator to this SCSI connector on the storage array. For an illustration, see Figure 2–2.
Figure 2–2 Disconnecting the Node from Shared Storage by Using Terminators

-
-
Boot Node A into cluster mode.
-
If you detached the submirrors in Step 4, reattach the submirrors. Wait for the submirrors to resynchronize.
For more information, see your Solstice DiskSuite/Solaris Volume Manager or VERITAS Volume Manager documentation.
-
Repeat Step 4 through Step 8 for each remaining storage array that is connected to Node A.
-
Reconnect the node to the shared storage as outlined in Reconnect the Node to Shared Storage.
 Reconnect the Node to Shared Storage
Steps
-
(Optional) If necessary, detach the submirrors on the storage array.
For more information, see your Solstice DiskSuite/Solaris Volume Manager or VERITAS Volume Manager documentation.
-
Disconnect the SCSI terminator. Reattach the SCSI cable between the storage array and Node A.
 Caution –
 Connect this storage array to the same host adapter that the storage array was connected before you disconnected the SCSI cable.
-
Boot Node A into cluster mode.
-
If you detached submirrors in Step 1, reattach the submirrors on the storage array. Wait for the submirrors to resynchronize.
For more information, see your Solstice DiskSuite/Solaris Volume Manager or VERITAS Volume Manager documentation.
-
Repeat Step 1 through Step 4 for the remaining storage array that you want to reconnect to Node A.
-
(Optional) Return the resource groups and device groups that you identified in Step 1 to Node A.
# scswitch -z -g resource-group -h nodename
# scswitch -z -D device-group-name -h nodename
- © 2010, Oracle Corporation and/or its affiliates
