|
| |
| Sun Java(TM) System Directory Proxy Server 5.2 2005Q1 Administration Guide | |
Chapter 8
Defining and Managing Property ObjectsAs explained in the deployment chapter of this book, Directory Proxy Server can function as an LDAP access router, helping you protect your private directory information from unauthorized access, while making it safe for you to publish your public information. The server can handle thousands of LDAP client requests and can apply fine-grained access control rules and protocol filtering rules to each request before routing it to a directory server.
Property objects in Directory Proxy Server enable you to specify specialized restrictions that the LDAP clients must follow. These properties can then be included in other entries where the restrictions need to be applied. This chapter provides an overview of each of the properties and explains how to create property objects using the Directory Proxy Server Configuration Editor Console.
The chapter has the following sections:
Attribute Renaming PropertyTypically, an LDAP directory contains information about entities such as people in your organization and your network resources. For each entity, there would be an entry in the directory. Each entry in a directory is identified by its distinguished name (DN) and is represented by a set of attributes and their values. Each entry has an object class attribute that specifies the kind of object the entry describes and defines the set of additional attributes it contains. Each attribute describes a particular trait or characteristic of an entry. For example, an entry might be of an object class organizationalPerson, indicating that the entry represents a person within a particular organization. This object class allows the givenname and telephoneNumber attributes. The values assigned to these attributes give the name and phone number of the person represented by the entry.
In many directory deployments, the attributes defined on the LDAP client side don't map to the ones defined on the server side. To facilitate communication between the clients and servers in such a setup, Directory Proxy Server supports renaming of attributes—that is, Directory Proxy Server can rename attributes in a client query to a form understood by a directory server before passing the query to a directory server, and do the same in the server response before passing it to a client.
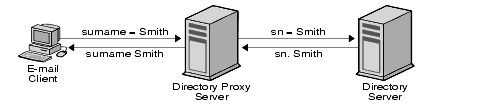
Figure 8-1 illustrates how attribute renaming feature of Directory Proxy Server can be used for schema mapping.
Figure 8-1 Mapping Schema by Using the Attribute Renaming Property
Notice that the email client expects the last names of people to be the value of an attribute named "surname," whereas in the LDAP server, the last names are specified by the attribute named "sn." When Directory Proxy Server maps these two attributes, only the attribute names are affected; the attribute values remain unchanged.
You use the Attribute Renaming property to define the rules that govern renaming of client and server attributes. You specify the names of the client attributes that need to be mapped to the corresponding server attributes and vice versa. This way, if a client request contains an attribute name unknown to the server, Directory Proxy Server would be able to map it to a name known to the server and help the client communicate with the server. Similarly, when the server responds back, Directory Proxy Server would translate any attributes that are unknown to the client to known forms.
The section that follows explains how to create an object for the attribute renaming property from the Directory Proxy Server Configuration Editor Console.
Note
Any object you create for the attribute-renaming property must have both server and client attributes. Otherwise, Directory Proxy Server will fail to start.
Creating Attribute Renaming Property Objects
To Identify Client and Server Attributes for Renaming
- Access the Directory Proxy Server Configuration Editor Console as described in Accessing the Directory Proxy Server Consoles.
- In the navigation tree, expand the Properties node, and then select Attribute Renaming.
The right pane shows the list of existing objects for the attribute renaming property.
- Click New.
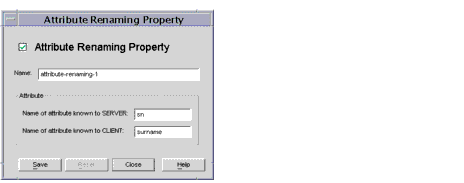
The Attribute Renaming Property window appears.
- In the Name field type, a name for the property object. The name must be a unique alphanumeric string.
- In the remaining fields, identify the attributes for mapping:
Attribute renaming values may be written as decimal digits with components separated by periods; for example 2.5.4.10. Attribute renaming values may also assign one or more textual names for an attribute type. These names must begin with a letter, and may only contain ASCII letters, digit characters, and hyphens. The value is case insensitive.
Name of attribute known to SERVER. Enter a value to specify the name of the attribute known to the server.
Name of attribute known to CLIENT. Enter a value to specify the name of the attribute known to the client.
If a client request contains an attribute name specified by the "Name of attribute known to CLIENT," it will be transformed to the value of "Name of attribute known to SERVER." Similarly, if a result sent by the server contains an attribute name specified in "Name of attribute known to SERVER," it will be transformed to the value of "Name of attribute known to CLIENT."
- Click Save to create the object.
The Directory Proxy Server configuration is modified, and you're prompted to restart the servers that rely on this configuration. Don't restart the servers yet. You can do this after you've completed all the configuration changes.
- Restart the servers as described in Restarting Directory Proxy Server.
Forbidden Entry PropertyFor various reasons, certain entries (or the attributes that represent these entries) in an LDAP directory will need to be hidden from the LDAP clients. For example, if your directory contains entries for all the employees and each of these entries contain relevant attributes for employee data, such as the name, email address, department, office location, office phone number, and home phone number, you can hide all employees' home phone numbers from being visible to clients.
A forbidden entry refers to an entry in an LDAP directory that needs to be hidden from LDAP clients. To facilitate communication between the clients and directory servers in such a setup, Directory Proxy Server supports forbidden entries—that is, Directory Proxy Server can hide LDAP entries and the attributes of these entries from LDAP clients.
You use the Forbidden Entry property to define the rules that govern hiding of directory entries and their attributes. This property enables you to specify a list of entries or the attributes of the entries that need to be hidden in several ways. For example, you can specify:
- DNs of entries or attributes in those entries that you want to hide.
- Regular expressions of DNs of entries or attributes in those entries that you want to hide (for example, .*OU=INTERNAL.*).
- Attribute name/value pairs of an entry (for example, secret:yes). If an entry has an attribute name/value pair that matches any of the specified attribute name/value pairs, then that entry or some of its content will be hidden.
The section that follows explains how to create an object for the forbidden entry property from the Directory Proxy Server Configuration Editor Console.
Creating Forbidden Entry Property Objects
To Identify Entries or Attributes to Hide From Clients
- Access the Directory Proxy Server Configuration Editor Console as described in Accessing the Directory Proxy Server Consoles.
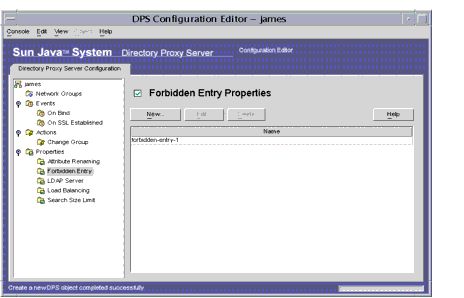
- In the navigation tree, expand the Properties node, and then select Forbidden Entry.
The right pane shows the list of existing objects for the forbidden entry property.
- Click New.
The Forbidden Entry Property window appears.
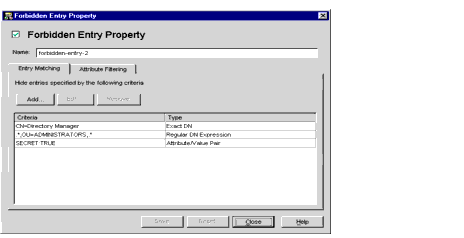
- In the Name field type a name for the property object. The name must be a unique alphanumeric string.
- In the Entry Matching tab, specify the appropriate values; the tab displays settings for this property's name and LDAP entries to hide.
Add. Displays a menu for adding criteria for hiding LDAP entries. Criteria can be of the following type: Exact DN, Regular DN Expression, or Attribute/Value Pair. You may type in an entry or browse the Directory Information Tree for existing entries.
Exact DN. Displays a dialog for entering the DN of an entry to hide.
Regular DN expression. Displays a dialog for entering a regular DN expression of entries to hide. The regular expression of the DN should be specified in the normalized form; that is, there should be no spaces between RDN components and the "=" sign and attribute names and values must be in all capital letters.
For example, to match any DN with a RDN component of "ou=internal," you must specify the following:
.*OU=INTERNAL.*
If the Attribute Filtering tab contains attribute names to be included, and an attribute does not match one of those listed, then it is not returned. If an LDAP entry has no attributes that match any attributes to be excluded in the Attribute Filtering tab, then it is returned.
The following book can be used as a reference on regular expressions: Mastering Regular Expressions, by Friedl and Oram, published by O'Reilly, ISBN: 1565922573.
Attribute/Value pair. Displays a dialog used to specify attribute name/value pairs. If an entry has an attribute name/value pair that matches any of the specified attribute name/value pairs, then that entry or some of its content will be hidden.
For example, if you want to restrict all entries that have either "ou=internal" or "secret=yes" as one if its attributes, then you can specify the following: an attribute of "ou" and a value of "internal."
Edit. Displays a dialog for editing the currently-selected entry in the table.
Remove. Removes the currently-selected entry in the table.
- Select the Attribute Filtering tab, and specify the appropriate values.
The tab contains settings that allow certain attributes to be excluded, or specifically included:
Exclude the entire entry. Select this option to indicate that no attribute filtering is to be performed and that the entire entry is to be hidden.
EXCLUDE only the following attributes from the entry. Select this option to indicate that the table contains a list of attribute names that are to be excluded from the entry that has matched any of the above specifications.
INCLUDE only the following attributes from the entry. Select this option to indicate that the table contains a list of attribute names that may be returned as part of the entry that has matched any of the above specifications.
- Click Save to create the object.
The Directory Proxy Server configuration is modified, and you're prompted to restart the servers that rely on this configuration. Don't restart the servers yet. You can do this after you've completed all the configuration changes.
- Restart the servers as described in Restarting Directory Proxy Server.
LDAP Server PropertyIn a directory deployment, Directory Proxy Server is located between LDAP clients and LDAP directory servers. It filters requests from LDAP clients before routing them to LDAP directory servers and responses from directory servers before passing them to the clients. Directory Proxy Server also supports automatic load balancing and automatic failover and failback among a set of replicated directory servers.
You use the LDAP Server property to identify the directory servers that Directory Proxy Server should use as the backend servers. When defining this property, you specify all the details required by Directory Proxy Server—for example, the IP address or fully-qualified hostname of the directory server, the port number at which the directory server is listening for client connections, the LDAP versions supported by the server, the version to be used for communication between Directory Proxy Server and this server, and so on—to communicate with a directory server.
The section that follows explains how to create an object for the LDAP server property from the Directory Proxy Server Configuration Editor Console.
Creating LDAP Server Property Objects
To Identify Directory Servers for Communication With Directory Proxy Server
- Access the Directory Proxy Server Configuration Editor Console as described in Accessing the Directory Proxy Server Consoles.
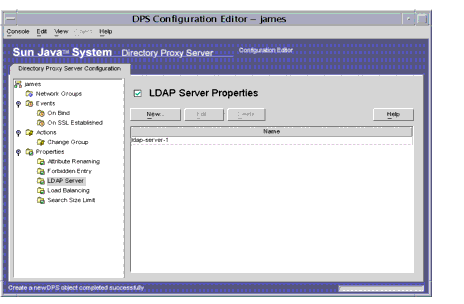
- In the navigation tree, expand the Properties node, and then select LDAP Server.
The right pane shows the list of existing objects for the LDAP Server property.
- Click New.
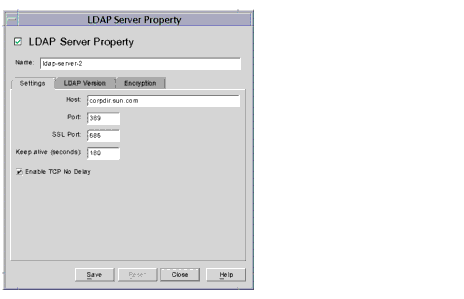
The LDAP Server Property window appears.
- In the Name field, type a name for the property object. The name must be a unique alphanumeric string.
- In the Settings tab specify the basic settings of the LDAP server referred to by this property.
Host. Enter a value specifying the full domain name or IP address of the host where the backend LDAP server is running. This attribute is mandatory.
Port. Enter a number specifying the port on which the backend LDAP server is running. The default port used, if this attribute is absent, is 389.
SSL port. Enter a number specifying the port on which the backend LDAP server listens for LDAPS (LDAP over SSL) connections. Do not set any value for this attribute if the backend LDAP server does not support LDAPS.
Keep alive interval. Enter the number of seconds after which Directory Proxy Server will poke an unresponsive server, to determine if the network link to an LDAP directory server is down or if the LDAP directory server has become unresponsive. If the client connected to Directory Proxy Server has pending operations and if Directory Proxy Server has not received any data from the connection's LDAP server for the number of seconds specified here, then Directory Proxy Server will test the availability of the LDAP server by opening another communication channel to it. If Directory Proxy Server is unsuccessful in doing so, it will fail over to another LDAP server, if available. The default value for this attribute is 180 seconds. It is recommended that you increase this value if the LDAP server is not on the same local network as Directory Proxy Server.
Enable TCP no delay. Disable this option to cause Directory Proxy Server to use the Nagel Algorithm on connections to this server. The option must be disabled only if the network bandwidth between Directory Proxy Server and the server defined by this object entry is very limited. By default, this setting is enabled.
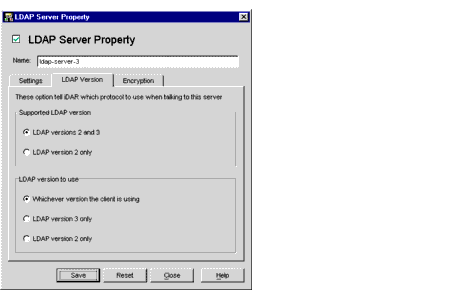
- Select the LDAP Version tab and specify the appropriate values.
The tab displays settings indicating which versions of LDAP are supported by this server, and which version should be used for communication between Directory Proxy Server and this server.
Supported LDAP version. Select one of the two options present: LDAP versions 2 and 3, or LDAP version 2 only. The default is LDAP versions 2 and 3.
LDAP version to use. Select one of the three options present: "Whichever version the client is using," "LDAP version 3 only," or "LDAP version 2 only." This attribute tells Directory Proxy Server the preferred LDAP protocol version to use when talking to the backend server this entry defines. By default, "Whichever version the client is using" is selected.
This option is useful when you have an LDAPv2 client for which Directory Proxy Server needs to follow referrals. In this case Directory Proxy Server itself needs to connect as LDAPv3 client to the backend server in order for the backend server to send referrals back to it. LDAP version 3 only must be selected if the network group referring to this property allows multiple LDAP version 2 binds.
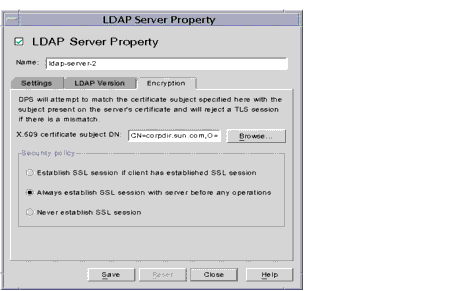
- Select the Encryption tab and specify the appropriate values.
The tab displays settings relating to secure communications for the LDAP server referred to by this property.
X.509 certificate subject DN. Specify the LDAP server's certificate subject name. If specified, Directory Proxy Server will attempt to match the certificate subject with the subject present on the LDAP server's certificate and will reject a TLS session if there is a mismatch. (This attribute allows Directory Proxy Server to authenticate the LDAP server to which it is connecting. Directory Proxy Server accepts any name if this attribute is not set.)
Security policy. Select one of the options that define the security policy for connections between Directory Proxy Server and the backend server: "Establish SSL session if client has established SSL session," "Always establish SSL session with server before any operations," "or Never establish SSL session."
- Click Save to create the object.
The Directory Proxy Server configuration is modified, and you're prompted to restart the servers that rely on this configuration. Don't restart the servers yet. You can do this after you've completed all the configuration changes.
- Restart the servers as described in Restarting Directory Proxy Server.
Load Balancing PropertyDirectory Proxy Server enables high availability of directory deployments by providing both automatic load balancing and automatic failover and failback among a set of replicated LDAP directory servers. In order for Directory Proxy Server to do this, you need to identify the directory servers that Directory Proxy Server should work with and specify how client load is to be distributed among these servers.
You configure Directory Proxy Server for load balancing using the Load Balancing property. This property enables you to identify the back-end directory servers that Directory Proxy Server should communicate with and specify the percentage of total client load each directory server should receive. Once configured, Directory Proxy Server automatically distributes client queries to different directory servers conforming to the load criteria defined in the configuration. If a directory server becomes unavailable, Directory Proxy Server distributes the load percentage of that server proportionally among the available servers based on their load percentage. Directory Proxy Server starts rejecting client queries if all back-end LDAP servers become unavailable.
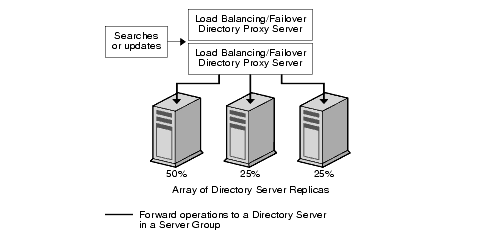
Figure 8-2 shows client load distributed among a set of three directory server replicas.
Figure 8-2 Load Balancing Across a Set of LDAP Directory Replicas
Load balancing in Directory Proxy Server is session based. This means that the decision function that chooses a particular directory server to which a client's queries will be directed is applied once per client session, in particular, at the start of the client session. All subsequent client queries in that session are directed to the same directory server that was chosen at the beginning of the session.
The number of back-end directory servers that Directory Proxy Server can load balance depends on several factors, some of which are listed below:
In general, Directory Proxy Server can support fewer directory servers if most sessions are short lived and queries are computationally intensive. Computationally intensive queries are those that require the inspection of the entire message such as, if the attribute renaming (see Attribute Renaming Property) feature is used.
Directory Proxy Server detects when a directory server becomes unavailable either when a connection attempt is returned with a connection refused error or when it times out. Because both these cases occur at the initial stages of the session, and no operations have yet been processed for that session, Directory Proxy Server fails over to another server provided one is available transparently. In the connect-attempt-timeout case, the client can experience significant delay in getting a response. If a connection between Directory Proxy Server and a back-end server is abruptly lost, Directory Proxy Server returns LDAP_BUSY error for all outstanding operations to the affected client. Subsequently, Directory Proxy Server fails over that client session to another directory server.
In order to avoid Directory Proxy Server from becoming the single point of failure for your directory deployment, we recommend you use at least two Directory Proxy Servers with an IP appliance in front of it. This is described in Directory Proxy Server Deployment Scenarios." In case it is not possible to deploy Directory Proxy Server this way, we recommend that you use the -M switch, which will enable Directory Proxy Server to monitor itself.
Directory Proxy Server uses a monitor process to make health checks on its backend servers. This feature is automatically enabled if load balancing is used. Directory Proxy Server makes an anonymous search operation for the Root DSE every 10 seconds for each of its backend directory servers. If one of them becomes unavailable or unresponsive, Directory Proxy Server removes it from the active load balanced server set. When the server becomes available again, it is reintroduced in the set. When a server has only its secure port enabled, the Directory Proxy Server will try to perform the health checks securely.
The section that follows explains how to create an object for the load balancing property from the Directory Proxy Server Configuration Editor Console.
Creating Load Balancing Property Objects
This section explains how to configure Directory Proxy Server for load balancing. Before you create objects for the load balancing property, be sure to identify the LDAP directory servers that Directory Proxy Server should use for balancing the client load. For details, see LDAP Server Property.
To Define Load Balancing for a Set of Directory Servers
- Access the Directory Proxy Server Configuration Editor Console as described in Accessing the Directory Proxy Server Consoles.
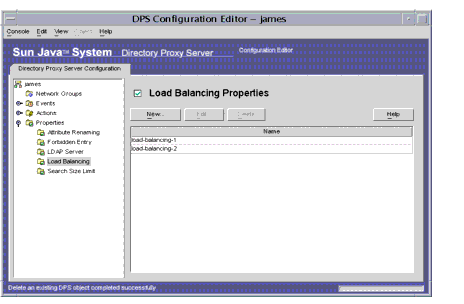
- In the navigation tree, expand the Properties node, and then select Load Balancing.
The right pane shows the list of existing objects for the Load Balancing property.
- Click New.
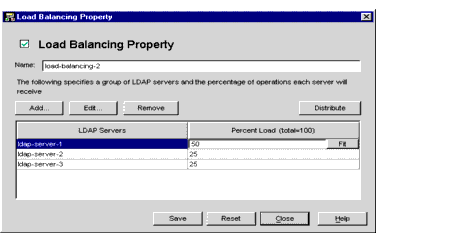
The Load Balancing Property window appears.
- In the Name field, type a name for the property object. The name must be a unique alphanumeric string.
- Use the remaining form elements to get the desired results.
To edit a percentage, click the Percentage Load column next to the row containing an LDAP Server, type a number between 0 and 100, and click the Fit button. This action assigns the percentage to the current row and attempts to make the sum of all the percentages 100. The current percentage sum is displayed in the Percentage Load column heading.
Add. Displays a dialog for adding a reference to an LDAP server property. By default, the first server added is assigned 100 percent of the load with subsequent additions getting 0 percent.
Edit. Displays a dialog for editing the currently-selected item from the table.
Remove. Removes the currently-selected LDAP server from the list of servers across which load balancing will be performed.
Distribute. Distributes the percentage load evenly across all LDAP servers currently referred to in the table.
- Click Save to create the object.
The Directory Proxy Server configuration is modified, and you're prompted to restart the servers that rely on this configuration. Don't restart the servers yet. You can do this after you've completed all the configuration changes.
- Restart the servers as described in Restarting Directory Proxy Server.
Search Size Limit PropertyAn LDAP directory typically functions as a central repository for an organization, enabling LDAP clients deployed across the organization to look up information. LDAP clients generally look up information by searching for specific information using search filters. When searching for an entry, clients generally specify attributes associated with that type of entry; for example, when you search for people entries, you can use the CN attribute to search for people with a specific common name.
Directory Proxy Server can handle thousands of LDAP client requests and can be configured to apply fine-grained access control policy on LDAP directories, such as controlling who can perform different types of operations on different parts of the Directory Information Tree (DIT). You can also configure Directory Proxy Server to disallow certain kinds of operations, such as the ones performed by web trawlers and robots to collect information contained in a directory.
You use the Search Size Limit property to apply size limits based on the search base and search scope. If neither the search base nor search scope specified in this property object entry match a given search, the size limit defaults to the size limit specified in the Network Group object entry as described in Creating and Managing Groups."
The section that follows explains how to create an object for the search size limit property from the Directory Proxy Server Configuration Editor Console.
Creating Search Size Limit Property Objects
To Define Limits for Search Sizes
- Access the Directory Proxy Server Configuration Editor Console as described in Accessing the Directory Proxy Server Consoles.
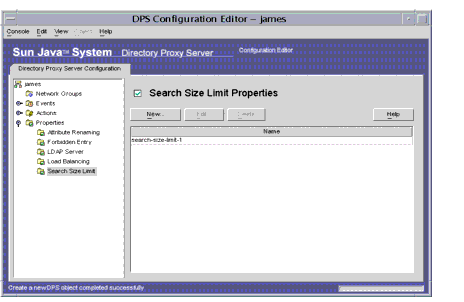
- In the navigation tree, expand the Properties node, and then select Search Size Limit.
- Click New.
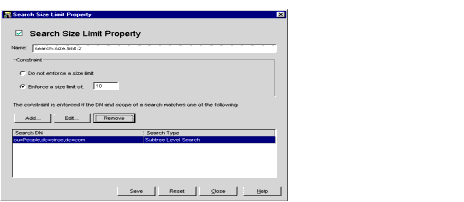
The Search Size Limit Properties window appears.
- In the Name field, type a name for the property object. The name must be a unique alphanumeric string.
- Use the remaining form elements to get the desired results:
Constraint. Specifies whether or not to enforce a size limit constraint.
Do not enforce a size limit. Select this option to specify that no size limit will be enforced.
Enforce a size limit of. Select this option and enter an integer value, specifying the size limit to enforce.
Add. Displays a menu for adding a size limit condition. Conditions must be one of two types: one level search and subtree level search.
One level search. Displays a dialog for entering a DN and adding it to the condition table. If the DN of the search base of a one level search matches one of the distinguished names specified for one level searches from the condition table, the size limit specified is enforced as the size limit of that search.
Subtree level search. Displays a dialog for entering a DN. If the DN of the search base of a subtree search matches one of the distinguished names specified for subtree level searches from the condition table, the size limit specified is enforced as the size limit of that search.
Edit. Displays a dialog for editing the currently-selected entry in the table.
Remove. Removes the currently-selected entry in the table.
- Click Save to create the object.
The Directory Proxy Server configuration is modified, and you're prompted to restart the servers that rely on this configuration. Don't restart the servers yet. You can do this after you've completed all the configuration changes.
- Restart the servers as described in Restarting Directory Proxy Server.
Modifying Property ObjectsTo Modify a Property Object
- Access the Directory Proxy Server Configuration Editor Console as described in Accessing the Directory Proxy Server Consoles.
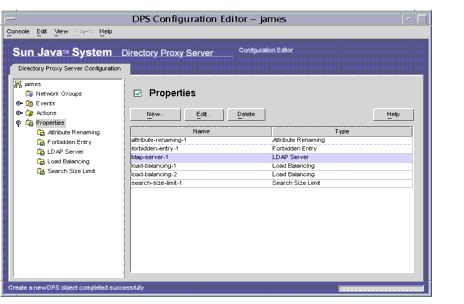
- In the navigation tree, select the Properties node.
The right pane shows the list of existing property objects. To view objects pertaining to a specific property, expand the Properties node, and then select the property of your interest.
- In the list, select the object you want to modify and click Edit.
- Make the required modifications.
- Click Save to save your changes.
The Directory Proxy Server configuration is modified, and you're prompted to restart the servers that rely on this configuration. Don't restart the servers yet. You can do this after you've completed all the configuration changes.
- Restart the servers as described in Restarting Directory Proxy Server.
Deleting Property ObjectsYou can delete any unwanted property objects from the Directory Proxy Server configuration. Before deleting an object, make sure that it's not used in any other configuration entries.
To Delete a Property Object
- Access the Directory Proxy Server Configuration Editor Console as described in Accessing the Directory Proxy Server Consoles.
- In the navigation tree, select the Properties node.
The right pane shows the list of existing property objects. To view objects pertaining to a specific property, expand the Properties node, and then select the property of your interest.
- In the list, select the object you want to delete and click Delete.
- Confirm your action.
The Directory Proxy Server configuration is modified, and you're prompted to restart the servers that rely on this configuration. Don't restart the servers yet. You can do this after you've completed all the configuration changes.
- Restart the servers as described in Restarting Directory Proxy Server.