| Sun ONE Application Server 7, Enterprise Edition Migrating and Redeploying Server Applications Guide |
Chapter 6
Importing 6.5 Applications in
Sun ONE StudioThis chapter describes the use of Sun ONE Studio in migrating the application developed using Sun ONE Application Server 6.5. This chapter gives step-by-step instructions to migrate each component of an application using Sun ONE Studio for Java. The iBank sample that is bundled with Sun ONE Application Server 6.5 is used as an example to demonstrate the steps.
For a detailed specification of the iBank application, see Appendix A, "iBank Application Specification."
Preparing for Migrating the Application
Before you migrate your applications using Sun ONE Studio, perform the following steps to setup your development environment for migration:
- Install Sun ONE Application Server 7 EE and Sun ONE Studio for Java 4.0 on your development environment.
For information on installing the Application Server and Sun ONE Studio, see the Sun ONE Application Server Installation Guide.
- Extract the application, which is in a zip format in a local directory.
The source for the iBank application (iBank65.zip) can be found at the migration site http://www.sun.com/migration/sunonetools.html. Unzipping the file iBank65.zip would create the following directory structure:
iBank
/docroot
/session
/entity
/script
- /docroot contains HTML, JSPs and Image files in its root. It also contains the source files for servlets and EJBs in the sub-folder WEB-INF\classes following the package structure com.sun.bank.*. A war file is generated through the contents of this directory.
- /session contains the source code for the session beans following the package structure com.sun.bank.ejb.session. This directory forms the EJB module for the session beans.
- /entity contains the entity beans following the package structure com.sun.bank.ejb.entity. This directory would form the EJB module for the entity beans.
- /scripts contain the sql scripts for the database setup.
- Setup the schema for iBank application by executing the sql scripts provided in the /scripts folder. These scripts are for oracle database. These scripts creates user and tables and insert data into the tables. Execute the scripts in the following order:
- Start Sun ONE Application Server.
For instructions, see the Sun ONE Application Server Getting Started Guide.
- Prepare Sun ONE Studio for assembling and deploying the sample application ‘iBank’.
Invoke Sun ONE Studio tool through the runide.sh file that is stored in the following location:
Sun ONE App Server_Root/AppServ/Sun ONE Studio forJava_Root/bin
- In the explorer window of the IDE, Select the Runtime tab.
- Click ‘Server Registry’.
- Click ‘installed servers’.
- Choose Sun ONE Application Server.
- Setup the Admin Server by right clicking on the Sun ONE Application Server node and then selecting ‘Add Admin Server’.
- Enter the following details:
- host - where Sun ONE Application Server is installed. If the application server is installed on your local machine, enter localhost.
- port number - port number at which the application server can be accessed. The default value of the port number is 4848.
- username - User name as specified during the installation.
- password - Password specified during the installation of the application server.
- Once the admin server is setup, click on it to install the server instance.
- Set the server instance as the default server by right clicking on the server instance and selecting the option ‘Set As Default’.
Migrating the Application Components
This section gives step-by-step instructions to migrate each component of the iBank application.
For information on migrating the deployment descriptors, see"Migrating Deployment Descriptors".
- Create a web module by following the instructions given in "Creating a Web application module in Sun ONE Studio for Java".
- Migrate the EJBs. Sun ONE Studio does not support the migration of EJBs. You need to manually migrate the EJBs. However, you can use Sun ONE Studio to open the source code for the EJB’s and modify it. For detailed information on how to migrate EJBs, see "EJB Migration".
- Migrate the JDBC code. For detailed information on migrating the JDBC code, see "Migrating JDBC Code".
- iBank application has Entity Beans with CMP 1.1. To convert the entity beans with CMP 1.1 to CMP 2.0, see "Migrating CMP Entity EJBs".
The Account entity bean as it has Enumeration used in its code. The code for this has to be changed manually following the instructions given in the section, "Migrating CMP Entity EJBs". Refer section, "Migrating CMP Entity EJBs" for an example of changes to be carried out for converting CMPs from 1.1 to 2.0.
- Create separate EJB modules for the Entity Beans and the Session Beans. See, "Creating an EJB module in Sun ONE Studio for Java".
- Create the enterprise application. Follow the instructions given in the section, "Creating an Enterprise Application in Sun ONE Studio for Java". This includes the creation of the web module as well as the EJB modules. The final output of this step is a .ear file, which can later be deployed.
- Deploy the .ear file on Sun ONE Application Server 7 by following the instructions given in the section, "Deploying an Application in Sun ONE Application Server 7".
Creating a Web application module in Sun ONE Studio for Java
To create a Web module in Sun ONE Studio for Java, follow the procedure below:
- Mount the /docroot directory that contains the source files. To mount the directory in the Sun ONE Studio for Java, select FileSystems Explorer tab in the left pane. Select Mount the FileSystem from the File menu. Choose the directory to be mounted in the Browser dialog box.
- Mount the directories containing the EJBs in the source file directory structure, namely, entity and session.
- Create an empty directory for the web module in the root directory structure. For example, WarContent.
- Mount the newly created directory WarContent.
- Convert the FileSystem WarContent into a Web module. Select the mounted directory in the Explorer, right-click and select the option ‘Convert FileSystem to Web Module’ from the Tools sub menu.
- Copy the source JSP, HTML and image files to the web application root. i.e., to the directory WarContent from the docroot directory.
- Copy servlets and auxiliary class sources to the WEB-INF/classes directory. That is, copy the sub folder com in the docroot directory to the WEB-INF/classes directory.
- Copy the tag library present in the WEB-INF of the docroot directory to the WEB-INF of WarContent directory.
- Edit the source code wherever required to migrate it to Sun ONE Application Server 7 (if it has not been modified through the migration tool), by following the steps below:
- Check the JSPs that have to be changed.
- Check if any custom JSP tags are used in the application.
- Open the selected JSP code in Sun ONE Studio. To open a JSP file in Sun ONE Studio, select the JSP file in the left pane, right click and select the Open option from the popup menu.
- Follow the steps given in the section "Migrating Java Server Pages and JSP Custom Tag Libraries" to modify the source.
- Similarly, migrate the servlets by following the steps given in the section, "Migrating Servlets".
- Assemble the application and edit the deployment descriptor web.xml (in the WEB-INF/ directory). Click on the web.xml file and edit the properties of the elements. During this assembly phase, configure each servlet, JSP page and JSP tag library, as well as the EJB or data source references used in the web application.
The following topics describe how you can assemble the web application in Sun ONE Studio for Java:
Configuring a Servlet
To configure a Servlet in the deployment descriptor:
- Select the web module from the Warcontent folder. Right click on the web module and select the properties option from the popup menu. The Properties window is displayed.
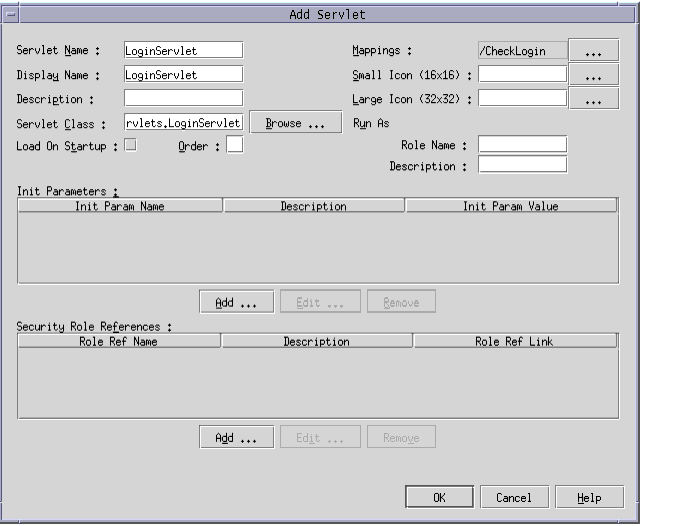
- To configure the servlets, in the Deployment tab, click the Servlets button. The Servlets dialog box is displayed.
- Click Add to add servlets. For each servlet in the web application, you specify the name of the servlet, the full name of its implementation class by clicking the Browse button, the mapping elements for the servlet by clicking Mappings, and any initialization parameters.
Figure 6-1 Configuring Servlet
The list of servlets and their mappings in iBank application are listed in the table, "Servlets and Mappings." The left column lists the servlet name, the center column lists the display name and the third column on the right lists the mapping.
Configure all the above servlets such that web.xml has entries for all of them.
After completing the above steps, the Deployment tab shows 11 servlets mappings and 11 servlets.
Configuring a JSP tag library
To configure a JSP tag library:
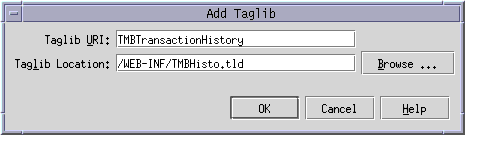
- In the Deployment tab of the properties window, click the Tag Libraries button. The Tab Libraries dialog box is displayed.
- To define a JSP tag library in the web application deployment descriptor, click Add. In the Add Tablig dialog box, enter the URI of the library which is the identifier that the JSP pages will use to access it, and the path to the library's deployment descriptor (.tld file).
In iBank, there is one JSP Tag library TMBHisto.tld. The deployment descriptor is stored under the WEB-INF folder.
Figure 6-2 Configuring Taglib
Add Resource Reference
To add resource reference to the deployment descriptor:
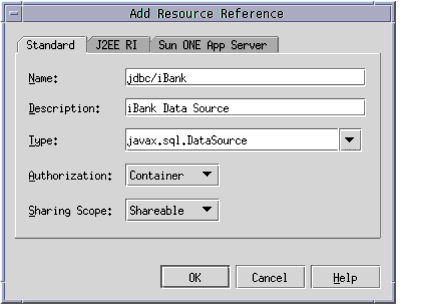
- Select the References tab in the Properties window. Click the Resource Reference button.
- To add a new resource, click Add. In the Standard tab of the Resource Reference dialog box, enter the details of the resource reference. The following figure shows adding a new resource jdbc/iBank for data source in iBank.
Figure 6-3 Adding Resource Reference
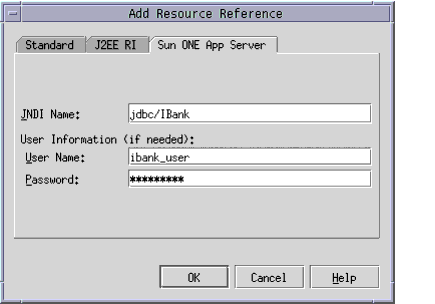
- In the Sun ONE App Server tab, set the JNDI name as jdbc/IBank and also set the user name and password depending on the database schema you are using.
Figure 6-4 Adding Resource Reference entry for Sun ONE Application Server
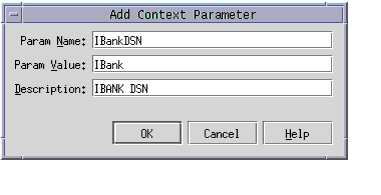
Add Context Parameter
To add a context parameter for the JNDI name to lookup iBank data source:
Specify the Welcome File
In the Deployment tab, click the Welcome Files button to specify the welcome files. In case of iBank, index.jsp is the welcome file.
Converting CMP Entity EJBs from 1.1 to 2.0
The iBank application has Entity Beans with CMP 1.1. To convert the entity beans with CMP 1.1 to CMP 2.0, see section on "Migrating CMP Entity EJBs".
The Account entity bean has Enumeration used in its code. The code for this has to be changed manually. This topic discusses the procedure to convert the Account entity bean from CMP 1.1 to CMP 2.0.
The following are the related files for Account entity bean:
Account.java
AccountEJB.java
AccountHome.java
AccountPK.javaThe changes that you must carry out in the above mentioned files are described below:
Edit this file to comment out the setters for the primary key. Make sure to keep the other setters as it is.
Before modifying the file, the code looks like this:
public String getBranchCode()
throws RemoteException;
public void setBranchCode(String branchCode)
throws RemoteException;
public String getAccNo()
throws RemoteException;
public void setAccNo(String accNo)
throws RemoteException;
------
------
-----other getters and setters----
After commenting the setters for the primary keys, i.e., branchCode and accNo, the code will look like this:
public String getBranchCode()
throws RemoteException;
/* public void setBranchCode(String branchCode)
throws RemoteException; */
public String getAccNo()
throws RemoteException;
/* public void setAccNo(String accNo)
throws RemoteException; */
------
------
-----other getters and setters----
The changes that you must incorporate in the bean class are as follows:
Before modification:
public String branchCode;
public String accNo;
public int custNo;
public String accTypeId;
public double accBalance;
public String accTypeDesc;
public double accTypeInterestRate;
private EntityContext context;
public String getBranchCode() {
return(branchCode);
}
public void setBranchCode(String branchCode) {
this.branchCode = branchCode;
}
public String getAccNo() {
return(accNo);
}
public void setAccNo(String accNo) {
this.accNo = accNo;
}
public int getCustNo() {
return(custNo);
}
public void setCustNo(int custNo) {
this.custNo = custNo;
}
public String getAccTypeId() {
return(accTypeId);
}
public void setAccTypeId(String accTypeId) {
this.accTypeId = accTypeId;
}
public BigDecimal getAccBalance() {
return new BigDecimal(accBalance);
}
public void setAccBalance(BigDecimal accBalance) {
this.accBalance = accBalance.doubleValue();
}
After modification:
private EntityContext context;
public abstract void setBranchCode(String branchCode);
public abstract String getBranchCode();
public abstract void setAccNo(String accNo);
public abstract String getAccNo();
public abstract void setCustNo(int custNo);
public abstract int getCustNo();
public abstract void setAccTypeId(String accTypeId);
public abstract String getAccTypeId();
public abstract void setAccBalance(BigDecimal accBalance);
public abstract BigDecimal getAccBalance();
The code before any modification:
public void setEntityContext(EntityContext ec) {
context = ec; }
public void unsetEntityContext() {
this.context = null;
}
public void ejbActivate() {
this.branchCode = ((com.sun.bank.ejb.entity.AccountPK)
context.getPrimaryKey()).branchCode;
this.accNo = ((com.sun.bank.ejb.entity.AccountPK)
context.getPrimaryKey()).accNo;
}
public void ejbPassivate() {
}
public void ejbLoad() {
}
public void ejbStore() {
}
public AccountPK ejbCreate(String branchCode,
String accNo, int custNo, String accTypeId,
BigDecimal accBalance) {
this.branchCode = branchCode;
this.accNo = accNo;
this.custNo = custNo;
this.accTypeId = accTypeId;
this.accBalance = accBalance.doubleValue();
return null;
}
public void ejbPostCreate(String branchCode,
String accNo, int custNo, String accTypeId,
BigDecimal accBalance) {
}
public void ejbRemove() {
}
The code after all the above mentioned modifications:
public void setEntityContext(EntityContext ec) {
context = ec;
}
public void unsetEntityContext() {
this.context = null;
}
public void ejbActivate() {
}
public void ejbPassivate() {
}
public void ejbLoad() {
}
public void ejbStore() {
}
public AccountPK ejbCreate(String branchCode,
String accNo, int custNo, String accTypeId,
BigDecimal accBalance) {
setBranchCode(branchCode);
setAccNo(accNo);
setCustNo(custNo);
setAccTypeId(accTypeId);
setAccBalance(accBalance);
return null;
}
public void ejbPostCreate(String branchCode,
String accNo, int custNo, String accTypeId,
BigDecimal accBalance) {
}
public void ejbRemove() {
}
In the home interface of the bean, changes are required to be made only if the return type of any finder methods is of type java.util.Enumeration. In case of the Account bean, the home interface has a finder findOrderedAccountsForCustomer which has the return type as Enumeration. In such cases, the return type has to be changed to Collection. In addition, the code in the session bean which uses this finder method also has to be changed such that it has provision to accept the result of this finder method in a Collection.
The changes done in the home interface is shown below:
The code before modification:
The code after modification:
Due to the above changes, session bean BankTeller which accesses this finder method also needs to incorporate changes to accept the result of the finder method in a Collection.
The following code snippet shows the changes made to BankTellerEJB.java:
Consider the method getAccountSummary which uses finder method findOrderedAccountsForCustomer:
The code before modification:
public AccountSummary getAccountSummary()
throws EJBException
{
int custNo = 0;
Enumeration accEnum = null;
AccountSummary accSum = new AccountSummary();
-----
----
try
{
AccountHome home=(AccountHome) PortableRemoteObject.
narrow(accHomeHandle.getEJBHome(), AccountHome.class);
AccountTypeHome accTypeHome = (AccountTypeHome)
PortableRemoteObject.narrow(accTypeHomeHandle.getEJBHome(),
AccountTypeHome.class);
accEnum = (Enumeration) home.
findOrderedAccountsForCustomer(this.custNo);
AccountTypePK accTypePK = new AccountTypePK();
Account accRef = null;
AccountType accTypeRef = null;
String accTypeDesc = null;
int i = 0;
while(accEnum.hasMoreElements())
{
i++;
accRef = (Account) accEnum.nextElement();
accTypePK.accTypeId = accRef.getAccTypeId();
accTypeRef = (AccountType) PortableRemoteObject.
narrow(accTypeHome.findByPrimaryKey(accTypePK),
AccountType.class);
accTypeDesc = accTypeRef.getAccTypeDesc();
accSum.addElement(
accRef.getBranchCode(),
accRef.getAccNo(),
accRef.getAccBalance(),
accTypeDesc
);
}
}
-----
----
}
The code after modification:
public AccountSummary getAccountSummary()
throws EJBException
{
int custNo = 0;
//Enumeration accEnum = null;
Collection accEnum = null;
AccountSummary accSum = new AccountSummary();
try
{
AccountHome home = (AccountHome) PortableRemoteObject.
narrow(accHomeHandle.getEJBHome(), AccountHome.class);
AccountTypeHome accTypeHome = (AccountTypeHome)
PortableRemoteObject.narrow(accTypeHomeHandle.
GetEJBHome(), AccountTypeHome.class);
// accEnum = (Enumeration) home.
// findOrderedAccountsForCustomer(this.custNo);
accEnum = (Collection) home.
findOrderedAccountsForCustomer(this.custNo);
AccountTypePK accTypePK = new AccountTypePK();
Account accRef = null;AccountType accTypeRef = null;
String accTypeDesc = null;
int i = 0;
Iterator iterator = accEnum.iterator();
// while(accEnum.hasMoreElements())
while(iterator.hasNext())
{
i++;
// accRef = (Account) accEnum.nextElement();
accRef = (Account) PortableRemoteObject.
narrow(iterator.next(), Account.class);
accTypePK.accTypeId = accRef.getAccTypeId();
accTypeRef = (AccountType) PortableRemoteObject.
narrow(accTypeHome.findByPrimaryKey(accTypePK),
AccountType.class);
accTypeDesc = accTypeRef.getAccTypeDesc();
accSum.addElement(
accRef.getBranchCode(),
accRef.getAccNo(),
accRef.getAccBalance(),
accTypeDesc
);
}
}
----
----
}Creating an EJB module in Sun ONE Studio for Java
The following steps describes the procedure to create an EJB module in Sun ONE Studio for Java, using the existing source files:
Creating Module for Session Beans
The folder session contains the following bean classes and the interfaces for the following session beans:
To create a module for the session beans:
- In the FileSystems tab of the left pane, select the mounted directory session. Navigate through the com sub folder and select the package session.
- Right click on the session package. From the File menu, select the New. In the New Wizard, navigate through the options and select J2EE -> EJB Module.
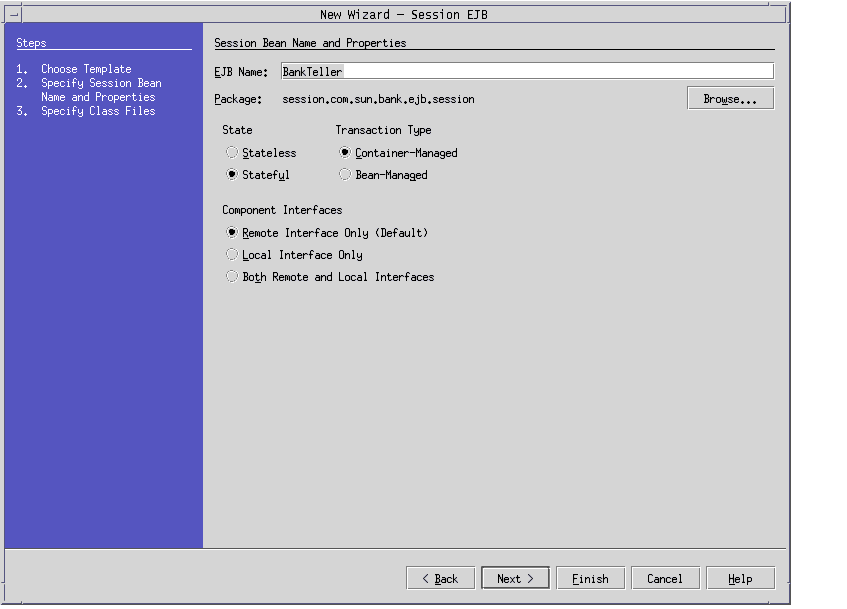
- Specify the main characteristics of the EJB such as, the name of the EJB, the state of the bean, whether stateless or stateful, the package for the EJB. The following figures shows the creation of Session Bean BankTeller which is a Stateful Session bean, whereas, the InterestCalculator session bean is Stateless. Click the browse button to specify the package.
Figure 6-6 Creation of New Session Bean
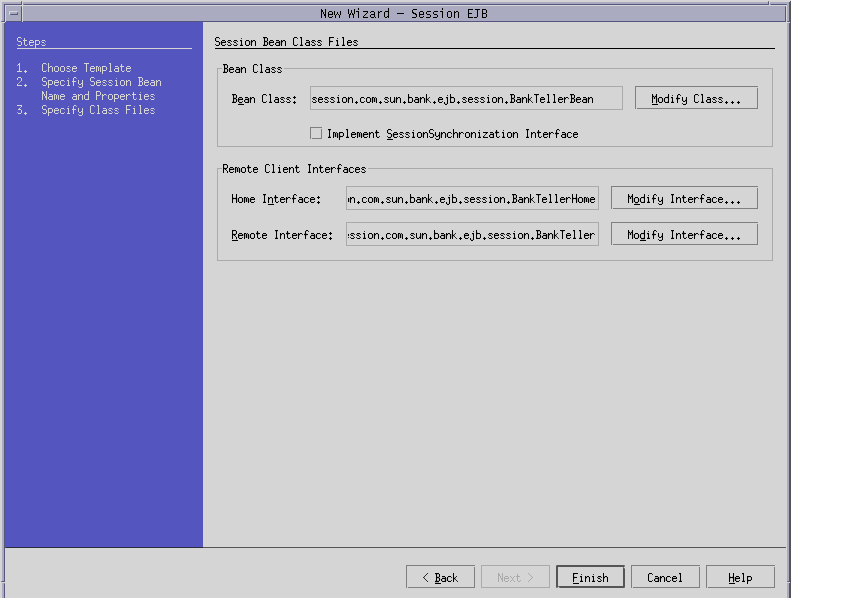
- To specify the implementation class, the home and the remote interfaces that match the existing source files, use the Modify button in the dialog box and choose "Select an existing source file."
Repeat the steps above to create all the session beans.
The following figure shows specifying the bean class, the home interface and the remote interface for the session bean. Clicking the modify button and choosing the option to use an existing class, shows the existing files, which can be selected.
Figure 6-7 Specifying the Bean class, Home Interface and the Remote Interface
Create the InterestCalculator session bean following the above mentioned steps.
- Edit the properties of the EJBs.
By editing the properties of an EJB, you can declare the EJB Resource References; specify an EJB's environment entries.
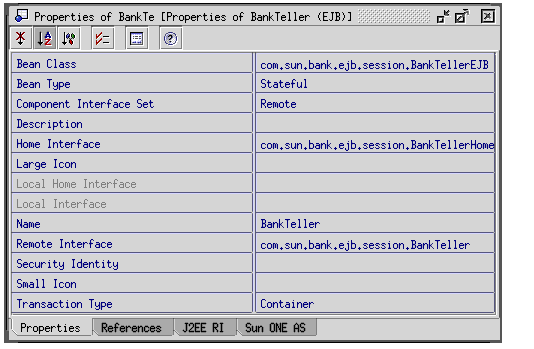
Figure 6-8 Properties window of the Session Bean BankTeller
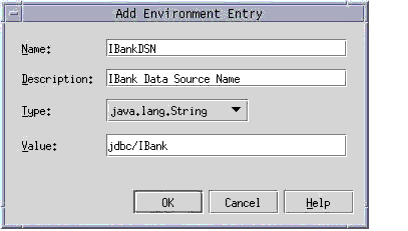
The following figure shows the declaration of an environment entry for the BankTeller session bean. InterestCalculator bean does not require this entry.
Click at the Environment Entries in the 'References' tab and then click Add to add a new entry for the Data Source Name.
Figure 6-9 Adding Environment Entry to BankTeller Session Bean
In the references tab of the Properties window for the BankTeller session bean, click Resource Reference to add a new resource. Add a new resource jdbc/iBank for the data source in iBank.
Select Sun ONE App Server tab to set the JNDI name as 'jdbc/iBank' and username and password depending on the database schema used.
InterestCalculator bean does not require this entry.
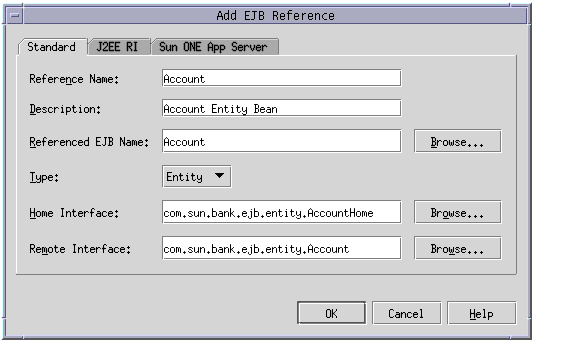
In the References tab of the Properties window, click the EJB Reference button to add EJB references. The following figure shows adding EJB Reference for the BankTeller session bean. BankTeller session bean has references to the entity bean Account and Customer. You need to add these entity bean references to the BanTeller session bean.
Specify the Home and Remote interfaces by clicking the modify button and then choosing the existing source for the beans option.
Figure 6-10 Add EJB Reference
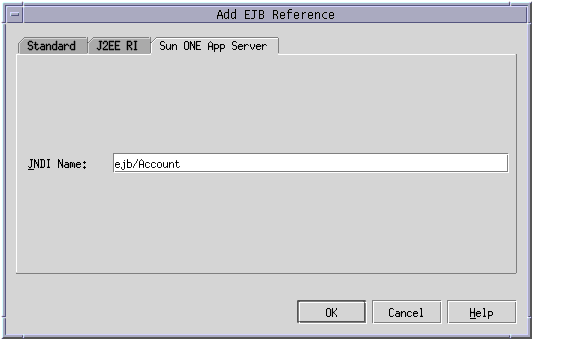
In the Sun ONE App Server tab in the EJB Reference, specify the JNDI name. The following figure shows the JNDI entry ejb/Account, made for the Account entity bean. Similarly, when the EJB reference for the Customer bean is added, specify the JNDI name in the Sun ONE App Server tab as jndi/Customer.
Figure 6-11 Adding EJB Reference entry for Sun ONE Application Server
- Compile the source files.
- Create an EJB module and assemble the EJBs within it.
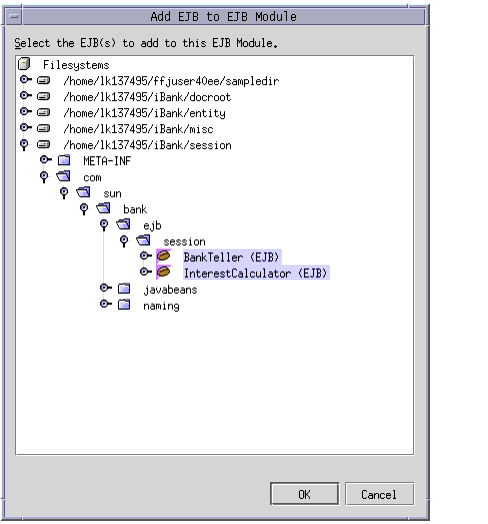
In accordance with the J2EE 1.3 specification, in Sun ONE Application Server 7 EE, you must group the EJBs together in an EJB module. Create a new EJB module named as SessionModule at the root directory session. To create a new session EJB module, select the session folder. From the File menu, select New -> J2EE -> EJB Module. After creating the module, add the session EJB's into it.
The figure below shows how the BankTeller and InterestCalculator EJBs are added to an EJB module SessionModule.
Figure 6-12 Adding Session Beans to EJB Module
Creating Module for Entity Beans
- The folder for the entity beans contains the bean class, remote and Home interface for the following entity beans:
- Configure the JDBC driver.
In the Runtime view of the Explorer, navigate through the tree to select the Drivers under Databases. Right click and select the option Add Driver from the pop-up menu. In the Add Driver dialog box, specify the driver name, implementation class, and the prefix of the relevant URL. The corresponding JAR or ZIP for the driver must be accessible to Sun ONE Studio for Java, and must therefore be copied into the Sun ONE Studio for Java Root/lib/ext directory.
To place the driver classes in the appropriate Sun ONE Studio for Java directory in Solaris, run the following command from the shell (sh or ksh):
cp $ORACLE_HOME/jdbc/lib/classes12.zip Sun ONE Studio for Java Root/lib/ext
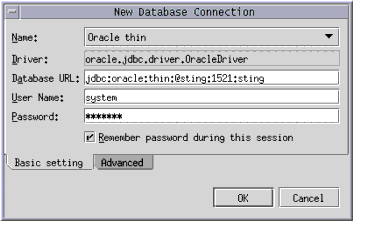
- Define the database connection properties
In the Runtime view of the Explorer, select Database. Right click and select the Add Connection... option from the pop-up menu. In the New Database Connection dialog box, specify the driver used, the full connection URL, the user name, the related password, and the appropriate database schema:
Figure 6-13 Configuring a database connection (Oracle) in Sun ONE Studio for Java
- Create new EJBs from existing source files.
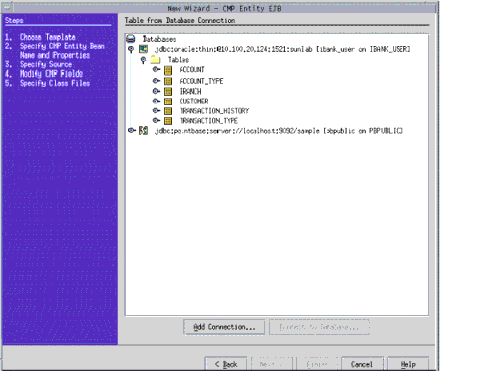
Select the File Systems tab in the Explorer. Select the mounted directory entity. From the File menu, select New -> J2EE -> CMP Entity EJB. The New EJB wizard is displayed.
Specify the name of the EJB and define the package for the EJB. Under the Source for Entities and Fields pane, select the option, Table from Database Connection in order to be able to specify the database table to be used for the persistence of the EJB fields.
Figure 6-14 Creation of an Entity bean with container-managed persistence
In the following Wizard screen, select the right connection from the list of database connections defined. Once the connection is selected, list of tables accessible from this connection are shown, and select the appropriate table:
Figure 6-15 Choosing a table for mapping CMP bean fields
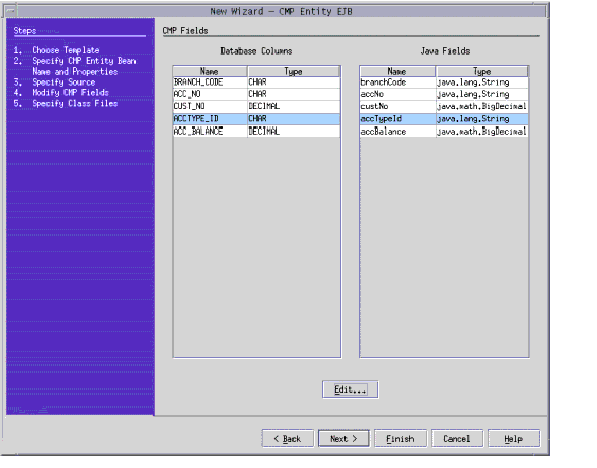
The next screen is used to the configure mapping between the columns of the table selected and the CMP fields of the bean. Particular care should be taken to correctly indicate the names of the bean fields and associate the Java types.
Figure 6-16 Mapping between table columns and CMP fields of the bean
The next screen allows you to specifying the source files for the entity bean.
Figure 6-17 Mapping between table columns and CMP fields of the bean
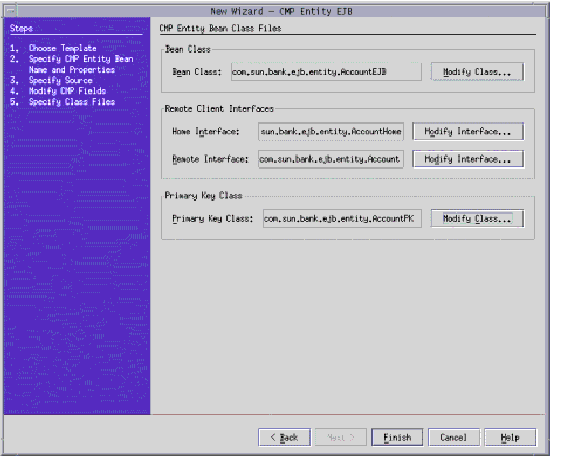
The next step involves informing Sun ONE Studio for Java that you want to create the EJB from the existing source files, which can be specified by clicking the Modify Class button.
If you receive any error while pointing to the existing source files, it may have caused because you made a mistake in the previous steps or the source is not migrated properly. Such errors should be handled by making changes as and when reported.
The next screen shows the process of selecting the existing source file for the EJB bean class.
Figure 6-18 Specifying EJB Bean class by selecting option for Existing Source files
Repeat the above steps to create all the entity beans.
- Edit the properties of the EJBs.
Select the new EJB in the explorer window, right click and select Properties option from the pop-up menu. The Properties window is displayed.
In the properties window, select the References tab, click on the Resource References button, on the right hand edge of this text field.
In the Add Resource Reference dialog box, set the following properties for the entity bean Customer.
In the Standard tab, give the full name of the data source (“jdbc/DataSourceName”) the resource type (javax.sql.DataSource), and select Container from the drop-down list of options for managing access to this resource (Authorization).
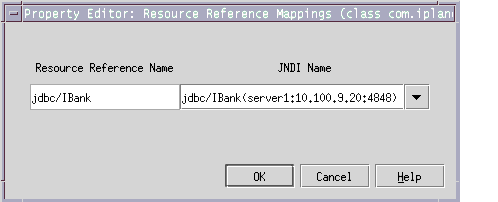
Once the declaration has been made, select the Sun ONE App Server tab, and specify the JNDI name of the data source jdbc/iBank in the JNDI Name column of the entry that corresponds to the resource reference defined previously. Also specify the username and the password.
In the properties window select the Sun ONE AS tab, click on the Reference Resource Mapping and choose the data source i.e, jdbc/IBank on the server instance which has to be used.
Figure 6-19 Resource Reference Mapping for Sun ONE Application Server
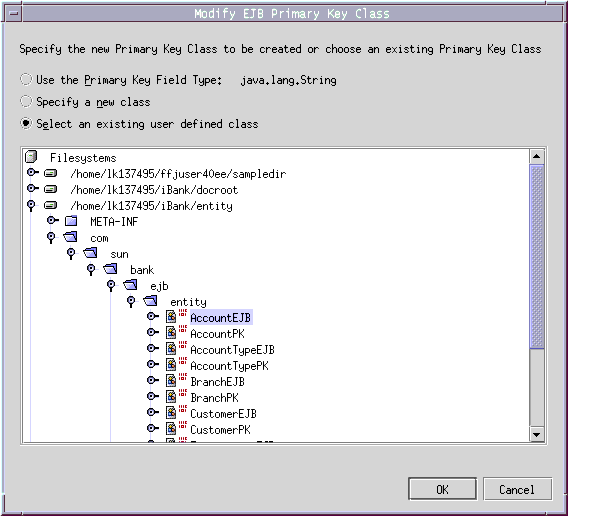
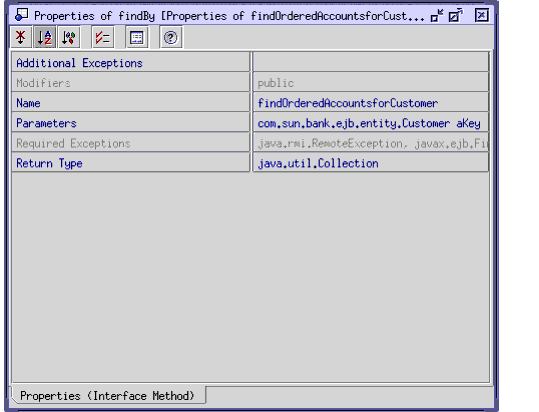
- Set EJB QL for finders other than the findByPrimaryKey method.
EJB QL has to be specified for finders. As per the CMP 2.0 specification, the finders will use EJB QL.
In the iBank application, the entity bean that would require this type of editing is the Account bean. Select the AccountEJB node in the Sun ONE Studio explorer window and expand the finder methods in it. Click on any finder method other than the findByPrimaryKey to open its properties window:
Figure 6-20 Properties of Finder Method
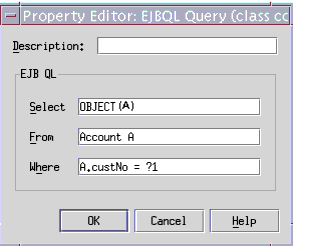
Click the EJBQL Query field to enter the query. The following figure shows the query entered:
Figure 6-21 Editing EJB QL for the Finder
- Create an EJB module and assemble the EJBs within it.
Create new EJB module named EntityModule and add all entity beans into this module by right clicking on the EJB module and selecting the option to add the EJBs. As per the J2EE 1.3 specification, you must group EJBs together in a EJB module.
- Create a new Database Schema.
From the File menu select new and then select new Database Schema. Provide the connection information for the database from which the schema has to be captured.
- Map the database entries for Sun ONE Application Server 7.
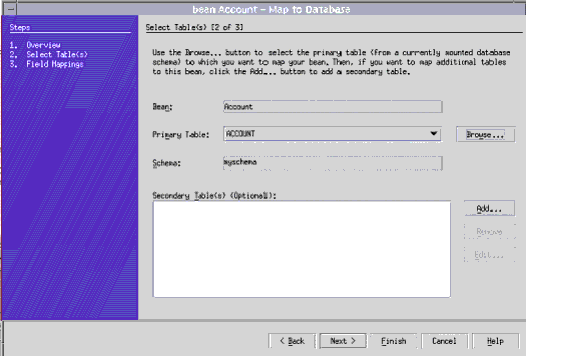
Select an EJB node in the EJB module, right click the node to choose the properties window and select Sun ONE AS tab. Specify the database schema and the primary table name for this particular entity bean. Repeat the process for other entity beans in the EJB module.
The following figure shows the selection of primary table for the entity bean Account.
Figure 6-22 Database Mapping
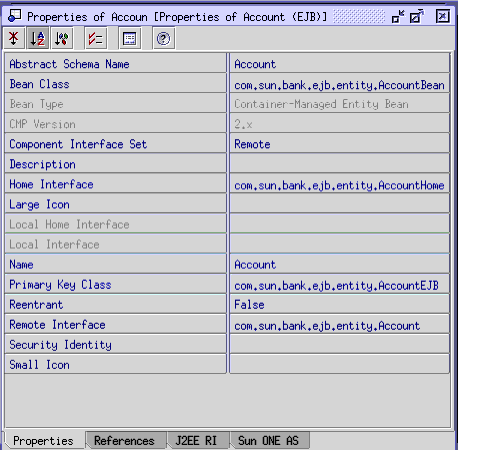
Click Next for specifying the mappings for the cmp fields of bean with the table fields.
Now select the Sun ONE Mapping tab from the Properties window and re-enter the mappings.
The following figure shows the mappings for the Account EJB.
Figure 6-23 Properties of entity bean ‘Account’
Similarly, set the mappings for all the entity beans.
See "Defining Entity Bean Relationships" for the details on the mapping of a particular entity bean to a corresponding database table field.
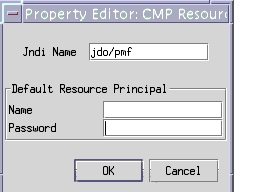
- Add a CMP resource.
Select EntityModule and view its properties. Select the Sun ONE AS tab, and now click the CMP Resource button to configure the persistence manager factory.
The following figure shows the configuration:
Figure 6-24 Adding CMP Resource
Creating an Enterprise Application in Sun ONE Studio for Java
After creating the Web application and the EJB files, the next step is to create an enterprise application, which groups all the modules together. The process for creating an enterprise application is as follows:
- Create a new enterprise application module in a new directory say 'IBank' under the same package available for the source.
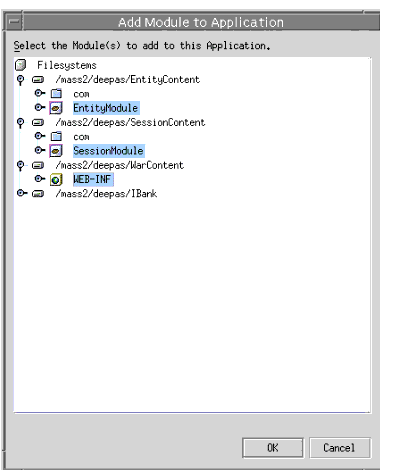
- Add the Web module and EJB modules to the enterprise application module.
The following figures show an enterprise application called iBank, containing a Web module called WarContent and an EJB module called SessionModule and EntityModule.
Figure 6-25 Adding Modules to the Application
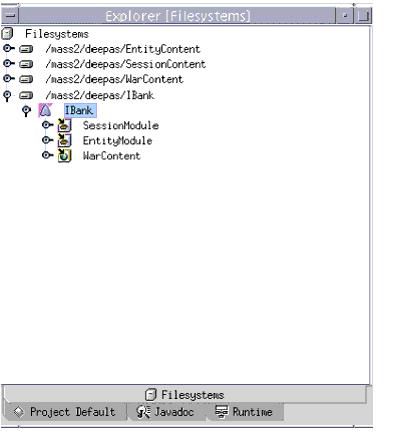
The following figure shows the application iBank having 3 modules in it.
Figure 6-26 File System showing Application ‘iBank’ having different modules
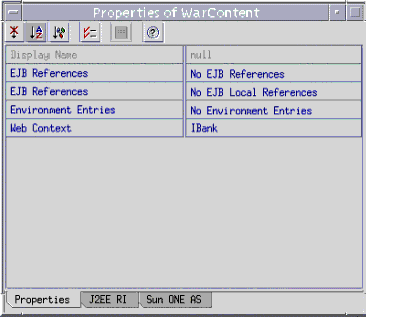
- Edit the enterprise application properties.
The property editor allows you to set the different properties of the enterprise application module. In particular, this is where the root context name is defined for the web module of the enterprise application:
Figure 6-27 Specifying the Web Context
- Export the EAR file.
Export the EAR file by right clicking the enterprise application and selecting the option for exporting the EAR file. This EAR file contains JAR files, a WAR file, and XML files. This EAR file has all the Sun ONE specific XML files required for the deployment on Sun ONE Application Server 7. This EAR file can now be deployed.
Deploying an Application in Sun ONE Application Server 7
The last stage is to deploy the application on an instance of Sun ONE Application Server 7. The process for deploying an application is described below:
- Deploying an application on Sun ONE server 7 instance from Sun ONE Studio for Java.
Right click on the EAR file and select the option ‘Deploy. This would deploy the application on the default server instance. Restart the server instance and then test the application.
- Deploying an application on an instance using Sun ONE Application Server 7 asadmin utility:
An alternative to using Sun ONE Studio for Java to deploy enterprise applications on a Sun ONE Application Server instance is to use the Sun ONE Application Server 7 asadmin utility, after creating and exporting the application EAR archive from Sun ONE Studio for Java.