| Sun Blade X6270 Server Module Linux, VMware, Solaris, and OpenSolaris Operating Systems Installation Guide |
| Sun Blade X6270 Server Module Linux, VMware, Solaris, and OpenSolaris Operating Systems Installation Guide |
| C H A P T E R 7 |
|
Installing VMware |
This chapter summarizes the necessary steps for installing:
In particular, this chapter includes specific information for selecting a network interface card (NIC) for the VMware service console.
| Note - VMware ESX 3.5 was formerly named as VMware ESX Server 3.5 and VMware ESXi 3.5 as VMware ESX Server 3i version 3.5. |
The following topics are discussed in this chapter:
Use TABLE 7-1 to preview the installation process defined as a series of tasks. The table identifies the required tasks, describes them, and provides pointers to the instructions for performing the task.
|
Verify that all applicable requirements are met for installing an operating system to your server. |
|||
|
Evaluate and select an installation method that meets the needs of your infrastructure. |
|||
|
Verify that the factory default settings in the BIOS are set prior to performing the operating system installation. |
|||
|
A VMware ESX license can be purchased from Sun or VMware. VMware ESXi is available as a free download from VMware. |
You can download the software for VMware ESX/ESXi 3.5 Update 4 or ESX/ESXi 4.0 from the following site: |
||
|
The installation instructions in this chapter explain the initial steps for booting the installation media. For further information about installing VMware ESX and ESXi, refer to the VMware documentation at:
|
|||
|
The VMware ESX or ESXi installation media might not contain the most up-to-date versions of the operating system. Follow the instructions in this chapter to update the ESX or ESXi operating system. |
|||
|
This feature enables you to power on the server from another location over the network. |
The following procedures summarize the steps for installing VMware (ESX or ESXi) from local or remote installation media.
The following procedures assume you are booting the VMware installation software from one of the following sources:
| Note - If you want to use a CD/DVD for installation, you must create it. VMware does not provide the OS software on media. It is only available as a download. |
Refer to the following procedures to install the VMware OS from local or remote media:
Prior to performing the installation, the following requirements must be met:
Note that the following procedures explain the initial steps for booting the installation media and launching the VMware ESX or ESXi installation program.
After completing this procedure, you should review and perform the required post installation tasks described later in this chapter. For more details, see VMware ESX and ESXi Post Installation Tasks.
|
1. Ensure that the installation media is available to boot.
| Note - For the Sun Blade X6270 Server Module Server, which has neither a CD/DVD-ROM drive nor a USB connector on the front panel, use the ILOM Remote Console to redirect the boot media from a remote storage device. For instructions, see “Remote Boot Media” in TABLE 1-4 Boot Media Options for Performing the OS Installation. |
For additional information about how to set up the installation media, see TABLE 1-4 Boot Media Options for Performing the OS Installation.
2. Reset the power on the server.
3. In the BIOS power-on self-test screen, press F8 to specify a temporary boot device for the VMware installation.
The Please Select Boot Device menu appears.
4. In the Boot Device menu, select either the external or virtual CD/DVD device as the first boot device, then press Enter.
The device strings listed in the Boot Device menu are in the following format: device type, slot indicator, and product ID string.
After a few seconds, the splash screen for the VMware installation appears.
5. Refer to the VMware installation documentation for ESX to assist you through the installation process.
For installation documentation, see: http://www.vmware.com/support/pubs/vi_pubs.html
During the installation procedure, a Network Configuration dialog appears.

6. In the Network Interface Card field, click the Device drop-down menu and select the desired network adapter.
A live network adapter (that is, an adapter connected to the network) must be specified for the VMware service console (vmnic0). To determine how to translate the PCI bus labels to the physical ports on a NIC, see Appendix A Translate Network Interface Card PCI Bus Number to Physical Network Port
| Note - If you are not sure which network adapter to select, contact your network administrator. |
7. To configure the network interface card, do one of the following:
8. Refer to the VMware installation documentation for ESX and complete the installation.
For installation documentation, see: http://www.vmware.com/support/pubs/vi_pubs.html
9. Review and, if necessary, perform the post installation tasks described later in this chapter.
Refer to VMware ESX and ESXi Post Installation Tasks.
|
1. Ensure that the installation media is available to boot.
| Note - For the Sun Blade X6270 Server Module Server, which has neither a CD/DVD-ROM drive nor a USB connector on the front panel, use the ILOM Remote Console to redirect the boot media from a remote storage device. For instructions, see “Remote Boot Media” in TABLE 1-4 Boot Media Options for Performing the OS Installation. |
For additional information about how to set up the installation media, see TABLE 1-4 Boot Media Options for Performing the OS Installation.
2. Reset the power on the server.
3. In the BIOS power-on self-test screen, press F8 to specify a temporary boot device for the VMware installation.
The Please Select Boot Device menu appears.
4. In the Boot Device menu, select either the external or virtual CD/DVD device as the first boot device, then press Enter.
The device strings listed in the Boot Device menu are in the following format: device type, slot indicator, and product ID string.
After a few seconds, the splash screen for the VMware installation appears.
5. Refer to the VMware installation documentation for ESXi 3.5 Update 4 to assist you through the installation process.
For installation documentation, see: http://www.vmware.com/support/pubs/vi_pubs.html
During the installation procedure, the following Network Configuration dialog appears.

6. Under Configure Management Network, select Network Adapters, and press Enter.
The Network Adapters dialog appears.
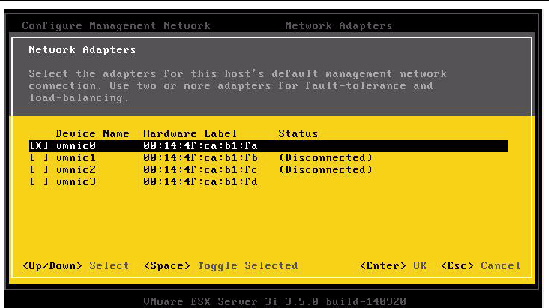
7. In Network Adapters dialog, select a live network adapter (that is, an adapter connected to the network) for the VMware service console (vmnic0) and press Enter.
A live network adapter (that is, an adapter connected to the network) must be specified for the VMware service console (vmnic0). Notice that the MAC address that is associated with the server’s physical network port (NET0, NET1, NET2, or NET3) is displayed in the Hardware Lable column. Therefore, you can use the MAC address to determine which of the server’s physical network ports is being displayed. For example, to determine the MAC address for each server network port, simply enter the following command in the Sun ILOM command-line interface (CLI) for each server network port:
If the network adapter shown in the above dialog were associated for network port NET0, then the CLI command show /SYS/MB/NET0, would produce the following output, where the fru_serial_number field lists the MAC address.
| Note - If you are not sure which network adapter to select, contact your network administrator. |
8. Refer to the VMware installation documentation for ESXi and complete the installation.
For installation documentation, see: http://www.vmware.com/support/pubs/vi_pubs.html
9. Review and, if necessary, perform the post installation tasks described later in this chapter.
Refer to VMware ESX and ESXi Post Installation Tasks.
|
1. Ensure that the installation media is available to boot.
| Note - For the Sun Blade X6270 Server Module, which has neither a CD/DVD-ROM drive nor a USB connector on the front panel, use the ILOM Remote Console to redirect the boot media from a remote storage device. For instructions, see “Remote Boot Media” in TABLE 1-4 Boot Media Options for Performing the OS Installation. |
For additional information about how to set up the installation media, see TABLE 1-4 Boot Media Options for Performing the OS Installation.
2. Reset the power on the server.
3. In the BIOS power-on self-test screen, press F8 to specify a temporary boot device for the VMware installation.
The Please Select Boot Device menu appears.
4. In the Boot Device menu, select either the external or virtual CD/DVD device as the first boot device, then press Enter.
The device strings listed in the Boot Device menu are in the following format: device type, slot indicator, and product ID string.
After a few seconds, the splash screen for the VMware installation appears.
5. Refer to the VMware installation documentation for ESX to assist you through the installation process.
For installation documentation, see: http://www.vmware.com/support/pubs/vi_pubs.html
During the installation procedure, a Network Configuration dialog appears.
.")
6. In the Network Adapter field, click the drop-down menu and select the desired network adapter, and click Next.
A live network adapter (that is, an adapter connected to the network) must be specified for the VMware service console (vmnic0). Each network adapter that is live has a green check mark next to it as shown in the above dialog. Also, notice that the MAC address that is associated with the server’s physical network port (NET0, NET1, NET2, or NET3) is displayed. Therefore, you can use the MAC address to determine which of the server’s physical network ports is being displayed. For example, to determine the MAC address for each server network port, simply enter the following command in the Sun ILOM command-line interface (CLI) for each server network port:
If the network adapter shown in the above dialog were associated for network port NET0, then the CLI command show /SYS/MB/NET0, would produce the following output, where the fru_serial_number field lists the MAC address:
| Note - If you are not sure which network adapter to select, contact your network administrator. |
A second ESX 4.0 Network Configuration dialog appears.
.")
7. Select a network adapter configuration method.
8. Refer to the VMware installation documentation for ESX and complete the installation.
For installation documentation, see: http://www.vmware.com/support/pubs/vs_pubs.html
9. Review and, if necessary, perform the post installation tasks described later in this chapter.
Refer to VMware ESX and ESXi Post Installation Tasks.
|
1. Ensure that the installation media is available to boot.
| Note - For the Sun Blade X6270 Server Module Server, which has neither a CD/DVD-ROM drive nor a USB connector on the front panel, use the ILOM Remote Console to redirect the boot media from a remote storage device. For instructions, see “Remote Boot Media” in TABLE 1-4 Boot Media Options for Performing the OS Installation. |
For additional information about how to set up the installation media, see TABLE 1-4 Boot Media Options for Performing the OS Installation.
2. Reset the power on the server.
3. In the BIOS power-on self-test screen, press F8 to specify a temporary boot device for the VMware installation.
The Please Select Boot Device menu appears.
4. In the Boot Device menu, select either the external or virtual CD/DVD device as the first boot device, then press Enter.
The device strings listed in the Boot Device menu are in the following format: device type, slot indicator, and product ID string.
After a few seconds, the splash screen for the VMware installation appears.
5. Refer to the VMware installation documentation for ESXi to assist you through the installation process. For installation documentation, see: http://www.vmware.com/support/pubs/vs_pubs.html
6. Review and, if necessary, perform the post installation tasks described later in this chapter.
Refer to VMware ESX and ESXi Post Installation Tasks.
After completing the ESX or ESXi installation, review the following post installation tasks and, if necessary, perform the tasks that are applicable to your system.
The VMware ESX or ESXi installation media might not contain the most up-to-date versions of the operating system.
If necessary, update the ESX or ESXi OS software with the latest updates and patches. For download instructions, see this web site:
http://support.vmware.com/selfsupport/download/
After installing the operating system, you might want to consider enabling the Wake On LAN (WOL) option in the BIOS Setup utility. This feature enables you to power on the server from another location over the network. For details about the requirements for enabling WOL, see “Wake On LAN” in the Sun Blade X6270 Server Module Service Manual.
| Sun Blade X6270 Server Module Linux, VMware, Solaris, and OpenSolaris Operating Systems Installation Guide | 820-6176-13 |
Copyright © 2009 Sun Microsystems, Inc. All rights reserved.
 Install VMware ESX 3.5 Update 4 From Local or Remote Media