| Netra™ High Availability Suite 3.0 1/08 Foundation Services Overview |
| C H A P T E R 6 |
The Reliable File Service provides a method by which customer applications can access highly available data on the master node disks. This service is one of the highly available services that the Netra HA Suite Foundation Services provides. The Reliable File Service includes the following features:
A reliable file system that customer applications access through NFS mount points (Reliable NFS). When using Reliable NFS, customer applications running on peer or non-peer nodes can access highly available data on the master node disks.
IP replication of disk-based data from the master node to the vice-master node.
Data sharing between the master node and vice-master node through shared disks. This functionality is not yet available on Linux.
IP replication and shared disks are two different methods for sharing data between a master node and a vice-master node and, as a consequence, for making data highly available. Only one of these two mechanisms may be installed at a time for use on a given cluster.
The Reliable NFS is implemented by the nhcrfsd daemon. The nhcrfsd daemon runs on the master node and vice-master node. It implements the failover or switchover from the master node to the vice-master node. If the master node fails, the vice-master node becomes master and the Reliable NFS server on the new master node becomes active.
The nhcrfsd daemon responds to changes in the cluster state as it receives notifications from the Cluster Membership Manager. For more information about the Cluster Membership Manager, see Chapter 5. The Reliable NFS daemon is monitored by the Daemon Monitor, nhpmd. For more information about the Daemon Monitor, see Chapter 10.
If the impact on performance is acceptable, do not use data and attribute caches when writing to shared file systems. If it is necessary to use data caches to improve performance, ensure that your applications minimize the risk of using inconsistent data. For guidelines on how to use data and attribute caches when writing to shared file systems, see “Using Data Caches in Shared File Systems” in the Netra High Availability Suite 3.0 1/08 Foundation Services Cluster Administration Guide.
For reference information about network tunable parameters and the Solaris kernel, see the Solaris Tunable Parameters Reference Manual for your version of the Solaris Operating System. Information about tunable parameters in the Linux kernel can be obtained from the provider of the actual Linux distribution.
For a failover to be transparent to customer applications running on peer or non- peer nodes, the following must be true:
NFS mount points on the master node disks, which customer applications will use to access to highly available data, must be mounted on the floating address of the master node.
The floating address must always be configured and active on the node that holds the master role, even after failover or switchover. The Reliable NFS daemon takes care of configuring and unconfiguring this address depending on the role of the node (master or vice-master) on which it runs.
For more information about the floating address of the master node, see Floating Address Triplet.
IP replication is one of two mechanisms provided by the Reliable File Service for sharing data between a master node and a vice-master node. It is also called a “shared nothing” mechanism.
Replication is the act of copying data from the master node to the vice-master node. Through replication, the vice-master node has an up-to-date copy of the data on the master node. Replication enables the vice-master node to take over the master role at any time, transparently. After replication, the master node disk and vice-master node disk are synchronized, that is, the replicated partitions contain exactly the same data.
Replication occurs at the following times:
When the master node and vice-master node are running, and data on the master node disk is changed
After startup, to replicate the software installed on the replicated partitions
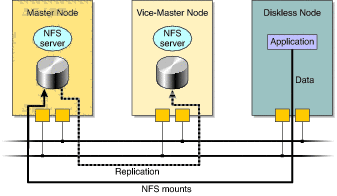
The following figure illustrates a client node (diskless or dataless) writing data to the master node, and that data being replicated to the vice-master node.
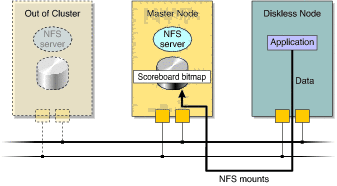
During failover or switchover, the master node goes out of service for a time before being re-established as the vice-master node. During this time, changes that are made to the new master node disk cannot be replicated to the vice-master node. Consequently, the cluster becomes unsynchronized.
While the vice-master node is out of service, data continues to be updated on the master node disk, and the modified data blocks are identified in a specific data area. FIGURE 6-2 illustrates Reliable File Service during failover or switchover.
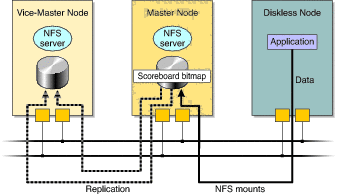
When the vice-master node is re-established, replication resumes. Any data written to the master node is replicated to the vice-master node. In addition, the data area used to keep track of modifications to data blocks is examined to determine which data blocks have been changed while the vice-master node was out of service. Any changed data blocks are also replicated to the vice-master node. In this way, the cluster becomes synchronized again. The following figure illustrates the restoration of the synchronized state.
You can verify whether a cluster is synchronized, as described in “To Verify That the Master Node and Vice-Master Node Are Synchronized” in the Netra High Availability Suite 3.0 1/08 Foundation Services Cluster Administration Guide.
You can collect replication statistics by using the Node Management Agent (NMA), as described in the Netra High Availability Suite 3.0 1/08 Foundation Services NMA Programming Guide.
On the Solaris OS, the data area that is used to keep track of modifications that are made to data blocks is called the scorecard bitmap. On Linux, these modifications are tracked by DRBD metadata. The following sections describe how this works in each environment.
When data is written to a replicated partition on the master node disk, the corresponding scoreboard bitmap is updated.
The scoreboard bitmap maps one bit to a block of data on a replicated partition. When a block of data is changed, the corresponding bit in the scoreboard bitmap is set to 1. When the data has been replicated to the vice-master node, the corresponding bit in the scoreboard bitmap is set to zero.
The scoreboard bitmap can reside on a partition on the master node disk or in memory. There are advantages and disadvantages to storing the scoreboard bitmap on the master node disk or in memory:
Storing the scoreboard bitmap in memory is a problem if the master node and vice-master node fail simultaneously. In this case, the scoreboard bitmap is lost and a full resynchronization is required when the nodes are rebooted.
Storing the scoreboard bitmap on a disk partition is slower during normal operation because writing to disk is slower than writing to memory. However, if the master node and vice-master node fail simultaneously, the scoreboard bitmap can be used to resynchronize the nodes, without the need for a full resynchronization.
Storing the scoreboard bitmap in memory is encouraged when data is continuously and frequently updated, or when data is expected to be written to a replicated partition during a switchover. This ensures that writes to replicated partitions are performed as quickly as possible and that the time required to synchronize the partitions after a switchover is reduced.
Storing the scoreboard bitmap in memory means better performance because writing to memory is quicker than writing to disk.
Each replicated partition on a disk must have a corresponding partition for a scoreboard bitmap, even if the scoreboard bitmap is stored in memory.
For information about how to configure the scoreboard bitmap in memory or on disk, see “Changing the Location of the Scoreboard Bitmap” in the Netra High Availability Suite 3.0 1/08 Foundation Services Cluster Administration Guide.
On Linux, DRBD is used for disk replication. DRBD metadata keeps track of writes to replicated partitions on the master node disk and works like scoreboard bitmaps on the Solaris OS as described in preceding section, except that DRBD metadata cannot be kept in memory, it has to be stored on a disk partition.
When a cluster is unsynchronized, the data on the master node disk is not fully backed up. You must not schedule major tasks when a cluster is unsynchronized. If this constraint does not suit the use you want to make of your cluster, you can choose to:
If you need to reduce the disk and network load on the cluster and so want to reduce the CPU used during synchronization, you can serialize slice synchronization.
This feature enables you to delay the start of synchronization between the master and vice-master disks. By default, this feature is disabled. Delay synchronization if you do not want the synchronization task to conflict with other CPU-intensive activities. If you enable this feature, you can trigger synchronization at a later time of your choosing using the nhenablesync command.
Until synchronization is triggered and completed, the vice-master is not eligible to become master, and the cluster is open to a single point of failure. By delaying synchronization you are prolonging this vulnerability.
Activate this feature by setting the RNFS.EnableSync parameter in the nhfs.conf file. If you are installing the cluster with nhinstall, specify the synchronization method by setting SYNC_FLAG in the cluster_definition.conf file. For more information, see the nhfs.conf4, cluster_definition.conf4, and nhenablesync1M man pages.
Choose how the master and vice-master disks are synchronized if you want to reduce the time it takes to synchronize the master and vice-master disks. You can synchronize either an entire master disk or only those blocks that contain data. By choosing the latter option, you reduce the time it takes to synchronize the disks. You can choose to synchronize only the blocks that contain data if you have a UNIX® File System (UFS). If you have a file system other than UFS, the entire master disk is synchronized.
Set this feature to have the same value on both server nodes. If you change the value of the RNFS.SyncType property defining this feature, reboot the cluster as described in “Shutting Down and Restarting a Cluster” in the Netra High Availability Suite 3.0 1/08 Foundation Services Cluster Administration Guide.
Choose the synchronization method by setting the RNFS.SyncType parameter in the nhfs.conf file. If you are installing the cluster with nhinstall, choose the synchronization method by setting SLICE_SYNC_TYPE in the cluster_definition.conf file. For more information, see the nhfs.conf4 and cluster_definition.conf4 man pages.
This feature enables you to synchronize the master and vice-master disks one slice at a time rather than all at once. By default, this feature is disabled. Enabling this feature reduces the disk and network load. However, it limits the availability of the cluster during a certain limited time period because the vice-master cannot become master before all slices have been synchronized. During this time period, the cluster is vulnerable to a single point of failure.
Activate this feature by setting the value of the RNFS.SerializeSync parameter in the nhfs.conf file. If you are installing the cluster with nhinstall, specify the synchronization method by setting SERIALIZE_SYNC in the cluster_definition.conf file. For more information, see the nhfs.conf4, and cluster_definition.conf4 man pages.
This feature enables you to continuously scan the state of replicated slices. By default, this feature is disabled and it can only be used if the master and vice-master disks are synchronized. If you do not monitor the state of the replicated slices, it is possible that the vice-master disk is corrupted and partly or completely inaccessible.
Activate this feature by setting the RNFS.CheckReplicatedSlices parameter in the nhfs.conf file. If you are installing the cluster with nhinstall, enable this feature by setting CHECK_REPLICATED_SLICES in the cluster_definition.conf file. For more information, see the nhfs.conf4 and cluster_definition.conf4 man pages.
This section describes how the master node disk and vice-master node disk are partitioned.
The master node, vice-master node, and dataless nodes access their local disks. The vice-master node and dataless nodes also access some disk partitions of the master node. Diskless nodes do not have, or are not configured to use, local disks. Diskless nodes rely entirely on the master node to boot and access services and data.
You can partition your disks as described in Solaris OS Standard Disk Partitioning, or as described in Solaris OS Virtual Disk Partitioning.
To use standard disk partitioning, you must specify your disk partitions in the cluster configuration files. During installation, the nhinstall tool partitions the disks according to the specifications in the cluster configuration files. If you manually install the Netra HA Suite software, you must partition the system disk and create the required file systems manually.
The master node disk and vice-master node disk can be split identically into a maximum of eight partitions. For a cluster containing diskless nodes, you can arrange the partitions as follows:
Partitions that contain data are called data partitions. One data partition might typically contain the exported file system for diskless nodes. The other data partition might contain configuration and status files for the Foundation Services. Data partitions are replicated from the master node to the vice-master node.
To be replicated, a data partition must have a corresponding scoreboard bitmap partition. If a data partition does not have a corresponding scoreboard bitmap partition, it cannot be replicated. For information about the scoreboard bitmap, see Replication During Normal Operations.
TABLE 6-1 shows an example disk partition for a cluster containing server nodes and client (diskless) nodes. This example indicates which partitions are replicated.
Note - Server nodes in a cluster that does not contain diskless nodes do not require partitions s3 and s5. |
Virtual disk partitioning is integrated into the Solaris OS (since the Solaris 9 OS) in the Solaris Volume Manager software.
One of the partitions of a physical disk can be configured as a virtual disk using Solaris Volume Manager. A virtual disk can be partitioned into a maximum of 128 soft partitions. To an application, a virtual disk is functionally identical to a physical disk. The following figure shows one partition of a physical disk configured as a virtual disk with soft partitions.
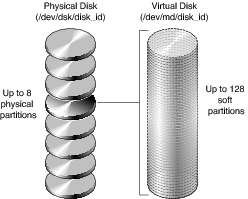
In Solaris Volume Manager, a virtual disk is called a volume.
To use virtual disk partitioning, you must manually install and configure the Solaris Operating System and virtual disk partitioning on your cluster. You can then configure the nhinstall tool to install the Netra HA Suite software only, or you can install the Netra HA Suite software manually.
For more information about virtual disk partitioning, see the Solaris documentation.
To use standard disk partitioning on Linux, you must specify your disk partitions in the cluster configuration files. During installation, the nhinstall tool partitions the disks according to the specifications in the cluster configuration files. If you manually install the Foundation Services, you must partition the system disk and create the required file systems manually.
For a cluster containing diskless nodes, you can arrange the partitions on master and vice-master nodes as follows:
Partitions that contain data are called data partitions. The data partition might contain configuration and status files for the Foundation Services. Data partitions are replicated from the master node to the vice-master node. If needed, more data partitions can be added.
To be replicated, a data partition must have corresponding DRBD metadata. Metadata for all replicated data partitions can be kept in a single metadata partition (in separate 128-MB slots).
TABLE 6-2 shows an example disk partition for a Netra HA Suite cluster. This example indicates which partitions are replicated.
Virtual disk partitioning on Linux can be done using the Logical Volume Manager (LVM). To do this, begin by declaring one or more physical disks as LVM physical volumes. Next, you need to create a volume group as a set of physical volumes. Finally, create the logical volumes from space that is available in a volume group.
To an application, a logical volume is functionally identical to a physical disk.
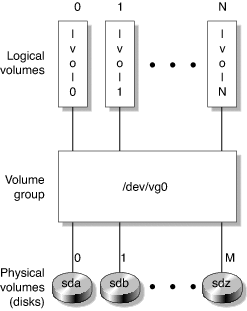
To use virtual disk partitioning, you must manually install and configure the Linux operating system and virtual disk partitioning on your cluster. You can then configure the nhinstall tool to install only the Foundation Services, or you can install the Foundation Services manually. For more information about virtual disk partitioning, see the Linux and LVM documentation, for example: http://www.tldp.org/HOWTO/LVM-HOWTO/index.html
On the Solaris OS, logical mirroring is provided by Solaris Volume Manager (Solaris VM) for the Solaris 9 and Solaris 10 OS. In the Solaris environment, logical mirroring can be used with IP replication to strengthen system reliability and availability.
Logical mirroring can be used on server nodes with two or more disks. The disks are mirrored locally on the server nodes. They always contain identical information. If a disk on the master node is replaced or crashes, the second local disk takes over without a failover.
For more information about logical mirroring on the Solaris OS, see the Solaris documentation. For more information about logical mirroring on Linux, see the Linux Software RAID documentation, for example: http://www.tldp.org/HOWTO/Software-RAID-HOWTO.html
The shared disk capability is one of two mechanisms provided by the Reliable File Service for sharing data between a master node and a vice-master node. It requires at least one disk bay, which can be physically attached to the master node and to the vice-master node. Usually, the disk bay contains two disks that are mirrored using the Solaris VM. This section describes how the shared disk is partitioned.
Note - The shared disk functionality is not supported for use with Carrier Grade Linux. |
The master node, vice-master node, and dataless nodes access their local disks. The vice-master node and dataless nodes also access some disk partitions mounted on the master node. Client nodes do not have, or are not configured to use, local disks. Client nodes rely entirely on the master node to boot and access services and data.
The following figures show how data is replicated on a shared disk, how a shared disk fails or switches over, and how the shared disk is returned to a synchronized state.
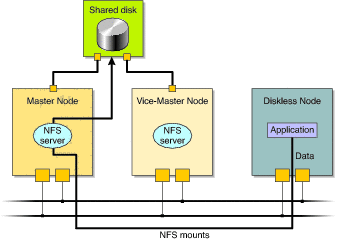
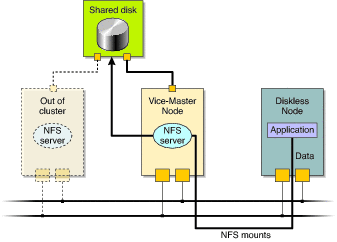
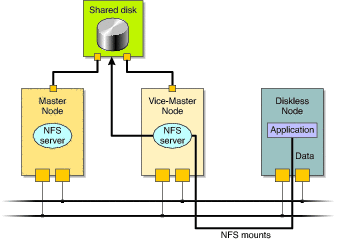
To use standard disk partitioning, you must specify your disk partitions in the cluster configuration files. During installation, the nhinstall tool partitions the disks according to the specifications in the cluster configuration files. If you manually install the Netra HA Suite software, you must partition the system disk and create the required file systems manually.
The shared disk can be split into a maximum of eight partitions. For a cluster containing client nodes, the partitions can be arranged as follows:
Partitions that contain data are called data partitions. One data partition might typically contain the exported file system for client nodes. The other data partition might contain configuration and status files for the Foundation Services.
TABLE 6-3 shows an example disk partition for a cluster containing server nodes and client nodes. This example indicates which partitions are shared
Server nodes in a cluster that does not contain client (diskless) nodes do not require partition s0.
Copyright © 2008, Sun Microsystems, Inc. All rights reserved.