Chapter 16 Using Image Viewer
Use Image Viewer to view, edit, print, and translate the file formats of monochrome and color images and multiple page documents such as PostScript files. Use the Snapshot function of Image Viewer to capture snapshots of windows, user-defined regions, or the entire desktop screen.
Starting and Quitting Image Viewer
There are several ways to start Image Viewer:
-
From the Workspace Programs menu
-
From Application Manager
-
From the command line
To Start Image Viewer from the Workspace Programs Menu
-
Place the mouse pointer anywhere on the background of the desktop (the workspace) and click mouse button 3.
The Workspace menu appears.
-
Choose Programs, and then choose Image Viewer from the Programs submenu.
To Start Image Viewer from Application Manager
-
Open Application Manager by clicking the Applications icon on the Applications subpanel of the Front Panel.
-
Double-click Desktop_Apps in the Application Manager window.
The Desktop_Apps group is displayed in Application Manager.
-
Double-click Image Viewer in the Desktop_Apps group.
Image Viewer opens.
Figure 16–1 Image Viewer icon
Install Image Viewer in the Front Panel.
To Start Image Viewer from the Command Line
Image Viewer has new features which can be accessed by running the tool from the command line. To start Image Viewer and open files directly from the command line:
Or, type sdtimage filename to start Image Viewer and open a specific file.
To Exit Image Viewer
Choose Exit from the File menu.
Viewing Images
With Image Viewer, you can view, edit, print, and translate the file formats of monochrome and color images and PostScript files. See Image Viewer File Formats for a list of the file formats that Image Viewer can open. See Viewing PostScript Files to learn how to view PostScript files.
To Open an Image File
-
Choose Open from the File menu.
The Open dialog box appears.
-
To navigate among and display the contents of folders, double-click a folder in the Folders list.
-
Select an image file from the Files list or type its name in the Enter file name field.
-
Click OK to open the image file.
To Open an Image File Using Drag and Drop
If Image Viewer is already running, drop an image file icon on an open Image Viewer window.
If Image Viewer is not running:
-
Drag an image file icon from File Manager and drop it on the workspace.
-
Click mouse button 3 over the image file icon on the workspace and choose Open from the Workspace Object menu.
Image Viewer starts and the image file is displayed in Image Viewer's View window.
-
To remove the icon from the Workspace when you are finished with it, click mouse button 3 on the icon and select Remove From Workspace from the pop-up menu.
To View an Image in Gray Scale or Color
To determine whether images appear in gray scale or color:
-
Choose Options from the File menu.
-
Select either Gray Scale or Color for the View Image In setting.
-
If you chose to display images in color, set the Color option to the number of colors you want used.
The Color setting depends on the type of display monitor you have. For example, if only one option, such as 256, appears, that is the only option available on your monitor.
-
Click OK to activate the settings and close the dialog box. Click Apply to activate the setting and leave the dialog box displayed.
To Move the Image within the View Window
-
Select Palette from the Edit menu if the palette is not displayed.
-
Click the Pan tool in the palette.
See Using the Palette Tools for information on the palette.
-
Move the pointer into the View window, over the image or page.
The pointer changes to a hand shape.
-
Drag the pointer in the direction you want to move the image or page.
To Change an Image Orientation in the View Window
To rotate the displayed image in 90-degree increments (mimics landscape or portrait orientation):
-
Choose Page Viewing Controls from the View menu.
-
Select a percentage by which you want the image rotated (90 degrees, 180 degrees, or 270 degrees).
-
Select whether you want the image rotated Right or Left.
-
Click OK to rotate the image and close the dialog box, or Apply to rotate the image and leave the dialog box displayed.
To Display Information about an Image
Choose Image Info from the View menu.
The Image Information dialog box appears.
Figure 16–2 Image Information dialog box
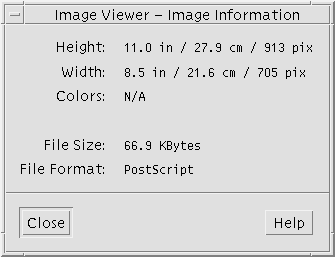
The dialog box displays the following information about the image:
-
Width of the page in inches, centimeters, and pixels
Editing Images
You can use Image Viewer to manipulate images in many ways:
-
Select a region to save
-
Rotate, flip, or scale the image
Using the Palette Tools
The Palette dialog box provides tools that enable you to manipulate images.
Figure 16–3 Palette dialog box
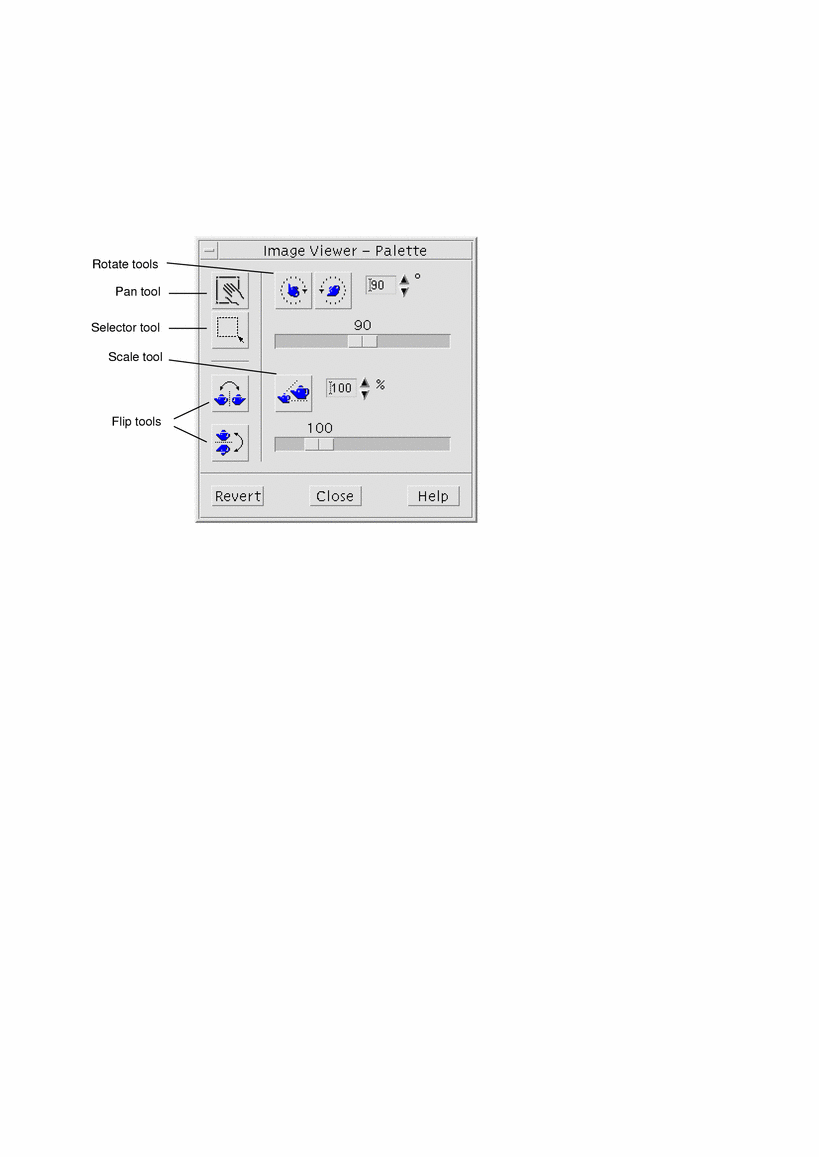
To Display the Palette Automatically
You normally display the Image Viewer Palette by choosing Palette from the Edit menu. However, you can also automatically display the palette whenever you open a document:
To Select a Region to Save as a New File
You can cut out a region of an image or page and save that region as a new file.
-
Select Palette from the Edit menu if the palette is not displayed.
-
Click the Selector tool in the palette.
-
Move the pointer into the View window.
-
Place the target pointer over a corner of the region you want to save as a new image and drag mouse button 1 to the opposite corner.

Image Viewer draws a border around the region you define.
-
Choose Save Selection As from the File menu.
The Save Selection As dialog box appears.
-
Select the file format in which you want your file written.
For a list of the formats, see Image Viewer File Formats.
-
(Optional) Choose a compression method from the Compression menu button.
The default is None (no compression); compressed files require less disk space.
-
(Optional) Choose the number of colors to save for your file from the Colors menu button.
The choices depend on the type of monitor you have.
-
Click OK.
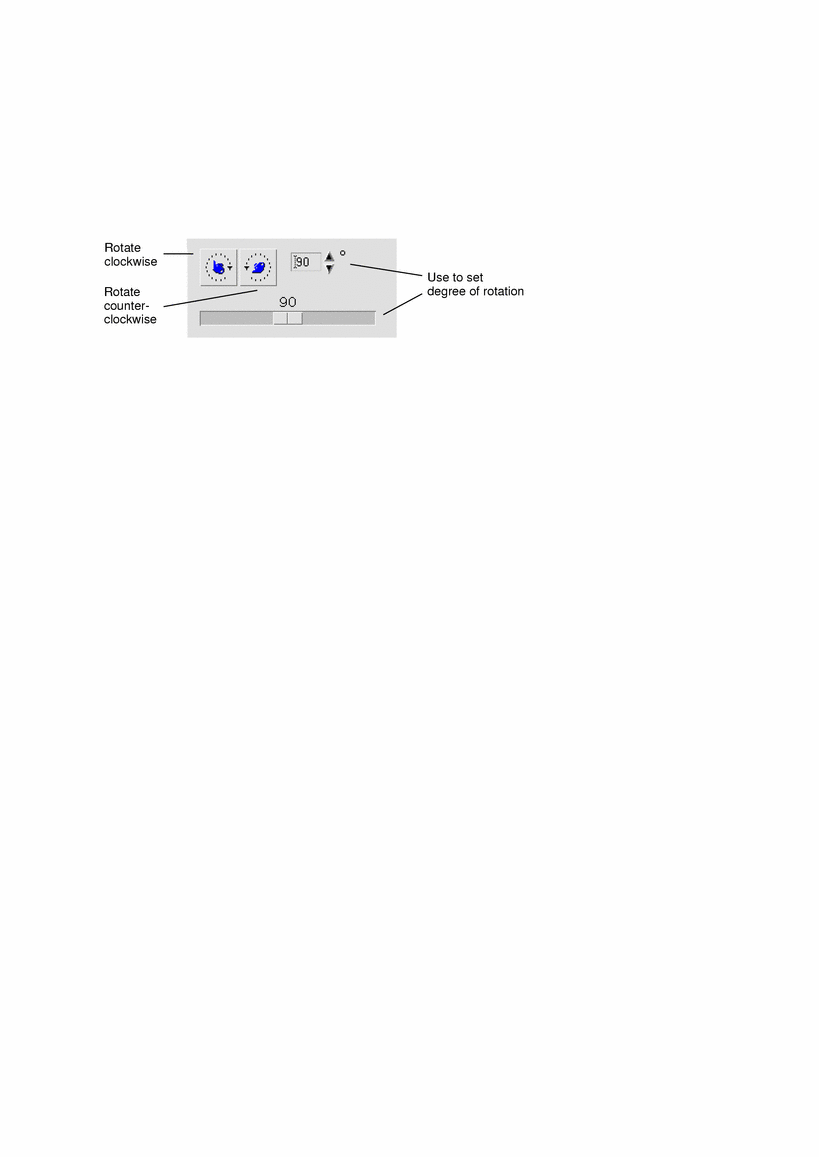
To Rotate an Image
-
Select Palette from the Edit menu if the palette is not displayed.
-
Specify the number of degrees you want the image or page rotated.
The default value is 90 degrees; change the value in one of the following ways:
-
Double-click in the Rotate Degrees field and type the number
-
Click the arrow buttons
-
Drag the slider
-
-
Click one of the rotate tools to rotate the image or page left or right.
Image Viewer rotates the image or page according to the value in the Rotate Degrees field.
-
To restore the image to its last-saved orientation, click Revert.
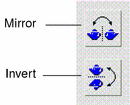
To Flip an Image
-
Select Palette from the Edit menu if the palette is not displayed.
-
Click one of the flip tools to invert or create a mirror image of the currently displayed image or page.
-
To restore the image to its last-saved orientation, click Revert.
To Scale an Image
To enlarge or reduce an image proportionally:
-
Select Palette from the Edit menu if the palette is not displayed.

-
Specify the scale percentage.
The default value is 100%; change the value in one of the following ways:
-
Double-click in the Scale Percentage field and type the number
-
Click the arrow buttons
-
Drag the slider
-
-
Click the Scale tool.
Image Viewer scales the image according to the value in the Scale Percentage field.
-
To restore the image to its last-saved size, click Revert.
To Undo an Edit Operation
Image Viewer provides two methods for cancelling an unsaved edit operation:
-
Choose Undo from the Edit menu to cancel the last unsaved edit made to an image or page.
-
Or, click the Revert button on the palette to cancel all unsaved changes and display the last saved version of the image or page.
Saving Images
You can save changes you make to an image or page in the same file you opened, or to a new file. Saving to a new file enables you to save to a different format or name.
To Save an Edited Image in the Same File
-
Choose Save from the File menu.
The Save dialog box appears.
-
Click OK.
A dialog box is displayed, asking you if you want to overwrite the existing file.
-
Click Overwrite Existing File to save the changes in the existing file.
Click Cancel if you do not want to overwrite the existing file. Change the file name or change folders in the Save dialog box to save the changes to a new file.
To Save an Image as a New File
To save a file and specify its format, folder, and name:
-
Choose Save As from the File menu.
-
Double-click a folder name in the Folder list to open it.
-
Type the name of the file in the Enter file name field.
-
Select the file format in which you want your file written.
For a list of the formats, see Image Viewer File Formats.
-
Choose a compression method from the Compression menu button.
The default is None (no compression); compressed files require less disk space.
-
Choose the number of colors to save for your file from the Colors menu button.
The choices depend on the type of monitor you have.
-
Click OK.
Image Viewer saves your file in the specified format.
Viewing PostScript Files
With Image Viewer you can view and manipulate PostScript files as well as image files. (See Viewing Images to learn how to view image files.)
To Open a PostScript File from the File Menu
-
To navigate among and display the contents of folders, choose a folder from the Folders list.
-
Choose a PostScript file from the Files list or type the PostScript file name in the Enter file name field.
-
Click OK to open the PostScript file.
The PostScript file is displayed in Image Viewer's View window.
To Open a PostScript File Using Drag and Drop
If Image Viewer is already running, drop a PostScript file icon on an open Image Viewer window.
If Image Viewer is not running:
-
Drag a PostScript file icon from File Manager and drop it on the Workspace.
-
Press or click mouse button 3 over the PostScript file icon on the workspace and choose Open from the Workspace Object menu.
Image Viewer is started up and the PostScript file is displayed in Image Viewer's View window.
-
To remove the icon from the Workspace when you are finished with it, click mouse button 3 on the icon and select Remove From Workspace from the popup menu.
To View a PostScript File in Black and White or Color
To Page through a PostScript File
Use the Page slider or the arrow buttons.

Using your keyboard, you can view:
-
The first page by pressing Home
-
The next page by pressing PgDn or Return
-
The previous page by pressing PgUp, Back Space, or Del[ete]
-
The last page by pressing End
To View a Specific Page of a PostScript File
-
Choose Page Overview from the View menu.
The Page Overview window uses thumbnail page buttons to show simple renderings of the pages in a document. Up to 16 thumbnail page buttons are displayed in a set. Clicking the scroll bar displays up to 12 new thumbnail page buttons.
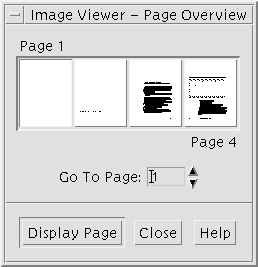
Note –If the Page Overview menu item is unavailable, Image Viewer is loading the information for the Page Overview dialog box. For a long document, this may take a while.
-
Determine the page you want to view.
-
Double-click the thumbnail page button.
-
Or, type the page number in the text field and click Display Page.
-
To Reverse Page Order
The page order of a document is often reversed when the file is prepared for printing; this is a convenient way to collate a document on printers that produce pages printed side up. To reverse the page order of a document you are viewing:
-
Choose Page Viewing Controls from the View menu.
The Page Viewing Controls dialog box appears.
-
Select the order in which you want the pages of the current document displayed (First Page First or Last Page First).
-
Click OK to apply your choices and close the dialog box.
To Change the Size of the Displayed Page
The page description language used to create some documents may not include page size information. This can cause page boundaries to display incorrectly. To change the displayed page size:
-
Choose Page Viewing Controls from the View menu.
The Page Viewing Controls dialog box appears.
-
Select the size of the page you want for displaying the current document.
-
Click OK to apply your choices and close the dialog box.
See Print Dialog Box for information on changing the size of the printed page.
To Save a PostScript Page as a Bitmap Image
-
Choose Save Page As Image from the File menu.
The Save Page As Image dialog box appears.
-
Select the file you want to save.
If you do not specify a file, Image Viewer saves the page currently displayed in the View window.
You can filter the Files list by typing a file-name condition in the Filter field and clicking Update. For example, typing *.ps will list only the files ending in .ps in the Files list.
-
Select the format in which you want to save the page from the File Format list.
See Table 16–2 for a list of file formats in which Image Viewer can save an image.
-
(Optional) Set a compression type through the Compression button menu.
-
(Optional) Choose the number of colors for the image from the Colors button menu.
The default is 256.
-
Type the name under which you want to save the file in the Enter file name field.
-
Click OK.
Printing
You can print an image or PostScript file in Image Viewer and set parameters for image position, orientation, and size, plus the more standard print settings such as page size and number of copies.
Print Dialog Box
Figure 16–4 Print dialog box
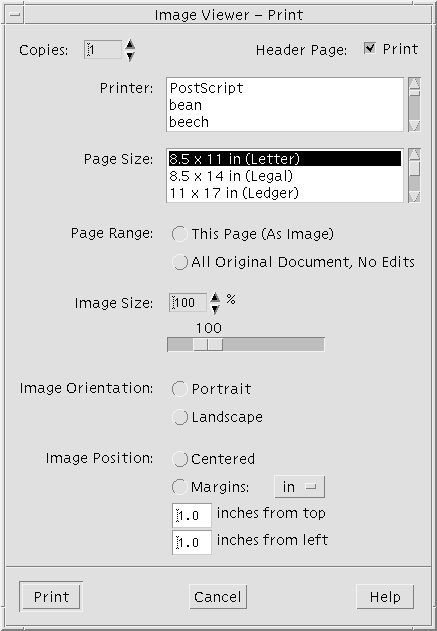 Table 16–1 Print Dialog Box Options
| Option | Usage |
|---|---|
|
Copies |
Increase or decrease the number of copies to print. |
|
Header Page |
Choose whether to print a header page. |
|
Printer |
Select the printer on which to print your image from a list of printers. |
|
Page Size |
Select from a list of standard page sizes. This value should correspond with the size of the paper in your printer. |
|
Page Range |
Choose whether to print the entire document or one page. |
|
Image Size |
If Page Range is This Page (As Image), you can choose whether to scale the image. |
|
Image Orientation |
Choose between Portrait, which prints an image vertically on the page, and Landscape, which prints it horizontally. |
|
Image Position |
Choose between Centered (default), which prints the image in the center of the page, and Margins, which uses the entered values for the top and left margins. The button labeled “in” or “cm” controls whether margin values are in inches or centimeters. |
To Print (With Options)
-
Specify the details of the print job your print parameters.
See Table 16–1.
-
Click Print.
To Preview a File to Be Printed
To see how the contents of the View window will appear when printed with the current Print dialog box settings:
-
Choose Print Preview from the File menu.
The Print Preview dialog box appears.
If the image is too big to fit on a single page, lines in the Print Preview window show you the boundaries of the printed page.
-
To control which area of the image or page is printed, move the pointer into the window (it changes to a hand shape) and use mouse button 1 to drag the image into position.
-
To print the image, click Print, and then click Print in the Print dialog box that is displayed.
See Print Dialog Box for information about print settings.
-
Click Close to close the Print Preview dialog box.
To Print a Document
To print a single copy of the image or multiple-page document you are viewing:
Choose Print One from the File menu.
Image Viewer prints one copy of the file, using the current Print dialog box settings.
See Print Dialog Box for information about Print settings.
To Print a Page from a Document
-
Display the required page in Image Viewer.
-
Choose Print Page from the File menu.
Image Viewer prints one copy of the current page on the current printer.
To Print an Image File
-
Display the required image in Image Viewer.
-
Choose Print Image from the File menu.
Image Viewer prints one copy of the current image file on the current printer.
Image Viewer File Formats
You may want to identify the specific format, or file type, of the file you want to open. Image Viewer can open files in the formats listed in Table 16–2, which you can specify by choosing Open As from the File menu.
Table 16–2 Image Viewer Open File Formats|
Andrew Toolkit |
Kodak Photo CD (Base/4) |
|
Atari Compressed Spectrum* |
Lisp Machine Bit-Array |
|
Atari Degas 1* |
MGR |
|
Atari Degas 3* |
MTV/PRT Ray-Tracer |
|
Atari Uncompressed Spectrum* |
MacPaint |
|
AutoCAD Slide |
PBM |
|
Benet Yee Face File |
PC PaintBrush |
|
CMU Window Manager |
PGM |
|
Encapsulated PostScript (EPSF) |
PICT |
|
FITS |
PPM |
|
GEM |
PostScript |
|
GIF |
QRT Ray-Tracer |
|
Gould Scanner |
Sun Icon |
|
Group 3 FAX |
Sun Raster |
|
HIPS |
TIFF |
|
HP PaintJet |
TrueVision Targa |
|
IFF ILBM |
Usenix FaceSaver |
|
Img-Whatnot |
X Bitmap |
|
JFIF (JPEG) |
X11 Window Dump (XWD) |
|
Kodak Photo CD (4Base) |
XPM |
|
Kodak Photo CD (Base) |
Xerox Doodle Brush |
|
Kodak Photo CD (Base/16) |
Xim |
*SPARC only.
Image Viewer can save files in the formats listed below:
|
Encapsulated PostScript (EPSF) |
GIF |
|
JFIF (JPEG) |
PostScript |
|
Sun Raster |
TIFF |
|
XPM |
|
Using Snapshot
Snapshot takes a “snapshot” of a window, of a region of the desktop, or of the entire desktop screen. You can then view, save, or edit the snapshot in Image Viewer.
To Start Image Viewer Snapshot
Choose Snapshot from the Image Viewer File menu
Or, start Image Viewer with the -snapshot option:
Figure 16–5 Snapshot window
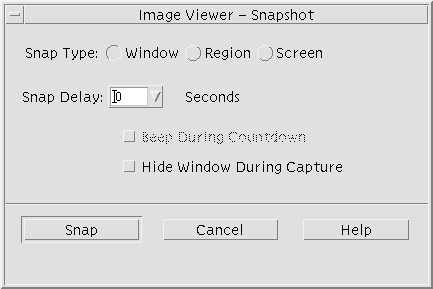
To Take a Snapshot of a Window
-
If Snapshot is not running, choose Snapshot from the Image Viewer File menu.
-
Click the Snap button.
The mouse pointer becomes a plus sign.
-
Move the mouse pointer to the window to be snapped and click mouse button 1.
The message at the bottom of the Snapshot dialog box reads “Snap succeeded” once the window is snapped.
To Take a Snapshot of a Region
-
If Snapshot is not running, choose Snapshot from the Image Viewer File menu.
-
Click the Snap button.
The mouse pointer becomes a plus sign.
-
Move the mouse pointer to a corner of the region to be snapped, press and hold mouse button 1, drag the mouse diagonally to encompass the region to be snapped, and release mouse button 1.
The message at the bottom of the window reads “Snap succeeded” once the region is snapped.
To Take a Snapshot of the Screen
-
If Snapshot is not running, choose Snapshot from the Image Viewer File menu.
-
Click the Snap button.
The message at the bottom of the window reads “Snap succeeded” once the screen is snapped.
To Take a Delayed Snapshot
When taking a snapshot of a menu or some other pop-up or pull-down element, you can delay the time between clicking Snap and the snapshot being taken.
-
If Snapshot is not running, choose Snapshot from the Image Viewer File menu.
-
Determine the number of seconds to delay by using the down arrow button and selecting a value or by typing in the text field.
The next time you click Snap, the snapshot will be delayed by the specified number of seconds.
-
(Optional) If you want to hear the seconds counted off before the snapshot is taken, select Beep During Countdown.
-
Select a Snap Type and click Snap.
If Snap Type is Region, drag mouse button 1 to select the region to be snapped.
-
Make any necessary adjustments to the image during the snap delay time.
You can display a menu, for instance, by clicking on an item in a menu bar.
After the specified number of seconds, the window, region, or screen is snapped and “Snap succeeded” is displayed in the message area at the bottom of the window.
To Hide the Snapshot Dialog Box While Taking a Snapshot
If you want a snapshot of the entire screen and do not want the Snapshot dialog box to be included in the image, you can hide the Snapshot dialog box while you take a snapshot.
-
If Snapshot is not running, choose Snapshot from the Image Viewer File menu.
-
Select the Hide Window During Capture check box.
The Snap Delay changes to 8 seconds and the message area at the bottom of the Snapshot dialog box displays “Timer adjusted to guarantee correct operation.”
-
Click Snap to take the snapshot.
All Image Viewer windows disappear and do not reappear until after the snapshot has been taken.
To Save a Snapshot
See To Save an Image as a New File for instructions for saving a captured snapshot image.
- © 2010, Oracle Corporation and/or its affiliates
