Overview of RAID 0 Volumes
RAID 0 volumes, including both stripes and concatenations, are composed of slices or soft partitions and enable you to expand disk storage capacity. They can be used either directly or as the building blocks for RAID 1 (mirror) volumes, transactional volumes, and soft partitions. There are three kinds of RAID 0 volumes:
-
Striped volumes (or stripes)
-
Concatenated volumes (or concatenations)
-
Concatenated striped volumes (or concatenated stripes)
Note –
A component refers to any devices, from slices to soft partitions, used in another logical volume.
A stripe spreads data equally across all components in the stripe, while a concatenated volume writes data to the first available component until it is full, then moves to the next available component. A concatenated stripe is simply a stripe that has been expanded from its original configuration by adding additional components.
RAID 0 volumes allow you to quickly and simply expand disk storage capacity. The drawback is that these volumes do not provide any data redundancy, unlike RAID 1 or RAID 5 volumes. If a single component fails on a RAID 0 volume, data is lost.
You can use a RAID 0 volume containing a single slice for any file system.
You can use a RAID 0 volume that contains multiple components for any file system except the following:
-
root (/)
-
/usr
-
swap
-
/var
-
/opt
-
Any file system that is accessed during an operating system upgrade or installation
Note –
When you mirror root (/), /usr, swap, /var, or /opt, you put the file system into a one-way concatenation or stripe (a concatenation of a single slice) that acts as a submirror. This one-way concatenation is mirrored by another submirror, which must also be a concatenation.
RAID 0 (Stripe) Volume
A RAID 0 (stripe) volume is a volume that arranges data across one or more components. Striping alternates equally-sized segments of data across two or more components, forming one logical storage unit. These segments are interleaved round-robin, so that the combined space is made alternately from each component, in effect, shuffled like a deck of cards.
Striping enables multiple controllers to access data at the same time, which is also called parallel access. Parallel access can increase I/O throughput because all disks in the volume are busy most of the time servicing I/O requests.
An existing file system cannot be converted directly to a stripe. To place an existing file system on a stripe, you must back up the file system, create the stripe, then restore the file system to the stripe.
For sequential I/O operations on a stripe, Solaris Volume Manager reads all the blocks in a segment of blocks (called an interlace) on the first component, then all the blocks in a segment of blocks on the second component, and so forth.
For sequential I/O operations on a concatenation, Solaris Volume Manager reads all the blocks on the first component, then all the blocks of the second component, and so forth.
On both a concatenation and a stripe, all I/O occurs in parallel.
Interlace Values for Stripes
An interlace is the size, in Kbytes, Mbytes, or blocks, of the logical data segments on a stripe. Depending on the application, different interlace values can increase performance for your configuration. The performance increase comes from having several disk arms doing I/O. When the I/O request is larger than the interlace size, you might get better performance.
Note –
RAID 5 volumes also use an interlace value. See Overview of RAID 5 Volumes for more information.
When you create a stripe, you can set the interlace value or use the Solaris Volume Manager default interlace value of 16 Kbytes. Once you have created the stripe, you cannot change the interlace value. However, you could back up the data on it, delete the stripe, create a new stripe with a new interlace value, and then restore the data.
Scenario—RAID 0 (Stripe) Volume
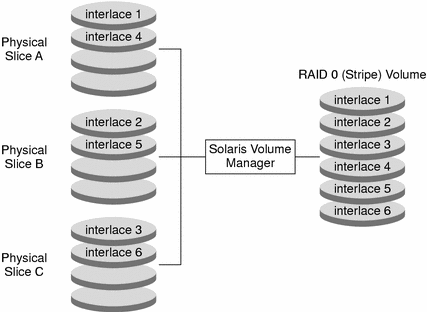
Figure 7–1 shows a stripe that is built from three components (disks).
When Solaris Volume Manager stripes data from the volume to the components, it writes data from chunk 1 to Disk A, from chunk 2 to Disk B, and from chunk 3 to Disk C. Solaris Volume Manager then writes chunk 4 to Disk A, chunk 5 to Disk B, chunk 6 to Disk C, and so forth.
The interlace value sets the size of each chunk. The total capacity of the stripe d2 equals the number of components multiplied by the size of the smallest component. (If each slice in the following example were 2 Gbytes, d2 would equal 6 Gbytes.)
Figure 7–1 Stripe Example

RAID 0 (Concatenation) Volume
A concatenated volume, or concatenation, is a volume whose data is organized serially and adjacently across components, forming one logical storage unit.
Use a concatenation to get more storage capacity by combining the capacities of several components. You can add more components to the concatenation as the demand for storage grows.
A concatenation enables you to dynamically expand storage capacity and file system sizes online. With a concatenation you can add components even if the other components are currently active.
Note –
To increase the capacity of a stripe, you need to build a concatenated stripe. See RAID 0 (Concatenated Stripe) Volume.
A concatenation can also expand any active and mounted UFS file system without having to bring down the system. In general, the total capacity of a concatenation is equal to the total size of all the components in the concatenation. If a concatenation contains a slice with a state database replica, the total capacity of the concatenation would be the sum of the components minus the space that is reserved for the replica.
You can also create a concatenation from a single component. Later, when you need more storage, you can add more components to the concatenation.
Note –
You must use a concatenation to encapsulate root (/), swap, /usr, /opt, or /var when mirroring these file systems.
Scenario—RAID 0 (Concatenation)
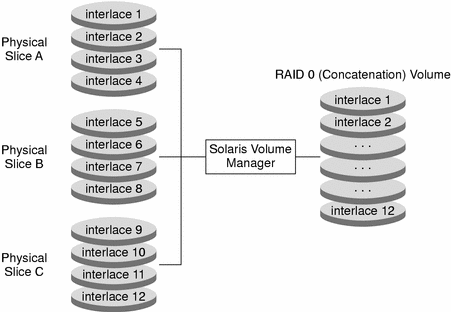
Figure 7–2 illustrates a concatenation that is made of three components (slices).
The data blocks, or chunks, are written sequentially across the components, beginning with Disk A. Disk A can be envisioned as containing logical chunks 1 through 4. Logical chunk 5 would be written to Disk B, which would contain logical chunks 5 through 8. Logical chunk 9 would be written to Drive C, which would contain chunks 9 through 12. The total capacity of volume d1 would be the combined capacities of the three drives. If each drive were 2 Gbytes, volume d1 would have an overall capacity of 6 Gbytes.
Figure 7–2 Concatenation Example

RAID 0 (Concatenated Stripe) Volume
A concatenated stripe is a stripe that has been expanded by adding additional components (stripes).
To set the interlace value for a concatenated stripe, at the stripe level, use either the Enhanced Storage tool within the Solaris Management Console, or the metattach -i command. Each stripe within the concatenated stripe can have its own interlace value. When you create a concatenated stripe from scratch, if you do not specify an interlace value for a particular stripe, it inherits the interlace value from the stripe before it.
Example—RAID 0 (Concatenated Stripe) Volume
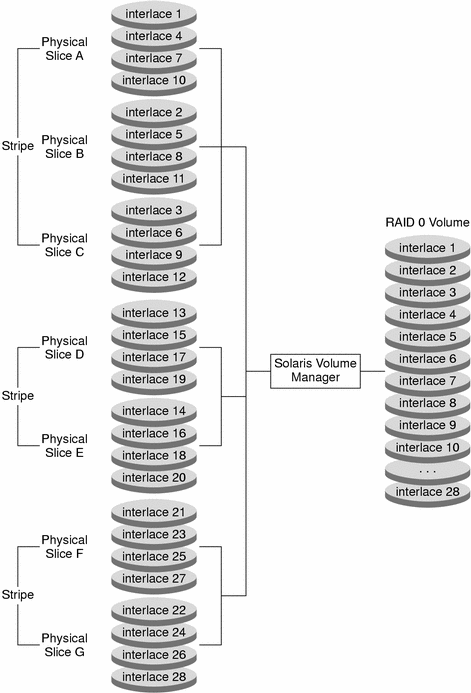
Figure 7–3 illustrates that d10 is a concatenation of three stripes.
The first stripe consists of three slices, Slice A through C, with an interlace value of 16 Kbytes. The second stripe consists of two slices Slice D and E, and uses an interlace value of 32 Kbytes. The last stripe consists of a two slices, Slice F and G. Because no interlace value is specified for the third stripe, it inherits the value from the stripe before it, which in this case is 32 Kbytes. Sequential data chunks are addressed to the first stripe until that stripe has no more space. Chunks are then addressed to the second stripe. When this stripe has no more space, chunks are addressed to the third stripe. Within each stripe, the data chunks are interleaved according to the specified interlace value.
Figure 7–3 Concatenated Stripe Example

- © 2010, Oracle Corporation and/or its affiliates
