Print Dialog Box
These are guidelines for a common look and feel print dialog box, which may be used wherever a print action is available. The print dialog is not a widget. Developers are encouraged to use these guidelines as a starting point and to add functionality as appropriate for their applications. It is important, however, to remember that users expect consistency from one print dialog to another; therefore, the common area should be left as unchanged as possible. Use a print dialog box whenever users would want to select options for printing a file, a selection, or other type of object. If your application supports printing, you should use a print dialog box, and you may provide an optional nondialog method of printing directly, that is, "silent" printing.
Standard Print Menu Items for Applications
Print...: brings up a print dialog so the user can choose from the available options before printing the selected objects.
Print One: prints one copy of the selected objects, using the default print methods previously defined by the user. The user is not prompted for further information through a dialog.
Guidelines for Common Print Dialog Functions
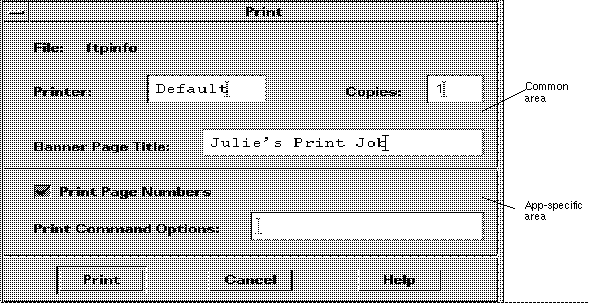
Applications are expected to provide many different types of printing functions and capabilities. This section provides guidelines for the most commonly used types of print options so that appearance and behavior for these items is consistent across applications. These common items are grouped into a common area that is located in the top portion of the print dialog. Figure 7-5 shows a typical print dialog. The common area is the area above the separator line.
Figure 7-5 A basic print dialog. box

The common area contains the following components:
-
Dialog Title: Print
-
File: this is a noneditable field. It displays the file name (if available). If the user is printing a nonfile object, this field should display the object type if possible (for example, mail message, calendar appointment).
-
Printer: A combination box; could also be a text field. It contains the name of the printer destination. The default entry is labeled Default, that is, whatever printer is the default destination. The user may select or type any other valid printer name. If it is a combination box, the list of printers could reflect what is appropriate for that printing job. The dialog should retain the last user entry or selection made.
-
Copies: A spin box (numeric widget) where the user selects or types the number of output copies desired. Optionally, this could be a text field.
-
Banner Page Title: A text field where the user may enter the text the user wants to appear on the banner page (that is, cover page) of their output. This field should pick up the default banner title if the user has set it elsewhere. Optionally, you could add a check box to turn the banner page off completely.
-
Separator lines: Used between the common fields, the application-specific fields, and the buttons.
-
The print dialog contains the following standard buttons:
-
Print: Accepts the user's choices in the dialog, prints the selected objects, and exits the dialog.
-
Cancel: Ignores the user's choices in the dialog, prints nothing, and exits the dialog.
-
Help: Brings up an associated Help window.
-
Optional buttons could include Reset, Print Preview.
-
Guidelines for Application-Specific Print Dialog Box Functions
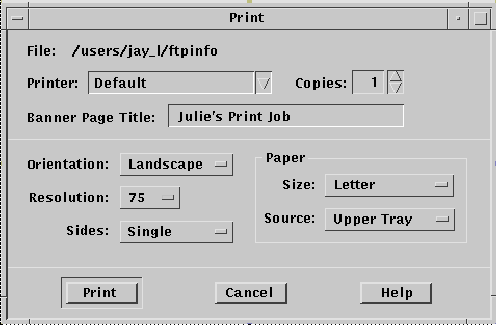
The standard print dialog application-specific area is the bottom half of the dialog box illustrated in Figure 7-6.
Depending upon the application or function, developers may choose to add more fields to the common Print dialog. The controls in the dialog are laid out horizontally; if more fields are needed, it is suggested that you add another separator line, then place the additional controls below it, as illustrated. If any additional push buttons are needed, they should go between the Print and Cancel buttons.
Optional Fields
Some possible optional fields include:
- Print Page Numbers
-
This checkbox applies only when ASCII files are being printed. If the objects selected for printing are non-ASCII, this control should be dimmed. When turned on, output pages will be numbered.
- Print Command Options
-
A text field where the user may type an lp command or script name to override the instructions in the other fields. If you want to provide print methods besides lp, rename this field (Print Method, Use Print Command, and so on).
- Priority
-
This might be an option menu containing values for High, Medium, and Low, or might be a spin box containing numbers.
- Orientation
-
An option menu containing the values Portrait and Landscape (see Figure 7-6).
- Resolution
-
An option menu or a spin box containing numeric values, in dpi (see Figure 7-6).
- Sides
-
An option menu containing the values Single and Double (see Figure 7-6).
- Paper Size
-
An option menu containing the values Letter, Legal, and so on. (Figure 7-6).
- Paper Source
-
An option menu containing the values Upper Tray, Lower Tray, and so on. (see Figure 7-6).
If the dialog box is to be used for an application, consider:
- Page Range
-
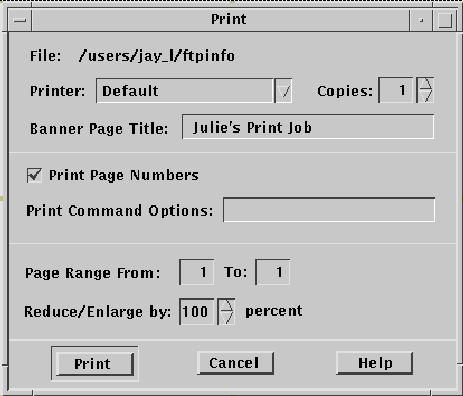
Two text fields, from x to y (see Figure 7-7).
- Reduce/Enlarge
-
A spin box containing values for percentages (see Figure 7-7).
- Print Preview
-
A button that brings up a WYSIWYG representation of the output.
Some Sample Layouts
Figure 7-6and Figure 7-7show some example Print dialog box layouts.
Figure 7-6 Example print dialog box layout for general printing

Figure 7-7 Example print dialog box layout for printing from applications

- © 2010, Oracle Corporation and/or its affiliates
