Sun Enterprise 10000 SSP 3.5 Installation Guide and Release Notes 10000 SSP 3.5 Installation Guide and Release Notes
|
|
| Sun Enterprise 10000 SSP 3.5 Installation Guide and Release Notes
|
|
| A P P E N D I X A |
Configuring the SSP Network |
If you are installing the SSP software on a new disk, and have already performed a fresh install of the Solaris operating environment, you need to configure the SSP network files before performing a fresh install of the SSP software.
This appendix describes the following SSP network configurations:
TABLE A-1 and FIGURE A-1 describe the two-subnet network configuration.
|
Note - In a two-subnet configuration (one SSP, one hub, and one control board), automatic SSP and control board failover are disabled. In a three-subnet configuration (one SSP, two hubs, and two control boards), control board failover is enabled, but SSP failover is disabled. In a spare SSP configuration (two SSPs, two hubs, and two control boards), both SSP and control board failover is enabled. For details on supported failover configurations, see Chapter 2. |
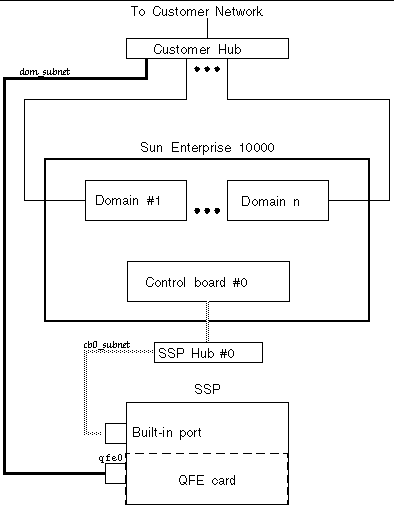
In FIGURE A-1 , the built-in port is le0 for a SPARCstation 5 and hme0 for a Sun Ultra 5 and a Sun Enterprise 250 system.
TABLE A-2 and FIGURE A-2 describe the three-subnet network configuration.

In FIGURE A-2 , the built-in port is le0 for a SPARCstation 5 and hme0 for a Sun Ultra 5 and a Sun Enterprise 250 system.
TABLE A-3 and FIGURE A-3 describe the spare SSP network configuration.
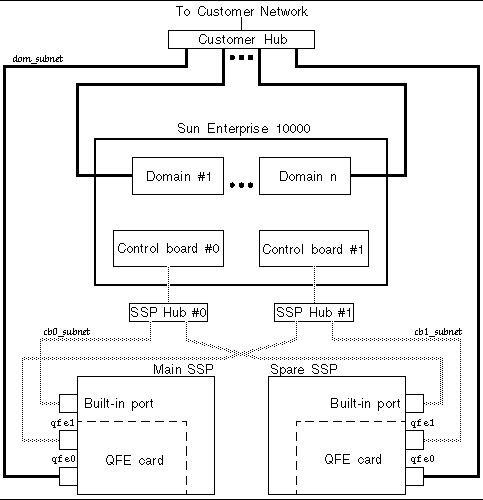
In FIGURE A-3 , the built-in port on the main SSP and the spare SSP is le0 for a SPARCstation 5 and hme0 for a Sun Ultra 5 and a Sun Enterprise 250 system.
This procedure provides instructions for configuring your SSP network in one of the three configurations discussed earlier in this appendix.
1. Log in to the SSP as superuser.
2. Create the /etc/hostname.* configuration files.
If you need to view your network controllers, use ifconfig -a .
For example, if you are using a Sun Quad FastEthernet
card, model 1049A, in the two-subnet, three-subnet, or spare SSP network configuration on a Sun Ultra 5 system, you need the following files:
/etc/hostname.qfe0 -- contains the current SSP host name; it configures the primary subnet, dom_subnet .
The following file is also needed if you are using either the three-subnet or spare SSP configuration:
|
Note Note - The two control board subnets must be on two different physical cards. The node name must reference the public interface and not the private interface. |
3. Set the contents of the defaultrouter file to the gateway IP address:
4. Manually update your name service hosts registry to include the host names and IP addresses of your control board(s) and other hosts, such as domains and the SSP.
This can involve updating the Network Information Service (NIS or NIS+), or the /etc/hosts file, or the Domain Name Service (DNS).
The example below shows the typical modifications for an /etc/hosts file on a Sun Ultra 5 system:
The /etc/hosts file is a link to the /etc/inet/hosts file.
The following examples show the /etc/hosts file for a main and spare SSP, respectively.
The main SSP, as shown in the /etc/hosts file in FIGURE A-4 , is configured as follows:
xf4 and xf4-b3 are host domains.
xf4-ssp1 is the main SSP and xf4-ssp2 is the spare SSP.
xf4-ssp-main is the floating SSP.
xf4-cb0 and xf4-cb1 are the host names for the two control boards.
The following /etc/hosts file for the spare SSP is similar to the previous /etc/hosts file for the main SSP, except the spare SSP is the loghost.
|
Note Note - The SSP and the host domains must be on the same subnet so you can boot domains from the network. |
5. Manually update your name service ethers registry to include the Ethernet addresses for the domain(s), SSP(s), and control board(s).
You need to update NIS or NIS+, or the /etc/ethers file. For example:
|
Note Note - The Ethernet address of the control board(s) is located on the front of each control board. |
6. Edit the /etc/nsswitch.conf file on the main SSP and the spare SSP.
If you are using local configuration files, the lines in the /etc/nsswitch.conf files are similar to the following example:
|
Note Note - The name server information (nis) is dependent on your network configuration. |
|
Sun Enterprise
10000 SSP 3.5 Installation Guide and Release Notes
| 816-3626-10 |
|
Copyright © 2002, Sun Microsystems, Inc. All rights reserved.
