 To Install Only Directory Proxy Server From
the Zip Distribution
This procedure covers installation of the software required to create Directory Proxy Server instances on the system.
Non-root users can install this component from the zip distribution.
On Windows systems in order to allow remote management capabilities when installing the zip distribution, you must install either as Administrator, or as a user who belongs directly to the local Administrators group.
You can also install Directory Proxy Server from native packages. See To Install Only Directory Proxy Server From Native Packages for details.
Before You Begin
Obtain the zip distribution for this installation.
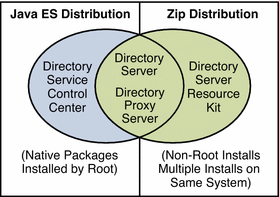
As shown in the following illustration, the zip distribution does not include Directory Service Control Center. You must install Directory Service Control Center from the native package Java ES distribution, as described in To Install Directory Service Control Center From Native Packages.

Complete the worksheet that follows for your installation.
|
Requisite Information |
Hints |
Your Answers |
|---|---|---|
|
Fully qualified hostname of the system where you install Directory Proxy Server |
Example: dps.example.com | |
|
(Optional) Cacao common agent container port number to access from Directory Service Control Center |
Default: 11162 | |
|
File system paths where you create Directory Proxy Server instances |
Example: /local/dps/ Create instances only on local file systems, never on network–mounted file systems such as NFS. Each path is henceforth referred to as an instance-path. | |
|
LDAP port number |
Default: 389 when installing as root; 1389 for non-root | |
|
LDAP/SSL port number |
Default: 636 when installing as root; 1636 for root | |
|
Directory Proxy Manager DN |
Default: cn=Proxy Manager | |
|
Directory Proxy Manager password |
Must be at least 8 characters long | |
|
(UNIX platforms) Server user (uid) |
Example: noaccess | |
|
(UNIX platforms) Server group (gid) |
Example: noaccess | |
|
(Optional) Connection information for each server to access through the proxy |
Example: ds1.example.com:1389, ds2.example.com:1636 |
The default user and group IDs for zip installations are those of the user performing the installation.
-
Install prerequisite patches or service packs for your platform.
See Operating System Requirements in Sun Java System Directory Server Enterprise Edition 6.0 Release Notes for details.
-
Change to the zip distribution directory containing the dsee_deploy command.
-
Install the software with the dsee_deploy(1M) command.
$ ./dsee_deploy install -c DPS -i install-path options
For example, the following command installs the component under /local, assuming you have access to create a file system directory there.
$ ./dsee_deploy install -c DPS -i /local
You can also use the --no-inter option to install in non-interactive mode, accepting the license without confirmation. Non-interactive mode is particularly useful for silent installation.
This step installs a Common Agent Container, cacao, with the local Directory Service Control Center agent as well, allowing you to use DSCC to create server instances. The previous command works properly only if you have not yet installed a Common Agent Container using the default port, 11162.
If you installed DSCC from native packages previously on the same system, a Common Agent Container using the default port is already installed. Specify a different port using the -p option.
$ ./dsee_deploy install -c DPS -i /local -p 11169
At this point, you can now create server instances on the system. See Server Instance Creation for details.
Next Steps
After installing the software, see Environment Variables.
- © 2010, Oracle Corporation and/or its affiliates
