| SunVTS 7.0 Software User’s Guide for Initial Release Through Patch Set 7 |
| C H A P T E R 5 |
|
Using the SunVTS TTY User Interface |
This chapter describes how to run a test session using the SunVTS TTY user interface (UI). Topics include:
| Note - SunVTS must first be started before selecting a user interface. See Starting SunVTS. |
The SunVTS TTY UI is an ASCII-based, screen-oriented interface that does not require a graphical window environment. Most of the control and monitoring options that are available in the SunVTS graphical interfaces are also available in the TTY interface.
You can use the TTY interface to run SunVTS from a serial terminal, or through a graphical window tool such as a shell tool, command tool, or terminal window. FIGURE 5-1 shows the TTY main window. (See Navigating the SunVTS TTY User Interface for a description of the keyboard commands used for the TTY interface.)
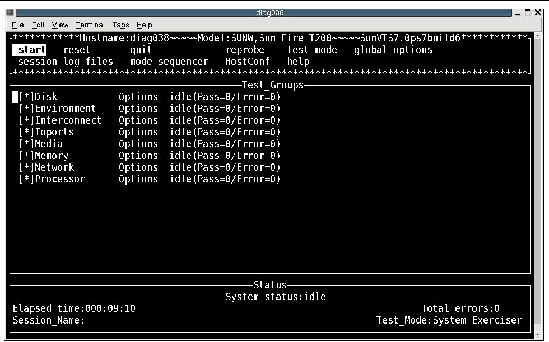
TABLE 5-1 describes items in the TTY main window.
|
Shows the testable devices (categorized in groups) and provides access to their test options. |
|
Use keyboard commands instead of the mouse to control SunVTS in the TTY UI. TABLE 5-2 lists the keyboard commands for the TTY UI.
This section describes how to configure SunVTS for a test session.
View the TTY main window Status panel for the current state of SunVTS. The following describes the System Status options:
The test modes consist of Online Stress mode, System Exerciser mode, and Component Stress mode.
The test modes are described in Chapter 1, Test Modes.
By default, the test mode is set to the System Exerciser mode.
1. Use the Tab key to move to the Control panel (if needed) in the TTY main window (FIGURE 5-1).
2. Use the arrow keys to select (highlight) test_mode and press Return.
The test_mode menu appears and displays the test_mode options (FIGURE 5-2).

3. Use the arrow keys to select either the System Excerciser, Component Stress, or Online Stress mode and press Return.
When global options are changed, these options remain applied for the entire test session. See Using the SunVTS Browser User Interface for more information about these options.
1. Use the Tab key to move to the Control panel (if needed) in the TTY main window (FIGURE 5-1).
2. Use the arrow keys to select (highlight) global_options and press Return.
The global_options menu appears and displays options (FIGURE 5-3).
3. In the Duration of Testing field, enter the numerical value for the desired test duration and press Return (FIGURE 5-3).
This sets all the global options changed.
4. Use the arrow key and select the Verbose option and press Return (FIGURE 5-3).
FIGURE 5-3 Global Option Menu - Changing the Global Options
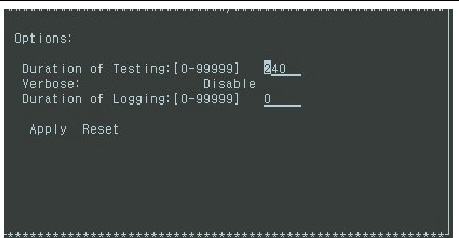
5. Enable or Disable the Verbose option using the arrow keys to select your choice and press Return.
6. In the Duration of logging field, enter the duration in minutes.
The testing information messages are logged at regular intervals.
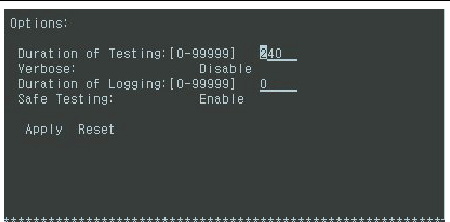
| Note - To work with the Safe Option, see Safe and Unsafe Options. If the feature is enabled, the global Options screen in TTY will be as shown in FIGURE 5-4. |
FIGURE 5-4 Duration of Logging
Test specific options are specific to individual tests.
To change specific test options:
1. Use the Tab key to move to the test groups menu (if needed) in the TTY main window (FIGURE 5-1).
2. Use the arrow keys to move to individual tests (FIGURE 5-5).
3. To enable or disable a particular test, highlight the test using arrow keys.
4. Use the arrow keys to highlight the [ ] (brackets) next to the test that you want to select or deselect.
5. Press the space bar to toggle the asterisk.
6. Move the cursor using arrow keys to the options and press return.
FIGURE 5-5 Selecting Specific Test Options
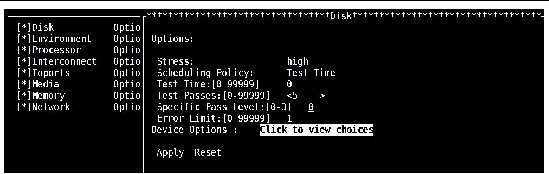
To change the value of Stress to a high or a low value:
a. Move the cursor to the default value in the Stress field and press Return.
A display appears showing two entries, low and high (FIGURE 5-6).
b. Select the desired stress level and press Return.
To change the Scheduling Policy:
a. Move the cursor to the Scheduling Policy field and press Return.
A display appears showing two entries, Test time or Test passes base (FIGURE 5-7).
b. Select the desired option and press Return.
8. Change the device specific options:
a. Move the cursor to Device Options and Click to view the choices (FIGURE 5-8).
A list of exported devices is displayed.
b. Move the cursor to Options and press Return.
c. Select or add the desired entries for the displayed options.
d. Move the cursor to the Apply button and press Return.
The previous screen is displayed.
e. Move the cursor to the Apply button and press Return to apply the options.
FIGURE 5-6 Changing the Stress Option

FIGURE 5-7 Changing the Scheduling Policy

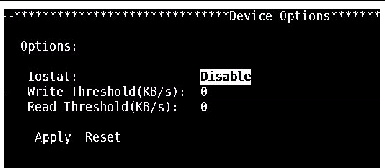
FIGURE 5-8 Displaying Device Options

FIGURE 5-9 Changing Device Options
1. Use the tab key to go to Test_Groups window in the TTY main window (FIGURE 5-1).
2. Use the arrow keys to go to the [*]/[ ] (brackets) button.
3. Use the arrow keys to go to the test to be enabled or disabled.
4. Press the space bar to enable or disable the test.
This section describes how to run, monitor and stop test sessions.
1. Use the tab key to move to the Control panel in the TTY main window (FIGURE 5-1).
2. Use the arrow keys to select (highlight) start and press Return.
The test session then begins. Depending on how you configured the options in the Test_Execution menus, testing continues until one of the following occurs:
Monitor the overall test session status by watching the Status panel. The Status panel indicates that a test session is running by displaying testing for the System_status. The field elapsed_time will show how much time has elapsed since tests were started. Total_errors will show how many errors were encountered since the tests began execution.
Monitor specific tests by watching the Status panel. An asterisk displayed next to each device indicates which test (for example, Processor test) is currently under test.
1. Use the Tab key to move to the Control panel in the TTY main window (FIGURE 5-1).
2. Use the arrow keys to highlight stop, and press Return.
3. Press Esc to dismiss the confirmation menu.
The test session stops. The test session is being stopped and the system status displays “stopping”. The main window shows a disabled stop button as <stop>. When the tests completely stop, the “start” button appears.
This section shows how to review logs, interpret SunVTS messages, and reset test session results.
SunVTS provides access to four log files:
1. Use the tab keys to move to the Control panel in the TTY main window (FIGURE 5-1).
2. Use the arrow keys to highlight log_files.
The log_files menu appears (FIGURE 5-10).
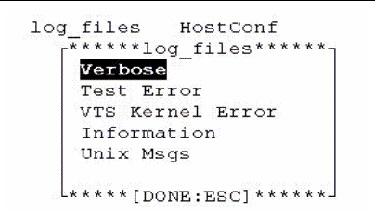
3. Use the arrow keys to select one of the log files and press Return (FIGURE 5-10).
FIGURE 5-11 Log File Display Option

4. Use the arrow keys to select one of the following and press Return (FIGURE 5-11):
| Note - Take the length of the log file into consideration before you print it. |
5. Press Esc to close the log_file menu.
Resetting test sessions resets all the tests pass, error, and time limit counts to zero. Reset is only possible if the SunVTS System Status is idle. If the system status is not idle, then an error is returned.
1. Use the tab key to move to the Control panel in the TTY main window (FIGURE 5-1).
2. Use the arrow keys to highlight reset and press Return.
The information in the Status panel is reset.
| Note - This does not reset your test options. |
This section describes additional SunVTS features using the SunVTS TTY user interface.
You can use the Session Files feature to save the current set of selected tests and test options for reuse. This is a convenient feature when you plan to use the same test session configuration repeatedly.
The configuration information is saved in a file name of your choice in the /var/sunvts/sessions directory.
1. Configure SunVTS for the test session that you want to save.
See Configuring SunVTS for a Test Session.
2. Select (highlight) session in the Control panel in the TTY main window (FIGURE 5-1), and press Return.
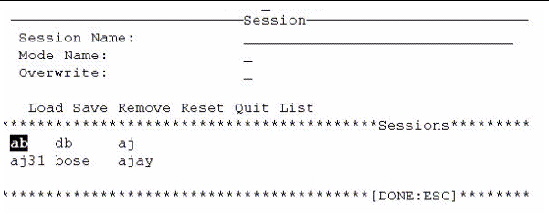
The Session Files menu appears (FIGURE 5-12).
FIGURE 5-12 Sessions File Menu

3. Select a session file name in the Session file field.
s for System Excerciser, c for Component Stress or o for Online Stress modes. or leave it blank to save it with the default mode of the current test session.
5. Enter y for yes or n for no if you are overwriting and saving with the same name as an existing session.
6. Move the cursor to save the menu item on the Session display and press Return to save the session.
| Note - To access Session Files from the TTY UI, the Session File name must be 30 characters or less-the TTY UI has a maximum of 30 characters for input. |
| Note - Loading a Session file that was created on another system is permitted, but you must make sure that the configuration is valid for the system you plan to test. |
1. Select (highlight) session in the Control panel in the TTY main window (FIGURE 5-1), and press Return.
The Session Files menu appears (FIGURE 5-12).
2. Select (highlight) List and press Return.
The list of available session files appears (FIGURE 5-13).
FIGURE 5-13 Sessions File - Sessions Displayed
| Note - To access session files from the TTY UI, the session file name must be 30 characters or less. The TTY UI has a maximum of 30 characters for input. |
3. Select (highlight) a session file from the list, and press Return.
4. Select (highlight) Load, and press Return.
The test session configuration is loaded into SunVTS. You can use this configuration, or modify it before you start the test session.
1. Select (highlight) session in the Control panel in the TTY main window (FIGURE 5-1), and press Return.
The Session files menu appears (FIGURE 5-13).
2. Select (highlight) List and press Return.
The list of available session files are displayed.
3. Select (highlight) the session file from the list that you want to delete, and press Return.
| Note - To access session files from the TTY UI, the session file name must be 30 characters or less. The TTY UI has a maximum of 30 characters for input. |
4. Select (highlight) Remove, and press Return.
To view a host system configuration:
1. Use the tab key to move to the main Control panel in the TTY main window (FIGURE 5-1).
2. Use the arrow keys to select (highlight) the HostConf button and press Return.
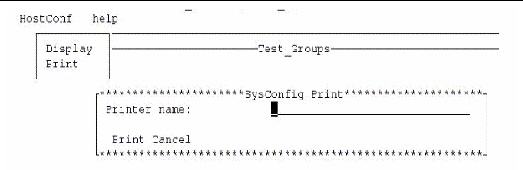
This displays the option to display or print the System Configuration of the machine under test (FIGURE 5-14).
FIGURE 5-14 Host Configuration

3. Select Display, and press Return, to display the system configuration.
4. Select Print, and press Return, to view the host configuration print display (FIGURE 5-15).
Enter the printer name and press the Print button to print the System Configuration.
FIGURE 5-15 Host Configuration - Print Display
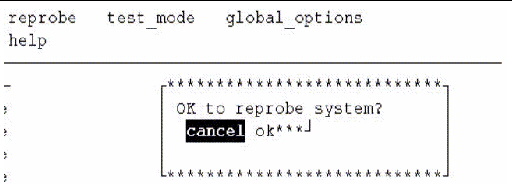
Reprobing is a feature provided in SunVTS which reprobes and registers the devices either of which are added under testing to the SunVTS. This feature also removes the device from the SunVTS listing if the device has been removed from the system.
1. Use the tab key to move to the Control panel in the TTY main window (FIGURE 5-1).
2. Use the arrow keys to select reprobe and press Return.
The reprobe screen appears (FIGURE 5-16).
3. Press Ok to start reprobing.
FIGURE 5-16 Reprobing System Display
To access help and the Release Table:
1. Use the tab key to move to the Control panel in the TTY main window (FIGURE 5-1).
2. Use the arrow keys to select help and press Return.
The help option menu appears (FIGURE 5-17).
3. Select a help option (help or Release Table).
a. Select vtstty help to view help contents in a vi editor.
b. Select Release Table to view the supported Solaris releases for the current SunVTS.

The Auto Mode Sequencer will only function when this option is enabled. By default, the Sequencer is switched off, or set to Disable.
Under normal circumstances, you run only one mode at a time in a session. Once testing with a mode is over, you must switch the mode in the same session and start the testing if it is required.See Saving a Test Session Configuration for Repeated Use (Session Files).
Use the Auto Mode Sequencer if a testing session requires running different modes automatically. You can select any of the three modes for the first, second and third sequences. It can be the same mode for all three sequences. You can specify one of the modes and leave the other two sequences as None. This will result in running only one mode for loop number of times.
| Note - At least one sequence must have a mode specified. If no modes are selected for the sequence, the sequencer will behave as if it is set to off, even if the sequencer option is set to “on”. |
When testing is started with the Auto Mode Sequencer, if the testing incurs an error in any of the modes in the sequence, the Auto Mode sequencer will halt and will not switch to the next mode in the sequence. This allows you to analyze the test error. If the testing had continued without halting, the error might occur without notice.
|
Use the sequencer to determine the sequence of tests in auto mode. By default, the Sequencer is switched off (set to Disable).
1. Set the Sequencer option to Enable ().
Loop determines the number of times the sequence will run.
1. Specify a numerical value for this option.
The default value is 1. The Maximum is 99999.
FIGURE 5-18 Auto Mode Sequencer Screen in the TTY Interface
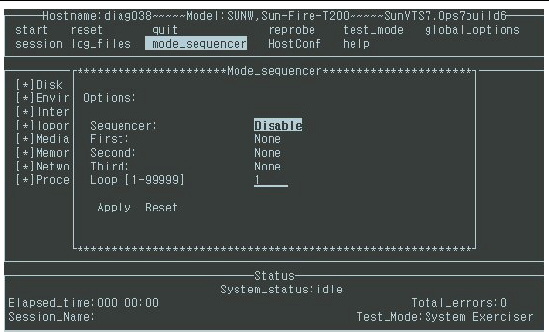
2. Select Apply to set all the changes.
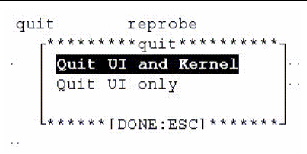
The Quit option provides a way to exit out of the terminal user interface. This can be done when the testing is not in progress and system status is idle.
1. Use the tab key to move to the control panel in the TTY main window (FIGURE 5-1).
2. Select quit and press Return.
The quit menu appears (FIGURE 5-19).
3. To quit the TTY UI, select Quit UI and press Return.
4. To completely exit SunVTS, select Quit UI and Kernel.
| SunVTS 7.0 Software User’s Guide for Initial Release Through Patch Set 7 | 820-0012-20 |
Copyright © 2010, Oracle and/or its affiliates. All rights reserved.
 To Create a Session File