| Exit Print View | |
Sun Fire X4170 M2 and X4270 M2 Servers Installation Guide for Linux, Virtual Machine Software, and Oracle Solaris Operating Systems |

|
| Exit Print View | |
Sun Fire X4170 M2 and X4270 M2 Servers Installation Guide for Linux, Virtual Machine Software, and Oracle Solaris Operating Systems |

|
Part I Linux Software Installation
1. Assisted OS Installation With Oracle Hardware Installation Assistant
2. Getting Started With Linux Operating System Installations
4. Installing SUSE Linux Enterprise Server
5. Installing Red Hat Enterprise Linux
Part II Virtual Machine Software Installations
6. Getting Started With Virtual Machine Software Installations
8. Installing VMware ESX or ESXi
Installing VMware ESX or ESXi Using Local or Remote Media
Install VMware ESXi 4 From Local or Remote Media
Install VMware ESX 4 From Local or Remote Media
VMware ESX and ESXi Post Installation Tasks
Configure Network Adapters for VMware ESXi Installations
Configure Network Adapter Settings
Local Storage Drive Not Seen After Performing VMware ESXi Installation
Make Local VMFS Datastore Visible to VSphere Client
Part III Oracle Solaris Installation
9. Getting Started With Oracle Solaris Operating System Installations
10. Installing Oracle Solaris 10
Part IV System Administrator References
A. Supported Installation Methods
B. Supported Operating Systems
C. BIOS Defaults for New Installations
This chapter summarizes the necessary steps for installing:
VMware ESX 4.0 Update 2 and 4.1 (and subsequent releases)
VMware ESXi 4.0. Update 2 and 4.1 (and subsequent releases)
This chapter includes the following topics:
The procedures in this section describe how to install the VMware (ESX or ESXi) software from local or remote media. It assumes that you are booting the VMware installation media from one of the following sources:
VMware ESX or ESXi 4.0 Update 2 or 4.1 CD or DVD (internal or external CD or DVD)
VMware ESX or ESXi 4.0 Update 2 or 4.1 ISO image (network repository)
Note - The VMware ISO image can be used for remote installations or for creating an installation CD or DVD.
Refer to the following procedures to install the VMware software from local or remote media:
Prior to performing the installation, the following requirements must be met:
All applicable installation considerations for installing the virtual machine software should have been met. For details, see ![]() VM Software Installation Considerations.
VM Software Installation Considerations.
Gather the VMware ESX or ESXi documentation. This documentation should be used in conjunction with the installation procedure presented in this chapter.
The VMware ESX and ESXi documentation is available at:
For VMware ESX installations, determine the network management interface you will use for the VM service console.
The VM service console and management interface require a network interface. The service console does not automatically use the first interface with a live connection. Therefore, you will need to select a network interface for the service console during installation since the network interface defaults to vmic0.
For additional information about how to set up the installation media, see ![]() Appendix A, Supported Installation Methods.
Appendix A, Supported Installation Methods.
For example:
Note - The next events occur very quickly; therefore, focused attention is needed for the following steps. Watch carefully for these messages as they appear on the screen for a brief time. You might want to enlarge the size of your screen to eliminate scroll bars.
The Please Select Boot Device menu appears.
The device strings listed in the Boot Device menu are in the following format: device type, slot indicator, and product ID string.
After a few seconds, the splash screen for the VMware installation program appears.
You can access the VMware ESXi 4.0 installation documentation at: http://www.vmware.com/support/pubs/vs_pubs.html
For additional information about how to set up the installation media, see ![]() Appendix A, Supported Installation Methods.
Appendix A, Supported Installation Methods.
For example:
Note - The next events occur very quickly; therefore, focused attention is needed for the following steps. Watch carefully for these messages as they appear on the screen for a brief time. You might want to enlarge the size of your screen to eliminate scroll bars.
The Please Select Boot Device menu appears.
The device strings listed in the Boot Device menu are in the following format: device type, slot indicator, and product ID string.
After a few seconds, the splash screen for the VMware installation program appears.
You can access the VMware ESX 4.0 installation documentation at: http://www.vmware.com/support/pubs/vs_pubs.html
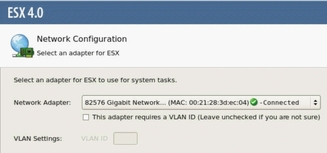
In this dialog, a live network adapter (that is, an adapter connected to the network) must be specified for the VMware service console (vmnic0). Each network adapter that is live has a green check mark next to it as shown in the above dialog. Also, notice that the MAC address that is associated with the network port (for example: NET0, NET1, NET2, or NET3) appears. You can use the MAC address to determine which physical network port is present.
Alternatively using the ILOM command-line interface (CLI), you can determine the MAC addresses that are associated with the server’s physical network ports. For example, in the ILOM CLI you would type the following command to determine the MAC address that is associated with the physical network port known as NET0:
-> show /SYS/MB/NET0
In the sample output shown below, the MAC address for NET0 is 00:14:4F:CA:B8:36.
->show /SYS/MB/NET0
 /SYS/MB/NET0
 Targets:
 Properties:    type = Network Interface
 ipmi_name = MB/NET0
 fru_name = GIGABIT ETHERNET CONTROLLERS
 fru_manufacturer = INTEL
 fru_part_number = 82575EB
 fru_serial_number = 00:14:4F:CA:B8:36
 fault_state = OK
 clear_fault_action = (none)
Note - If you are unsure which network adapter to select, contact your network administrator.
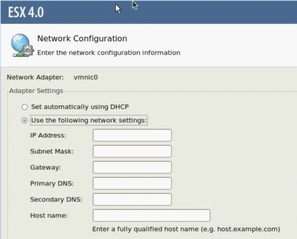
The ESX 4 Network Configuration dialog appears enabling you to specify the network adapter settings.
After completing the ESX or ESXi installation, review the following post installation tasks and, if necessary, perform the tasks that are applicable to your system.
The following procedure describes how to configure the VMware ESXi settings for the network adapter(s) installed on your server. These instructions also include steps for discovering the physical port location of each network adapter installed on your server.
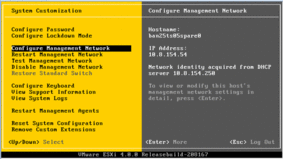
The Configure Management Network dialog appears.
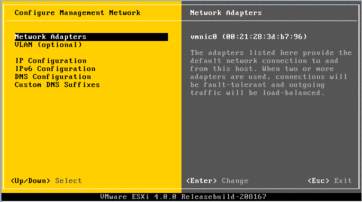
The Network Adapters dialog appears.
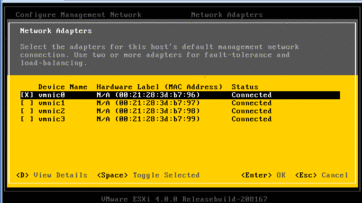
A live network adapter (that is, an adapter connected to the network) must be specified for the VMware service console (vmnic0). Notice that the MAC address that is associated with the server’s physical network port (for example: NET0, NET1, NET2, or NET3) is displayed in the Hardware Label column. Therefore, you can use the MAC address to determine which of the server’s physical network ports are being displayed. For example, to determine the MAC address for each server network port, enter the following command in the ILOM command-line interface (CLI) for each server network port:
-> show /SYS/MB/NETn
Where is n is 0, 1, 2, or 3
If the network adapter shown in the above dialog were associated for network port NET0, then the CLI command show /SYS/MB/NET0, would produce the following output, where the fru_serial_number field lists the MAC address.
-> show /SYS/MB/NET0
 /SYS/MB/NET0
 Targets:
 Properties:
 type = Network Interface ipmi_name = MB/NET0
 fru_name = GIGABIT ETHERNET CONTROLLERS
 fru_manufacturer = INTEL
 fru_part_number = 82576EB
 fru_serial_number = 00:21:28:3D:B7:96
 fru_extra_2 = 00:21:28:3D:B7:96
 fault_state = OK
 clear_fault_action = (none)
Note - If you are unsure of which network adapter to select, contact your network administrator.
If your local storage drive on the server is attached to a Sun Storage 6 Gb SAS PCIe Host Bus Adapter (SG-SAS6-INT-Z or SG-SAS6-EXT-Z), the VMFS datastore on the local storage drive is not visible after performing the VMware ESXi installation. In this case, perform the following procedure to make the existing VMFS datastore on the local storage drive visible and ready for use.
The local VMFS datastore is visible and ready for use.
The VMware ESX or ESXi installation media might not contain the most up-to-date versions of the software.
If necessary, update the ESX or ESXi Server software with the latest updates and patches. For download instructions, see this web site:
http://support.vmware.com/selfsupport/download/
It is recommended to install patch ESX400-201002001 for ESX or patch ESXi400-201002001 for ESXi.
To learn more about configuring and managing VMware resources, refer to the VMware documentation at:
http://www.vmware.com/support/pubs/vs_pages/vsp_pubs_esxi40_i_vc40.html