|
| |
| Sun Java System Access Manager 6 2005Q1 Deployment Planning Guide | |
Appendix E
Load Balancer ConfigurationSun Java™ System Access Manager can be configured to work with a load balancer. This chapter details the features of load balancing and how it can be accomplished. The chapter contains the following sections:
Load Balancer OverviewLoad balancing is used to divvy up between two or more servers the amount of work usually done by one, allowing more work to get done in the same amount of time. In general, this means that all users are served faster. Load balancing can be implemented with hardware, software, or a combination of both. Figure E-1 illustrates how an Access Manager deployment can be configured with a load balancer. It is important in this configuration that all instances of Access Manager share the same Directory Server. Once configured, the load balancer (and thus, all Access Manager services) is accessed via the URL http://loadbalancer_host.domain:port/amconsole.
Figure E-1 Access Manager Configuration With Load Balancer
Sticky Sessions
A load balancer deployed with Access Manager must support sticky sessions. A sticky session specifies that once a session is created by a given server, subsequent requests from the user will continue to be routed to that same server in order to preserve session information. Since Access Manager uses cookies to relay session information, the load balancer needs to redirect to the server that created the session. Without sticky sessions, all servers would have to be trusted and performance might be impaired.
Resonate Central Dispatch Installation
Resonate Central Dispatch is a software-based load balancer. The first step in configuring Access Manager to work with a load balancer is installation. Assuming two physical servers, ensure that the machines are in the same subnet. On machine1, install Sun Java System Web Server, Sun Java System Directory Server, and Access Manager (in that order), pointing the instance of Access Manager to the installed instance of Directory Server. On machine2, install Sun Java System Web Server and Access Manager, pointing the instance of Access Manager to the instance of Directory Server installed on server1. The Central Dispatch software should be installed as follows:
A Reporter Agent will be automatically installed on both machines during the installation process itself. The terms defined in Table E-1 are specific to Central Dispatch and might be used in the configuration procedures.
For more information on installing Central Dispatch and the product in general, see the documentation set that is provided with the software.
Configuring the Load BalancerSticky Sessions can be implemented using either the setcookie function or load balancer cookies. The procedures detailed in the next sections illustrate how to configure the load balancer for both of these options. The steps involved relate to the Resonate Central Dispatch load balancer although they can be modified to work with any load balancer software.
To Configure Central Dispatch for setcookie
- Create two Solaris users (cdadmin and cdmon) using admintool.
- Launch the CDMaster console on server1.
Change to the default directory (/usr/local/resonate/cd/cdmaster/bin) and run ./cdmaster. When instructed, connect to the CDAdapter installed on machine2.
- Click on Nodes in the left frame of CDMaster and create one node for each of the two installed instances of Access Manager.
Figure E-2 is a screenshot of the CDMaster console illustrating this step.
Figure E-2 Creating Nodes With Resonate
- Click on VIPs in the left frame of CDMaster and create a new virtual IP address for the host on which the load balancer is installed.
Figure E-3 is a screenshot of the CDMaster console illustrating this and the following steps. Ensure that the Primary Scheduler and Backup Scheduler are correctly configured.
Figure E-3 Creating a new Virtual IP Address
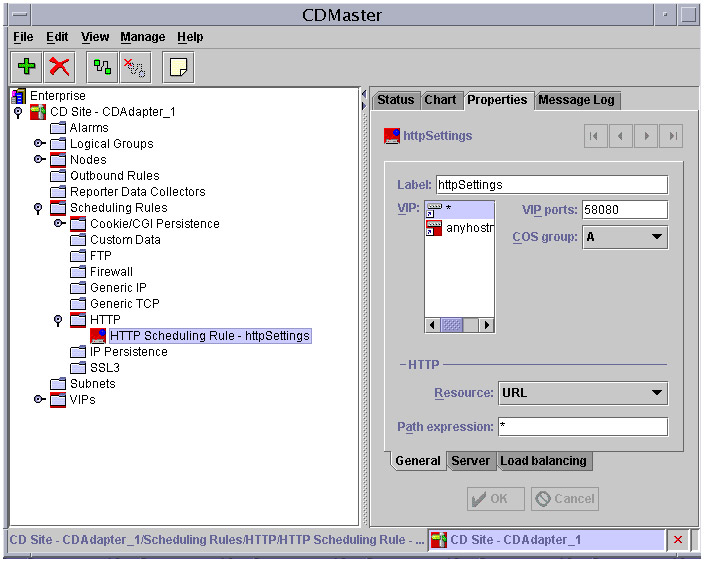
- Click on the Scheduling Rules tab in the right frame of VIPs and select HTTP to configure a HTTP scheduling rule as follows:
- Click on HTTP under Scheduling Rules in the left frame of CDMaster.
Figure E-4 is a screenshot of the CDMaster console illustrating this and the following steps.
- Select the Server tab at the bottom of the right frame.
Ensure that the servers are selected.
- Click on the Load Balancing tab at the bottom of the right frame and select Round Robin (Basic).
Figure E-4 Configuring HTTP Scheduling Rules
- Click on Nodes in the left frame of CDMaster and select the configured node for the second instance of Access Manager, server2.
Figure E-5 is a screenshot of the CDMaster console illustrating this and the following steps.
Figure E-5 Configuring Nodes With CDMaster
- Click on Properties at the top of the right frame and make sure that the Alias is server2.example.com and that Server Enabled and Server auto enabled are selected.
- Click the VIP Scheduling tab at the bottom of the right frame and check that the Primary virtual IP is configured for the host on which the load balancer is installed.
- Select the Scheduling Rules tab at the bottom of the right frame and make sure that all the servers and ports are listed under Component.
Configure the first instance of Access Manager (server1) as detailed, deleting Step 11 which configures server2 as the Primary under the Scheduling Rules tab.
- Click on Scheduling Rules in the left frame of CDMaster.
Figure E-6 is a screenshot of the CDMaster console illustrating this and the following steps.
Figure E-6 Configuring a Cookie Persistence Scheduling Rule
- Select Cookie/CGI Persistence and create a Cookie Persistence Scheduling Rule.
The Attribute-value pair is defined as iPlanetDirectoryPro=*.
- Label the rule and make sure that the correct port for the virtual IP is defined.
The VIP list should contain the configured host on which the load balancer is installed.
- Select the Server tab at the bottom of the right frame and make sure that both servers are checked.
- Select the Load Balancing tab at the bottom of the right frame and select Round Robin (Basic).
This completes the configuration of Central Dispatch for setcookie. Continue to the next section, To Configure Access Manager for setcookie, to complete the deployment.
To Configure Access Manager for setcookie
The Access Manager configuration for both server1 and server2 needs to be updated to recognize the load balancer when using setcookie.
- Login as amadmin to the Access Manager instance installed on server1.
- Add the value of the host machine on which the load balancer is installed to the Organization Aliases attribute.
View the top-level organization under the Identity Management tab to find the Organization Aliases attribute.
- Add server2 to the Platform List attribute in the Platform Service under the Service Management tab.
- Set the fqdnMap property in AMConfig.properties.
By default, the fqdnMap property is commented out. Remove the # and configure the property as: com.sun.identity.server.fqdnMap[loadbalancer_host.domain]=loadbalancer_host.domain
- Restart server1 and server2.
See Confirming The Configuration for instructions on how to verify the configuration procedure.
To Configure Central Dispatch with Load Balancer Cookies
- Create two Solaris users (cdadmin and cdmon) using admintool.
- Launch the CDMaster console on server1.
Change to the default directory (/usr/local/resonate/cd/cdmaster/bin) and run ./cdmaster. When instructed, connect to the CDAdapter installed on server2.
- Click on Nodes in the left frame of CDMaster and create one node for each of the two installed instances of Access Manager.
- Click on VIPs in the left frame of CDMaster and create a new virtual IP address for the host on which the load balancer is installed.
Ensure that the Primary Scheduler and Backup Scheduler are configured.
- Click on the Scheduling Rules tab in the right frame of VIPs and select HTTP to configure a HTTP scheduling rule as follows:
- Click on HTTP under Scheduling Rules in the left frame of CDMaster.
- Select the Server tab at the bottom of the right frame.
Ensure that the servers are selected.
- Click on the Load Balancing tab at the bottom of the right frame and select Round Robin (Basic).
- Click on Nodes in the left frame of CDMaster and select the configured node for the second instance of Access Manager, server2.
- Click on Properties at the top of the right frame and make sure that the Alias is server2.example.com and that Server Enabled and Server auto enabled are selected.
- Click the VIP Scheduling tab at the bottom of the right frame and check that the Primary virtual IP is configured for the host on which the load balancer is installed.
- Select the Scheduling Rules tab at the bottom of the right frame and make sure that all the servers and ports are listed under Component.
Configure the first instance of Access Manager (server1) as detailed, deleting Step 11 which configures server2 as the Primary under the Scheduling Rules tab.
- Click on Scheduling Rules in the left frame of CDMaster.
- Select Cookie/CGI Persistence and create two Cookie Persistence Scheduling Rules: one for server1 and one for server2.
- Label server1 and make sure that the correct port for the virtual IP is defined.
The VIP list must also contain the configured host on which the load balancer is installed.
- Choose cookie as the Resource and define the Attribute-value pair as server1=server1.
- Select the Server tab at the bottom of the right frame and make sure that both servers are selected.
- Select the Load Balancing tab at the bottom of the right frame and select Round Robin (Basic).
This completes the configuration of Central Dispatch for load balancer cookies. Continue to the next section, To Configure Access Manager with Load Balancer Cookies, to complete the deployment.
To Configure Access Manager with Load Balancer Cookies
The Access Manager configuration for both server1 and server2 needs to be updated to recognize the load balancer.
- Login as amadmin to the Access Manager instance installed on server1.
- Add the value of the host machine on which the load balancer is installed to the Organization Aliases attribute.
View the top-level organization under the Identity Management tab to find the Organization Aliases attribute.
- Add server2 to the Platform List attribute in the Platform Service under the Service Management tab.
- Set the fqdnMap property in AMConfig.properties.
By default, the fqdnMap property is commented out. Remove the # and configure the property as: com.sun.identity.server.fqdnMap[loadbalancer_host.domain]=loadbalancer_host.domain
- Add the following properties to the AMConfig.properties files on server1 and server2, respectively.
- Restart server1 and server2.
Confirming The ConfigurationThe following steps will confirm that the configuration is correct.
Caution
Before starting these procedures, disable the keepAliveTimeout option in the Sun Java System Web Server web container.
- Start the CDMaster by selecting Start under the Manage tab of the console.
- Create several new users and login as those users.
- Type http://loadbalancer_host.domain:port/amconsole into the Location bar of a web browser.
- Login to Access Manager as amadmin and select the Current Sessions tab.
As amadmin, the created users and their corresponding servers will be visible. The users should all redirect back to the server on which their sessions were initiated. The web server access logs can also confirm this.
Configuring SSL Termination for a Load BalancerThis section describes how you configure the redirect URL returned by Access Manager so you can use a load balancer to handle SSL requests. This scenario for this configuration includes the following components:
- Access Manager instances on two or more servers, with each instance pointing to your Directory Server. (If you are using version Access Manager 2003Q4 or 2004Q2, make sure you have the required service pack installed.)
- Web container (Web Server or Application Server) on each server running the Access Manager instance.
- Load balancer that routes client requests to the Access Manager instances.
To configure SSL termination for a load balancer
- Login to the Access Manager console as amAdmin.
- In the Access Manager console, add the load balancer’s DNS name to the organization alias, as follows:
On the Identity Management tab, select Organization, and then add the load balancer’s DNS name to Organization Aliases under General Properties. For example:
lb-host.example.com
- In the Access Manager console, add the load balancer to the platform server list, as follows:
On the Service Configuration tab, click Platform, and then add the load balancer to the Server List under Global. For example:
lb-host.example.com
- Edit the AMConfig.properties file on each server running an Access Manager instance. First, find the FQDN section and make following change:
com.sun.identity.server.fqdnMap[lb-host.example.com]=lb-host.example.co m
If the protocols for the load balancer and the Access Manager are different (http and https or https and http), add the com.sun.identity.url.redirect property for URL redirection. For example:
com.sun.identity.url.redirect=https,lb-host.example.com
However, if protocols for the load balancer and the Access Manager host are the same, you don’t need to set this property.
- Restart the Access Manager instance on each server.
The load balancer can now handle the SSL requests and route them to the appropriate Access Manager instance.