| Sun StorageTek Common Array Manager User Guide for the J4000 Array Family |
| C H A P T E R 3 |
|
Registering and Initially Administering the Array |
This chapter provides an overview of the management software and the steps required for first time you log in. including registering the array. It contains the following sections:
This section describes the operations you need to perform the first time you open the management software. The sections include:
Opening the Common Array Manager after a first-time installation displays the General Configuration page.

The General Configuration page contains information about the site, rather than individual information about an array.
1. Enter the following information for your site:
The required fields are indicated by an asterisk: (*).
2. Click Save and Continue Setup.
Once you have saved the General Configuration page, the Auto Service Request page displays during initial installations.
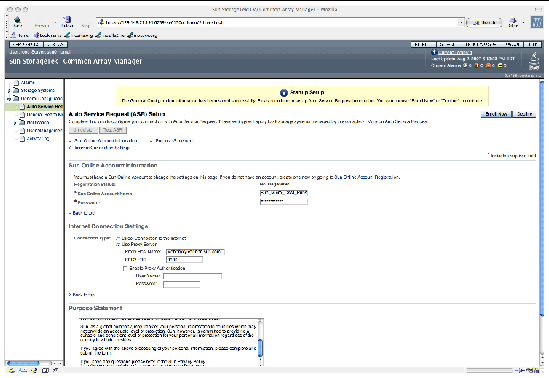
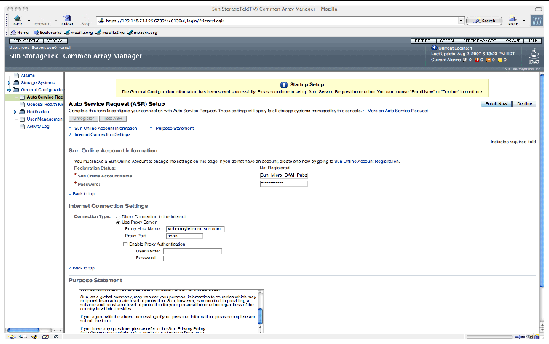
During the initial Common Array Manager installation, the software prompts you to enroll CAM with the Auto Service Request service by displaying the Auto Service Request (ASR) Setup page.
Auto Service Request (ASR) monitors the array system health and performance and automatically notifies the Sun Technical Support Center when critical events occur. Critical alarms generate an Auto Service Request case. The notifications enable Sun Service to respond faster and more accurately to critical on-site issues.
You can select the Enroll Now button to enroll or the Decline button to defer enrollment.
For more information on Auto Service Request, see Setting Up Auto Service Request.
To enroll with the Auto Service Request service during the Common Array Manager installation, on the Auto Service Request Setup page:
1. Provide the following information:
ASR is available to all customers with a current warranty or Sun Spectrum Contract:
http://www.sun.com/service/warranty/index.xml
http://www.sun.com/service/serviceplans/index.jsp
2. To register for Auto Service Request, click Enroll Now.
There is a Test button to verify that CAM is communicating with the Sun Online Account services.
While ASR is enabled by default for all registered arrays, there are settings that must be configured to use ASR to monitor an array as described in Configuring Auto Service Request for an Array.
When you install the management software on a new host, the Storage System Summary page is displayed next. Initially the page is blank with no arrays listed.
On all subsequent logins to the Common Array Manager, the Storage System Summary page is displayed with the arrays you registered with the software.
To register an array, you launch the Array Registration wizard to either search the subnet for arrays that are not already registered or manually register an array.
Registering arrays are documented in the following sections:
The registration wizard can automatically discover arrays that are on the same subnet as the management host, or you can point the wizard to the array if it is not on the same subnet as the management host.
If searching for arrays on a subnet, the discovery process displays the percentage of completion while the array management software polls devices in the network to determine whether any new arrays are available. When complete, a list of discovered arrays is displayed.
The Storage System Summary page is displayed.
The Register Storage System wizard is displayed.
3. In the Register Storage System wizard, select the Discovery and Authentication Method you want to use.
If each proxy agent has a different password, only the array with a proxy agent using that password will be discovered. You may want to set up a common proxy agent password.
| Note - It can take as much as 2 minutes for the software to discover each array. |
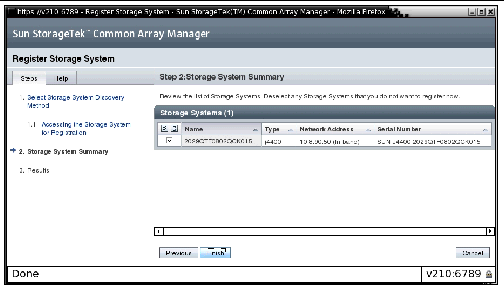
The Results page displays, showing whether the array was successfully registered with the software.
The Results page also displays a message if the discovered array’s firmware does not match the firmware baseline. To install the firmware, see Installing New Firmware.

You remove an array from the management software by unregistering the array.
The Storage System Summary page is displayed.
2. Select the check box to the left of the array you want to remove from the list of registered arrays.
This enables the Remove button.
The array is unregistered and removed from the Storage System Summary.
New arrays come with the firmware installed. As updates to the firmware are released, you will need to follow these instructions to install the new firmware.
| Note - For other arrays managed by the Sun StorageTek Common Array Manager, firmware, this release may require special firmware instructions. Refer to the Sun StorageTek Common Array Manager Software Release Notes, Release 6.1.2 (or later) for the latest firmware information and a list of firmware files for your array. http://docs.sun.com/app/docs/prod/stor.arrmgr61~cam6.1#hic |
You can update your array firmware by clicking the Install Firmware button on the Storage System Summary page or the array’s Administration page.
As part of the installation of the Common Array Manager software, the script puts the array firmware files in a directory on the management host. When you upgrade the firmware, the software analyzes the firmware installed on the array. If the firmware on the host is newer, and you choose to install, the software installs the firmware on the array.
For optimal performance, Sun Microsystems recommends that the firmware on all arrays be at the level of the current firmware baseline. New features are not supported with older versions of firmware not at the baseline.
Always check the latest Common Array Manager and array Release Notes for the latest release-specific information about firmware and other features.
1. Check the release notes for any release-specific upgrade requirements:
http://docs.sun.com/app/docs/prod/stor.arrmgr#hic
Upgrades to the J4000 Array Family firmware (SAS I/O modules and disks) require an offline upgrade (stop all I/O activity to the array).
2. Check alarms and resolve the problems using Service Adviser before attempting to update.
3. On the Storage System Summary page, click the checkbox of the array you want to upgrade.
You can only upgrade one J4000 Array Family array at a time.
Upgrades to the J4000 Array Family firmware (SAS I/O modules and disks) require an offline upgrade (stop all I/O activity to the array).

The Install Firmware button is enabled.
The management software launches the Analyze and Install Array Firmware wizard. Step 1, the Overview, is displayed.


Step 2, Analyze Arrays, is displayed. It compares the current firmware to the new firmware. You set whether to install or not install the new firmware. Depending on the difference from the new firmware, you may also set the array firmware to install.
6. If you need to update disk drive firmware, stop disk I/O before installation.
7. In the Action field, specify the type of upgrade, and click Next.
Step 2.1, Validate Password verifies that the array password is correct. For J4000 Array Family arrays registered through a remote proxy, the registration validates the proxy agent password entered during the software installation. No password is checked for local in-band arrays.


9. Review the current installation action.
10. To install the firmware, click Finish.

11. When the upgrade is complete, click Close.
To set up the array for basic operation, perform the procedures outlined in the following sections:
The Administration page contains other features that you may decide to configure. See the online help for more information before you change any default settings.
Open the Administration page to perform array administration functions.
1. In the navigation pane, click on the array you want to work with to expand the navigation tree.
The navigation tree expands to display the configuration options for the selected array, including Administration.

2. Click on Administration, under the array you have selected.
The Administration page for that array is displayed.
3. Click Save to save any changes you have made.
 of a parent array to the SAS I/O modules of child array. Other arrays, such as the Sun Storage J4500 array, have different components. See the hardware documentation for details.The Administration page for that array includes array name and contact information.")
After making any changes on the Administration page, click Save to save the changes.
Each array requires a unique name to be identified on the subnet.
1. On the Administration page, locate the Name field and enter a unique name consisting of up to 30 characters.
You can also update the system time on the array so that it synchronizes the information with your management host. You set the system time from the Administration page for the array in the browser interface. When you set the time and date for a selected array, the values are updated for all arrays registered with this management software.
1. On the Administration page, scroll down to the System Time section.
2. Click Synchronize with Server to synchronize the time on the array with your management host.
3. Click Save to save your changes.
The Administration page is refreshed, and a Success message is displayed at the top of the page.
For more information about the fields and buttons on the Administration page, see the online help.
To use the Common Array Management software, users and roles must be defined on the host and assigned in CAM.
User names must be a currently defined user on the management host.
Roles assign privileges to users. Two roles (storage and guest) are defined in CAM.
Assigns a user write permission and access to all of the software features related to array configuration and management.
Assigns a user read permission but restricts the ability to manage the array.
By default, CAM automatically assigns roles to:
For all other users, you assign roles to users in the CAM software.
TABLE 3-2 describes the user names and user role functions and the requirements for each.
Setting up users and roles is described in the following sections:
The first time that you access CAM software, you sign in as an administrative user defined on the management host:
By default, the administrative user has the storage role. The administrative user can add users in CAM and assign roles to them.
For users other than the administrative user to access CAM, the storage and guest roles must also be defined on the management host using its OS software.
To add new roles to hosts running Solaris or Linux OS, consult the system administration documentation.
To add new roles (as groups) to hosts running Windows, refer to Adding New Users in Windows.
User names in CAM must be currently defined users on the host.
To add new users to hosts running Solaris or Linux OS, consult the system administration documentation.
To add new users to hosts running Windows, refer to Adding New Users in Windows.
To share a user name for storage administration, add the following user names to your hosts:
Once these user names are added to the host, by default they are assigned the storage and guest roles.
This section describes how to add new users and assign them the storage or guest role in CAM. The users and roles must first be defined on the host.
You do not have to complete this step for users automatically assigned a role by CAM:
1. To view the list of defined users, choose General Configuration > User Management in the navigation pane.
The User Summary page is displayed.
2. To add a new user, click the Add button.
The Add New User page is displayed.

3. In the User Name field, enter a valid user name defined on this host.
4. From the User Role list, select the storage or guest role you want to assign to this user.
The User Summary page is displayed with a success message and the name is added to the list.
Newly added users can log into the Sun Java Web Console to access CAM with the same password that they use to log into the system.
This section provides the information you need to create users in Windows and assign them to groups for privileges.
| Note - The steps are an example and may differ in your Windows software. |
This appendix contains the following section:
These instructions show you an example of how to configure an administrative user in standard Windows XP. Other versions of Windows software may vary slightly. Consult the Windows documentation.
| Note - Administrative user names for Windows cannot have a space character. |
1. Click Start and select Administrative Tools -> Computer Management.
The Computer Management window displays.
2. In the Computer Management window, select Local Users and Groups -> Users.

3. Right click and select New User.

4. Complete the New User window as follows:
a. Enter a username in the User name box (root is used as an example).
b. Create a password and confirm it.
c. Uncheck the box labeled User must change password at next login.
d. Check Password never expires.
The Computer Management window displays.
f. Select Users, right click on root, and select Properties.
The Properties window for the username displays.

The Select Groups window displays.

7. In the Enter the object names box, type Administrators and click Check Names.
The system displays the computer-name\Administrator group in the box labeled “Enter the object names to select.”
The root Properties window shows that root is a member of Users and the Administrators groups. The root user now has Windows Administrator privileges and is automatically assigned the storage role in CAM.
To add non-Administrator users, follow the same steps as Adding an Administrator User, but define groups called storage and guest and add the user name to one of those groups instead of the Administrator group.
When done, check the Properties window of the user name and Member of tab to verify that the user is assigned to Users and to the storage or guest Group.
Proceed to assign the user name the storage or guest role in the CAM software, as described in Adding New Users to CAM.
Once these user names are added to the system, by default they are assigned the storage and guest roles.
Multiple instances of the same user name can be logged in concurrently. However, because users with the storage user role have write privileges, there is a risk that the changes of one logged-in user will overwrite previous changes of another logged-in user. Therefore, you should develop policies about who can make changes and how to notify others.
During the initial storage array set-up process, Common Array Manager prompts you to enroll with the Auto Service Request service by displaying the Auto Service Request (ASR) Setup page. This page continues to display until you either fill out the page and click OK, or click Decline to either decline or defer ASR service enrollment.
To set up the array for Auto Service Request, perform the procedures outlined in the following sections:
Auto Service Request (ASR) monitors the array system’s health and performance and automatically notifies the Sun Technical Support Center when critical events occur. Critical alarms generate an Auto Service Request case. The notifications enable Sun Service to respond faster and more accurately to critical on-site issues.
The Common Array Manager provides the interface to activate Auto Service Request on behalf of the devices it manages. It also provides the fault telemetry to notify the Sun service database of fault events on those devices.
To use ASR, you must provide Sun online account information to enroll this CAM software to participate in the ASR service. After you enroll CAM with ASR, you can choose which arrays you want to be monitored and enable them individually.
ASR uses SSL security and leverages Sun online account credentials to authenticate transactions. The service levels are based on contract level and response times of the connected devices.
ASR is available to all customers with a current warranty or Sun Spectrum Contract:
http://www.sun.com/service/warranty/index.xml
http://www.sun.com/service/serviceplans/index.jsp
The service runs continuously from activation until the end of the warranty or contract period.
Event Information Collected Using Auto Service Requests (ASR)
Only the event information listed in the following table is collected.
Your stored data is not read and remains secure.
The event information is sent by secure connection to
https://cns-services.sun.com.
During the initial CAM set-up process, the Common Array Manager prompts you to enroll with the Auto Service Request service by displaying the Auto Service Request (ASR) Setup page. This page continues to display until you either fill out the page and click OK, or click Decline to either decline or defer ASR service registration.
To enroll with ASR after the initial set-up, use the following procedure.
1. Click Sun StorageTek Common Array Manager.
The navigation pane and the Storage System Summary page are displayed.
2. In the navigation pane, expand General Configuration and choose Auto Service Request.
The following Auto Service Request Setup page is displayed.
3. Provide the following information:
TABLE 3-4 describes the fields and buttons on the Auto Service Request page.
You can test the Auto Service Request service connection to ensure that the email address specified in the Sun online account and CAM are communicating. The CAM software must be enrolled with the Auto Service Request service before testing.
1. Click Sun StorageTek Common Array Manager.
The navigation pane and the Storage System Summary page (see ) are displayed.
2. In the navigation pane, expand General Configuration and choose Auto Service Request.
The Auto Service Request Setup page displays.
The Sun Online Account service will send a confirmation email to the email address on record for your Sun Online Account. If you do not receive a confirmation email within approximately 30 minutes, contact the Sun Online Account personnel.
When you unregister from Auto Service Request service, ASR will stop sending telemetry data to Sun about your system.
1. Click Sun StorageTek Common Array Manager.
The navigation pane and the Storage System Summary page are displayed.
2. In the navigation pane, expand General Configuration and choose Auto Service Request.
The Auto Service Request Setup page displays.
After registering with ASR, you can choose which arrays to monitor using ASR. In order for an array to be monitored using ASR, the following settings must be in effect:
While ASR is enabled by default for all registered arrays, the following settings must be configured to use ASR to monitor an array:
1. Click Sun StorageTek Common Array Manager.
The navigation pane and the Storage System Summary page are displayed.
2. In the navigation pane, expand the array you want to monitor using ASR.
3. In the navigation pane, click on Array Health Monitoring
The Array Health Monitoring Setup page is displayed.
4. In the Health Monitoring section, ensure that the Health Monitoring Agent Active and the Device Category Monitored fields are set to Yes. If either are set to No, go to the General Health Monitoring Setup page and change the settings.
5. In the Monitoring this Array section, the checkbox next to both Health Monitoring and Auto Service Request are selected by default. If monitoring is not desired, deselect the Auto Service Request checkbox.
You are now ready to start monitoring the array you registered.
| Sun StorageTek Common Array Manager User Guide for the J4000 Array Family | 820-3765-11 |
Copyright © 2008 Sun Microsystems, Inc. All Rights Reserved.
 To Register an Array
