| Sun StorageTek 6540 Array Hardware Installation Guide |
| Sun StorageTek 6540 Array Hardware Installation Guide |
| C H A P T E R 2 |
|
|
This appendix provides information for the Sun StorageTek 6540 Array as a standalone system and a factory default system that is fully racked and cabled.
Use the procedures in this appendix to install trays in a cabinet. The number of trays you need to install depends on your overall storage requirements. You can install one controller tray and up to 14 expansion trays. The maximum configuration would require a second cabinet, as the cabinets can hold 11 trays only.
This chapter describes the process of installing the Sun StorageTek 6540 Array. It contains the following sections:
The installation procedures in the following section requires the following items:
Use the following procedures to prepare for installation:
Only Sun Service should install expansion modules with data. See the Sun StorageTek Common Array Manager 5.1.3 or higher for more information about supported expansion modules by array.
When you add a new CSM200 expansion module to an existing array in a production or active environment, it is best practice to cable and add the trays while the RAID controller module is powered on, in order to avoid a variety of issues including those listed below.
Before connecting any replacement drive or additional expansion module to an existing functioning array, it is best practice to contact Sun Microsystems Support Services. One reason for this is to avoid issues related to DACstore, the configuration and status database maintained by the array firmware, that stores its information on each of the disk drives.
Contact Sun Microsystems Support Services promptly upon experiencing any of the following symptoms:
Use the universal rail kit to mount the Sun StorageTek 6540 expansion trays in any of the following cabinets:
Unpack the universal rail kit and check the contents.
The universal rail kit (part number 594-2489-02) contains the following items:
| Note - Typically, the main and extender pieces of both the left and right rails are shipped pre-assembled. |
The mounting hardware required for each rack or cabinet type is listed in the following table:
*For cabinet installations with M5 or 12-24 threaded cabinet rails, the following screws are not supplied. You must acquire these to match the threading requirements of your cabinet rails:
**For cabinet installations with unthreaded cabinet rails, the following hardware is not supplied. You must acquire these to match the requirements of your cabinet rails:
Use the #2 Phillips screwdriver to loosen the two rail adjustment screws on each rail to allow adjustment of each rail length (FIGURE 2-1).

Use the #2 Phillips screwdriver to loosen the four rail adjustment screws on each rail to allow adjustment of each rail length (FIGURE 2-2).
FIGURE 2-2 Loosening the Rail Screws to Adjust the
Expansion Rail Length

Note - The expansion tray rails are preconfigured to adjust to cabinet rail depths of between 26.18 inches (664.97 mm) and 28.93 inches (734.82 mm). For cabinet rail depths outside of this range, remove and reposition the four rail adjustment screws (FIGURE 2-2) to support your required rail length. |

2. Check the contents of the box for the following items:
Select the cabinet in which you will be installing the array. Be sure the cabinet is installed as described in the installation instructions provided with it.
1. Stabilize the cabinet as described in the cabinet documentation.
2. If the cabinet has casters, make sure the casters are locked to prevent the cabinet from rolling.
3. Remove or open the top front panel.
4. Remove or open the vented back panel.
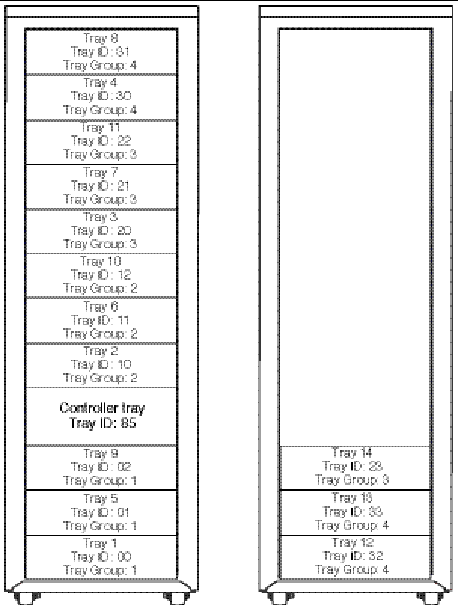
The 6540 is comprised of a controller tray and up to 14 expansion trays. The expansion trays are divided into four tray groups. A tray group is defined as the one to four trays that share the same two connections to the controller tray. They can also be identified by their tray ID's most significant digit (Tray Groups Are Defined Using Tray IDs).
Each controller in the Sun StorageTek 6540 array has four expansion ports. For optimal reliability, availability, and serviceability, you should divide expansion trays evenly among the four expansion channels, resulting in tray groupings. Tray groups enable load balancing to provide optimum system performance. TABLE 2-2 identifies the tray groupings depending on the number of expansion trays in the system.
The 6540 has two controllers with four drive channels each. For redundancy, the expansion channels are divided both logically and physically. The physical divisions are based on the ASICs on the controllers and are called Drive Channels 1 to 4. The logical divisions are based on their connections to tray groups.
To understand the physical division of the controller port drive associations, consider the following:
The required placement of the controller tray and the expansion trays in the cabinet facilitates cabling the trays in the required groups. TABLE 2-1 shows the required location of each tray in the main cabinet.
FIGURE 2-3 shows the physical location of each tray in the cabinet.
FIGURE
2-3 Physical Location of Each Tray in the
Cabinet
To understand the tray balancing among tray groups that establishes the logical divisions, TABLE 2-2 identifies the expansion trays that are included in each group. Refer to Intertray Cabling for additional information.
FIGURE 2-4 shows the allocation of tray groups within a cabinet.
FIGURE 2-4 6540 Array Tray Groups

The resulting association between the controller ports and the
drive ports and tray groups follows:
Cabling from Controller A's side is done from the bottom-up whereas the cabling from Controller B's side is done from the top-down.
Tray groups are associated with tray IDs, as follows:
FIGURE 2-5 shows the intratray cabling within a tray group.
FIGURE 2-5 Intratray Cabling Within a Tray Group

The procedure in this section describes how to attach the rails for a standard 19-inch cabinet with threaded cabinet rails. Depending on your cabinet, the specific steps you need to follow may vary.
To attach the rails to a cabinet with threaded cabinet rails:
1. Follow these steps first for the left rail and then for the right rail:
a. Position the front of the rail directly inside the front cabinet rail (FIGURE 2-6).
Make sure that you feed the back rail pin through the appropriate hole.
FIGURE 2-6 Positioning the Front of the Left Rail
Behind the Left Front Cabinet Rail

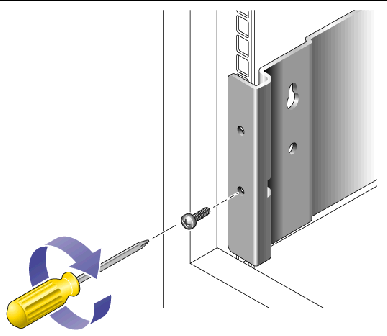
b. Use the #2 Phillips screwdriver to insert and tighten the two screws to secure the left rail to the front of the cabinet (FIGURE 2-7).
Put the screws into the bottom two holes only. You will secure the third screw after inserting the tray.
The controller tray requires four standard mounting units (4RU) of vertical space in the cabinet. Each standard mounting unit (U) has three mounting holes in the left and right cabinet rails. Insert the screws into the lowest two holes of the 4RU slot in which the tray is to be mounted.
These screws pass through the cabinet rail holes and screw into threaded holes in the rail. Do not tighten the front screws until you have begun securing the back rail screws.
When first positioning the rails, observe that the top of the rail ear (brace) is 1.25 inches below the top of where the tray will be positioned.
FIGURE 2-7 Securing the Left Rail to the
Front of the Cabinet

c. At the back of the cabinet, adjust the length of the rail to position it directly inside the cabinet rail (FIGURE 2-8).
Be sure to align the rail flange so that the mounting holes at the back correspond to those at the front of the cabinet.
FIGURE 2-8
Adjusting the Length of the Left Rail at the Back of the Cabinet

d. Use the #2 Phillips screwdriver to insert and tighten the three screws at the back of the rail (FIGURE 2-9).
FIGURE 2-9 Securing the Left Rail to the Back of the Cabinet

2. Use the #2 Phillips screwdriver to tighten the adjustment screws at the back of each rail (FIGURE 2-10).
FIGURE 2-10 Tightening the Rail Adjustment Screws

Install the controller tray in the fourth slot up from the bottom of the cabinet, where you have attached the rails.
1. Using two people, one at each side of the tray, carefully lift and rest the tray on the bottom ledge of the left and right rails (FIGURE 2-11).
 |
Caution - Use care to avoid injury. A tray can weigh up to 95 pounds (45 kg). Use two people to lift the tray. |
FIGURE 2-11 Positioning the Tray in the Cabinet

2. Carefully slide the tray into the cabinet until the front flanges of the tray touch the vertical face of the cabinet (FIGURE 2-12).
FIGURE 2-12 Sliding the Tray Into
the Cabinet

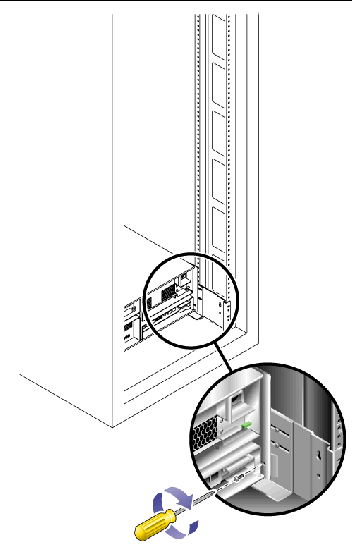
Use the #2 Phillips screwdriver to install and
tighten the third rail screw on each side, securing the tray to the
cabinet and rail.
FIGURE 2-13 Securing the Tray to the
Front of a Cabinet

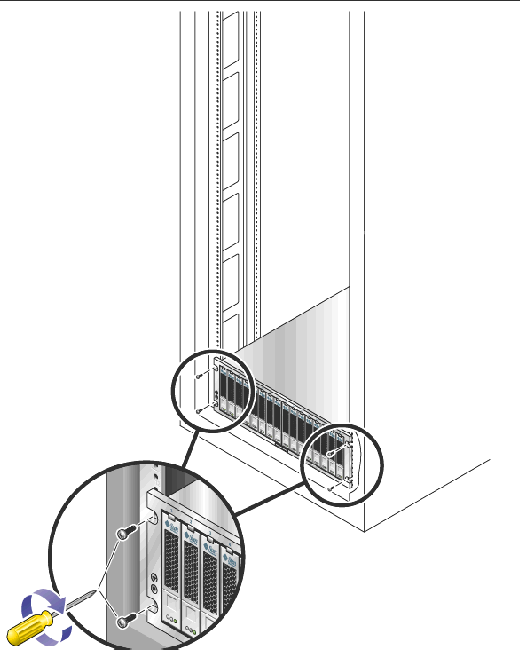
3. Install and tighten the screw on each side of the back of the tray to secure the tray to the cabinet (FIGURE 2-14).
FIGURE 2-14 Securing the Tray to the Back of the Cabinet
Rail

You will install the expansion trays beneath the controller tray in the first empty 3RU slot at the bottom of the cabinet. If you are installing additional expansion trays, continue installing the trays from the bottom up.
Depending on the type of cabinet in which you will install the expansion tray, use one of the following procedures to attach the rails:
This procedure describes the steps to attach the universal rail kit to:
To attach the universal rail kit to a Sun Rack cabinet or a cabinet with M5 or 12-24 threaded cabinet rails:
1. Follow these steps first for the left and then for the right rail:
a. Position the front of the rail directly inside the front cabinet rail (FIGURE 2-15).
FIGURE 2-15 Positioning the Left Rail Behind the
Left Front Cabinet Rail

b. Use the #2 Phillips screwdriver to insert and tighten two 8-32 screws to secure the rail to the front of the cabinet (FIGURE 2-16).
Each expansion tray requires three standard mounting units (3RU) of vertical space in the cabinet. Each standard mounting unit (U) has three mounting holes in the left and right cabinet rails. Insert the screws into the lowest holes in the top two mounting units of the 3RU slot in which the tray is to be mounted.
These screws pass through the cabinet rail holes and screw into threaded holes in the left rail.
FIGURE 2-16 Securing the Left Rail to the Front
of the Cabinet

c. At the back of the cabinet, adjust the length of the rail as needed to fit the cabinet, and position the rail flange over the face of the cabinet rail (FIGURE 2-17).
FIGURE 2-17 Adjusting
the Length of the Left Rail at the Back of the Cabinet

Be sure to align the rail flange so that the mounting holes at the back correspond to those at the front of the cabinet.
d. Depending on the type of cabinet you have, do one of the following (FIGURE 2-18):
FIGURE 2-18 Securing the Left Rail to the
Back of the Cabinet

2. Using the #2 Phillips screwdriver, tighten the eight adjustment screws (four on each side) at the back of each rail (FIGURE 2-19).
FIGURE 2-19 Tightening the Rail
Adjustment Screws

This procedure describes the steps to attach the universal rail kit to a Sun StorEdge Expansion cabinet or a Sun Fire cabinet.
To attach the universal rail kit, follow these steps first for the left rail and then for the right rail:
1. In each of the four inner mounting rails, insert a 10-32 screw in the center hole of the mounting unit of the 3RU slot in which the tray is to be mounted (FIGURE 2-20).
Do not tighten at this time. You will hang the side rails on these screws.
FIGURE 2-20 Inserting Rail Mounting
Screws in Middle Holes
of the Upper Mounting Unit of the Mounting Slot

2. Hang the rail by aligning the large slots of the rail over the front and back screws and then pulling the rail down so that each screw is at the top of the slot (FIGURE 2-21).

3. Adjust the length of the rail to fit the cabinet.
4. Using the #2 Phillips screwdriver, insert two 10-32 screws in the lower side mounting holes for the rail (FIGURE 2-22).
The hole corresponds to the center hole of the middle mounting unit of the 3RU slot in which the rail is installed.
FIGURE 2-22 Inserting Screws in the Lower Side
Mounting Holes of the Cabinet

5. Use the #2 Phillips screwdriver to insert and tighten two 8-32 screws to secure the rail to the front of the cabinet (FIGURE 2-23).
These screws pass through the cabinet rail holes and screw into threaded holes in the front of the rails.
Insert the screws into the lowest holes in the top two mounting units of the 3RU slot in which the tray is to be mounted.
FIGURE 2-23 Securing the Rail to the Front of the Cabinet

6. Tighten all screws on the rail.
This procedure describes the steps to attach the universal rail kit to any 19-inch wide, 4-post EIA-compatible rack, or cabinet with unthreaded cabinet rails.
To attach the universal rail kit, follow these steps first for the left rail and then for the right rail:
1. Snap two cage nuts over the middle holes in the upper and lower mounting units of the 3RU cabinet slot in which you will mount the tray (FIGURE 2-24).
FIGURE 2-24 Inserting Cage Nuts Over Rail Mounting
Holes in Cabinet Rails
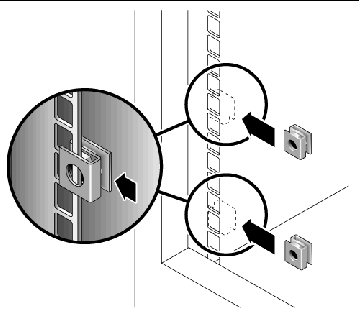
2. Hook a cabinet rail adapter plate over the front of the cabinet rail (FIGURE 2-25).
Position the adapter plate over the 3RU slot in which the tray is to be mounted.
FIGURE 2-25 Inserting the Cabinet Rail Adapter
Plate on the Cabinet Rail
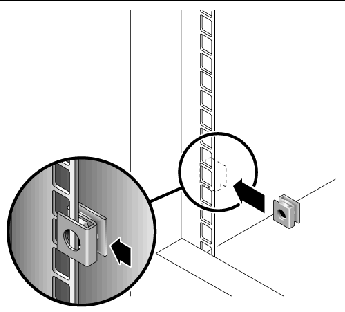
3. Use the #2 Phillips screwdriver to insert and tighten two 8-32 screws to secure the rail to the front of the cabinet (FIGURE 2-26).
These screws pass through the unthreaded inner holes of the cabinet rail adapter plate and screw into the threaded holes in the front of the mounting rail.
FIGURE 2-26 Securing the Rail to the Front of the Cabinet

4. On the corresponding cabinet rail at the back of the cabinet, snap one cage nut over the lowest hole in the middle mounting unit of the 3RU cabinet slot in which you will mount the tray (FIGURE 2-27).
FIGURE 2-27 Inserting a Cage Nut on the Cabinet
Rail at the Back of the Cabinet
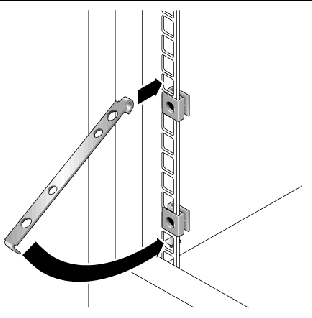
5. At the back of the cabinet, adjust the length of the rail as needed to fit the cabinet, and position the rail flange over the face of the cabinet rail (FIGURE 2-28).
FIGURE 2-28 Adjusting the Length of the Rail at the Back of the Cabinet

6. Insert and tighten a screw appropriate for the cage nut to secure the rail to the back cabinet rail (FIGURE 2-29).
The screw passes through the lower unthreaded inner hole of the mounting rail and screws into the threaded hole of the cage nut.
FIGURE 2-29 Securing the Rail to the Back of the
Cabinet
1. Using two people, one at each side of the tray, carefully lift and rest the tray on the bottom ledge of the left and right rails (FIGURE 2-30).
| |
Caution - Use care to avoid injury. A tray can weigh up to 95 pounds (45 kg). |
FIGURE 2-30 Positioning the Tray in the Cabinet

2. Carefully slide the tray into the cabinet until the front flanges of the tray touch the vertical face of the cabinet (FIGURE 2-31).
FIGURE 2-31
Sliding the Tray Into the Cabinet

3. Depending on the type of cabinet you have, do one of the following:
FIGURE 2-32 Securing the Tray to the Front of
a Cabinet
4. Install and
tighten the 6-32 screw on each side of the back of the tray to secure
the tray to the cabinet (FIGURE 2-33).
FIGURE 2-33 Securing the Tray to the Back
of the Cabinet Rail
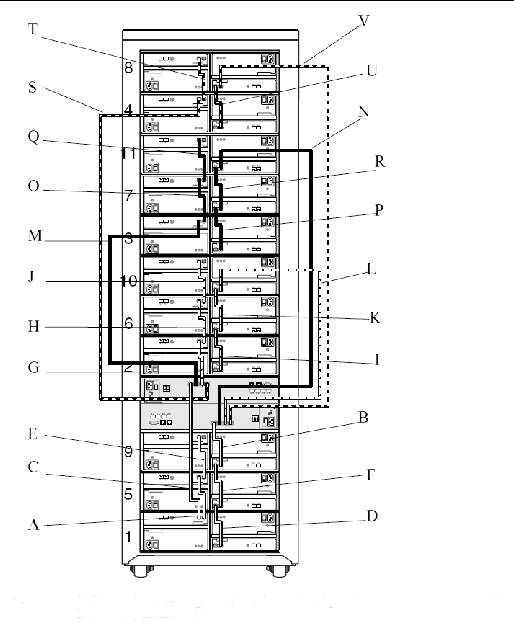
This section describes how to cable a controller tray to expansion trays housed in a cabinet other than the Sun 1000-38 cabinet for several different configurations. The controller tray uses Controller A and Controller B drive ports to connect to the expansion ports at the back of each expansion tray.
FIGURE 2-34 Drive Ports on the Controller
Tray

The configuration naming convention is the number of controller trays x the number of expansion trays where the first number is the controller tray and the second is the number of expansion trays. For example, 1x1 is the controller tray and one expansion tray, and 1x7 is the controller tray and 7 expansion trays.
Use the following instructions to connect the dual-RAID controller tray to one or more expansion trays.
Two 2-meter FC cables are required to connect a controller tray to an expansion tray. TABLE 2-3 lists the number of FC cables required for up to four expansion trays.
TABLE 2-4 lists the cabling between one controller tray and up to four expansion trays.
|
Corresponding Call-out in FIGURE 2-35 |
|||||
|---|---|---|---|---|---|
FIGURE 2-35 shows the cabling between one controller tray and up to four expansion trays.

An array configuration that consists of one controller tray and five expansion trays requires ten 2-meter FC cables.
TABLE 2-5 lists the cabling between one controller tray and five expansion trays.
An array configuration that consists of one controller tray and six expansion trays requires twelve 2-meter FC cables.
TABLE 2-6 lists the cabling between one controller tray and six expansion trays.
An array configuration that consists of one controller tray and seven expansion trays requires fourteen 2-meter FC cables.
TABLE 2-7 lists the cabling between one controller tray and seven expansion trays.
An array configuration that consists of one controller tray and eight expansion trays requires sixteen 2-meter FC cables.
TABLE 2-8 lists the cabling between one controller tray and eight expansion trays.
|
Corresponding Call-out in FIGURE 2-36 |
|||||
|---|---|---|---|---|---|
FIGURE 2-36 shows the cabling between one controller tray and up to eight expansion trays.
FIGURE 2-36 Cabling of Sun StorageTek 6540 Array
Configuration - One Controller Tray and Eight Expansion Trays

An array configuration that consists of one controller tray and nine expansion trays requires eighteen 2-meter FC cables.
TABLE 2-9 lists the cabling between one controller tray and nine expansion trays.
An array configuration that consists of one controller tray and ten expansion trays. requires twenty 2-meter FC cables.
TABLE 2-10 lists the cabling between one controller tray and ten expansion trays.
An array configuration that consists of the controller tray and eleven expansion requires twenty-two 2-meter FC cables.
TABLE 2-11 lists the cabling between one controller tray and eleven expansion trays.
|
Corresponding Call-out in FIGURE 2-37 |
|||||
|---|---|---|---|---|---|
FIGURE 2-37 shows the cabling between one controller tray and eleven expansion trays.
Configuration - One Controller and Eleven Expansion Trays
Expansion
trays 12, 13, and 14 are located in an expansion rack shown in
TABLE 2-12.
Two 2-meter FC cables are required to connect a controller tray to an expansion tray that is located side-by-side. Longer cables are required if the cabinets are further apart.
TABLE 2-14 lists the cabling between one controller tray and up to fourteen expansion trays.
|
Corresponding Call-out in FIGURE 2-36 |
|||||
|---|---|---|---|---|---|
FIGURE 2-38 shows the cabling between one controller tray and up to fourteen expansion trays.
FIGURE 2-38 Cabling
of Sun StorageTek 6540 Array
Configuration - One Controller and
Fourteen Expansion Trays

The initial release of the Sun StorageTek 6540 Array was shipped in a cabinet using a patch panel. To connect to an expansion tray from one of these cabinets, you should bypass the patch panel (FIGURE 2-38):
1. Disconnect the FC cables and the Ethernet cable from the patch panel.
The initial release of the Sun StorageTek 6540 Array was shipped in a cabinet using a patch panel, which was primarily used to extend cable ports from the back of the controller and expansion trays to the rear of the cabinet. The external host FC and Ethernet cables are plugged directly into the patch panel ports, and in the case of an expansion rack, expansion tray FC cables may have also been connected to the corresponding patch panel ports.
To upgrade the system by adding additional expansion trays into one of these cabinets, you should bypass the patch panel and connect directly to the existing expansion trays as shown in FIGURE 2-52. You should bypass the patch panel for the host cables also:
1. Disconnect the host FC cables and the Ethernet cable from the patch panel and connect to the corresponding ports on the controller tray.
2. Connect the FC cables from the expansion tray upgrade directly into Expansion ports A and B on the exiting expansion tray or trays.
3. Connect the Ethernet cable directly into the Ethernet port on the expansion tray.
1. Verify that both power switches are off (see FIGURE 1-6) for each tray in the cabinet.
2. Connect each power supply in the tray to a different power source in the cabinet.
3. Connect the power cables from the cabinet to the external power source.
| Note - The power-on sequence is described in detail in Chapter 6. |
Do not power on the array until you complete the procedures in this chapter.
After installing and cabling the trays, you are ready to connect the management and data hosts, as described in Chapter 3.
| Sun StorageTek 6540 Array Hardware Installation Guide | 819-6461-13 |