| Sun ONE Studio 5 J2EE Application Tutorial |
| Sun ONE Studio 5 J2EE Application Tutorial |
| C H A P T E R 1 |
|
Getting Started |
This chapter describes what you must do before starting the Sun ONE Studio 5 J2EE Application tutorial. The topics covered in this chapter are:
|
Note - There are several references in this book to the DiningGuide application files. These files include a completed version of the tutorial application, a readme file describing how to run the completed application, and SQL script files for creating the required database tables. These files are compressed into a zip file you can download from the Sun ONE Studio 5 Developer Resources portal at http://forte.sun.com/ffj/documentation/tutorialsandexamples.html |
The following items are required to create and run the tutorial.
 9 Update 2 Operating Environment, for example, includes an installation of Sun ONE Application Server 7.
2 Software Development Kit (the J2SE SDK), version 1.4.1_02 or higher
or Microsoft's Internet Explorer.You can access general system requirements from the release notes or from the Sun ONE Studio 5 Developer Resources portal's Documentation page at http://forte.sun.com/ffj/documentation/.
This section describes how to start the Sun ONE Studio 5 IDE and Sun ONE Application Server 7 after the software has been installed.
There are several ways to start the Sun ONE Studio 5 IDE. Only one is described here. For more options, see the Sun ONE Studio 5, Standard Edition Getting Started Guide.
 Start the Sun ONE Studio 5 IDE by running the program executable.
 Programs Sun Microsystems Sun ONE Studio 5 SE Sun ONE Studio 5 SE
$ sh s1studio-install-directory/bin/runide.sh |
The s1studio-install-directory variable stands for the IDE's home directory, which is by default $HOME/studio5_se (UNIX standard user) or /opt/studio5_se (UNIX superuser).
Before starting this section, you must have write access to an application server domain. The default domain is created during installation and requires superuser privileges (administrator privileges on Microsoft Windows systems or root privileges in Solaris or Linux environments) to access. If your userid has superuser privileges, you can start the application server using all default settings, as described in the next section. Standard users (without superuser privileges) must use the procedures described in Starting the Admin Server (Standard User).
If you have started the admin server previously, confirm whether it is running. See Confirming Sun ONE Application Server 7 as the Default Server for information. If this is the first time you have started the admin server, start with this section.
1. In the IDE, select the Runtime tab of the Explorer.
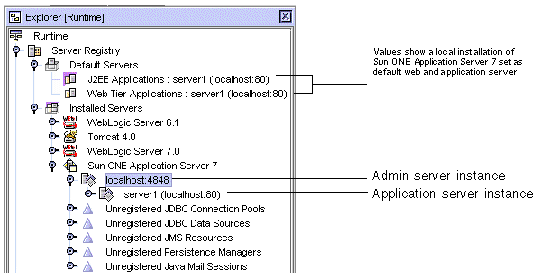
The Runtime pane of the Explorer displays the Server Registry node, among other nodes. This node contains subnodes for all the installed web and application servers, and a node showing which servers are the default servers.
2. Select the Server Registry node.
A query window pops up, asking whether you want to start the admin server. This refers to the default domain's admin server, which can only be run by a privileged user.
3. Click OK to start the default admin server.
The IDE starts the default admin server and configures Sun ONE Application Server 7 as the IDE's default application server. It also creates a server instance, server1.
4. Expand the Server Registry node, the Installed Servers node, and the Sun ONE Application Server 7 node.
The Server Registry in the Explorer looks like this:
Now, start the server instance, as described in Starting the Application Server Instance.
If your userid does not have superuser privileges, a superuser must create a domain for you before you start this section. The procedures are described in the Sun ONE Studio 5, Standard Edition Getting Started Guide.
If you have started the IDE previously, created an admin server, and started it, confirm now whether it is running by using the procedures described in Confirming Sun ONE Application Server 7 as the Default Server. If this is the first time you have started the admin server, continue with this section.
Before starting the procedures described in this section, you will need values of several properties of your domain. Your administrator can provide these for you. Use the following table to record your values to these properties.:
1. In the IDE, select the Runtime tab of the Explorer.
The Runtime pane of the Explorer displays the Server Registry node, among other nodes. This node contains subnodes for all the installed web and application servers, and a node showing which servers are the default servers.
2. Select the Server Registry node.
A query window pops up, asking whether you want to start the admin server. This refers to the admin server of the default domain, which can only be run by a privileged user.
If you click OK, this action creates and starts an admin server that you cannot use. Click Cancel.
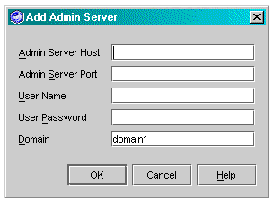
3. Add your admin server to the IDE.
a. Expand the Server Registry node and the Installed Servers node.
b. Right-click the Sun ONE Application Server 7 node and choose Add Admin Server.
The Add Admin Server dialog box is displayed.
c. Type in your values (see TABLE 1-1) and click OK.
If an error message appears, stating that the IDE could not locate the admin server, but will start it if it is local, click OK to close the error window. A progress window appears, showing the admin server process starting up.
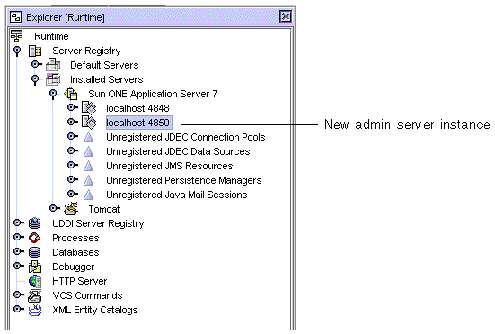
A new admin server node is generated in the Explorer. In the following screen shot, for example, a new admin server's host is localhost and port number is 4849.
4. Create an application server instance.
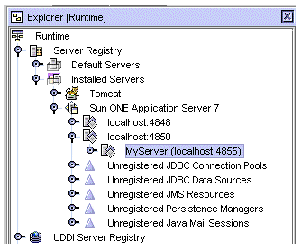
a. Right-click the new admin server node and choose Create a Server Instance.
The Enter Server Instance Values dialog box is displayed.
b. Type in a name and an available port number.
For example, you could type MyServer and 4855.
This action starts the admin server, which you can verify by messages in the output window and status bar. The new server instance is created in the IDE.
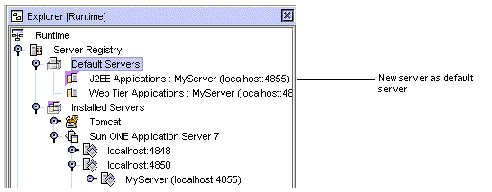
5. Set the default application and web server by right-clicking the new server instance and choosing Set As Default.
6. Expand the Default Servers node to verify this action.
The default servers for J2EE applications and web tier applications show the new server as the default.
Now start the server instance, as described in the next section.
When you are test deploying and deploying applications during development, the IDE starts the application server instance automatically as long as the admin server is running. In this section, you start the application server instance manually in order to perform some operations described later in this chapter.
All users start the server instance as follows:
1. Right-click the application server node and choose Status.
|
Note - If this node is not displayed, select the admin server instance node and choose Refresh. |
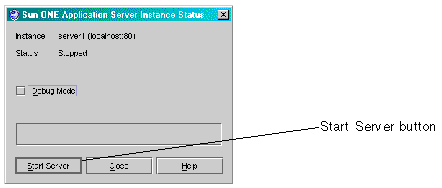
The Sun ONE Application Server Instance Status dialog box is displayed, as shown (your instance label may be different).
2. Click the Start Server button.
(If the dialog box has a Stop Server button, the server is already running.)
On Microsoft Windows systems, a command window appears, displaying progress messages.
The server is started when the Server Instance Status window displays Status: Running.
3. Click Close on the instance status dialog box.
Now, proceed to Setting Up Database Connectivity.
If you have started Sun ONE Application Server 7 before, this is how you confirm that it is still the default server:
1. In the IDE, select the Runtime tab of the Explorer.
2. Expand the Server Registry node and its Default Servers subnode.
If the J2EE Applications node's label is server-instance(server-hostname:server-port-number), as shown, then Sun ONE Application Server 7 is the default application server. Go to the next section. Otherwise, continue with the next step.
3. Find your application server instance under the Installed Servers node, right-click it, and choose Set As Default.
Your server is set as the default server for J2EE and Web Tier applications.
An enterprise application uses the Java Database Connectivity (JDBC) API to interact with a database. Before you can deploy and execute an enterprise application with Sun ONE Application Server 7, the following required JDBC-related actions must be performed in the application server environment. These include:
Under most circumstances, the Sun ONE Studio 5 IDE performs all these actions for you, providing the values required by the tutorial. Depending on the privileges of your userid and the platform you are using, these are performed with different methods, which are described in Setting JDBC Resources (Microsoft Windows Superusers) and Setting JDBC Resources (All Other Users).
Exceptions to automatic enabling of the JDBC driver, however, are not dependent on your userid, as the next section describes.
The PointBase JDBC driver is installed automatically with the standard installation, where the Sun ONE Studio 5 IDE and Sun ONE Application Server 7 are installed together.
The Sun ONE Studio 5 installer automatically creates the three connectivity resources for the Microsoft Windows user with administrator privileges.
|
Note - If the Sun ONE Studio 5 IDE and Sun ONE Application Server 7 were installed separately, you must configure the JDBC resources with the procedure described in Setting JDBC Resources (All Other Users). |
To view the resources in the IDE:
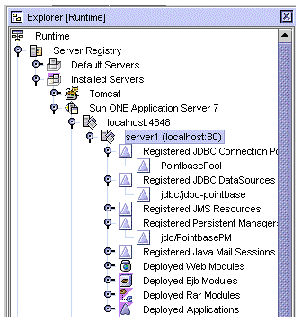
1. In the Runtime pane of the Explorer, expand the Server Registry and Installed Servers nodes.
2. Expand the default admin server node (localhost:4848) and the default application server node (server1(localhost:80)).
3. Expand the registered resources for JDBC Connection Pools, JDBC Data Sources, and Persistent Managers.
You should see the following nodes under these:
|
Note - Before starting this procedure, make sure both the admin server and the application server are running (refer to Starting the Software). |
To create the JDBC connection resources for this tutorial:
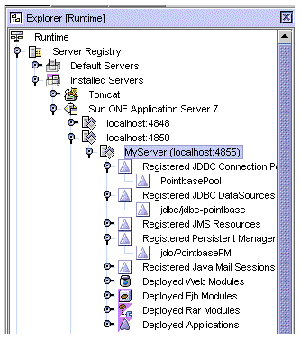
1. In the Runtime pane of the Explorer, expand the Server Registry and Installed Servers nodes.
2. Locate your application server instance.
It is labeled app-server-name (app-server-host:app-server-port), for example, MyServer (localhost:4855).
3. Right-click the application server instance node and choose Preconfigure PointBase JDBC Resources.
A timer icon (such as an hour glass) appears. When the process is complete, the cursor reverts to its usual icon.
4. Expand the registered resources for JDBC Connection Pools, JDBC Data Sources, and Persistent Managers.
You should see the following nodes under these:
Now proceed to the tutorial's database tables.
The DiningGuide tutorial uses two database tables, Restaurant and CustomerReview. These tables are automatically created for you in the PointBase default (sample) database with the standard installation, where Sun ONE Studio 5 software and Sun ONE Application Server 7 are installed together.
However, if Sun ONE Studio 5 software and Sun ONE Application Server 7 were not installed together, you must follow the procedures described in Enabling the JDBC Driver. This action not only enables the PointBase JDBC driver, but copies the default sample database to your user directory, which makes these tables available to you.
The database schemas shown in TABLE 1-2 are used in this tutorial. They are created in the PointBase database by the Sun ONE Studio 5 installer.
|
Compound primary key with CustomerName; references Restaurant(restaurantName) |
|||
The Restaurant table contains the records shown in TABLE 1-3.
The CustomerReview table contains the records shown in TABLE 1-4.
Now you are ready to start the tutorial application. Either continue to Chapter 2 to get an overview of the application you will build, or go directly to Chapter 3 and start building it.
| Sun ONE Studio 5 J2EE Application Tutorial | 817-2322-10 |
Copyright © 2003, Sun Microsystems, Inc. All rights reserved.