Installing Storage Arrays
This section contains the procedures that are listed in Table 2–1.
Table 2–1 Task Map: Installing Storage Arrays|
Task |
Information |
|---|---|
|
Install a storage array in a new cluster, before the OS and Sun Cluster software are installed. | |
|
Add a storage array to an existing cluster. |
Storage Array Cabling Configurations
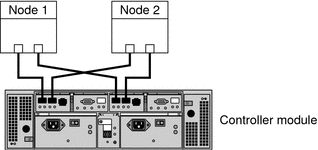
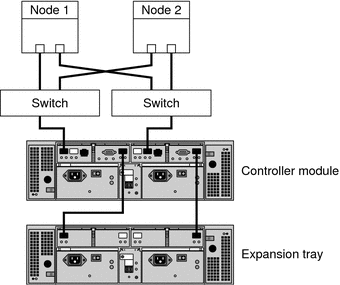
You can install your storage array in several different configurations: Figure 2–1 and Figure 2–2 are two examples.
Figure 2–1 StorageTek 2540 Array Direct-Connect Configuration

Note –
The StorageTek 2540 array houses two controllers, each having two host ports. The cabling approach is the same as shown in Figure 2–1.
Figure 2–2 StorageTek 2540 Array Switched Configuration

How to Install Storage Arrays in a New Cluster
Use this procedure to install a storage array in a new cluster. To add a storage array to an existing cluster, use the procedure in How to Add Storage Arrays to an Existing Cluster.
This procedure relies on the following assumptions:
-
You have not installed the Solaris Operating System.
-
You have not installed the Sun Cluster software.
-
Your cluster has not been established.
-
You have enough host adapters to connect the nodes and the storage array to the service processor panel.
If you need to install host adapters, see How to Replace a Host Adapter. When this procedure asks you to replace the failed host adapter, simply install the new host adapter instead.
 Install and Cable the Hardware
-
Unpack, place, and level your storage array.
For the procedure about how to unpack, place, and level your storage array, see Sun StorageTek 2500 Series Array Hardware Installation Guide, v1.0.
-
(Optional) If you do not have a Fibre Channel (FC) switch installed, install it for the storage array.
For the procedure about how to install an FC switch, see the documentation that shipped with your FC switch hardware.
-
Connect the nodes.
-
(Direct-Attached Configuration) To see how to connect each node to the host ports on the array, see Figure 2–1.
-
(SAN Configuration) To see how to connect the nodes to the ports of the FC switches, see Figure 2–2.
For instructions, see Sun StorageTek 2500 Series Array Hardware Installation Guide, v1.0.
-
-
Install the storage array.
For instructions, see Sun StorageTek 2500 Series Array Hardware Installation Guide, v1.0.
-
Power on the storage array nodes, and if necessary, the FC switches.
For instructions, see Sun StorageTek 2500 Series Array Hardware Installation Guide, v1.0.
 Install the Solaris Operating System
and Configure Multipathing
-
On all nodes, install the Solaris operating system and apply the required Solaris patches for Sun Cluster software and storage array support.
For the procedure about how to install the Solaris operating environment, see How to Install Solaris Software in Sun Cluster Software Installation Guide for Solaris OS.
-
Install any required patches or software for Solaris I/O multipathing software support to nodes and enable multipathing.
For the procedure about how to install the Solaris I/O multipathing software, see How to Install Sun Multipathing Software in Sun Cluster Software Installation Guide for Solaris OS.
See Also
-
To create a logical volume, see How to Create a Logical Volume.
-
To continue with Sun Cluster software installation tasks, see your Sun Cluster software installation documentation.
 How to Add Storage Arrays to an
Existing Cluster
Use this procedure to add a new storage array to a running cluster. To install a new storage array in a Sun Cluster configuration that is not running, use the procedure in How to Install Storage Arrays in a New Cluster.
Before You Begin
This procedure relies on the following assumptions:
-
(Veritas Volume Manager Only) You have a version of Veritas Volume Manager that includes Array Support Library (ASL). For more information on this requirement, see Requirements for This Array.
-
You have enough host adapters to connect the nodes and the storage array to the service processor panel.
If you need to install host adapters, see How to Replace a Host Adapter. When this procedure asks you to replace the failed host adapter, simply install the new host adapter instead.
-
You do not need to install a new node in your cluster.
If you need to add a node to your cluster, see your Sun Cluster system administration documentation. Ensure that you install the required Solaris patches for storage array support.
-
Unpack, place, and level your storage array.
For the procedure about how to unpack, place, and level your storage array, see Sun StorageTek 2500 Series Array Hardware Installation Guide, v1.0.
-
(Optional) If you do not have a Fibre Channel (FC) switch installed, install it for the storage array.
For the procedure about how to install an FC switch, see the documentation that shipped with your FC switch hardware.
-
Connect the nodes.
-
(Direct-Attached Configuration) To see how to connect each node to the host ports on the array, see Figure 2–1.
-
(SAN Configuration) To see how to connect the nodes to the ports of the FC switches, see Figure 2–2.
For instructions, see Sun StorageTek 2500 Series Array Hardware Installation Guide, v1.0.
-
-
Install the storage array.
For instructions, see Sun StorageTek 2500 Series Array Hardware Installation Guide, v1.0.
-
Power on the storage array nodes, and if necessary, the FC switches.
For instructions, see Sun StorageTek 2500 Series Array Hardware Installation Guide, v1.0.
See Also
-
To create a logical volume, see How to Create a Logical Volume.
-
If you added a new node, perform the steps in Install the Solaris Operating System and Configure Multipathing as appropriate. Apply the correct patches for storage array support enable multipathing.
- © 2010, Oracle Corporation and/or its affiliates
