| Sun Java System Application Server Platform Edition 8 Administration Guide |
Chapter 1
Getting StartedThis chapter describes the Sun JavaTM System Application Server and introduces basic administration tasks. This chapter contains following sections:
About the Sun Java System Application ServerWhat is the Application Server?
The Application Server provides a robust J2EE platform for the development, deployment, and management of enterprise applications. Key features include transaction management, performance, scalability, security, and integration. The Application Server supports services from Web publishing to enterprise-scale transaction processing, while enabling developers to build applications based on JavaServer Pages (JSP™), Java servlets, and Enterprise JavaBeans™ (EJB™) technology.
The Application Server Enterprise Edition provides advanced clustering and failover technologies. These features enable you to run scalable and highly available J2EE applications.
Horizontal scaling is acheived by adding Application Server instances to a cluster, thereby increasing the capacity of the system. It is possible to add Application Server instances to a cluster without disrupting service. The HTTP, RMI/IIOP, and JMS load balancing systems distribute requests to healthy Application Server instances in the cluster.
- High Availability - Availability allows for failover protection of Application Server instances in a cluster. If one application server instance goes down, another Application Server instance takes over the sessions that were assigned to the unavailable server. Session information is stored in the high-availability database (HADB). HADB supports the persistence of HTTP sessions and stateful session beans.
Application Server Architecture
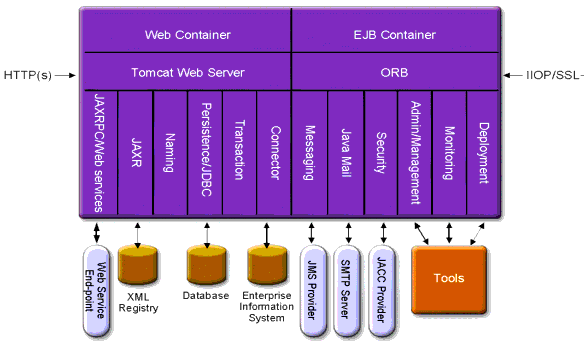
This section describes Figure 1-1, which shows the high-level architecture of the Application Server.
Figure 1-1 Application Server Architecture
- Containers - A container is a runtime environment that provides services such as security and transaction management to J2EE components. Figure 1-1 shows the two types of J2EE containers: Web and EJB. Web components, such as JSP pages and servlets, run within the Web container. Enterprise beans, the components of EJB technology, run within the EJB container.
- Client Access - At runtime, browser clients access Web applications by communicating with the Web server via HTTP, the protocol used throughout the internet. The HTTPS protocol is for applications that require secure communication. Enterprise bean clients communicate with the Object Request Broker (ORB) through the the IIOP or IIOP/SSL (secure) protocols. The Application Server has separate listeners for the HTTP, HTTPS, IIOP, and IIOP/SSL protocols. Each listener has exclusive use of a specific port number.
- Web Services - On the J2EE platform, it is possible to deploy a Web application that provides a Web service implemented by Java API for XML-Based RPC (JAX-RPC). A J2EE application or component can also be a client to other Web services. Applications access XML registries through the Java API for XML Registries (JAXR).
- Services for Applications - The J2EE platform was designed so that the containers provide services for applications. Figure 1-1 shows the following services:
- Naming - A naming and directory service binds objects to names. A J2EE application locates an object by looking up its JNDI name. JNDI stands for the Java Naming and Directory Interface API.
- Security - The Java Authorization Contract for Containers (JACC) is a set of security contracts defined for the J2EE containers. Based on the client’s identity, the containers restrict access to the container’s resources and services.
- Transaction management - A transaction is an indivisible unit of work. For example, transfering funds between bank accounts is a transaction. A transaction management service ensures that a transaction either completes fully or is rolled back.
Access to External Systems
The J2EE platform enables applications to access systems that are outside of the application server. Applications connect to these systems through objects called resources. One of the responsibilities of an administrator is resource configuration. The J2EE platform enables access to external systems through the following APIs and components:
- JDBC - A database management system (DBMS) provides facilities for storing, organizing, and retrieving data. Most business applications store data in relational databases, which applications access via the JDBC API. The information in databases is often described as persistent because it is saved on disk and exists after the application ends. The Application Server bundle includes the PointBase DBMS.
- Messaging - Messaging is a method of communication between software components or applications. A messaging client sends messages to, and receives messages from, any other client. Applications access the messaging provider through the Java Messaging Service (JMS) API. The Application Server includes a JMS provider.
- Connector - The J2EE Connector architecture enables integration between J2EE applications and existing Enterprise Information Systems (EIS). An application accesses an EIS through a portable J2EE component called a connector or resource adapter.
- JavaMail - Through the JavaMail API, applications connect to an SMTP server in order to send and receive email.
- Server Administration - The lower right-hand corner of Figure 1-1 shows some of the tasks performed by the administrator of the Application Server. For example, an administrator deploys (installs) applications and monitors the server’s performance. These tasks are performed with the administration tools provided by the Application Server.
Tools for Administration
Admin Console
The Admin Console is a browser-based tool that features an easy-to-navigate interface and online help. This manual provides step-by-step instructions for using the Admin Console. The administration server must be running to use the Admin Console.
When the Application Server was installed, you chose a port number for the server, or used the default port of 4849. You also specified a user name and master password.
To start the Admin Console, in a web browser type:
https://hostname:port
For example:
https://kindness.sun.com:4949
If the Admin Console is running on the machine on which the Application Server was installed, specify
localhostfor the host name.On Windows, start the Application Server Admin Console from the Start menu.
The installation program creates the default administrative domain (named
domain1) with the default port number 4849, as well as an instance separate from the domain administration server (DAS). After installation, additional administration domains can be created. Each domain has its own domain administration server, which has a unique port number. When specifying the URL for the Admin Console, be sure to use the port number for the domain to be administered.If your configuration includes remote server instances, create node agents to manage and facilitate remote server instances. It is the responsibility of the node agent to create, start, stop, and delete a server instance. Use the command line interface (CLI) commands to set up node agents.
asadmin Utility
The
asadminutility is a command-line tool. Use theasadminutility and the commands associated with it to perform the same set of tasks that can be performed in the Admin Console. For example, start and stop domains, configure the server, and deploy applications.Use these commands either from a command prompt in the shell, or call them from other scripts and programs. Use these commands to automate repetitive administration tasks.
To start the
asadminutility:
$ asadminTo list the commands available within
asadmin:
asadmin> helpIt is also possible to issue an
asadmincommand at the shell’s command prompt:
$ asadmin helpTo view a command’s syntax and examples, type
helpfollowed by the command name. For example:
asadmin> help create-jdbc-resourceThe
asadmin helpinformation for a given command displays the Unix man page of the command. These man pages are also available in HTML format.Application Server Management Extension (AMX)
The Sun Java System Application Server Management eXtension is an API that exposes all of the Application Server configuration and monitoring JMX managed beans as easy-to-use client-side dynamic proxies implementing the AMX interfaces.
For more information on using the Application Server Management Extension, see the Using the Java Management Extensions (JMX) API chapter in the Sun Java System Application Server Developers Guide.
Application Server ConfigurationConfiguring the Application Server
Application Server domains are logical or physical units created to help the administrator manage a system configuration. A domain is broken down into smaller units including instances and node agents. A server instance is a single Java Virtual Machine (JVM) that runs the Application Server on a single physical machine. Each domain has one or more instances. A domain must also have at least one associated node agent for the instance to function properly. Domains can be grouped together to create a cluster. Clusters allow the administrator to manage groups of hardware and software.
Configuring Domains
Administrative domains provide a basic security structure whereby different administrators can administer specific groups (domains) of application server instances. By grouping the server instances into separate domains, different organizations and administrators can share a single Application Server installation. Each domain has its own configuration, log files, and application deployment areas that are independent of other domains. If the configuration is changed for one domain, the configurations of other domains are not affected.
Each Administration console session allows you to configure and manage the domain. If you have created multiple domains, you must start an additional Administation Console session to manage each domain. Each domain has its own Domain Administration Server (DAS), with a unique port number. Each administrative domain can have multiple application server instances. However, an application server instance can belong to just one domain. When the Application Server is installed, an administrative domain named
domain1is automatically created.Creating a Domain
Domains are created using the
create-domaincommand. The following example command creates a domain namedmydomain. The administration server listens on port 1234 and the admininstrative user name ishanan. The command prompts for the administrative and master passwords.
$ asadmin create-domain --adminport 80 --adminuser hanan mydomainTo start the Admin Console for mydomain domain, in a browser, enter the following URL:
http://hostname:80For the preceding
create-domainexample, the domain’s log files, configuration files, and deployed applications now reside in the following directory:install_dir
/domains/mydomainTo create the domain’s directory in another location, specify the
--domaindiroption. For the full synax of the command, typeasadmin help create-domain.Deleting a Domain
Domains are deleted using the
asadmin delete-domaincommand. Only the operating system user (or root) who can administer the domain can execute this command successfully. To delete a domain namedmydomain, for example, type the following command:$ asadmin delete-domain mydomainListing Domains
The domains created on a machine can be found using the
asadmin list-domainscommand. To list the domains in the default install_dir/domainsdirectory, type this command:
$ asadmin list-domainsTo list domains that were created in other directories, specify the
--domaindiroption.Starting the Domain
When starting a domain, the administration server and application server instance are started. Once the application server instance is started it runs constantly, listening for and accepting requests. Each domain must be started separately.
To start a domain, type the
asadmin start-domaincommand and specify the domain name. For example, to start the default domain (domain1), type the following:
$ asadmin start-domain domain1If there is only one domain, omit the domain name. For the full command syntax, type
asadmin help start-domain. If the password data is omitted, you are prompted to supply it.On Windows, to start the default domain:
From the Windows Start Menu, select Programs -> Sun Microsystems -> Application Server -> Start Admin Server.
Restarting the Server or Domain
Restarting the server is the same as restarting the domain. To restart the domain or server, stop and start the domain.
Stopping the Domain
Stopping a domain shuts down its administration server and application server instance. When stopping a domain, the server instance stops accepting new connections and then waits for all outstanding connections to complete. This process takes a few seconds because the server instance must complete its shut-down process. While the domain is stopped, the Admin Console or most
asadmincommands cannot be used.To stop a domain, type the
asadmin stop-domaincommand and specify the domain name. For example, to stop the default domain (domain1), type the following:
$ asadmin stop-domain domain1If there is only one domain, then the domain name is optional. For the full syntax, type
asadmin help stop-domain.To stop the domain using the Admin Console:
On Windows, to stop the default domain:
From the Start menu select Programs -> Sun Microsystems -> Applicationserver-> Stop Admin Server.
Recreating the Domain Administration Server
For mirroring purposes, and to provide a working copy of the Domain Administration Server (DAS), you must have:
- One machine (machine1) that contains the original DAS.
- A second machine (machine2) that contains cluster with server instances running applications and catering to clients. The cluster is configured using the DAS on the first machine.
- A third backup machine (machine3) where the DAS needs to be recreated in case the first machine crashes.
Steps for DAS Migration
The following steps are required to migrate the Domain Administration Server from the first machine (machine1) to the third machine (machine3):
- Setup the third machine by installing the same bits of the application server on the third machine, as is installed on the first machine.
This is required so that the DAS can be properly restored on the third machine and there are no path conflicts.
- Copy the backup ZIP file from the first machine into
install_dir/domainson the third machine. You may also FTP the file.- Execute
asadmin restore-domaincommand to restore the ZIP file onto the third machine:
asadmin restore-domain --filename install_dir/domains/sjsas_backup_v00001.zip domain1You can backup any domain. However, while recreating the domain, the domain name should be same as the original.
- Change install_dir
/domains/domain1/generated/tmpdirectory permissions on the third machine to match the permissions of the same directory on first machine.The default permissions of this directory are:
?drwx------?(or 700).For example:
chmod 700install_root/domains/domain1/generated/tmpThe example above assumes you are backing up domain1. If you are backing up a domain by another name, you should replace domain1 above with the name of the domain being backed up.
- Change the host values for the properties in the
domain.xmlfor the third machine:- Update the install_root/domains/domain1/
config/domain.xmlon the third machine.For example:
Search for machine1 and replace it with machine3. So, you can change:
<jmx-connector><property name=client-hostname value=machine1/>...to:
<jmx-connector><property name=client-hostname value=machine3/>...- Change:
<jms-service... host=machine1.../>to:
<jms-service... host=machine3.../>- Start the restored domain on machine3:
asadmin start-domain --user admin_user --password admin_password domain1- Change the DAS host values for properties under nodeagent on machine2:
- Change
agent.das.hostproperty value in install_dir/nodeagents/nodeagent/agent/config/das.propertiesin machine2.- Restart nodeagent on machine2.
Application Server InstancesAbout Application Server Instances
Sun Java System Application Server creates one application server instance, called server at the time of installation. You can delete the server instance and create a new instance with a different name if you prefer.
Each Sun Java System Application Server instance has its own J2EE configuration, J2EE resources, application deployment areas, and server configuration settings. Changes to one application server instance have no effect on other application server instances. You can have many application server instances within one administrative domain.
For many users, one application server instance meets their needs. However, depending upon your environment, you might want to create one or more additional application server instances. For example, in a development environment you can use different application server instances to test different Sun Java System Application Server configurations, or to compare and test different application deployments. Because you can easily add or delete an application server instance, you can use them to create temporary “sandbox” areas to experiment with while developing.
In addition, for each application server instance you can also create virtual servers. Within a single installed application server instance you can offer companies or individuals domain names, IP Addresses, and some administration capabilities. For the users, it is almost as if they have their own web server, without the hardware and basic server maintenance. These virtual servers do not span application server instances. For more information about virtual servers, see Configuring the JVM General Settings.
In operational deployments, for many purposes you can use virtual servers instead of multiple application server instances. However, if virtual servers do not meet your needs, you can also use multiple application server instances.
A Sun Java System Application Server instance is not started automatically. Once you start an instance, the instance runs until you stop it. When you stop an application server instance, it stops accepting new connections, then waits for all outstanding connections to complete. If your machine crashes or is taken offline, the server quits and any requests it was servicing may be lost.
Defining Application Server Instances
Application server instances form the basis of an application deployment. Each instance belongs to a single domain and has its own directory structure, configuration, and deployed applications. Each server instance also includes the J2EE platform web and EJB containers. Every new server instance must contain a reference to a node agent name defining the machine on which the instance will reside.
- Defining and Using Clusters - A cluster is a group of server instances sharing the same set of applications, resources, and configuration information. A server instance can belong to only one cluster. Among other things, the cluster is used to facilitate load balancing, through ditribution of a load across multiple machines, and high availability, through instance level failover.
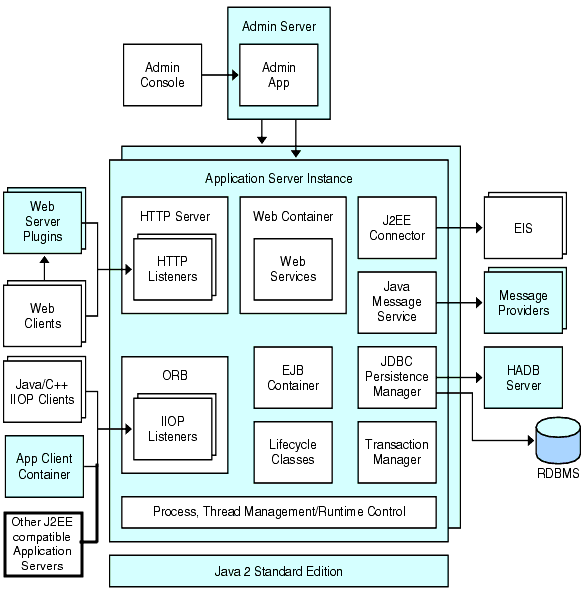
Figure 1-2 Sun Java System Application Server Instance
About Stand-Alone Instances
A Sun Java System Application Server instance is not started automatically. Once you start an instance, the instance runs until you stop it. When you stop an application server instance, it stops accepting new connections, then waits for all outstanding connections to complete. If your machine crashes or is taken offline, the server quits and any requests it was servicing may be lost.
Viewing General Server Information
From the General Tab you can perform the following tasks:
- Click Start Instance to start the instance.
- Click Stop Instance to stop the instance.
- Click View Log Files to open the server log viewer.
- Click Rotate Log File to rotate the log file for the instance. This action schedules the log file for rotation. The actual rotation takes place the next time an entry is written to the log file. The rotation happens immediately for the default server (the DAS) but is delayed for other stand-alone server.
- Click JNDI Browsing to browse the JNDI tree for a running instance.
- Click Recover Transactions to recover incomplete transactions.
In addition you can select the following tabs to perform thse additional tasks:
- Applications Tab: deploy a selected application.
- Resources Tab: manage a selected resource.
- Properties Tab: configure instance specific properties.
- Monitor Tab: view monitoring data for JVM, Server, Thread Pools, HTTP Service, and Transaction Service.
- Advanced Tab: set general properties for deploying applications.
Managing Applications
From the Applications Tab, you can enable, disable, and deploy selected applications associated with the instance.
To deploy an application:
- Select the checkbox for the desired application.
- From the Deploy drop down menu, select the type application module you want to deploy:
- Enterprise Application: a J2EE application in an EAR(Enterprise Application Archive) file or directory.
- Web Application: a collection of Web resources such as JavaServer Pages (JSPs), servlets, and HTML pages that are packaged in a WAR (Web Application Archive) file or directory.
- EJB Module: one or more Enterprise JavaBeans (EJBs) contained in an EJB JAR (Java Archive) file or directory.
- Connector Module: connects to an Enterprise Information System (EIS) and is packaged in a RAR(Resource Adapter Archive) file or directory.
- Lifecycle Module: performs tasks when it is triggered by one or more events in the server’s lifecycle.
- App Client Module: also called a J2EE application client JAR file, contains the server-side routines for the client.
Managing Resources
From the Recources Tab, you can enable, disable, and create a new resource type to associate with the instance.
To create a new resource type:
- Select the checkbox for the desired resource.
- From the New drop down menu, select the resource type you want to create and associate with that instance:
- JDBC: provide applications with a means of connecting to a database.
- Persistence Manager: required for applications with container-managed persistence beans (needed for backward compatibility).
- JMS Connection Factory: objects that allow an application to create other JMS objects programmatically.
- JMS Destination: represents a mail session in the JavaMail API, which provides a platform-independent and protocol-independent framework to build mail and messaging applications.
- JavaMail: provides a platform-independent and protocol-independent framework to build mail and messaging applications.
- Custom: represents non-standard resources with a defined JNDI subcontext, resource type, and factory class.
- External: enables an application to locate an external resource object in a Lightweight Directory Access Protocol (LDAP) repository.
- Connector: a program object that provides an application with a connection to an enterprise information systems (EIS).
- Admin Object: configures a JSR-160 compliant remote JMX connector
Administration Server Advanced Settings
The Administration Server Advanced settings allow you to set general properties for deploying applications. These properties enable you to ensure and monitor that changes to deployed applications are detected and the modified classes reloaded.
Setting Applications Configurations
If dynamic reloading is enabled, the server periodically checks for changes in the files of the deployed application and automatically reloads the application with the changes. Dynamic reloading is useful in a development environment because it allows code changes to be tested quickly. In a production environment, however, dynamic reloading may degrade performance.
Dynamic reloading is intended for development environments. It is incompatible with session persistence, a production environment feature. Do not enable session persistence if dynamic deployment is enabled.
To configure dynamic reloading from the Applications Configuration page, configure the following:
Setting the auto deploy
The auto deploy feature enables you to deploy a pre-packaged application or module by copying it to the
install_dir/domains/domain_dir/autodeploydirectory.For example, copy a file named
hello.warto the install_dir/domains/domain1/autodeploydirectory. To undeploy the application, remove thehello.warfile from theautodeploydirectory.The auto deploy feature is intended for development environments. It is incompatible with session persistence, a production environment feature. Do not enable session persistence if dynamic deployment is enabled
To configure the auto deploy settings from the the Applications Configuration page:
- Enable or disable auto deploy by selecting or deselecting the Enabled checkbox.
- In the Auto Deploy Poll Interval field, specify how often the server checks the auto deploy directory for application or module files. Changing the poll interval will not affect the amount of time it takes to deploy an application or module.
- In the Auto Deploy Directory, if you specify the directory where you build your application, then you won’t have to copy the file to the default auto deploy directory.
The default is a directory called
autodeployin the server instance’s root directory. By default a variable is used to eliminate the need to manually change the directory for multiple server instances.- To run the verifier before deployment, select the Verifier Enabled checkbox. The verifier examines the structure and content of the file. Verification of large applications is often time-consuming.
- To precompile JSP pages, select the JSPs checkbox. If you do not select this checkbox, the JSP pages are compiled at runtime when they are first accessed. Because compilation is often time-consuming, in a production environment select this checkbox.
Setting Additional Properties
Click the Add Property button to specify additional settings.
Setting Domain Attributes
The following domain attributes properties are available.
Instance Specific Configuration Properties
The instance specific Configuration Properties override the values for this instance.
To revert the value back to the default value:
If no override value is set, the default value is used.
Adding or Deleting Instance Properties
To add properties:
The following property attribute name/value pairs for configuring the resource are available:
To delete properties:
Creating an Instance
To create an instance:
- In the tree component, select the Standalone Instances node.
- On the Stand Alone Server Instances page, click New.
- In the Name field, identify a unique name for the new instance.
- Select a Node Agent.
The node agent must be started using the
asadmin start-node-agentcommand on the node agent’s host machine so that the server instance you are creating can be associated with that node agent.- Select a desired configuration.
- By default, new instances are created with configurations copied from the default-config configuration. To copy from a different configuration, specify it when creating the new instance.
- For a server instance, the new configuration is named
instance_name-config.The configuration
default-configis the default configuration that acts as a template for creating standalone server instance. No unclustered server instances or clusters are allowed to refer to the default-config configuration; it can only be copied to create new configurations. Edit the default configuration to ensure that new configurations copied from it have the correct initial settings.Equivalent
asadmincommand:create-instance.Starting an Instance
To start an instance, perform these steps:
The node agent associated with the instance must be started using the
asadmin start-node-agentcommand before you can successfully start the instance.Once an instance is started, it is possible to perform the following tasks from the General tab:
Equivalent asadmin command: start-instance.
Recovering Transactions
Transactions might be incomplete either because the server crashed or a resource manager crashed. It is essential to complete these stranded transactions and recover from the failures. Application Server is designed to recover from these failures and complete the transactions upon server startup.
If the selected server is running, then recovery will be done by the same server. If the selected server is not running, then the selected Destination Server will do the recovery.
Stopping an Instance
To stop an instance, perform these steps:
Equivalent asadmin command: stop-instance.
Shutting Down the Server Instance
To shut down the Administration Server:
A confirmation dialog displays to confirm that you wish to shutdown the Administration Server.
Configuration ChangesChanging Application Server Configuration
When making any of these configuration changes, restart the server for the changes to take effect:
For instructions, see Restarting the Server or Domain.
With dynanamic configuration, most changes take effect while the server is running. To make the following configuration changes, do NOT restart the server:
Note that the
asadmin reconfigcommand has been deprecated and is no longer necessary. Configuration changes are applied to the server dynamically.Ports in the Application Server
Table 1-1 describes the port listeners of the Application Server.
Viewing Port Numbers
Changing the Administrative Server Port
Changing an HTTP Port
Changing an IIOP Port
- In the tree component, expand the Configurations node.
- Expand the server-config (Admin Config) node
- Expand the ORB node.
- Expand the IIOP Listeners node.
- Select the listener whose port number you want to change.
- On the Edit IIOP Listener page, change the value of the Listener Port field.
- Click Save.
- Restart the server.
Configuring a JMX Connector Using the Admin Service
Use the Admin Service to configure a JSR-160 compliant remote JMX connector, which handles communication between the domain administration server and the node agents, which manage server instances on a host machine, for remote server instances.
The Admin Service determines whether the server instance is a regular instance, a domain administration server (DAS), or a combination. A DAS is similar to a J2EE server instance, except that user applications and resources are not deployed to a DAS, though it is capable of serving user application requests. The only significant difference between a DAS and a J2EE Server Instance is that the former can not be a part of a cluster, the homogeneous unit of server instances.
To configure the JMX connector:
- Select Configurations from the tree.
- 2. Select the instance to configure:
- Select Admin Service from the tree.
- From the Type drop-down menu, select what you want the Admin service to configure: DAS , DAS and server, or server. Selecting DAS and server is the same as selecting DAS. The server selection selects a non-DAS server instance.
- In the JMX Connector Name field, enter the name of the JMX connector used internally. The name of the connector is system.
Editing the JMX Connector Configuration
With the Edit JMX Connector screen you can edit the configuration of the JSR 160-compliant JMX Connector.
- Select Configurations from the tree.
- Select the instance to configure:
- Expand the Admin Service node and click system, which is the JMX connector used internally.
- Enter the port of the JMX connector server. The JMX service URL is a function of the protocol, port, and address, as defined by the JSR 160 1.0 Specification
- Enter the protocol that this JMX connector should support. The Application Server version 8.1 supports the rmi_jrmp protocol only.
- In the Realm Name field, enter the name that represents the special administrative realm. All authentication will be handled by this realm.
- Select the Enabled checkbox to indicate that transport layer security should be used in the JMX connector. If you enable transport layer security, fill out the SSL section by following the instructions in Configuring Security for the Admin Service’s JMX Connector.
Changing the J2SE Software
The Application Server relies on the Java 2 Standard Edition (J2SE) software. When the Application Server was installed, the directory for the J2SE software was specified. For instructions on changing the J2SE software, see Configuring the JVM General Settings.
Using Online Help
The Admin Console’s online help is context-sensitive: When clicking the Help link in the upper right corner, the help browser window displays a topic related to the current Admin Console page. If the current page has no help information, the Using Online Help topic is displayed.
The online help includes conceptual topics that are not context-sensitive. To view one of these topics, select it from the table of contents in the help browser window.
To go back to the previous help screen:
If you do not find the information you’re looking for, check the Application Server Administration Guide, available online at:
http://docs.sun.com/Further Information
- Sun Microsystems Wordlwide Training - Over 250,000 students each year are trained by Sun and its authorized centers through Web-based courses and at over 250 training sites located in more than 60 countries. For more information, see:
http://training.sun.com/- The J2EE 1.4 Tutorial - Written for developers, the tutorial has administrative instructions for configuring JMS, setting up JavaMail resources, and managing security. To access the tutorial, go to this URL:
http://java.sun.com/j2ee/1.4/docs/tutorial/doc/index.html- Application Server Developer’s Guide - This guide contains development information that is specific to the Application Server. The Developer’s Guide is available at:
http://docs.sun.com/- The
asadminman pages - Available in HTML format, these pages include syntax and examples for all the application server utilities including theasadminutility commands. These HTML pages are posted at the following URL:http://docs.sun.com/- Application Server Release Notes - Available online at:
http://docs.sun.com/- Getting Started With J2EE Connectors - This document has instructions for configuring connectors (resource adapters), connection pools, and connector resources:
http://java.sun.com/j2ee/connector/- docs.sun.com: Sun Product Documentation - From this site you can search for and access all of our product documentation:
http://docs.sun.com/- J2EE 1.4 Documentation page - Located on our public Web site, this page has links to the technical documentation for the J2EE 1.4 platform:
http://java.sun.com/j2ee/1.4/docs/- The Quick Start Guide - This document shows you how to deploy and run a simple Web application. The guide is in the install_dir
/docs/QuickStart.htmlfile.