| C H A P T E R 10 |
|
Controlled Access Mode |
This chapter describes Controlled Access Mode (CAM) as well as how to deploy, install, and configure your system to allow controlled, simplified access to anonymous users without compromising the Sun Ray server's security. Controlled Access Mode was formerly called Kiosk Mode.
The Sun Ray system is well-suited to host a CAM application, such as public terminals in an airport. In CAM, a user accesses only specified applications. The user does not need to pass security to log in or to use a smart card.
The CAM feature is administered through the Sun Ray Administration Tool or through the Command-line Interface (CLI).
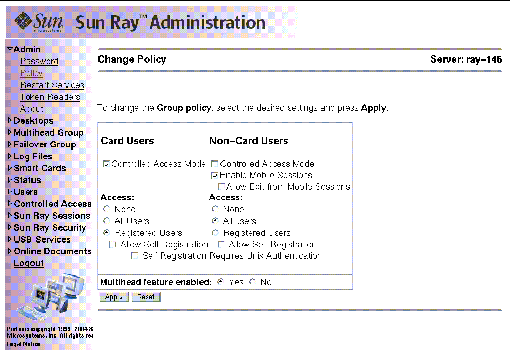
CAM is a policy decision that affects system-level operations. Turn controlled access mode on and off in the Change Policy section of the Admin function of the Administration Tool. You can enable the CAM Policy option for smart card users, non-smart card users, or both.
When controlled access mode is turned on, kiosk.start uses scripts to choose temporary users and home directories, then uses the kiosk.conf file to configure and populate the user's environment and to launch enabled applications. When a session terminates, kiosk.start cleans up all the files and entries related to the session, then recreates the environment for a new user.
1. Start the Administration Tool.
2. Select the arrow to the left of Admin to expand the navigation menu.
4. For smart card users, select the Controlled Access Mode check box in the Card Users column.
All smart card users get a Controlled Access Mode session.

5. For non-smart card users, select the Controlled Access Mode check box in the Non-Card Users column.
7. Select the Restart Services option in the Admin menu.
8. Under Scope, click the Local or Group radio button, depending on the failover scenario.
9. Click the Cold Restart button.
1. Click the arrow to the left of Controlled Access Mode in the navigation menu.
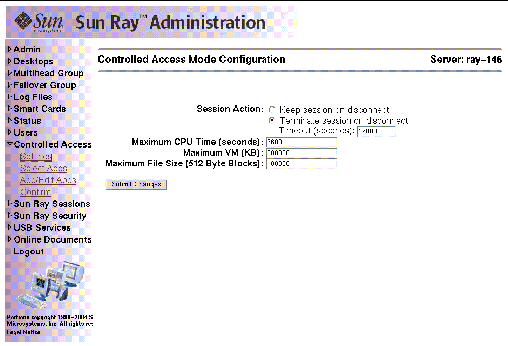
This panel is where the action parameters are set for the Controlled Access Mode. The values define how a session is managed.
3. Click the Submit Changes button to store the action parameters in the /var/opt/SUNWut/kiosk/kiosk.conf file, which is the controlled access mode configuration file.
The Controlled Access Mode Configuration panel is displayed.

The default settings for each controlled access mode session can be edited from this panel. The Session Action option determines whether sessions remain resident after having been disconnected. If you choose the option to kill the session (the default), the Timeout text box value determines how long to wait before killing the session.
The default values in the maximum CPU, VM, and File Size text boxes are set with the ulimit command. These limits contain the CAM user processes.
4. Click the Confirm link in the navigation menu to save the changes.
5. Click the Confirm Configuration button.
6. Click the arrow to the left of Admin to expand the navigation menu.
7. Click the Reset Services link.
8. Select the Local or Group radio button, depending on the failover scenario.
 As superuser, type the utpolicy command for your authentication policy with the addition of the -k argument. For example:
When CAM is enabled, dtsession is launched by default to provide basic Controlled Access Mode functionality; however, you may choose to use a different window manager. Additional applications need to be added to the user's session to extend this basic functionality. Possible applications include:
|
Tip - Complete your additions and edits in the Add/Edit Apps section and your selections in the Select Applications section before clicking the Confirm link. |

1. Click the Add/Edit Applications link from the Controlled Access Mode menu.
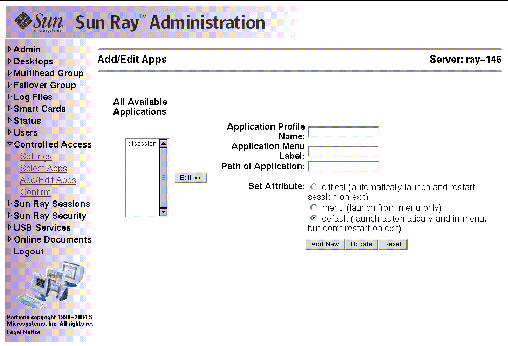
The Add/Edit Apps window is displayed.
2. Enter a profile name, a menu label, and a path to the application.
In the Path of Application text field:
3. Set the application behavior by clicking one of the radio buttons.
The new application is added to the Available Applications list.
The confirm panel is displayed.
6. Click the Confirm Configuration button.
The Confirm link sends kiosk.conf information to the internal Sun Ray database. This information is then replicated to the failover group. After defining a user's session by writing the kiosk.conf file, you must restart failover services to propagate the configuration to all the servers in a failover group.
7. To enable the newly added application, go to the Select Applications panel and add the application to the Applications to Launch list.
All applications must be accessible to all servers in the failover group. Add new applications to all servers in a failover group.
1. Click the Add/Edit Applications link from the Controlled Access Mode menu.
The Add/Edit Apps window is displayed.
2. Highlight the application in the All Available Applications list that you want to change and click the Edit button.
The fields on the right are populated. If, for example, you want to change a default application to be a critical application, you must edit the application and change the attribute to critical.
3. Make the changes and click the Update button.
The application information is updated.
The confirm panel is displayed.
5. Click the Confirm Configuration button.
6. If the application is enabled, click the Reset Services link in the Admin menu.

1. Choose Select Applications from the Controlled Access Mode menu.
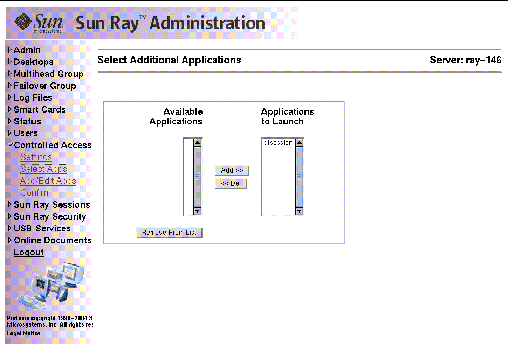
This panel lists the other applications that are available for the user's sessions. In FIGURE 10-4, there are default applications and two possible additional applications you can make available to the user.
2. In the Available Applications column, highlight the application that you plan to add.
3. Click the Add button to add it to the Applications to Launch column.
The confirm panel is displayed.
5. Click the Confirm Configuration button.
6. Under the Admin menu, click the Reset Services link.
1. From the Controlled Access Mode menu, click the Select Applications link.
2. In the Applications to Launch list, highlight the application that you want to make unavailable.
This moves the application back to the Available Applications list.
The confirm panel is displayed.
5. Click the Confirm Configuration button.
6. Under the Admin menu, click the Reset Services link.
1. From the Controlled Access Mode menu, click the Select Applications link.
2. In the Available Applications list, highlight the application that you want to remove.
3. Click the Remove From List button.
This completely removes the application.
The confirm panel is displayed.
5. Click the Confirm Configuration button.
To customize the CAM user's environment further, you can use prototypes or wrapper scripts to enhance application behavior. Prototypes enhance application behavior by providing files in the user's home directory specific to that application.
|
Note - Prototypes must be duplicated on each server in a failover group. |
|
Note - When you add new applications, the name of the prototype directory must match the name in the Application Profile Name field of the Administration Tool. |
1. Create a directory with the same name as the application profile name provided in the Add/Edit Applications section of the Administration Tool:
2. Populate the new prototype directory with files specific to that application:
If the application is enabled, everything below the prototype directory is copied recursively to each user's home directory at runtime by the Controlled Access Mode startup scripts. For example, at runtime, there is a dtsession prototype directory that matches the application profile name, dtsession.
If an application requires specific environment variables to be set or if you need to launch the application instead of simply providing the path to the application with options, you can use a wrapper script.
 When you add the application using the Administration Tool, provide the path to the wrapper script instead of a path to the executable:
This example wrapper script customizes the right-click menu button to reflect application labels for menu or default-attributed applications. The script then launches dtsession.
 Alternatively, put the wrapper script in the directory where the Controlled Access Mode program checks for wrapper scripts:
In this case, the wrapper scripts must have the same name as the path of the application entered in the Add/Edit Applications tab. For an example of a wrapper script, refer to ControlledBrowser, which is installed when cbinstall is executed. The cbinstall script is found in the Supplemental directory on the CD-ROM, in the /opt/SUNWut/kiosk/wrappers directory.
|
Note - Wrapper scripts in /opt/SUNWut/kiosk/wrappers are sourced rather than executed. Any wrapper script you put in this directory must set waitPIDs. |
Customers may want to set up their CAM displays to emulate their own corporate logos or other display artifacts. The following procedures suggest how to modify the CAM display.
1. Run xv (version 3.10 or later) on any desired image.
2. Save the file as "XPM". Rename the file from <>.xpm to <>.pm.
3. Edit the file /opt/SUNWut/kiosk/prototypes/dtsession/Dtwm and change the two backdrop lines to the full pathname of the <>.pm file.
You can also place the <>.pm file in /usr/dt/share/backdrops and then refer to it by <> in the Dtwm file.
|
Note - For your personal CDE workspace, you can save this file in $HOME/.dt/backdrops, log out and back in, then set your workspace backdrop to NoBackdrop using style manager. |
The menu is created from three files in /opt/SUNWut/kiosk/bin:
kiosk.menu
dtwmrc.header
dtwmrc.footer
It uses /usr/dt/config/$LANG/sys.dtwmrc where $LANG most likely = "C" as a base.
1. Copy this file up to the local directory.
2. Change the kiosk.menu script to use your modified file for further tweaks.
kiosk.menu puts the final menu product together, and adds in the applications that are selected in the CAM configuration.
 Edit the file /var/opt/SUNWut/kiosk/kiosk.conf.
This creates a debug file /var/tmp/kiosk.$PID.
|
Note - This file gets reset, however, when the services are reset; the debugging output may be rather weak. |
Since Controlled Access Mode bypasses a login mechanism, you must consider the security of the applications added to the user environment. Many custom applications provide built-in security while other applications do not and, therefore, are not suitable for Controlled Access Mode.
For example, adding an application, such as xterm, provides users with access to a command-line interface from a Controlled Access Mode session. This would not be desirable in a public environment and is not advised. However, using a custom application for a call center would be an ideal situation. See Appendix A for an example of an application modified for Controlled Access Mode.
In a failover environment, the administrative settings in the kiosk.conf file are copied to the failover servers. Be sure that all application paths added to the Controlled Access Mode sessions are copied across the servers in the failover group. For example, if the Netscape application is added to the sessions with the executable path, /usr/local/exe/netscape, make sure that the path to the binary is available to all servers in the failover group.
Controlled Access Mode sessions use their server's default locale.
|
|
 Add the following line to the end of the /etc/default/init file:
The new locale is used by the Controlled Access Mode sessions.
|
Note - Adding this line changes the locale for all users on this server. |
Copyright © 2004, Sun Microsystems, Inc. All Rights Reserved.