| Sun ONE Web Server 6.1 Getting Started Guide |
Chapter 3
Enabling Access ControlEvery virtual server hosts one or more web sites. By default, everyone can access all the content on each web site. Sometimes, however, such unrestricted access might not be desirable and you might want to protect parts of your web site against unauthorized access. You can do so by setting up access control on your server.
Access control is a way of specifying who can access resources such as directories and files on your server, and what access they can have. You can allow or deny access to specified users and groups using ACLs (Access Control Lists).
There are two types of access control:
Host-based access control. This enables you to control access according to specific computers. You can identify the computer by either IP address or host name. All users accessing your site from a permitted computer are allowed access to resources.
User-based access control. This offers more security than computer-based access because users must supply a valid username and password before they can access your site. If you want to use user-based access control, you’d have to set up user and group accounts first.
This section describes basic tasks associated with setting up native access control. Native access control provides authenticated access for both Java-based and non-Java applications. However, if you plan on deploying Java web applications, you could also choose to leverage the benefits of Java-based security realms. The various aspects of Java security constraints are outside the scope of this guide but are discussed in detail in the Sun ONE Web Server 6.1 Programmer’s Guide to Web Applications.
Let’s walk though a simple exercise to see how a native ACL is configured. In this example, we will use combination of host-based and user-based access control. We will perform the following tasks:
Let’s assume that we want to allow access to all files under /hr/publish/manager to a user named “manager” at Acme Corp.
Since we shall be using user-based access control (in addition to host-based access control), we first need to create a directory service.
Create a Directory Service
A directory service allows you to authenticate and authorize users and groups. We can configure a directory service in one of the following ways:
In this example, we will set up user information in a file.
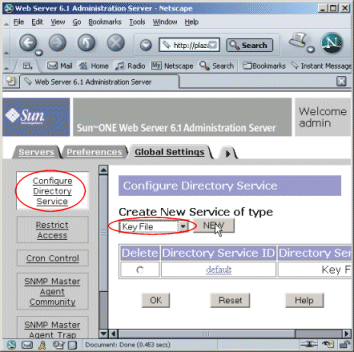
- Access the Administration Server and choose the Global Settings tab.
- Click the Configure Directory Service link.
- From the Create New Service of Type drop-down list, choose Key File as the type of directory service. This is a text file that contains the user’s password and the list of groups to which the user belongs.
- Click New.
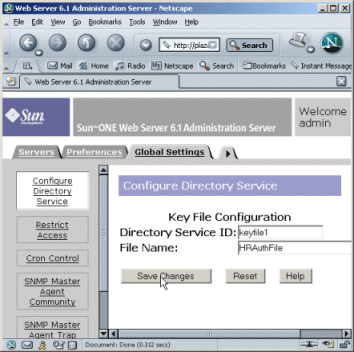
- Specify “keyfile1”as the Directory Service ID and “HRAuthFile” as the name of the file, as shown below:
- Click Save Changes.
- Restart the server for the changes to take effect.
Now that we’ve created a file-type database, “HRAuthFile”, we need to add users to it.
Add a User
We start with creating a user ID called “manager.” This will represent the person who needs to have access to all the files in /hr/publish/manager.
A new user is added to the file: “HRAuthFile.”
Next, we need to associate our virtual server, hr.acme.com, with the directory service we’ve created.
Specify a Directory Service for a Virtual Server
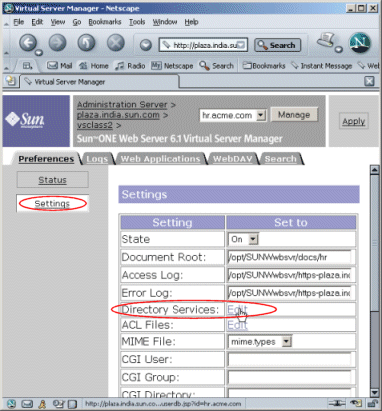
- Access the Virtual Server Manager and click the Settings link to bring up the Settings page for the virtual server, hr.acme.com.
- Click the Edit link next to the Directory Services setting.
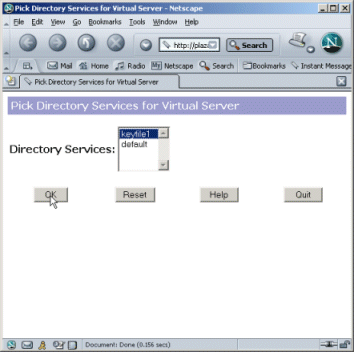
- Select keyfile1 in the Pick Directory Services for Virtual Server page as shown below:
- Click OK and then Apply to save and apply your changes.
We’re now ready to specify the required access control rules.
Set Access Control
We start out by creating an ACL for the virtual server hr.acme.com.
- Access the Server Manager and choose the Preferences tab.
- Click the Restrict Access link.
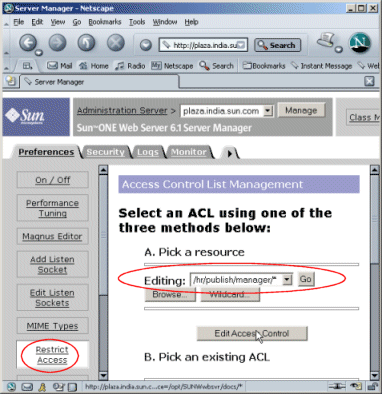
- Under the Option column, select the ACL file. We choose the default file in our example.
- Click OK.
The Access Control List Management Page appears.
- Select Pick a Resource and then specify the following wildcard pattern to control access to all files in the /hr/publish/manager directory :
/hr/publish/manager/*
- Click the Edit Access Control button.
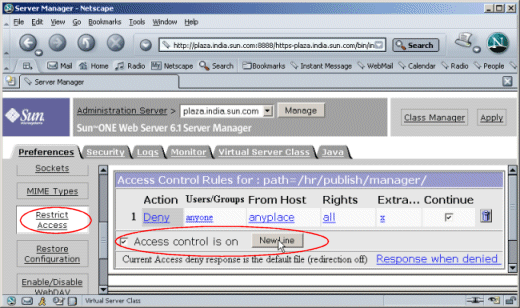
- Check the “Access control is on” checkbox, if not already selected, and click the New Line button.
- Click on Deny in the second row of the Action column.
This opens the Allow /Deny page in the lower frame:
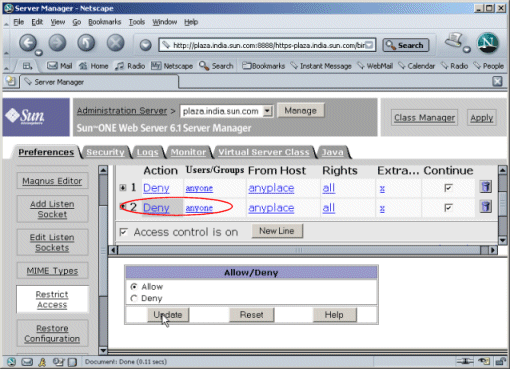
- Click Allow, if it isn’t already selected by default, and then click Update.
- Click on “anyone” in the Users/Groups column, in the top frame.
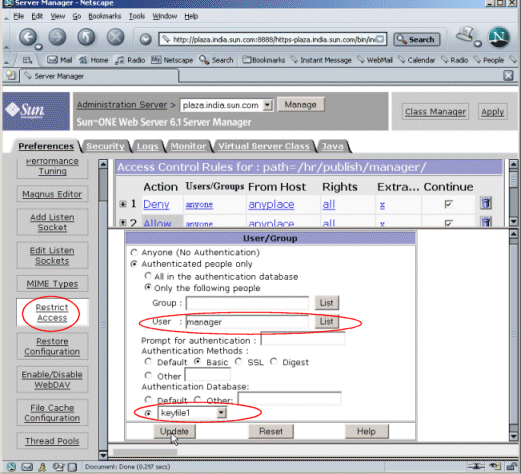
- Enter “manager” as the user you will allow access to, and keyfile1 as the authentication database, in the User/Group page that appears in the lower frame, as shown below
- Click Update.
- Click Submit to store the new access control rules in the ACL file.
- Click Apply Changes and save and apply the changes you’ve made.
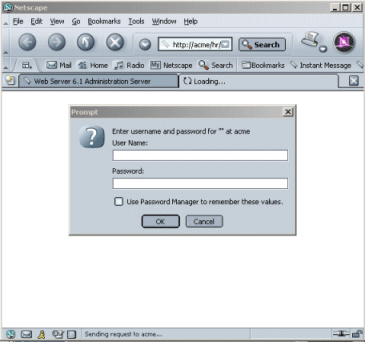
Once, an ACL is set, users accessing the site will be required to authenticate themselves before they are allowed access, as shown below: