| Sun ONE Web Server 6.1 Getting Started Guide |
Chapter 7
Setting Up Database ConnectivityWeb applications leverage the benefits of the component-based Java™ 2 Platform, Enterprise Edition (J2EE™) technology, which include scalability and speed.
Web components, Java Servlets or JSP pages, provide the dynamic extension capabilities for Sun ONE Web Server 6.1. Servlets and JSP pages are supported by the services of a runtime platform called a web container. The web container provides services such as request dispatching, security, and concurrency. It also gives web components access to APIs such as naming, datasources, and e-mail.
In this chapter, we will work with a sample application that uses the Java™ Database Connectivity (JDBC™) API to record greetings to a database.
In this chapter you will define the necessary JDBC-related settings in the web server environment prior to deploying and exercising the sample.
Install and Configure the JDBC driver
JDBC configuration involves setting up a JDBC driver, defining a JDBC connection pool, and registering the JDBC resources used by your application.
A JDBC driver must be configured in the classpath of the web server before you can exercise applications that use JDBC. In this example, we use the PointBase JDBC driver.
To install and configure PointBase for use with the sample applications, follow these steps:
Download and Install PointBase Server and Client Products
Download the PointBase evaluation software from http://www.pointbase.com/.
Install at least the PointBase Server and Client products on your system. The PointBase Client product includes the PointBase Type 4 JDBC driver.
Add PointBase Type 4 JDBC Driver to the Web Server's Classpath
- Open the server-instance/config/server.xml file of the web server instance. Add the location of the PointBase driver in the classpathsuffix.
You can find the JDBC driver under <pointbase_install_dir>/lib/.
The driver is named pbclientnn.jar where nn represents the version of PointBase.
- Restart the web server to make the server aware of the driver.
Alternatively, you can specify the location of the PointBase driver in the Classpath Suffix field in the web server’s configuration:
- Access the web server instance's Java tab -> Java Path Settings page to make this change.
If a PointBase JDBC driver is already configured in the Classpath Suffix field, replace it with the path to the newly installed driver.
- Once you’ve changed the Classpath Suffix field, apply the changes and restart the web server instance.
Start the Database Server
The database server can be easily started by performing one of the following actions:
On Windows Platforms:
Execute: <pointbase_install_dir>/tools/server/startserver.bat
On UNIX Platforms:
Execute: <pointbase_install_dir>/tools/server/startserver.sh
Once you execute the startup script, you will see the following text in either a command window or at the UNIX terminal prompt:
Server started, listening on port 9092, display level: 0 ...
Create a Database and Table
For information about creating and maintaining a database using PointBase, refer to the database documentation. After you have created a database, you need to use the following script to create the table 'Greeting', which will record application entries: <install_root>/plugins/java/samples/webapps/jdbc/simple/src/sql/jdbc-simple-pb.sql
Define the JDBC Connection Pool
Before running the sample application, you need to define a suitable JDBC connection pool that maps to the PointBase database server and a JDBC resource that associates the JDBC references made in the sample application to the JDBC connection pool definition.
- Through a web browser, access the administration server interface. (You might have to start the administration server if it is not running).
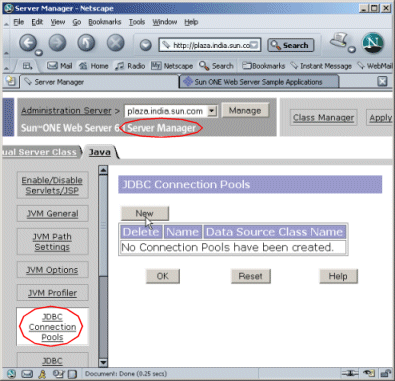
- Select the Java tab in the server instance and click JDBC Connection Pools
- Click New, and select the JDBC driver, as shown below:
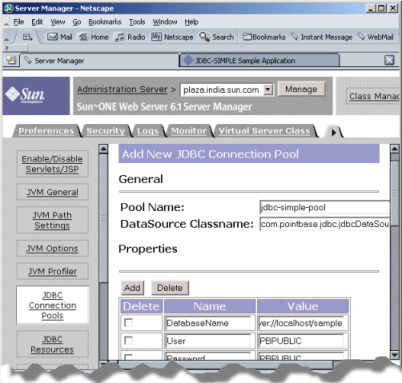
- In the Add New JDBC Connection Pools page, we’ve specified the following settings and left the rest unmodified:
- Click OK and then Apply to save and apply your changes.
Define the JDBC Resource
Now that the JDBC connection pool definition has been created, you are ready to define a JDBC resource and associate it with the connection pool entry.
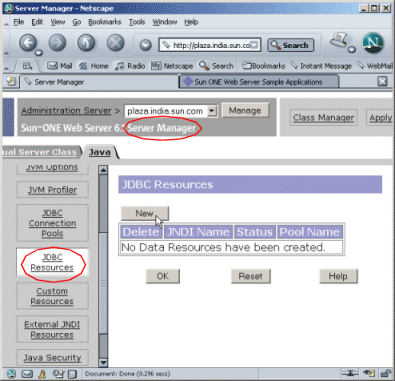
- Under the Java tab of the server instance, click the JDBC Resources link.
- Click the New button to define a new resource entry.
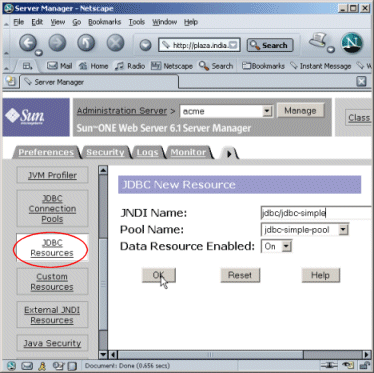
- Since the sun-web.xml file of the sample web application refers to the JNDI Name of the resource as "jdbc/jdbc-simple", you need to define the JDBC resource with this same JNDI name.
Set the fields to the following values and click the OK button to define the resource:
- Click OK and Apply to save and apply your changes.
After you’ve set up database connectivity, you’re ready to deploy the jdbc-simple sample web application that uses these newly created JDBC resources. You can find this sample application at the following location:
install_root/plugins/java/samples/webapps/jdbc/simple/jdbc-simple.w ar
To deploy this sample application, follow the steps outlined in Chapter 6, "Running Java Web Applications On Your Server."