|
|
| Sun ONE Portal Server Developer's Guide |
Chapter 2 Using Provider API (PAPI)
This chapter provides an overview of the SunTM ONE Portal Server software Provider Application Programming Interface (PAPI) and includes instructions for developing a custom provider by extending the PAPI.
This chapter contains the following sections:
- Overview of the Provider API and Desktop Servlet
- Overview of Implementing a Custom Provider
- Instructions for Extending the PAPI
Overview of the Provider API and Desktop Servlet
Figure 2-1 shows the relationship between the various interfaces, classes, and exceptions discussed in this chapter. For detailed information on these interfaces, classes, and exceptions, see the Javadocs at http://servername:port/portal/javadocs.
Figure 2-1 The Provider Application Programming Interface (PAPI)

The Provider API
This section provides an overview of the interfaces (see Provider, ProviderWidths, and ProviderEditTypes), base classes (see ProviderAdapter, ProfileProviderAdapter), context (see ProviderContext), exceptions (see Exceptions), and the lifecycle of the provider.
Provider
The Provider interface clearly defines the communication channel between a container and a provider. The container may be the DesktopServlet, or another provider object. The methods defined in the Provider interface supply the basic handshaking required for a container to display the content from a provider object.
A provider can implement this interface. Clients of the Provider interface call the methods in this interface to query information or to perform an action in the provider. Such clients include, but are not limited to, the DesktopServlet and other channels (container channels).
There are essentially two types of methods in this interface:
- Methods that handle actions - this includes getContent(), getEdit(), and processEdit() methods.
- Methods that facilitate the handling of actions - this includes all methods that begin with is and get (minus the get* methods used for handling actions).
See the Javadocs for more information on the methods in this interface.
ProviderAdapter
The ProviderAdapter class implements aspects of the Provider using the ProviderContext. The ProviderAdapter class implements the ProviderWidths interface, which defines the provider widths, and ProviderEditTypes interface, which defines the edit types, making the constants defined in these interfaces available to classes that extend ProviderAdapter.
Developers who wish to implement a provider can extend this class or the ProfileProviderAdapter class for forward compatibility and convenient access to the ProviderContext interface.
ProfileProviderAdapter
The ProfileProviderAdapter is a subclass of the ProviderAdapter that includes convenience wrappers around some commonly used methods in the ProviderContext interface, like get/set*Property(), exists*Property(), get/setStringAttribute(), and getTemplate().
The advantages of using the wrapper methods in the ProfileProviderAdapter class as opposed to using the methods in the ProviderContext interface are the following:
- For example, the ProviderContext.getStringProperty accepts the channel name as an argument. Since the ProfileProviderAdapter knows the channel name, it can use ProfileProviderAdapter.getStringProperty() method without providing the channel name.
- All of the methods in ProviderContext throw a ProviderContextException. The analogous methods in ProfileProviderAdapter throw a ProviderException. For example, when implementing the getContent() method, since this method is already defined to throw a ProviderException, when a client calls ProfileProviderAdapter.getStringProperty() inside the getContent() method, you need not implement a try-catch block. However, if you use ProviderContext.getStringProperty(), you must catch the ProviderContextException.
ProviderContext
The ProviderContext interface provides information pertaining to the environment that a provider object is executing within. Such information may be specific to the user, to the web container, or be global (shared between multiple users). This interface does not define what information falls into each of these categories; this is left up to the implementation.
The ProviderContext forms the layer between the services used by the provider and the provider implementation thus isolating the provider code from specific service interfaces and implementations. It defines the service interface for the Desktop, and allows different implementation to access the actual data.
The following are some of the methods in the ProviderContext:
- Service (data/functions pertaining to the Desktop service): getDesktopURL(), getLocaleString(), getLocale(), getDesktopType(), getLogoutURL(), getStringAttribute(), setStringAttribute(), getDefaultChannelName()
- Servlet (data/functions pertaining to the servlet): getRequestServer(), getServletConfig()
- Client type (data/functions pertaining to the client device type): getClientTypeProperty(), getDefaultClientType(), getClientType(), getCharset(), getClientPath(), getContentType()
- Session:
- Data/functions pertaining to the user's session: get/setSessionProperty(), getSessionID(), getUserID(), encodeURL()
- Data/functions pertaining to per-client properties: get/setClientProperty()
- Data/functions pertaining to the debug service: isDebugEnabled(), isDebugErrorEnabled(), isDebugWarningEnabled(), isDebugMessageEnabled(), debugMessage(), debugWarning(), debugError()
- Data/functions pertaining to template access: getTemplate(), getTemplatePath(), getTemplateMostSpecificPath()
- Data/functions pertaining to channel properties: getProviderName(), getClassName(), getNames(), get/set*Property(), exists*Property()
- Data/functions pertaining to config properties: getStaticContentPath(), getConfigProperty()
ProviderWidths
The ProviderWidths interface defines the widths that can be returned from the Provider.getWidth() method. The width is a suggestion to a client of a provider object as to how much screen real estate should be given to display the provider's default view.
- The provider can be displayed in a thick frame (WIDTH_THICK).
- The provider can be displayed in a thin frame (WIDTH_THIN).
- The provider can be displayed in a full_top frame at the top (WIDTH_FULL_TOP).
- The provider can be displayed in a full_bottom frame at the bottom (WIDTH_FULL_BOTTOM).
ProviderEditTypes
The ProviderEditTypes interface defines the edit types that can be returned from the Provider.getEditType() method. The edit type informs a client of a provider object what it can expect to be returned from the provider's getEdit() method. The edit type can be EDIT_COMPLETE or EDIT_SUBSET.
- EDIT_SUBSET - Indicates that the edit page is not a complete document. This value is potentially returned from getEditType() to signify that the buffer returned is only a subset of a document. This is useful for providing a common look and feel for a set of common portal pages. That is, it allows the channel's edit page to look and feel according to the container that it exists within although the same channel might appear in two different containers that have very different look and feel.
- EDIT_COMPLETE - Indicates that the edit page is a complete document. This value is potentially returned from getEditType() to signify that the buffer returned is a complete document. This can be used in cases where the provider must have control over the entire page.
Exceptions
The Desktop expects a provider to only throw ProviderException or a subclass of the ProviderException. For correct operation, a provider must only throw expected exception type. That is:
- Minor exceptions can be managed internally, for example, log a debug message.
- Serious exceptions can be rethrown as an expected exception type.
Exceptions from providers are logged in /var/opt/SUNWam/debug/desktop.debug file.
ProviderException
The ProviderException is a generic superclass for all provider related exceptions.
AsciiFormInputExpectedException
The AsciiFormInputExpectedException will be thrown from Provider.processEdit method when something other than ASCII only encoded form input is sent to it.
InvalidEditFormDataException
The InvalidEditFormDataException is thrown from the Provider.processEdit method when there is an error in the data input by the user. If thrown, the Desktop will send back the same Edit page, and will attach the exception's message as a parameter to the URL. For example, if the exception is:
throw new InvalidEditFormDataException("Error Error");
the Desktop will redirect back to the same Edit page, adding the error message to the URL error parameter:
error=Error Error
The edit page wrapper then looks for the error parameter in the URL and if present, displays the message at the top of the page in red.
UnknownEditTypeException
The UnknownEditTypeException may be thrown from Provider.getEditType() method if an unknown or undefined edit type is encountered.
The Provider Life Cycle
This section describes the lifecycle of the provider per user session. Figure 2-2, Figure 2-3, and Figure 2-4 shows how the Desktop handles each user session.
A session is created at the time the user logs in to the portal Desktop and ends when they logout. The session also ends when the user session is idle, or when the session times out. For authless logins, a single session is shared amongst all clients accessing the Desktop in authless mode, and the authless session never dies.
For each request, the DesktopServlet will validate the user session; if it is a valid session, the DesktopServlet will start to process the request. If a session does not exist, the DesktopServlet will create a session.
The creation of the provider context is equivalent to the creation of a session. The container provider context object is generated and maintained, one per session. So each time a request comes in, the cached container provider context object is used. For example, in Figure 2-2, when the first initial request comes in, the container provider context is created and initialized, and when the subsequent requests come in, as in the reload and logout requests shown in Figure 2-3 and Figure 2-4 respectively, the cached container provider context is returned.
The container provider context maintains a list of its contained provider objects and their cached content locally. Contained providers are created and initialized once per session, and their content is cached in the provider context object. Subsequent requests access the cached provider objects that live inside the provider context object.
The contentChanged() and allContentChanged() methods signify that either the content for one channel or all channels has changed, respectively. This is used to remove all the cached content for the channels, as well as to clear the cached provider objects. When the requested action is logout, as shown in Figure 2-4, the DesktopServlet will redirect the request to the logout URL, and the session will be destroyed. At this point, the provider context object is removed from the cached list, and ready for garbage collection. Also, if the session expires or timesout, the provider context object is removed from the cached list.
Figure 2-2 and Figure 2-4 shows a sample of how the content and logout actions are processed. For detailed information on how the DesktopServlet and the backend providers handle each action (including content and logout), see "The DesktopServlet."
Figure 2-2 The Provider Life Cycle - Initial Request for Authenticated User
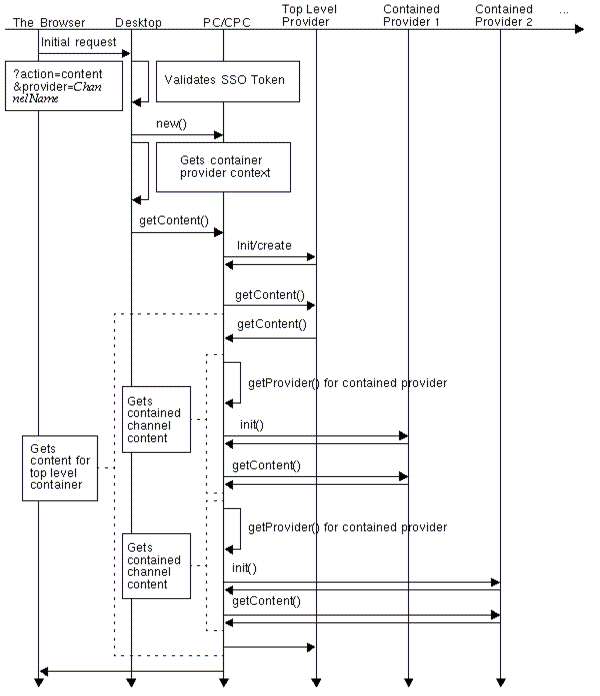
Figure 2-3 The Provider Lifecycle - Desktop Reload Request for Authenticated User
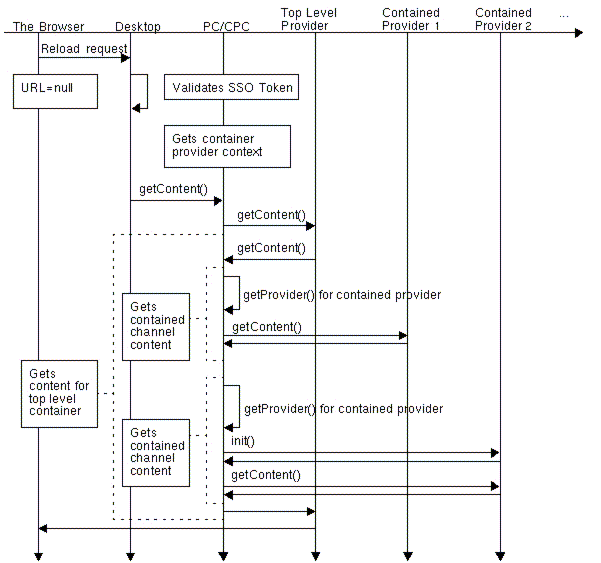
Figure 2-4 The Provider Lifecycle - Logout Request

The DesktopServlet
This section provides an overview of the DesktopServlet and discusses the relationship between the DesktopServlet and the PAPI. It provides information on how the DesktopServlet uses the various methods in the PAPI to perform the various actions (such as content, edit, process, and logout).
Introduction
The DesktopServlet co-ordinates the drawing of the Desktop, dispatches the process to the target channel based on the information stored in the underlining services, and validates the user with the iPlanetTM Directory Server Access Management Edition software.
In this sense, the DesktopServlet is a router of requests. It catches requests for content and processing, and passes them on to the specific provider object. Whenever a provider throws an exception which can not be handled by the container provider, the exception will propagate all the way up to the DesktopServlet, and the DesktopServlet will display an error page.
For detailed information on how the DesktopServlet creates and validates a user session and creates and gets the provider context object, see the "The Provider Life Cycle." The following sections only describe how the DesktopServlet handles the various actions.
DesktopServlet Actions
The DesktopServlet understands several actions. Every action has an associated channel or container name and actions are performed on the associated channel or container. Actions are passed to the servlet via request parameters. The associated channel name is also passed as a parameter.
For example, to perform an action on a channel, pass in the following parameters to the servlet:
DesktopServlet_URL?action=actionType&provider=ChannelName
Here:
- action - indicates the type of action to take. Action can be content, edit, process, or logout.
- provider - indicates the name of the provider to contact. The provider argument is named that way for historical reasons; the value of the provider argument is really a channel or container name. If the provider parameter is absent or null in the request, the servlet assumes it is equal to the value of the last request. For the initial request, if the provider parameter is absent, then the defaultChannelName from the Desktop service will be used.
The action and provider parameters are not required; if they are absent, the default to action is content, and provider is the value set in the Desktop service for the default channel.
The content, edit, and process actions map directly to method calls into the PAPI. For Desktop actions that map to PAPI method calls, the servlet passes an HTTP request and response object to the respective provider method. These objects are not the same objects passed into the servlet. The request and response objects passed to provider objects from the servlet are wrappers around the original request and response passed into the servlet. This is because there is certain functionality that is available from request and response objects that is not applicable to a provider. See the Javadocs for the Provider interface for more information.
The HTTP parameters in the original request object are processed before they are copied to the wrapper servlet request and response objects. As part of this processing, the parameters are decoded from the character set encoding used to represent the page into Unicode that is used in Java String objects. Therefore, the parameters that are passed to the providers are all stored as Unicode, and the provider does not have to do any decoding of its own related to the character encoding for the page.
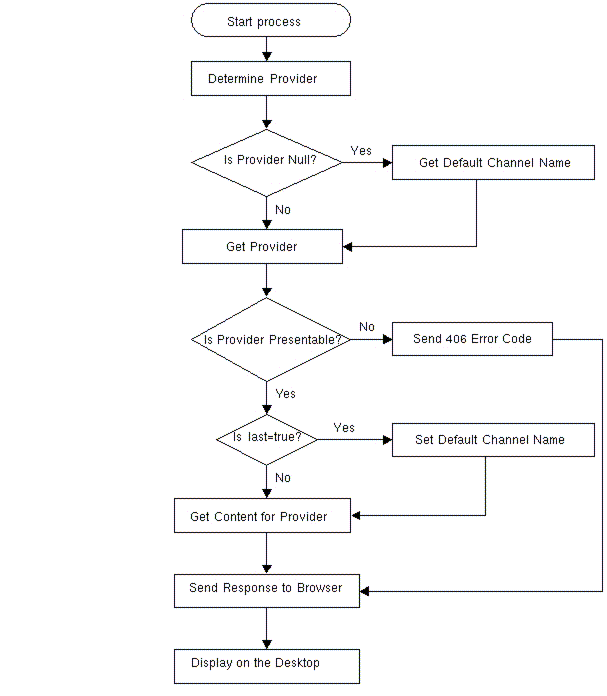
Action content
When the action is content, the DesktopServlet gets the named channel's main content. When the DesktopServlet receives a request where the action is content, to perform the content action on the channel, it takes the following parameters:
DesktopServletURL?action=content&provider=ChannelName[&last=false]
The content action maps directly to the following method calls in the PAPI: ProviderContext.getDefaultChannelName(), Provider.isPresentable(), and Provider.getContent().
The flowchart in Figure 2-5 shows the various methods executed in the backend to process the content action. When the client makes a request for content (say after login), the DesktopServlet:
- Determines the provider responsible for generating the requested content.
If provider is null, it uses the default channel name (stored in the DefaultChannelName attribute) to get the provider. The default channel name is an iPlanet Directory Server Access Management Edition software attribute (DefaultChannelName) in the Desktop service, which is set to the top most container that represents the whole Desktop view. The default channel name is set to the current target provider value when the request parameter last equals to true. If the provider is not null, the DesktopServlet gets the provider responsible from the HTTP parameter in the URL for generating the requested content.
- Once the provider is determined, the provider's isPresentable() method is invoked to determine whether or not the provider can be presented to the requesting client.
If the provider is determined to be not presentable, an error is thrown on the Desktop. If the provider can be presented, the provider's getContent() method fetches the content for display on the client's Desktop.
- When last is set to false, the DesktopServlet will not set the last channel to the value of the provider parameter. If not specified, the default setting is last=true, and the last accessed channel is set to the value of the provider parameter.
The next time when the action is content, the DesktopServlet provider parameter will be used to fetch the content. If the provider parameter is absent in the request URL, the DesktopServlet assumes it is equal to the value of the last request.
Figure 2-5 DesktopServlet content Action
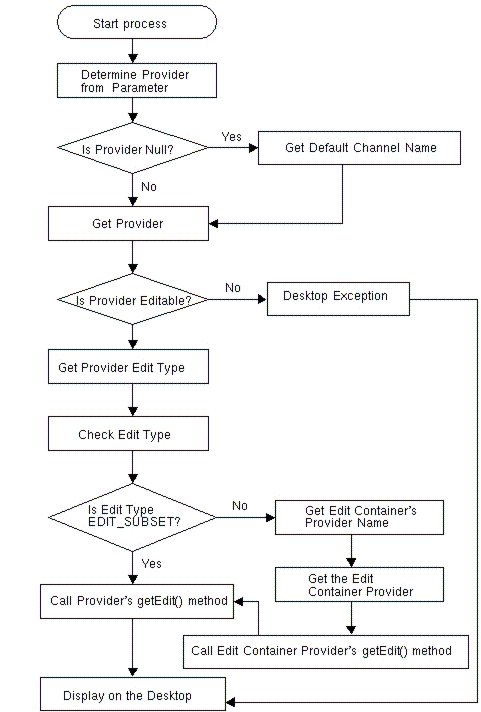
Action edit
When the action is edit, the DesktopServlet gets the named channel's editable parameters. When the DesktopServlet receives a request where the action is edit, to perform the edit action, it takes the following parameters:
DesktopServletURL?action=edit&provider=ChannelName for backward compatibility
The DesktopServlet checks the edit types based on the values defined in the ProviderEditTypes interface.
The flowchart in Figure 2-6 shows the various methods executed in the backend to process the edit action. When the client makes a request to edit the channel's editable parameters, the DesktopServlet:
- Determines the provider responsible for generating the requested content.
If provider is null, it uses the default channel name to get the provider. Default or last accessed channel is not assumed when action equals edit. Otherwise, the DesktopServlet gets the provider responsible specified in the URL.
- Once the provider is determined, the provider's isEditable() method is invoked to determine whether or not the provider can be edited by the user.
The DesktopServlet gets the named channel's isEditable property. If the provider is determined to be not editable, an exception is thrown on the Desktop. If the provider can be edited, the DesktopServlet also checks the editType for that channel. The editType is a channel property that can be retrieved via the Provider.getEditType() method. The provider's getEditType() method is invoked to determine the type of edit page to return on the Desktop.
- If the provider's edit type is:
- EDIT_COMPLETE, the provider's getEdit method is invoked and the Edit page for the channel is returned on the Desktop.
- EDIT_SUBSET, the edit container's provider name will be detected, and then the edit container's getEdit() method will be invoked. The edit container's provides a common look and feel of the edit page for all the channels that it contains. After it generates the markup for the common look and feel, it delegates the process to the target channel's getEdit() method. That is, the request parameter targetprovider stores the target channel's name. Based on the name, the target channel's provider object is retrieved and the target channel's getEdit method is called.
Figure 2-6 DesktopServlet edit Action
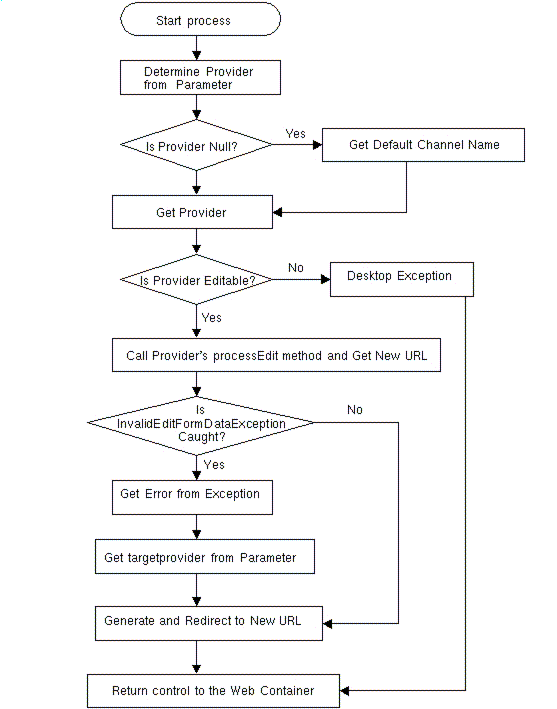
Action process
The process action allows the named channel to process URL parameters and form data, typically that of the channel's edit form. When the DesktopServlet receives a request where the action is process, to perform the process action, it takes the following URL parameters:
DesktopServletURL?action=process&provider=channelName
When the DesktopServlet receives a request where the action is process, the DesktopServlet:
- Looks at the parameters to identify which provider will handle the action, through the provider's processEdit() method.
The processEdit() method is called to process the edit page generated from the getEdit() method. The request passed in contains the parameters.
- Re-directs to the URL returned from the provider's processEdit() method.
If there is an InvalidEditFormDataException, the DesktopServlet will redirect the browser back to the channel's edit page and include a URL parameter error so that the channel may display the cause of the exception to the user. That is, the DesktopServlet will get the error message and generate a new request as follows:
?action=edit&provider=providername&error=errormessage
Figure 2-7 DesktopServlet process Action
Action logout
The logout action ends the user session. When the DesktopServlet receives a request where the action is logout, to perform the logout action, it takes the following parameters:
DesktopServletURL/dt?action=logout
When the DesktopServlet receives a request for the logout action, it redirects the browser to a URL defined by the iPlanet Directory Server Access Management Edition software iplanet-am-platform-logout-url attribute in the Platform service. By default, this attribute has the value /amserver/logout. But, If this is set to something that does not terminate the user's session, such as a static HTML page, then /portal/dt?action=logout will not terminate the user session.
Overview of Implementing a Custom Provider
This section describes the development process for a Sun ONE Portal Server provider. It touches on the public APIs available for integrating an application with the Sun ONE Portal Server software Desktop via the provider.
Before developing a custom provider, determine whether or not an existing provider can be used to serve the content. If none of the PAPIs can be used as is, determine whether or not the content can be presented by overriding one or more methods of the PAPI (see chapters 3 and 4 for information on overriding specific methods in the class file).
To develop a provider, you must start by:
- Defining Specific Requirements and Functionality that includes defining:
- Developing the Provider Class File and considering:
- Using the PAPI
- Extending the PAPI
- Creating XML Fragments for Display Profile
- Installing the Provider
Defining Specific Requirements and Functionality
Before beginning to develop a provider, determine the application specific requirements, content source, and properties of the provider.
Application Specific Requirements
- Determine the nature of the provider. Will this provider be a building block provider or will this be a content provider? The content providers are special purpose providers and the building block providers are general purpose providers. For example, the bookmark channel is special purpose, where XMLProvider is general purpose. That is, the XMLProvider can be used, in general, to connect to an XML source and translate it via XSLT to some markup language.
- Determine whether or not the content made available via this provider will be:
- Preset for the user by the administrator thus making it unmodifiable by the end-user. This will determine the logistics of the isEditable() method.
- Preconfigured for the user by the administrator, but editable by the end-user (determines the logistics of the getEdit() method). If editable, determine:
- What will and what will not be editable. That is, determine the parameters that will be configurable and those that will not be editable.
- The type of edit form to present - EDIT_SUBSET or EDIT_COMPLETE. The advantage of using EDIT_SUBSET is that the EditContainer provides a common look and feel for all providers that have EDIT_SUBSET edit type. Using EDIT_COMPLETE edit type provides more control over the overall look and feel for the edit page.
This will determine the logistics of the getEditType() and the processEdit() method.
- Determine the theme requirements for the content made available via this provider. A theme is a collection of visual elements, such as background color font face, and so on, to be used when displaying the provider's content. The themes are stored as global properties in the oranization level's display profile. Providers can use these properties in their templates or JSPs to achieve a global look and feel of the presentation. For use with JSP, theme properties can be accessed from a series of tag libraries. Non-JSP channels can access theme properties via the Theme java class. See the Javadocs for more detail.
Presentation Method
Determine whether the provider will fetch content from template files or JSPs. This will determine the logistics of the getTemplate() method.
Channel template files are stored in a directory based on the name of the channel, or the name of the provider that is used by the channel. The channel directory for the provider is created under the template root directory. By default, this will be:
/etc/opt/SUNWps/desktop/desktoptype/channeldirectory/templatefiles
Some of the JSPs are stored in /etc/opt/SUNWps/desktop/default/provider directory and some are stored in /etc/opt/SUNWps/desktop/default directory. Storing the files in the /etc/opt/SUNWps/desktop/default directory allows the files to be shared among multiple channels.
The directory search order for the template and JSP files is as follows:
type_locale/channelname/clientPath
type_locale/provider/clientPath
type_locale/channelname
type_locale/provider
type_locale/clientPath
type_locale
type/channelname/clientPath
type/provider/clientPath
type/channelname
type/provider
type
default_locale/channelname/clientPath
default_locale/provider/clientPath
default_locale/channelname
default_locale/provider
default_locale
default/channelname/clientPath
default/provider/clientPath
default/channelname
default/provider
default/clientPath
default
templateroot
Where
- type is the value of the Desktop template type property
- locale is the user's locale
- channelname is the name of the channel
- provider is the provider name
- clientPath is an optional file-path containing client-specific templates
- templateroot is, by default, /etc/opt/SUNWps/desktop
If there is no clientPath specified, then the directory search order is as follows:
type_locale/channelname
type_locale/provider
type_locale
type/channelname
type/provider
type
default_locale/channelname
default_locale/provider
default_locale
default/channelname
default/provider
default
templateroot
The root of the search directory (default value of /etc/opt/SUNWps/desktop/) can be changed by modifying the templateBaseDir property in the desktopconfig.properties file.
Provider-specific Properties
Properties contain configuration information for the provider and the provider's channels. A provider can define any number of specific properties.
Properties in Display Profile
Provider specific properties are defined in the display profile. The following is the structure of the properties in the display profile:
<Properties>
<Collection>
...subset of property definitions
</Collection>
<Integer>...</Integer>
<String>...</String>
<Boolean>...</Boolean>
</Properties>
Properties can be of types atomic (string, integer, boolean) or compound (collection, locale). See Chapter 5 of the Sun ONE Portal Server 6.0 Administrator's Guide for more information on the display profile merge semantics.
Typically, the custom provider will not modify the required properties. When properties are updated, they are set in the user's display profile by the administrator via the administration console. However, values can only be set on existing properties.
If the provider class does not extend the ProfileProviderAdapter and implements the Provider interface, then the get*Property() methods can not be used directly, and the display profile properties are not accessible. If the provider class implements the Provider interface directly, then no properties are required. Properties can be hardcoded return values or can come from another source such as a database.
However, some provider properties are required if the provider implementation extends ProviderAdapter or ProfileProviderAdapter. Table 2-1 describes the mandatory properties for a provider. The mandatory properties described in Table 2-1 are for a provider extending the ProviderAdapter or the ProfileProviderAdapter classes. If you are implementing the Provider interface directly, you can avoid the use of the display profile and the required properties outlined in Table 2-1.
Channel definitions that use a provider can overwrite the properties of that provider. At runtime, channel property values can be affected by the display profile merge process. See Sun ONE Portal Server 6.0 Administrator's Guide for detailed information on the display profile merge process.
See Chapter 4 of the Sun ONE Portal Server 6.0 Desktop Customization Guide for detailed information on the Display Profile properties.
Properties in Resource bundle
Strings defined in the provider's resource bundle properties file are displayed on the user's Desktop and they are not the channel's properties (such as the channel Title). Strings are defined in the resource bundle to enable localization.
Properties that do not need to be customized by the administrator or the end-user must be included in the resource bundle. For example, properties that need to be localized, are read-only at runtime, and properties that do not change per channel should be included in a resource bundle. Properties that need to be localized, are settable, and properties that change per channel should be in the display profile.
By default, a provider's resource bundle properties file is stored in /etc/opt/SUNWps/desktop/classes.
Resource bundles that are needed by the custom providers should be copied into the provider class base directory. Resource bundles should be placed as individual files and cannot exist inside the JAR file under the provider class base directory.
Resource bundles are given a base name that equals to the name of the display profile provider definition that they are associated with. Typically, this is the relative (non-fully qualified) class name of the Java class file that implements the provider.
To get the name of the resource bundle in your custom provider, call ProviderContext.getProviderName(). This value can then be used as the baseName argument to ResourceBundle.getBundle(). If you are extending ProviderAdapter, simply call getResourceBundle().
Developing the Provider Class File
This section includes information on the requirements for developing a provider's class file.
Provider Class File Location
The provider classes must be deployed in the provider class base directory specified in the file /etc/opt/SUNWps/desktop/desktopconfig.properties. By default, the provider class base directory is /etc/opt/SUNWps/desktop/classes.
For instant deployment, the JAR file has to be dropped in the directory mentioned in providerClassBaseDir variable in the desktopconfig.properties file.
Provider Class File
The custom provider classes and all other custom classes that the provider classes reference can be bundled into a JAR file and placed in the provider class base directory. They can also exist as .class files in the provider class base directory.
If a class exists in a file and is also present in a JAR file under the provider class base directory, the class existing as a file under the provider class base directory is given the first preference. Once the class is found as a file, no attempt is made to check for its existence in a JAR file.
If a class file exists in two JAR files under the provider class base directory, the class is picked up from one of them at runtime. Do not duplicate classes in multiple JAR files.
When compiling the class file, the Servlet API (BaseDir/SUNWam/lib/servlet.jar) and PAPI (BaseDir/SUNWps/sdk/desktop/desktopsdk.jar) are required in the CLASSPATH. That is, when compiling a *Provider.java file, you must type:
javac -d /etc/opt/SUNWps/desktop/classes -classpath BaseDir/SUNWps/sdk/desktop/desktopsdk.jar:BaseDir/SUNWam/lib/servlet. jar *Provider.java
Creating XML Fragments for Display Profile
A provider must be defined in the display profile before it can be used. This definition associates the provider with its class file implementation and includes the provider's properties. That is, the provider's display profile fragment should include default values for all the properties that are used in the provider.java file. For example, if the provider.java file contains getStringProperty("color"), the provider's display profile fragment should include a default value for color.
The provider's XML fragment in the display profile must adhere to the following structure:
See Chapter 2 of the Sun ONE Portal Server 6.0 Desktop Customization Guide for more information on the display profile provider definitions.
The provider definition is the template that decides the properties for the provider's channels. However, the display profile definition for the channel ultimately decides the values for the channel's properties. When a channel sets a property, the property is set in the channel and not in the provider's properties. When defining channel properties in the display profile, include only those properties where the provider defaults are not applicable.
The provider's channel XML fragment in the display profile must adhere to the following structure:
See Chapter 3 of the Sun ONE Portal Server 6.0 Desktop Customization Guide for more information on the display profile channel definitions.
The channel definition in the display profile need not have the <Container> tag unless the channel is defined within a container. Channel definitions in the display profile can be encapsulated inside a container. The advantage of this is that it provides name scoping so that channels with the same name do not collide.
Unless a channel is referenced directly from the DesktopServlet URL, in which case it need not be encapsulated inside a container, you must reference a channel from some container in order to see it.
The container within which the channel will operate must adhere to the following structure:
To upload display profile changes, type:
- dpadmin add -u dn_amadmin -w password -d distinguishedname provider.xml if the display profile XML fragment was stored in a separate file
- dpadmin modify -u dn_amadmin -w password -d distinguishedname provider.xml if an existing display profile document was directly edited
where provider.xml contains the display profile XML fragment for the provider. See Chapter 12 of the Sun ONE Portal Server 6.0 Administrator's Guide for more information on the dpadmin command. See Chapter 5 of the Sun ONE Portal Server 6.0 Administrator's Guide for more information on administering Sun ONE Portal Server software display profile.
Installing the Provider
This section provides information on:
- Installing a provider into a portal server instance:
- Manually without using the par utility
- Transporting Using the par Utility
- Provider Class Loader
Installing a provider
This section includes instructions for installing the provider using the par utility and manually.
Installing Manually
To install the provider manually:
- Compile the provider class file and copy the file to provider class base directory which, by default, is /etc/opt/SUNWps/desktop/classes. Or copy the file to the location specified in the /etc/opt/SUNWps/desktop/desktopconfig.properties file.
- Copy the resource bundle files, if any, to /etc/opt/SUNWps/desktop/classes directory.
- Develop the JSPs and templates for the provider and copy the files to the template root directory which, by default, is /etc/opt/SUNWps/desktop/default.
- Develop and upload the display profile XML fragments for the provider, the provider's channels, and the container within which the channels will operate, if any.
Transporting Using the par Utility
Utilize the par utility for deploying channels and providers. For example, if you have the provider associated files in the development environment ready for deployment into the production environment, use the following command to build the channel and provider into a par file which can then be deployed on the system.
par export -r dn_amadmin -p password -v provider.par dn exportfile
To deploy the par file into the system, use the following command:
par import -r dn_amadmin -p password -v provider.par dn provider=providername,channel=channelname
See Chapter 12 of the Sun ONE Portal Server 6.0 Administrator's Guide for more information on the par utility.
Provider Class Loader
The provider class loader in the Sun ONE Portal Server software is used to load the classes. Each channel/container is loaded with a separate provider class loader object. This enables on-the-fly reloading of classes when they change.
In order to upload a new version of a custom provider class without restarting the server:
- If the original class existed in a JAR file, rebuild the JAR with the new version of the class file and copy the JAR into the provider class base directory.
Or,
- Just copy the new version of the class as a file into the provider class base directory.
In order to reload a property file, that is being used by a custom provider, with a modified property inside a resource bundle in the provider class base directory without restarting the server, change the last modified time on the custom provider class. If the custom provider class exists:
- In a JAR file, use the command touch JAR-file-name
- As a file, use the command touch class-file-name
The presence of the provider class loader has an impact on the design of a multi-channel application in the Sun ONE Portal Server software Desktop. When an object reference is cast from one type to another, not only does the class of the variable need to match the class of the object, the two associated class loaders have to be the same too. This constraint can show up when objects are being passed between different channels in the Desktop.
For example, consider a portal application that uses two providers, one for a container and the other for several leaf channels. Call these providers HeadlineContainerProvider and HeadlineProvider. The container provider performs some common processing for the leaf channels, and then the leaf channels access the container object to get the results of that processing. One way to implement this would be to have the HeadlineContainerProvider put a reference to itself into the request object. For example, in the HeadlineContainerProvider.getContent, do:
request.setAttribute("HeadlineContainer", this);
Then, in the HeadlineProvider.getContent method, do:
HeadlineContainerProvider hcp = (HeadlineContainerProvider)request.getAttribute("HeadlineContainer" );
This example will compile, but when the desktop loads and runs this code, the HeadlineProvider will cause a ClassCastException on this second statement. The reason is that the HeadlinerContainerProvider object is loaded by one provider class loader object and the HeadlineProvider object is loaded by a different class loader object. The class loader for HeadlineProvider also loads HeadlineContainerProvider because HeadlineProvider references HeadlineContainerProvider. So we have:
- container1 of type HeadlineContainerProvider loaded by loader1
- channel1 of type HeadlinerProvider loaded by loader2
The HeadlineContainerProvider class is also loaded by loader2 because of the reference to it in the HeadlineProvider code. The cast is from the object container1 (loaded by loader1) to the variable hcp (of type HeadlineContainerProvider loaded by loader2). Thus the cast fails because the class loaders are not the same.
To understand a case where the classes could actually be different, consider the case where container1 is loaded at time 0, and channel1 is loaded at time 10, but the HeadlineContainerProvider class files was updated on disk at time 5. This means that channel1 will be running with a different version of the HeadlineContainerProvider class than that being used for container1. The case must fail because the class versions are different.
To implement this type of application, an alternate solution is to pass an object as a request or session property that has a class that is not in the /etc/opt/SUNWps/desktop/classes directory, such as String, Set, or Hashmap. These classes are never reloaded except when the server restarts. The data that you store in that object becomes a contract between different versions of the classes that use that object.
Instructions for Extending the PAPI
This section includes instructions for setting up a sample HelloWorldProvider that will display a message ("Hello World") by:
- Implementing the Provider Interface
- Extending the ProviderAdapter Class
- Extending the ProfileProviderAdapter Class
Three examples are provided for developing a sample HelloWorldProvider. This is to illustrate the fundamentals of how the Provider interface works first, followed by examples of how ProviderAdapter and ProfileProviderAdapter classes make the implementation easier. Use the instructions (provided with the sample HelloWorldProvider) for developing your custom provider by extending any one of these APIs.
Implementing the Provider Interface
The Provider interface defines the interface for implementing the provider component of a channel. If you want to directly implement the Provider interface, code should be written to implement all of the methods in this interface. You will not have access to the ProviderContext and the properties in the display profile cannot be accessed. If you are implementing this interface, it's up to the provider implementation to get the properties.
This section provides the instructions for creating a custom provider by implementing the Provider interface. The process described here includes creating a sample HelloWorldProvider that prints "Hello World!" on the provider's channel.
- Create a new java class which implements the Provider interface.
For the sample HelloWorldProvider, create the class file as shown in Code Example 2-4.
- Compile the class and put it in the user defined class directory.
The default directory for the class file is /etc/opt/SUNWps/desktop/classes. To compile the HelloWorldProviderP.java file, type:
javac -d /etc/opt/SUNWps/desktop/classes -classpath BaseDir/SUNWps/sdk/desktop/desktopsdk.jar:BaseDir/SUNWam/lib/servlet.jar HelloWorldProviderP.java
- Define the new provider and provider's channel definition in a temporary XML file.
The sample HelloWorldProvider XML fragments for the provider in the HelloProviderP.xml and XML fragments for the channel in the HelloChannelP.xml files are shown in Code Example 2-5 and Code Example 2-6 respectively.
Code Example 2-5 HelloProviderP.xml File
<Provider name="HelloWorldProviderP" class="custom.HelloWorldProviderP">
<Properties>
</Properties>
</Provider>
- Upload the provider and channel XML fragments using the dpadmin command.
For the sample HelloWorldProvider, upload the HelloProviderP.xml and HelloChannelP.xml XML fragments using the dpadmin command. That is, for example, type:
dpadmin add -u dn_amadmin -w password -d distinguishedname HelloProviderP.xml
dpadmin add -u dn_amadmin -w password -d distinguishedname HelloChannelP.xml
- Access the channel from a browser. To access, type the following URL in your browser:
http://hostname:port/portal/dt?provider=HelloWorldP
Extending the ProviderAdapter Class
As the ProviderAdapter class has implemented many of the methods of the Provider interface, the custom provider can extend ProviderAdapter and can override some of the methods or define any new methods. The advantage of extending this class versus implementing the Provider interface directly is that you will maintain forward compatibility as additions are made to the PAPI. Existing code will by default call the methods in this class. Also, the ProviderAdapter contains default implementations of methods in the Provider interface that you can use.
This section provides the instructions for creating a custom provider by extending the ProviderAdapter class. The process described here includes creating a sample HelloWorldProvider that prints "Hello World!" on the provider's channel.
- Create a new java class which extends the ProviderAdapter class.
For the sample HelloWorldProvider, create the class file as shown in Code Example 2-7.
- Compile the class and put it in the user defined class directory.
The default directory for the class file is /etc/opt/SUNWps/desktop/classes. To compile the HelloWorldProviderPA.java file, type:
javac -d /etc/opt/SUNWps/desktop/classes -classpath BaseDir/SUNWps/sdk/desktop/desktopsdk.jar:BaseDir/SUNWam/lib/servlet.jar HelloWorldProviderPA.java
- Define the new provider and provider's channel definition in a temporary XML file.
Use the dpadmin command to upload the display profile changes to these files.
The sample HelloWorldProvider XML fragment for the provider in the HelloProviderPA.xml is shown in Code Example 2-8.
- Upload the provider XML fragments using the dpadmin command.
For the sample HelloWorldProvider, upload the HelloProviderPA.xml file XML fragments using the dpadmin command. That is, for example, type:
dpadmin add -u dn_amadmin -w password -d distinguishedname HelloProviderPA.xml
- Include the new channel in one of the existing containers.
The sample HelloWorldProvider will be displayed only in a Table Desktop layout. To add the channel in the JSPTableContainer from the administration console, follow instructions in section "To Add a Channel or Container Channel" in Chapter 5 of the Sun ONE Portal Server 6.0 Administrator's Guide. To add the channel in the JSPTableContainer manually:
- Add the HelloWorldProvider channel XML fragment (in the HelloChannelPA.xml file) for the JSPTableContainer as shown in Code Example 2-9.
- Use the dpadmin add subcommand to add the channel to a container. If you do not specify a parent object with the -p option, the channel is added at the root level.
dpadmin modify -m -p "JSPTableContainer" -u dn_amadmin -w password -d distinguishedname HelloChannelPA.xml
- Access the HelloWorld channel inside the JSPTableContainer. To access, type the following URL in your browser:
http://hostname:port/portal/dt?provider=JSPTableContainer/HelloWorldPA
Extending the ProfileProviderAdapter Class
ProfileProviderAdapter has the default implementation of the Provider interface, and some convenient methods that allow the providers to get the channel data from the ProviderContext object. Developers who wish to create a new provider can take advantage of this, by extending the ProfileProviderAdapter class, and create their customized provider class.
Example 1
This section provides the instructions for creating a custom provider by extending the ProfileProviderAdapter. The process includes creating a sample provider that prints "Hello World!" on the provider's channel.
The following sample HelloWorldProvider reads a string property from the user's display profile and allows the user to edit the string.
- Create a new java class which extends the ProfileProviderAdapter class.
For the sample HelloWorldProvider, create the class file as shown in Code Example 2-10.
- Compile the class and put it in the user defined class directory.
The default directory for the class file is /etc/opt/SUNWps/desktop/classes. To compile the HelloWorldProviderPPA1.java file, type:
javac -d /etc/opt/SUNWps/desktop/classes -classpath BaseDir/SUNWps/sdk/desktop/desktopsdk.jar:BaseDir/SUNWam/lib/servlet.jar HelloWorldProviderPPA1.java
- Define the new provider and provider's channel definition in a temporary XML file.
The sample HelloWorldProvider XML fragment for the provider in the HelloProviderPPA1.xml file and the XML fragment for the channel in the HelloChannelPPA1.xml file are shown in Code Example 2-11 respectively.
- Upload the provider and channel XML fragments using the dpadmin command.
For the sample HelloWorldProvider, upload the HelloProviderPPA1.xml file and HelloChannelPPA1.xml file XML fragments using the dpadmin command. That is, for example, type:
dpadmin add -u dn_amadmin -w password -d distinguishedname HelloProviderPPA1.xml
dpadmin add -u dn_amadmin -w password -d distinguishedname HelloChannelPPA1.xml
- Include the provider's channel in one of the existing containers.
The sample HelloWorldProvider will be displayed in a Table Desktop layout. To add the channel in the JSPTableContainer from the administration console, follow instructions in section "To Add a Channel or Container Channel" in Chapter 5 of the Sun ONE Portal Server 6.0 Administrator's Guide. To add the channel in the JSPTableContainer manually:
- Add the HelloWorldProvider channel XML fragment (in the HelloContainerPPA1.xml file) for the JSPTableContainer as shown in Code Example 2-13.
- Use the dpadmin add subcommand to add the channel to a container. If you do not specify a parent object with the -p option, the channel is added at the root level.
dpadmin modify -m -p "JSPTableContainer" -u dn_amadmin -w password -d distinguishedname HelloContainerPPA1.xml
- Create the template files if the new provider requires template files.
The sample HelloWorldProvider requires content.template and edit.template files.
- Create the content.template file for the HelloWorldProvider.
The contents of content.template file is shown in Code Example 2-14.
Code Example 2-14 HelloWorldProviderPPA1 content.template File
<head></head>
<body bgcolor="white">
[tag:welcome]<br><br>
[tag:message]<br><br>
[tag:properties]
</body>
</html>
- Create the edit.template file for the HelloWorldProvider.
The contents of edit.template file is shown in Code Example 2-15.
- Create the channel directory under the template root directory.
By default, the template root directory is /etc/opt/SUNWps/desktop/default. For this example, create a HelloWorldPPA1 directory under /etc/opt/SUNWps/desktop/default directory.
- Copy all the template files over to the newly created directory (in Step 7). For example:
cp content.template /etc/opt/SUNWps/desktop/default/HelloWorldPPA1
cp edit.template /etc/opt/SUNWps/desktop/default/HelloWorldPPA1
- Create a resource bundle properties file.
The sample HelloWorldProvider includes a HelloWorldProviderPPA1.properties file.
- Create a HelloWorldProviderPPA1.properties properties file.
- Include the following property in the file:
welcome=Welcome to Hello World!!
- Copy the resource bundle to the user defined class directory.
By default, the class directory to copy the resource bundle into is /etc/opt/SUNWps/desktop/classes.
- Access the HelloWorld channel inside the JSPTableContainer. To access, type the following URL in your browser:
http://hostname:port/portal/dt?provider=JSPTableContainer
Example 2
This section provides the instructions for creating a custom provider by extending the ProfileProviderAdapter. The process includes creating a sample provider that prints "Hello World!" on the provider's channel. The following sample HelloWorldProvider reads a string property from the user's display profile and allows the user to edit the string.
The sample HelloWorldProvider described here will also support EDIT_COMPLETE, which means this provider is responsible for generating the complete edit form with header, footer, and handling of the form submit actions. To accomplish this:
- Create the Java class, which will generate the content for the channels backed by this provider.
For the sample HelloWorldProvider, create the class file as shown in Code Example 2-16.
- Compile the HelloWorldProviderPPA2.java class file. To compile the HelloWorldProviderPPA2.java file, type:
javac -d /etc/opt/SUNWps/desktop/classes -classpath BaseDir/SUNWps/sdk/desktop/desktopsdk.jar:BaseDir/SUNWam/lib/servlet.jar HelloWorldProviderPPA2.java
- Create a directory structure which reflects the packaging of this provider under the user defined class directory.
By default, provider class files are stored in /etc/opt/SUNWps/desktop/classes directory. For example:
- Change directories to /etc/opt/SUNWps/desktop/classes.
- Type mkdir custom/helloworld.
- Copy HellowWorldProviderPPA2.class into /etc/opt/SUNWps/desktop/classes/custom/helloworld directory.
- Create the resource bundle properties file for the HelloWorldProvider (HelloWorldProviderPPA2.properties) and include the following string:
welcome=Welcome to Hello World!!
- Copy the resource bundle properties file, HelloWorldProviderPPA2.properties, into /etc/opt/SUNWps/desktop/classes directory.
- Develop the template files for the HelloWorldProvider.
The HelloWorldProvider requires the following template files:
- content.template (see Code Example 2-17)
- edit.template (see Code Example 2-18) - This file generates the editable fields in the form
- editTemplate.template (see Code Example 2-19) - This file generates a complete form
Code Example 2-17 HelloWorldProviderPPA2 content.template File
<head></head>
<body bgcolor="white">
[tag:welcome]<br><br>
[tag:message]<br><br>
</body>
</html>
- Copy the templates for the provider into the channel directory under the templates root directory.
By default, templates are stored in /etc/opt/SUNWps/desktop/default directory.
- Create the HelloWorldProvider provider and channel definition for the display profile.
The HelloWorldProvider provider display profile XML fragment (in file HelloProviderPPA2.xml) is shown in Code Example 2-20.
The HelloWorldProvider channel display profile XML fragment (in file HelloChannelPPA2.xml) is shown in Code Example 2-21.
- Load the HelloWorldProvider provider and channel definitions using the dpadmin command. That is, type:
/opt/SUNWps/bin/dpadmin add -u dn_amadmin -w password -d distinguishedname HelloProviderPPA2.xml
/opt/SUNWps/bin/dpadmin add -u dn_amadmin -w password -d distinguishedname HelloChannelPPA2.xml
- Access the channel from a browser. To access, type the following URL in your browser:
http://hostname:port/portal/dt?provider=HelloWorldPPA2
To display the provider's channel as one of the leaf channels for a container, you have to add the channel into the container's available and selected list. To accomplish this:
- Add it to the Available and Selected list for the container. For example, to add the HelloWorldProvider to the TemplateTableContainer, type the following:
- To add to the Available list:
dpadmin modify -m -p "TemplateTableContainer" -u dn_amadmin -w password -d distinguishedname << EOF
<?xml version="1.0" encoding="utf-8" standalone="no"?>
<!DOCTYPE DisplayProfile SYSTEM "jar://resources/psdp.dtd">
<Available>
<Reference value="HelloWorldPPA2"/>
</Available>
EOF
- To add to the Selected list:
dpadmin modify -m -p "TemplateTableContainer" -u dn_amadmin -w password -d distinguishednode << EOF
<?xml version="1.0" encoding="utf-8" standalone="no"?>
<!DOCTYPE DisplayProfile SYSTEM "jar://resources/psdp.dtd">
<Selected>
<Reference value="HelloWorldPPA2"/>
</Selected>
EOF
- Access the HelloWorld Channel inside the TemplateTableContainer. To access, type the following URL in your browser:
http://hostname:port/portal/dt?provider=TemplateTableContainer
Utilize the par utility for transporting channels and providers. For example, the following command can be used to export the HelloWorld channel and provider into a par file which can be imported to another Sun ONE Portal Server system.
par export -r dn_amadmin -p password -v helloworld.par distinguishednode helloworld.txt
Here, helloworld.txt contains the following:
Using the following command, the contents of the helloworld.par can be imported to as HelloWorld channel in a different Sun ONE Portal Server installation.
par import -r dn_amadmin -p password -v helloworld.par distinguishednode provider=HelloWorldProvider,channel=HelloWorld,avail=TemplateTableC ontainer,selected
The above command, apart from installing the channel and provider, will also include the HelloWorld channel as one of the selected and available channels in the TemplateTableContainer. For more information on the par utility and its subcommands, see the Sun ONE Portal Server 6.0 Administrator's Guide.