|
Removing and Replacing a Power Supply |
This document describes replacement procedures for the power supply customer replaceable unit (CRU) installed in the Sun Storage J4400 Array. This document assumes you have:
This product is intended for restricted access whereby access is controlled through the use of a means of security (for example, key, lock, tool, badge access), and personnel authorized for access have been instructed on the reasons for the restrictions and any precautions that need to be taken.
When performing this service action, observe the following electrostatic discharge (ESD) precautions:
Each J4400 Array contains two hot-swappable, redundant power supplies. If one power supply is turned off or malfunctions, the other power supply maintains electrical power. Each power supply contains two internal fans that provide cooling for the J4400 Array components.

|
Caution - Only trained service personnel should remove the covers on this equipment. |
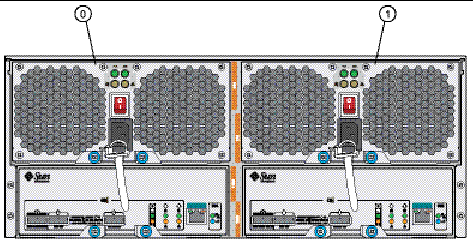
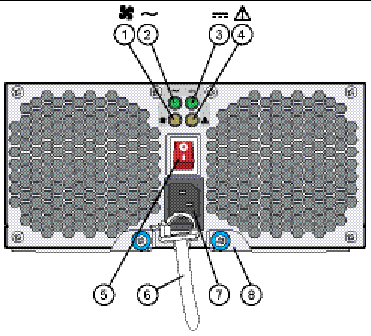
FIGURE 2 shows the location of power supplies 0 (left) and 1 (right) as viewed from the back of the disk tray. FIGURE 2 identifies the power supply components.
FIGURE 1 Location of Power Supplies 0 and 1 (Tray Back View)

FIGURE 2 Power Supply LEDs and Components (Tray Back View)

The J4400 Power Supply serial number is located on the top of the module.
This section describes how to remove and replace a power supply.

|
Caution - Potential loss of data access- Never remove a power supply unless the Power fault LED or Fan fault LED is amber (see FIGURE 2). |
| Note - The power supplies are hot-swappable and you do not need to disconnect power from the system or other components in order to replace one of these parts. |
|
1. Locate the respective disk tray and failed power supply. The Power fault or Fan fault LED is amber (see FIGURE 2).
2. Ensure the power supply on/off switch is in the “O” position.
3. Disconnect the power cord tie strap (see FIGURE 2) from the power cord.
4. Unplug the power cord from the power supply.
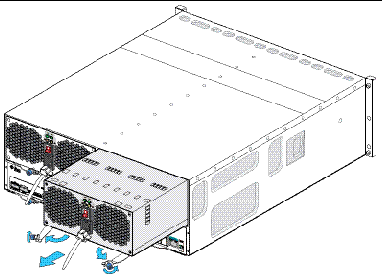
5. Using your thumb and forefinger, unscrew both ejection arm captive screws until loose and swing the ejection arms out until they are fully open (see FIGURE 3).
| Note - You might need a #2 Phillips screwdriver to loosen or tighten captive screws on the ejection arms. |
FIGURE 3 Removing a Power Supply

6. Pull the power supply out of the tray.

|
Caution - Be careful to not damage the circuit board connector extending from the back of the power supply. |

|
Caution - For products with multiple power cords, all power cords must be disconnected to completely remove power from the system. |
|

|
Caution - Follow all ESD precautions (see ESD Precautions) and use care when handling either the new or failed power supply. |
1. Unpack the new power supply and do one of the following:

|
Caution - Be careful to not damage the circuit board connector extending from the back of the power supply. |
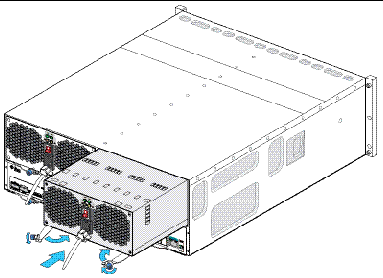
2. Unscrew both power supply ejection arm captive screws and swing the ejection arms out until they are fully open.
3. Slide the new power supply into the tray slot until it contacts the chassis backplane and the ejection arms begin to swing closed.
4. Push the ejection arms closed fully and secure both captive screws to seat and secure the power supply in the tray.
FIGURE 4 Replacing a Power Supply

5. Ensure the power supply on/off switch is in the “O” position.
6. Plug the power cord into the new power supply and attach the power cord tie strap to the power cord.
|
 Place the power supply on/off switch to the “I” position and verify the Power status LED is steady green and the Power fault LED and the Fan fault LED are off (see FIGURE 2).
For additional information about the Sun Storage J4400 Array, see the following product documentation:
If you need help installing or using this product in the United States, call
1-800-USA-4SUN(872-4786), or go to:
http://www.sun.com/service/contacting/index.xml
Copyright © 2008, Sun Microsystems, Inc. All Rights Reserved.