| Sun StorageTek Common Array Manager User Guide for Open Systems |
| C H A P T E R 2 |
|
Installing the Common Array Manager Software |
This chapter describes how to install CAM software.
If you want to install the CAM software using a CLI, see Appendix C for CLI options.
Before you perform an installation procedure, do the following:
1. Locate the management software.
The management software is distributed on the Sun StorageTek Common Array Manager Software DVD and is also available from the Sun website.
To obtain a general overview and detailed technical information, go to:
http://www.sun.com/storage/management_software/resource_management/cam/
Click the “Get It” tab to obtain the latest information and version available.
2. Locate the most current patches here:
Information regarding any available patches for CAM will be located here:
http://www.sun.com/storage/management_software/resource_management/cam/support.xml
3. Read the installation instructions.
4. Log in to the management host.
For more information about user and user roles, see the documentation for your operating system.
5. Before starting the installation script, the DVD verifies host requirements, such as the following:
If the host meets the requirements, the script will search for earlier versions and determine if a new installation or an upgrade/baseline installation is necessary. If the script detects there is no earlier version installed, it will perform a completely new installation.
6. Create the following user accounts on your server.
Refer to your OS documentation for information about adding user accounts.
For more information, see Adding Users And Assigning Roles.
You can get the CAM software from the CAM DVD or download it from the Sun distribution site.
The Sun StorageTek Common Array Manager Installation Software provides three installation-related wizards:
1. To download the latest version of CAM software , go to:
http://www.sun.com/storagetek/management_software/resource_management/cam
2. Click the “Get It” tab to obtain the latest information and version available.
When installing from a downloaded file on Solaris OS or Linux, do the following to unpack the file and run the install program:
2. Change to the directory where the install files are unpacked, for example:
cd /install_dir/Host_Software_6.x.x.x
3. Begin the applicable installation procedure at Step 4.
1. Unzip the host_sw_windows_6.x.x.x file using a Windows zip application.
2. Change to the directory where the install files are unpacked. For example:
3. Begin the Windows installation procedure at Step 4.
You can choose a Typical or Custom installation.
|
Select Typical to install the full CAM software on a management host. (See TABLE C-1 and TABLE C-2 in Appendix C for disk and RAM system requirements.) |
|
|
Select Custom to install specific device plug-ins.
|
The following sections describe installing the management software either locally on a data host or on a central management host, as described in the following sections:
TABLE 2-1 summarizes the commands you use to install the management software using CAM’s GUI installation wizard.
|
Uninstall the management software. Note: The Add/Remove Programs feature in Windows is supported. |
Note: Stop all java.exe or javaw.exe applications running on Windows before starting the uninstaller. |
|
Appendix C describes the uninstall -f command line option to force a complete cleanup. |
You can install the Common Array Manager software on a SPARC, X86, or X64 system running the Solaris Operating System or OpenSolaris OS.
The array installation files and installers are provided in a compressed .bin file on the DVD.
The process unpacks the contents of the file on the host and then proceeds with the installation.
After the installation, you will need to configure the firewall on each host to allow an exception for port 6789 as noted in Step 14.
Proceed to Installing a Typical (Full Version) of CAM.
You can install the Common Array Manager software on a host system running the Red Hat or SUSE Linux Operating System.
The array installation files and installers are provided in a compressed .bin file on the DVD.
The process unpacks the contents of the file on the host and then proceeds with the installation.
After the installation, you will need to configure the firewall on each host to allow an exception for port 6789 as noted in Step 14.
Proceed to Installing a Typical (Full Version) of CAM.
You can use a wizard to install the Common Array Manager software on a system running Windows 2003, 2008, or XP.
| Note - Windows XP is supported for CAM central management host only. Windows XP has not been qualified for Open Storage proxy agent inband support. |
Windows Installer 3.1 must be installed and the service packages listed in TABLE 2-2 are required:
If needed, download the files from the Microsoft Download site.
You must be logged in to the Windows system as an administrative user. For information on setting up administrative users and root users on Windows, see Adding Users And Assigning Roles.
The array installation files and installers are provided in a compressed file on the DVD.
The process unpacks the contents of the file on the host and then proceeds with the installation.
After the installation, you will need to configure the firewall on each host to allow an exception for port 6789 as noted in Step 14.
Proceed to Installing a Typical (Full Version) of CAM.
1. Log in to the management host.
For more information about user and user roles, see the documentation for your operating system.
2. Load the software from either a download or DVD installation:
a. Change to the Host_Software_6.x.x.x directory where the files were unpacked.
If the compressed installation files do not appear in a directory window:
a. Change to the cd-rom directory:
Solaris OS, OpenSolris OS: /cdrom/cdrom0
Windows: <system drive:> (Example: D:)
b. Display the contents of the DVD:
3. Review the README.txt file for the latest information on the product and the installation process.
4. To begin unpacking the contents of the compressed installation file, perform one of the following:
The files are unpacked in the default directory are /var/opt/CommonArrayManager.
The files are unpacked in the default directory path:
<system drive>:\Sun\CommonArrayManager\Host_Software_6.x.x.x\bin.
5. Review the README.txt file for the latest information on the product and the installation process.
The Host_Software_6.x.x.x directory is unpacked into the default directory. The unpacking process takes a couple of minutes. The contents of this directory includes:
If the wizard screen is not redisplayed or if you receive an error message, recheck that the disk space requirements (see TABLE C-1 in Appendix C) are met.
Summary information about the installation is displayed.

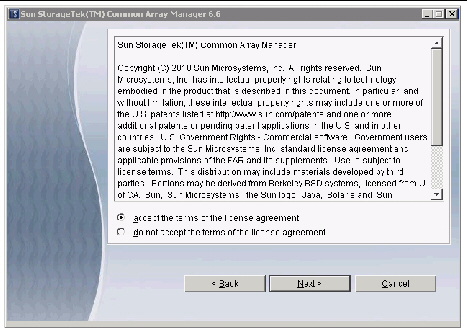
7. Click Next to display the license agreement screen.

8. Click the radio button to accept the license agreement, and then click Next to display the Installation Type screen.
9. Choose Typical to install the full CAM management software on the management host.

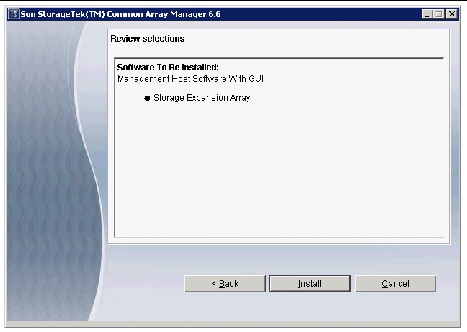
10. Click next to display the Review Selections screen.

11. To continue, click Install.
When the installation is complete, the View Results screen is displayed.

Your software installation on the management host is complete.
For information on installation logs, refer to Reviewing the Installation Logs.
12. If you have no other CAM installations, eject the DVD and remove it from the drive.
13. If you want to install the CAM proxy agent for one or more JBOD arrays, go to Installing the CAM Data Host Proxy Agent.
14. Configure the firewall on the management host.
a. Set the firewall to allow an exception for port 6789.
| Note - Because a proxy agent was not installed or activated with this installation option, there is no need to open port 8653 for a proxy. |
b. Your firewall program might prompt you to allow new programs to communicate through the firewall, and set the port for you. Refer to your firewall documentation for instructions on how to open a port through the firewall.
The Custom installation provides three installation options:
| Note - If the Data Host Proxy Agent installation option is selected, only JBOD device types can be selected, and array firmware will not be installed. |
The following core software packages are installed with the Custom installation options.
The plug-in software packages listed in the following table are installed with the Custom installation options.
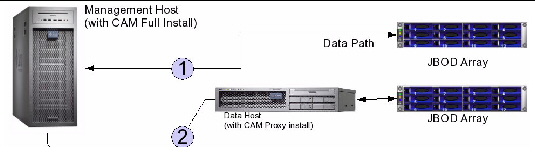
For each Storage Expansion Array to be managed, the CAM proxy agent must be installed on each data host that accesses the device.
|
Full (typical) CAM installed on management host with in-band management connection |
|
|
CAM proxy agent installed on data host with in-band management connection |
1. Start the installation using the steps for your OS.
a. Open a shell or terminal window.
b. Go to the directory containing the software you extracted.
c. Become superuser by typing su.
The Welcome panel appears. Go to Step 2 to continue.
a. Open a shell or terminal window.
b. Go to the directory containting the software you extracted.
c. Run the RunMe.bin script using the pfexec(1) command:
| Note - You must have the appropriate profile rights to run the pfexec(1) command. |
The Welcome panel appears. Go to Step 2 to continue.
Prerequisite: You must have Windows OS Administrator privileges to install the software.
a. Open the folder containing the extracted software.
b. Double-click the RunMe.bat icon.
The Welcome panel appears. Go to Step 2 to continue.
2. From the Welcome panel, click Next.

3. Accept the license agreement and click Next.
The Installation Type screen displays.
4. Choose Custom and click Next to reveal other installation options.

5. Select Data Host Proxy Agent to install the proxy agent on the data host.

| Note - The other options are explained in Appendix C, but are not needed of you are using the recommended installation. |
A selection menu, similar to the following, is displayed:

7. Select Storage Expansion Array to install proxy agents for JBOD arrays, and click Next.
8. Review your selections, and click Install.
The proxy agent is installed on the data host.
9. Eject the DVD and remove it from the drive.
10. Configure the firewall on each data host.
a. Set the firewall to allow an exception for port 8653 for the proxy agent.
b. Your firewall program might prompt you to allow new programs to communicate through the firewall, and set the port for you. Refer to your firewall documentation for instructions on how to open a port through the firewall.
Solaris OS 10 update 6 restricts port 6789 to listen to localhost only. To change this setting and enable remote access to the Java Web Console and CAM, do the following:
1. Become superuser or assume an equivalent role on the system where the console is running.
Roles contain authorizations and privileged commands. For more information about roles, see Configuring RBAC (Task Map) in System Administration Guide: Security Services
http://docs.sun.com/app/docs/doc/816-4557/rbactask-15?a=view
2. Set a property to allow the console server to respond to network requests, refresh the service, and restart the console server.
# svccfg -s svc:/system/webconsole setprop options/tcp_listen=true # svcadm refresh svc:/system/webconsole:console # /usr/sbin/smcwebserver restart |
The Sun StorageTek Common Array Manager provides a browser interface for accessing the management software from any host that is connected to the site LAN. The web browser interface is the primary interface for configuring, managing, and monitoring the system.
Two command-line interfaces options are also provided. For more information, refer to Appendix C.
You can start the management software on any system that is connected to the network. Before you log in, you need to set up a storage role or group in your OS and assign users to it. See Adding Users And Assigning Roles.
1. Open a supported web browser.
| Note - For information about supported web browsers, see the Sun StorageTek Common Array Manager Release Notes. |
2. Enter the IP address of the management host using this format:
https://cam-management-host:6789
cam-management-host is the IP address or hostname of the host where you installed the Sun StorageTek Common Array Manager software.

3. Log in with the root or administrator name.
You need root and storage users on the system. For more information about user names and roles, see Adding Users And Assigning Roles.
The Java Web Console page is displayed.
At this point, you are logged into the system.
| Note - The connection closes automatically if there is no activity for approximately 15 minutes. |

5. Select Sun StorageTek Common Array Manager from the Storage section of the Java Web Console page.
You can verify the installation by bringing up the Sun StorageTek Common Array Manager browser, as discussed in Starting the Management Software of the next chapter.
In the browser, click the Version button to verify the release version information.
You can also verify the success of the installation by reviewing the installation logs. Note that the installation logs are mainly intended for debugging by developers. By scrolling to the end of the installation log, you can verify the successful installation message or any error messages.
If an error occurs, review the:
For more information, consult the installation logs.
|
%SystemDrive%\Program Files\Common Files\Sun Microsystems\se6000 |
|
|
%SystemDrive%\Program Files (x86)\Common Files\Sun Microsystems\se6000 |
Verify that you made the firewall changes after you finished the installation as noted in Step 14.
| Sun StorageTek Common Array Manager User Guide for Open Systems | 821-0820-10 |
Copyright © 2009 Sun Microsystems, Inc. All rights reserved.