|
| |
| Sun Java System Identity Manager 2005Q4M3 Administration | |
8
Reporting
Identity Manager reports on automated and manual system activities. A robust set of reporting features lets you capture and view important access information and statistics on Identity Manager users at any time.
Read this chapter for information and procedures that show how to work with Identity Manager reporting features. You can learn about:
Working with ReportsIn Identity Manager, reports are considered a special category of task. As a result, you work with reports in two areas of the Identity Manager Administrator interface:
Reports
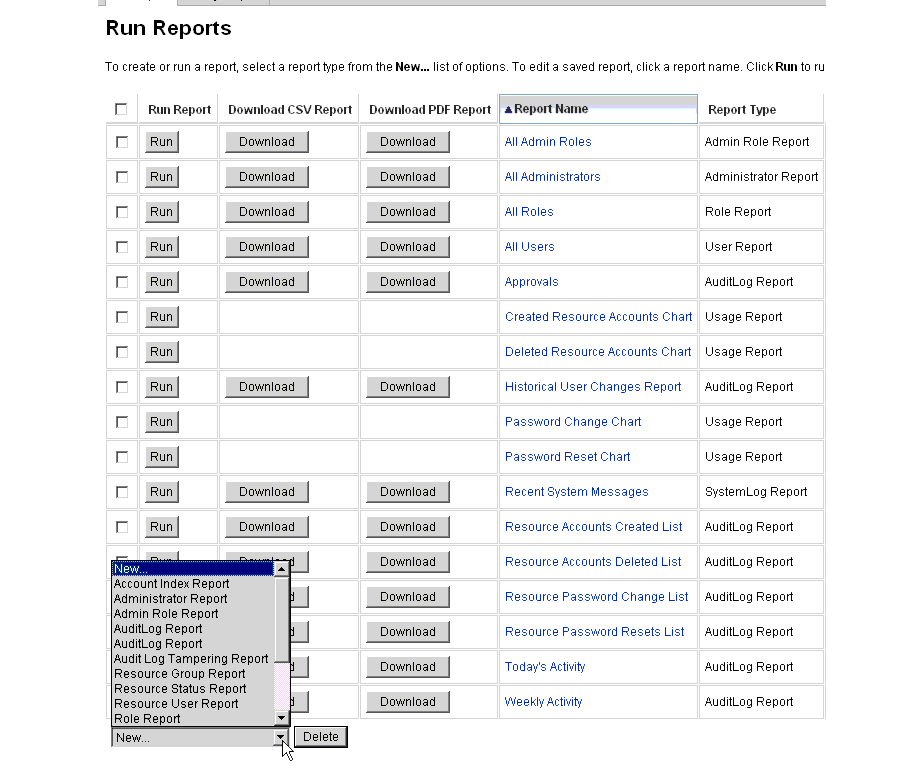
You perform most report-related activities from the Run Reports page, which allows you to:
To view this page, select Reports from the menu bar. The Run Reports subtab page appears.
Figure 1. Run Reports Page Selections
Begin defining reports by using one of these methods:
Creating Reports
To create a report:
Identity Manager displays the Define a Report page, where you select and save options to create the report.
Cloning Reports
To clone a report, select a report from the list. Enter the new report name and optionally adjust report parameters, and then click Save to save it with the new name.
Emailing Reports
When creating or editing a report, you can select an option to email the report results to one or more email recipients. When you select this option, the page refreshes and prompts for email recipients. Enter one or more recipients, separating addresses with a comma.
You also can choose the format of the report to be attached to the email:
Running Reports
After entering and selecting report criteria, you can:
- Run the report without saving — Click Run to run the report. Identity Manager does not save the report (if you defined a new report) or the changed report criteria (if you edited an existing report).
- Save the report — Click Save to save the report. Once saved, you can run the report from the Run Reports page (the list of reports).
Scheduling Reports
Depending on whether you want to immediately run a report or schedule it to run at regular intervals, you make different selections:
- Reports Run Reports — Allows you to run saved reports immediately. From the list of reports, click Run. Identity Manager runs the report and then displays the results in summary and detailed formats.
- Tasks Schedule Tasks — Schedules report tasks to be run. After selecting a report task, you can set report frequency and options. You also can adjust specific report details (as in the Define a Report page in the Reports area).
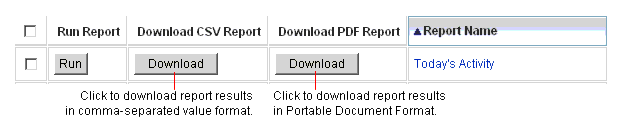
Downloading Report Data
From the Run Reports page, click Download in one of these columns:
Configuring Fonts for Report Output
For reports generated in portable document format (PDF), you can make selections to determine the fonts to be used in the report.
To configure report font selections, click Configure, and then select Reports. These selections are available:
- PDF Font Name — Select the font to use when generating PDF reports. By default, only fonts available to all PDF viewers are shown. However, additional fonts (such as those needed to support Asian languages) can be added to the system by copying font definition files into the product's fonts/ directory and restarting the server.
Accepted font definition formats include .ttf, .ttc, .otf, and .afm. If you select one of these fonts, then it must be available at the machine where the report is viewed. Alternatively select the Embed Font in PDF Documents option.
- Embed Font in PDF Documents — Select this option to embed the font definition in the generated PDF report. This ensures that the report is viewable in any PDF viewer.
Note Embedding the font can greatly increase the size of the document.
Click Save to save report configuration options.
Report Types
Identity Manager several report types, including:
AuditLog
Audit reports are based on events captured in the system audit log. These reports provide information about generated accounts, approved requests, failed access attempts, password changes and resets, and self-provisioning activities, among others.
Note Before running audit logs, you must specify the types of Identity Manager events you want to capture. To do this, select Configure from the menu bar, and then select Audit Events. Select one or more audit group names to record successful and failed events for each group. For more information about setting up audit configuration groups, see Audit Group Configuration in Chapter 5.
To define an AuditLog report, select AuditLog Report from the list of report options on the Run Reports page.
Once you have set and saved report parameters, run the report from the Run Reports list page. Click Run to produce a report of all results that match the saved criteria. Included in the report are the date an event occurred, the action performed, and the result of the action.
Real Time
Real Time reports poll resources directly to report real-time information. Real time reports include:
To define a Real Time report, select it from the list of report options on the Run Reports page.
Once you have set and saved report parameters, run the report from the Run Reports list page. Click Run to produce a report of all results that match the saved criteria.
Summary Reports
Summary report types include:
- Account Index – Report on selected resource accounts according to reconciliation situation.
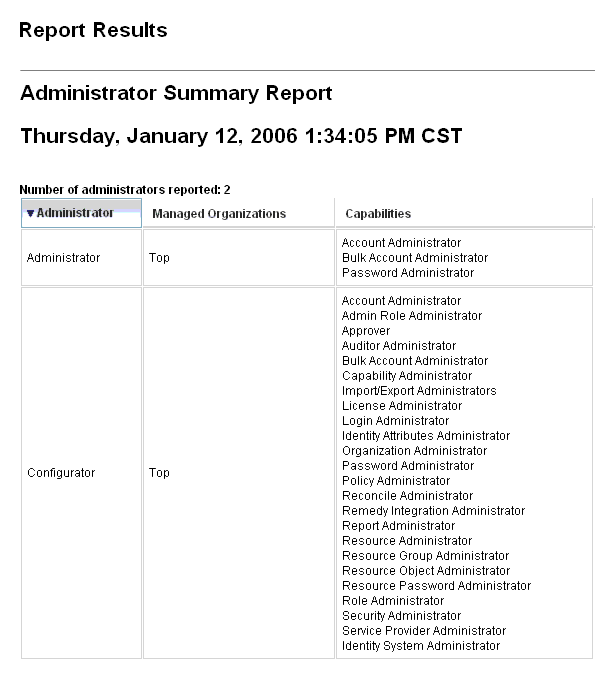
- Administrator – View Identity Manager administrators, the organizations they manage, and assigned capabilities. When defining an administrator report, you can select administrators to include by organization.
- Admin Role – List users assigned to admin roles.
- Role – Summarize Identity Manager roles and associated resources. When defining a role report, you can select the roles to include by associated organization.
- Task – Report on pending and finished tasks. You determine the depth of information to include by selecting from a list of attributes such as approver, description, expiration date, owner, start date, and state.
- User – View users, the roles to which they are assigned, and the resources they can access. When defining a user report, you can select which users to include by name, role, organization, or resource assignment.
- User Question – Allows administrators to find users who have not answered the minimum number of authentication questions, as specified by their account policy requirements. The results indicate user name, account policy, the interface associated with the policy, and the minimum number of questions that require answers.
Run summary reports from the Run Reports list page.
As shown in the following illustration, the administrator report lists Identity Manager administrators, the organizations they manage, and their assigned capabilities and admin roles.
Figure 3. Administrator Summary Report
SystemLog
A SystemLog report shows system messages and errors that are recorded in the repository. When setting up this report, you can specify to include or exclude:
You also set the maximum number of records you want to display (by default, 3000), and whether you want to display the oldest or newest records if available records exceed the specified maximum.
Note You also can run the lh syslog command to extract records from the system log. For detailed command options, read syslog command in
lh Reference.
To define a SystemLog report, select SystemLog Report from the list of report options on the Run Reports page.
Usage Reports
Create and run usage reports to view graphical or tabular summaries of system events related to Identity Manager objects such as administrators, users, roles, or resources. You can display output in pie chart, bar graph, or tabular format.
To define a usage report, select Usage Report from the list of report options on the Run Reports list page.
Once you have set and saved report parameters, run the report from the Run Reports list page.
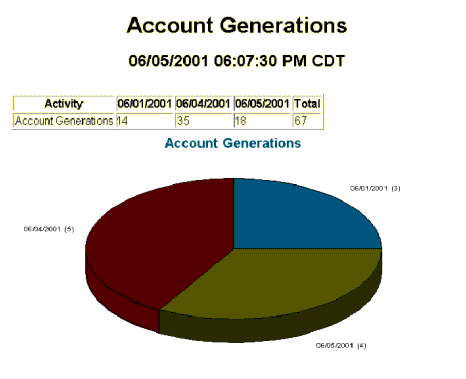
Usage Report Charts
In the following illustration, the table at the top shows events comprising the report. The chart below shows the same information in graphical format. As you move the mouse pointer over each portion of the chart, the value of that portion appears.
Figure 4. Usage Report (Generated User Accounts)
You can manipulate portions of a pie chart to highlight them. Right-click and hold a data slice, and then drag it away from center to visually separate it from the other data slices. You can do this with one or more portions of the chart. For most control, click the slice near the center; this allows you to drag it a longer distance from the remaining slices.
You also can rotate the pie chart to your desired view. Click and hold near the edge of the chart, and then move the mouse to right or left to rotate the view.
Risk AnalysisIdentity Manager risk analysis features let you report on user accounts whose profiles fall outside certain security constraints. Risk analysis reports scan the physical resource to gather data and show, by resource, details about disabled accounts, locked accounts, and accounts with no owners. They also provide details about expired passwords. Report details vary depending on the resource type.
Note Standard reports are available for AIX, HP, Solaris, NetWare NDS, Windows NT, and Windows Active Directory resources.
Risk analysis pages are controlled by a form and can be configured for your environment. You can find a list of forms under the RiskReportTask object on the idm\debug page, and modify these by using the Business Process Editor. See Identity Manager Technical Reference for more information about configuring Identity Manager forms.
To create a risk analysis report, click Risk Analysis from the menu bar, and then select a report from the New list of options.
You can limit the report to scan selected resources; and depending on the resource type, you can scan for accounts:
Once defined, you can schedule risk analysis reports to run at specified intervals.