Task Templates
Identity Manager’s task templates enable you to use the Administrator interface to configure certain workflow behaviors, as an alternative to writing customized workflows.
Identity Manager provides these task templates you can configure:
- Create User Template — Configures properties for the create user task.
- Delete User Template — Configures properties for the delete user task.
- Update User Template — Configures properties for the update user task.
Read the following sections for information about working with task templates:
- Enabling the Task Templates — Describes how to make the task templates available to your system.
- Configuring the Task Templates — Describes how to use task templates to configure workflow behaviors.
Enabling the Task Templates
Before using task templates, you must map the task templates processes. To map process types:
- From the Identity Manager Administrator interface, select Tasks, and then select Configure Tasks.
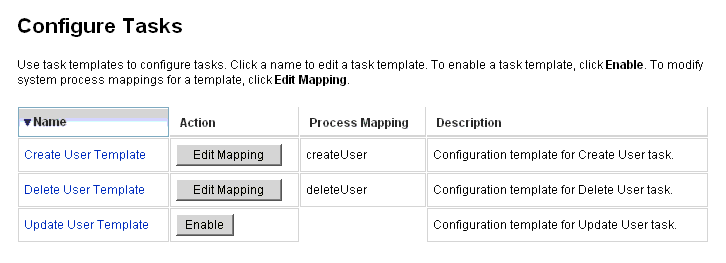
Figure 1. Configure Tasks
The Configure Tasks page contains a table with these columns:
- Name — Provides links to the Create User, Delete User, and Update User Templates.
- Action – Contains one of the following buttons:
- Enable – Displays if you have not enabled a template yet.
- Edit Mapping – Displays after you enable a template.
The procedure for enabling and editing process mappings is the same.
- Process Mapping – Lists the process type mapped for each template.
- Description – Provides a short description of each template.
- Click Enable to open the Edit Process Mappings page for a template.
For example, the following page displays for the Create User Template:
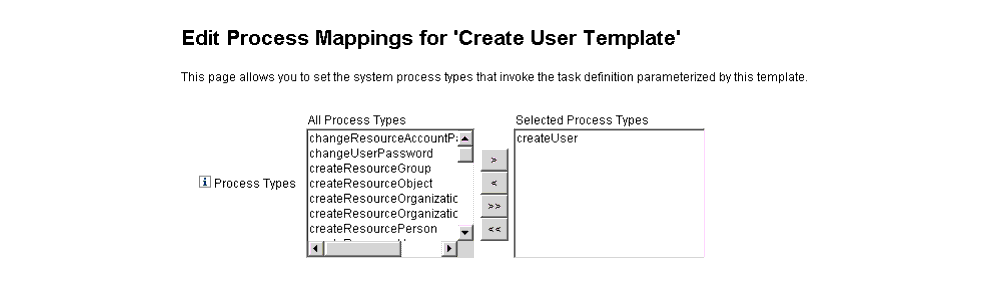
Figure 2. Edit Process Mappings Page
Note The default process type (in this case, createUser) automatically displays in the Selected Process Types list. If necessary, you can select a different process type from the menu.
- Generally, you do not map more than one process type for each template.
- If you remove the process type from the Selected Process Types list and do not select a replacement, a Required Process Mappings section displays instructing you to select a new task mapping.

Figure 3. Required Process Mappings Section
- Click Save to map the selected process type and return to the Configure Tasks page.
Note When the Configure Tasks page redisplays, an Edit Mapping button replaces the Enable button and the process name is listed in the Process Mapping column.
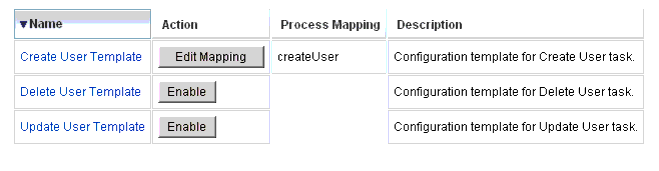
Figure 4. Updated Configure Tasks Table
- Repeat the mapping process for each of the remaining templates.
Notes:
- You can verify the mappings by selecting Configure > Form and Process Mappings. When the Configure Form and Process Mappings page displays, scroll down to the Process Mappings table and verify that the following Process Types are mapped to the Process Name Mapped To entries shown in the table.
|
Process Type
|
Process Name Mapped To
|
|
createUser
|
Create User Template
|
|
deleteUser
|
Delete User Template
|
|
updateUser
|
Update User Template
|
If the templates were enabled successfully, Process Name Mapped To entries should all include the word Template.
- You can also map these process types directly from this page if you type Template into the Process Name Mapped To column as shown in the table.
After successfully mapping the template process types, you can configure the task templates.
Configuring the Task Templates
To configure the different task templates, follow these steps:
- Select a Name link in the Task Template table. One of the following pages displays:
- Edit Task Template Create User Template — Open this page to edit the template used to create a new user account.
- Edit Task Template Delete User Template — Open this page to edit the template used to delete or deprovision a user’s account.
- Edit Task Template Update User Template — Open this page to edit the template used to update an existing user’s information.
Each Edit Task Template page contains a set of tabs that represent a major configuration area for the user workflow.
The following table describes each tab, its purpose, and which templates use that tab.
|
Tab Name
|
Purpose
|
Template
|
|
General
(default tab)
|
Allows you to define how a task name displays in the task bar located on the Home and Account pages, and in the task instance table on the Tasks page.
|
Create User and Update User Task Templates only
|
|
Allows you to specify how user accounts are deleted/deprovisioned
|
Delete User Template only
|
|
Notification
|
Allows you to configure email notifications sent to administrators and users when Identity Manager invokes a process.
|
All Templates
|
|
Approvals
|
Allows you to enable or disable approvals by type, designate additional approvers, and specify attributes from account data before Identity Manager executes certain tasks.
|
All Templates
|
|
Audit
|
Allows you to enable and configure auditing for the workflow.
|
All Templates
|
|
Provisioning
|
Allows you to run a task in the background and to allow Identity Manager to retry a task if the task fails.
|
Create User Task Template and Update User Task Templates only
|
|
Sunrise and Sunset
|
Allows you to suspend a creation task until a specified date/time (sunrise) or to suspend a deletion task until a specified date/time (sunset).
|
Create User Task Template only
|
|
Data Transformations
|
Allows you to configure how user data is transformed during provisioning.
|
Create User and Update User Task Templates only
|
- Select one of the tabs to configure workflow features for the template.
Instructions for configuring these tabs are provided in the following sections:
- When you are finished configuring the templates, click the Save button to save your changes.
Configuring the General Tab
This section provides instructions for configuring the General tab.
Note The Edit Task Template pages for the Create User Template and Update User Template are identical, so instructions for configuring the tabs are provided in one section.
For the Create User or Update User Templates
When you open the Edit Task Template Create User Template or Edit Task Template Update User Template the General tab page displays by default. This page consists of a Task Name text field and menu, as shown in the following figure.
Figure 5. General Tab: Create User Template
Task names can contain literal text and/or attribute references that are resolved during task execution.
To change the default task name, use the following steps:
- Type a name into the Task Name field.
You can edit or completely replace the default task name.
- The Task Name menu provides a list of attributes that are currently defined for the view associated with the task configured by this template. Select a attribute from the menu (optional).
Identity Manager appends the attribute name to the entry in the Task Name field. For example:
Create user $(accountId) $(user.global.email)
- When you are finished, you can
- Select a different tab to continue editing the templates.
- Click Save to save your changes and return to the Configure Tasks page.
The new task name will display in the Identity Manager task bar, located at the bottom of the Home and Accounts tabs.
- Click Cancel to discard your changes and return to the Configure Tasks page.
For the Delete User Template
When you open the Edit Task Template Delete User Template, the General tab page displays by default.
To specify how user accounts are deleted/deprovisioned, use the following steps:
- Use the Delete Identity Manager Account buttons to specify whether an Identity Manager account can be deleted during a delete operation, as follows:
- Never — Enable this button to prevent accounts from being deleted.
- Only if user has no linked accounts after deprovisioning — Enable this button to allow user account deletions only if there are no linked resource accounts after deprovisioning.
- Always — Enable this button to always allow user account deletions — even if there are still resource accounts assigned.
- Use the Resource Accounts Deprovisioning boxes to control resource account deprovisioning for all resource accounts, as follows:
- Delete All — Enable this box to delete all accounts representing the user on all assigned resources.
- Unassign All — Enable this box to unassign all resource accounts from the user. The resource accounts will not be deleted.
- Unlink All — Enable this box to break all links from the Identity Manager system to the resource accounts. Users with accounts that are assigned but not linked will display with a badge to indicate that an update is required.
Note These controls override the behaviors in the Individual Resource Accounts Deprovisioning table.
- Use the Individual Resource Accounts Deprovisioning boxes to allow a
more fine-grained approach to user deprovisioning (compared to Resource Accounts Deprovisioning) as follows:
- Delete — Enable this box to delete the account that represents the user on the resource.
- Unassign — Enable this box and the user will no longer be assigned directly to the resource. The resource account will not be deleted.
- Unlink — Enable this box to break the link from the Identity Manager system to the resource accounts. Users with accounts that are assigned but not linked will display with a badge to indicate that an update is required.
Note The Individual Resource Accounts Deprovisioning options are useful if you want to specify a separate deprovisioning policy for different resources. For example, most customers do not want to delete Active Directory users because each user has a global identifier that can never be re-created following deletion.
However, in environments where new resources are added, you might not want to use this option because the deprovisioning configuration would have to be updated every time you add a new resource.
- When you are finished, you can
- Select a different tab to continue editing the templates.
- Click Save to save your changes and return to the Configure Tasks page.
- Click Cancel to discard your changes and return to the Configure Tasks page.
Configuring the Notification Tab
All of the Task Templates support sending email notifications to administrators and users when Identity Manager invokes a process — usually after the process has completed. You can use the Notification tab to configure these notifications.
Note Identity Manager uses email templates to deliver information and requests for action to administrators, approvers, and users. For more information about Identity Manager email templates, see the section titled Understanding Email Templates in this guide.
The following figure shows the Notification page for the Create User Template.
Figure 6. Notification Tab: Create User Template
To specify how Identity Manager will determine notification recipients, use the following process:
- Complete the Administrator Notifications section.
- Complete the User Notifications section.
- When you are finished, you can
- Select a different tab to continue editing the templates.
- Click Save to save your changes and return to the Configure Tasks page.
- Click Cancel to discard your changes and return to the Configure Tasks page.
Configuring Administrator Notifications
Select an option from the Determine Notification Recipients from menu to determine the method for notifying administrator recipients.
Specifying Recipients by Attribute
To derive notification recipients’ account IDs from a specified attribute, use the following steps:
Note The attribute must resolve to a string that represents a single account ID or to a list in which the elements are account IDs.
- Select Attribute from the Determine Notification Recipients from menu and the following new options display:

Figure 7. Administrator Notifications: Attribute
- Notification Recipient Attribute — Provides a list of attributes (currently defined for the view associated with the task configured by this template) used to determine recipient account IDs.
- Email Template — Provides a list of email templates.
- Select an attribute from the Notification Recipient Attribute menu.
The attribute name displays in the text field adjacent to the menu.
- Select a template from the Email Template menu to specify a format for the administrators’ notification email.
Specifying Recipients by Rule
To derive notification recipients’ account IDs from a specified rule, use the following steps:
Note When evaluated, the rule must return a string that represents a single account ID or to a list in which the elements are account IDs.
- Select Rule from the Determine Notification Recipients from menu and the following new options display in the Notification form:
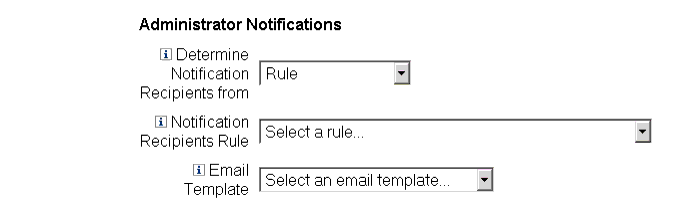
Figure 8. Administrator Notifications: Rule
- Notification Recipient Rule — Provides a list of rules (currently defined for your system) that, when evaluated, returns the recipients’ account IDs.
- Email Template — Provides a list of email templates.
- Select a rule from the Notification Recipient Rule menu.
- Select a template from the Email Template menu to specify a format for the administrators’ notification email.
Specifying Recipients by Query
Note Only LDAP and Active Directory resource queries are supported at this time.
To derive notification recipients’ account IDs by querying a specified resource, use the following steps:
- Select Query from the Determine Notification Recipients from menu and the following new options display in the Notification form:
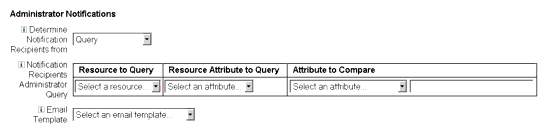
Figure 9. Administrator Notifications: Query
- Notification Recipient Administrator Query — Provides a table consisting of the following menus, which you can use to construct a query:
- Resource to Query — Provides a list of resources currently defined for your system.
- Resource Attribute to Query — Provides a list of resource attributes currently defined for your system.
- Attribute to Compare — Provides a list of attributes currently defined for your system.
- Email Template — Provides a list of email templates.
- Select a resource, resource attribute, and an attribute to compare from these menus to construct the query.
- Select a template from the Email Template menu to specify a format for the administrators’ notification email.
Specifying Recipients from the Administrators List
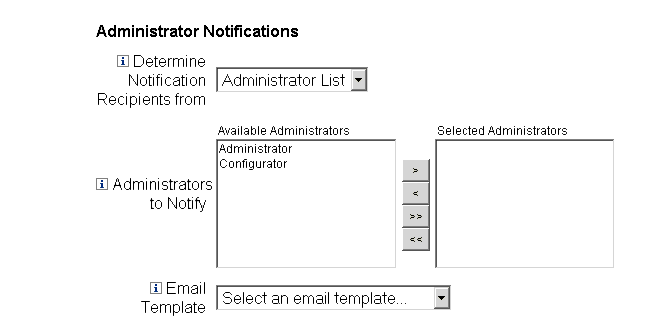
Select Administrators List from the Determine Notification Recipients from menu and the following new options display in the Notification form:
Figure 10. Administrator Notifications: Administrators List
- Administrators to Notify — Provides a selection tool with a list of available administrators.
- Email Template — Provides a list of email templates.
- Select one or more administrators in the Available Administrators list and use the
 button or
  button to move the selected name(s) to the Selected Administrators list.
 - Select a template from the Email Template menu to specify a format for the administrators’ notification email.
Configuring User Notifications
When specifying users to be notified, you must also specify the name of an email template to be used to generate the email used for notification.
To notify the user being created, updated, or deleted enable the Notify user checkbox and then select an email template from the menu.
Figure 11. Specifying an Email Template
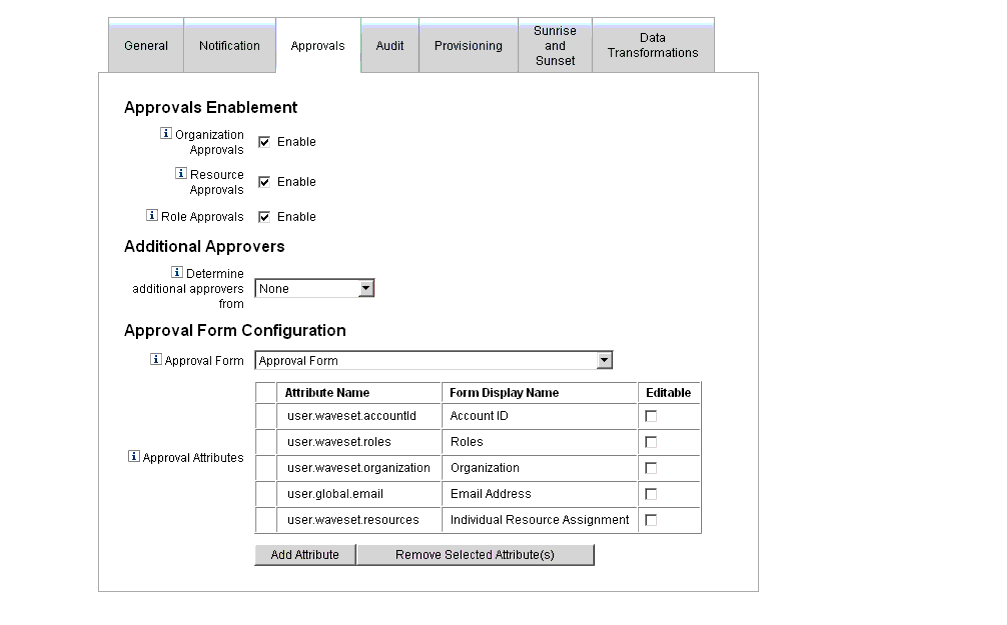
Configuring the Approvals Tab
You can use the Approvals tab to designate additional approvers and to specify attributes for the task approval form before Identity Manager executes the create, delete, or update user tasks.
Traditionally, administrators who are associated with a particular organization, resource, or role are required to approve certain tasks before execution. Identity Manager also allows you to designate additional approvers — additional administrators who will be required to approve the task.
Note If you configure Additional Approvers for a workflow, you are requiring approval from the traditional approvers and from any additional approvers specified in the template.
The following figure illustrates the initial Approvals page administrative user interface
Figure 12. Approvals Tab: Create User Template
To configure approvals, use the following process:
- When you are finished configuring the Approvals tab, you can
- Select a different tab to continue editing the templates.
- Click Save to save your changes and return to the Configure Tasks page.
- Click Cancel to discard your changes and return to the Configure Tasks page.
Enabling Approvals
Use the following Approvals Enablement checkboxes to require approvals before the create user, delete user, or update user tasks can proceed.
Note By default, these checkboxes are enabled for the Create User and Update User Templates, but they are disabled for the Delete User Template.
- Organization Approvals — Enable this checkbox to require approvals from any configured organizational approvers.
- Resource Approvals — Enable this checkbox to require approvals from any configured resource approvers.
- Role Approvals — Enable this checkbox to require approvals from any configured role approvers.
Specifying Additional Approvers
Use the Determine additional approvers from menu to specify how Identity Manager will determine additional approvers for the create user, delete user, or update user tasks. The options on this menu include:
|
Option
|
Description
|
|
None (default)
|
No additional approvers are required for task execution.
|
|
Attribute
|
Approvers’ account IDs are derived from within an attribute specified in the user’s view.
|
|
Rule
|
Approvers’ account IDs are derived by evaluating a specified rule.
|
|
Query
|
Approvers’ account IDs are derived by querying a particular resource.
|
|
Administrator List
|
Approvers are chosen explicitly from a list.
|
When you select any of these options (except None), additional options display in the administrative user interface. Instructions for configuring these options begin on page 14.
Use the instructions provided in the following sections to specify a method for determining additional approvers.
- From the Administrators List (page 18)
From Attributes
To determine additional approvers from an attribute,
- Select Attribute from the Determine additional approvers from menu.
Note The attribute must resolve to a string that represents a single account ID or to a list in which the elements are account IDs.
The following new options display:

Figure 13. Additional Approvers: Attribute
- Approver Attribute — Provides a list of attributes (currently defined for the view associated with the task configured by this template) used to determine approvers’ account IDs.
- Approval times out after — Provides a method for specifying when the approval will time out.
Note The Approval times out after setting affects both initial approvals and escalated approvals.
- Use the Approver Attribute menu to select an attribute.
The selected attribute displays in the adjacent text field.
- Decide whether you want the approval request to timeout after a specified period of time.
From Rules
To derive the approvers’ account IDs from a specified rule, use the following steps:
- Select Rule from the Determine additional approvers from menu.
Note When evaluated, the rule must return a string that represents a single account ID or to a list in which the elements are account IDs.
The following new options display.

Figure 14. Additional Approvers: Rule
- Approver Rule — Provides a list of rules (currently defined for your system) that, when evaluated, returns the recipients’ account IDs.
- Approval times out after — Provides a method for specifying when the approval will time out.
Note The Approval times out after setting affects both initial approvals and escalated approvals.
- Select a rule from the Approver Rule menu.
- Decide whether you want the approval request to timeout after a specified period of time.
From a Query
Note Only LDAP and Active Directory resource queries are supported at this time.
To derive approvers account IDs by querying a specified resource, use these steps:
- Select Query from the Determine additional approvers from menu and the following new options display:
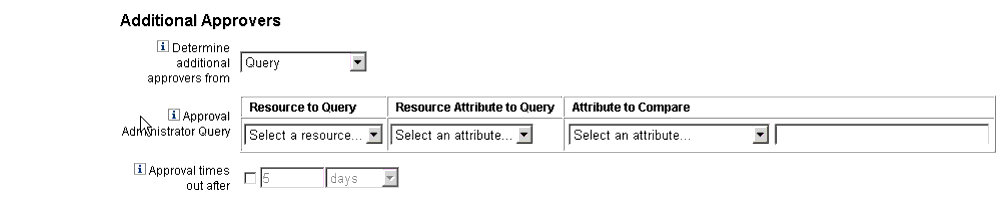
Figure 15. Additional Approvers: Query
- Approval Administrator Query — Provides a table consisting of the following menus, which you can use to construct a query:
- Resource to Query — Provides a list of resources currently defined for your system.
- Resource Attribute to Query — Provides a list of resource attributes currently defined for your system.
- Attribute to Compare — Provides a list of attributes currently defined for your system.
- Approval times out after — Provides a method for specifying when the approval will time out.
Note The Approval times out after setting affects both initial approvals and escalated approvals.
- Construct a query as follows:
- Select a resource from the Resource to Query menu.
- Select attributes from the Resource Attribute to Query and Attribute to Compare menus.
- Decide whether you want the approval request to timeout after a specified period of time.
From the Administrators List
To explicitly choose additional approvers from the Administrators List,
- Select Administrators List from the Determine additional approvers from menu and the following new options display:
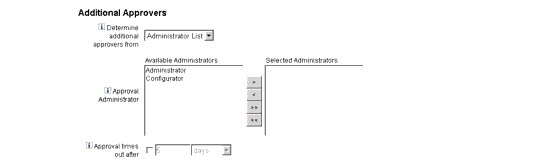
Figure 16. Additional Approvers: Administrators List
- Administrators to Notify — Provides a selection tool with a list of available administrators.
- Approval Form — Provides a list of user forms additional approvers can use to approve or reject an approval request.
- Approval times out after — Provides a method for specifying when the approval will time out.
Note The Approval times out after setting affects both initial approvals and escalated approvals.
- Select one or more administrators in the Available Administrators list and use the
 button or
  button to move the selected name(s) to the Selected Administrators list.
 - Decide whether you want the approval request to timeout after a specified period of time.
Configuring Approval Timeouts
To configure an approval timeouts,
- Enable the checkbox.
The adjacent text field and menu become active, and the Timeout Action buttons display, as shown in the following figure.

Figure 17. Approval Timeout Options
- Use the Approval times out after text field and menu to specify a timeout period as follows:
- Select seconds, minutes, hours, or days from the menu.
- Enter a number in the text field to indicate how many seconds, minutes, hours, or days you want to specify for the timeout.
Note The Approval times out after setting affects both initial approvals and escalated approvals.
- Enable one of the following Timeout Action buttons to specify what happens when the approval request times out:
- Reject Request — Identity Manager automatically rejects the request if it is not approved before the specified timeout period.
- Escalate the approval — Identity Manager automatically escalates the request to another approver if the request is not approved before the specified timeout period.
When you enable this button, new options display because you must specify how Identity Manager will determine approvers for an escalated approval. Continue to Escalating Approvals on page 9-20 for instructions.
- Execute a task — Identity Manager automatically executes an alternate task if the approval request is not approved before the specified timeout period.
Enable this button and the Approval Timeout Task menu displays so you can specify a task to execute if the approval request times out. Continue to Executing a Task on page 9-22 for instructions.
Escalating Approvals
When you enable the Timeout Action Escalate the approval button, the Determine escalation approvers from menu displays as follows:
Figure 18. Determine Escalation Approvers From Menu
Select one of the following options from this menu to specify how approvers are determined for an escalated approval.
- Attribute — Determine approver account IDs from within an attribute specified in the new user’s view.
Note The attribute must resolve to a string that represents a single account ID or to a list in which the elements are account IDs.
When the Escalation Administrator Attribute menu displays, select an attribute from the list. The selected attribute displays in the adjacent text field.

Figure 19. Escalation Administrator Attribute Menu
- Rule — Determine approver account IDs by evaluating a specified rule.
Note When evaluated, the rule must return a string that represents a single account ID or to a list in which the elements are account IDs.
When the Escalation Administrator Rule menu displays, select a rule from the list.

Figure 20. Escalation Administrator Rule Menu
- Query — Determine approvers account IDs by querying a particular resource.
When the Escalation Administrator Query menus display, build your query as follows:
- Select a resource from the Resource to Query menu.
- Select an attribute from the Resource Attribute to Query menu.
- Select an attribute from the Attribute to Compare menu.

Figure 21. Escalation Administrator Query Menu
- Administrator List (default) — Choose approvers explicitly from a list.
When the Escalation Administrator selection tool displays, select approver(s) as follows:
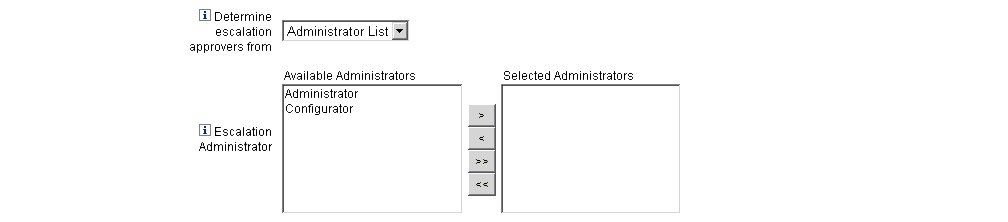
Figure 22. Escalation Administrator Selection Tool
- Select one or more administrator’s names from the Available Administrators list.
- Use the
 button or the
  button to move the name(s) to the Selected Administrators list.
Executing a Task
When you enable the Timeout Action Execute a task button, the Approval Timeout Task menu displays as follows:
Figure 23. Approval Timeout Task Menu
Specify a task to execute if the approval request times out. For example, you might allow the requester to submit a help desk request or send a report to the Administrator.
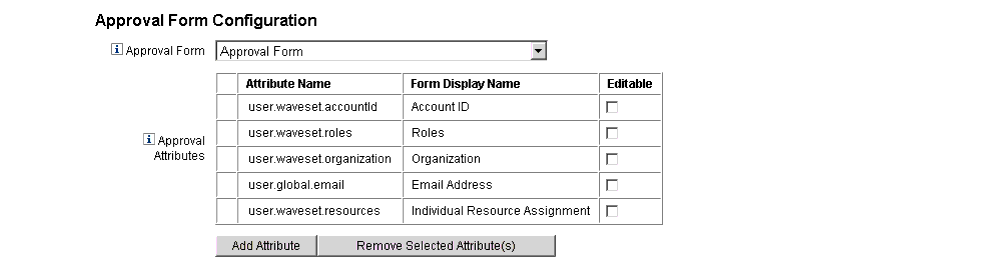
Configuring the Approval Form
Note The Delete User Template does not contain an Approval Form Configuration section. You can configure this section for Create User and Update User Templates only.
You can use features in the Approval Form Configuration section to select an approval form, and add attributes to (or remove attributes from) the approval form.
Figure 24. Approval Form Configuration
By default, the Approval Attributes table contains the following standard attributes:
To configure an Approval form for additional approvers:
- Select a form from the Approval Form menu.
Approvers will use this form to approve or reject an approval request.
- Enable checkboxes in the Editable column of the Approval Attributes table to allow approvers to edit the attribute value.
For example, if you enable the user.waveset.accountId checkbox the approver can change the user’s account ID.
Note If you modify any account-specific attribute values in the approval form, you will also override any global attribute values with the same name when the user is actually provisioned.
For example, if resource R1 exists in your system with a description schema attribute, and you add user.accounts[R1].description attribute to the approval form as an editable attribute, any changes to the description attribute value in the approval form will override the value propagated from global.description for resource R1 only.
- Click the Add Attribute or Remove Selected Attribute(s) buttons to specify attributes from the new user’s account data to display in the approval form.
Note You cannot remove the default attributes from an approval form unless you modify the XML file.
Adding Attributes
To add attributes to the approval form
- Click the Add Attribute button located under the Approval Attributes table.
The Attribute name menu becomes active in the Approval Attributes table, as shown in the following figure:
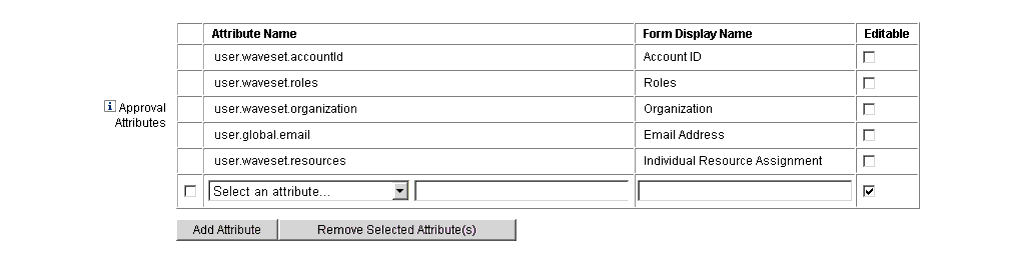
Figure 25. Adding Approval Attributes
- Select an attribute from the menu.
The selected attribute name displays in the adjacent text field and the attribute’s default display name displays in the Form Display Name column.
For example, if you select the user.waveset.organization attribute, the table will contain the following information:
- If necessary, you can change the default attribute name or the default Form Display Name by typing a new name into the appropriate text field.
- Enable the Editable checkbox if you want to allow the approver to change the attribute’s value.
For example, the approver may want to override information such as the user’s email address.
- Repeat these steps to specify additional attributes.
Removing Attributes
Note You cannot remove the default attributes from an approval form unless you modify the XML file.
To remove attributes from the approval form, use the following steps:
- Enable one or more checkboxes in the leftmost column of the Approval Attributes table.
- Click the Remove Selected Attribute(s) button to immediately remove the selected attributes from the Approval Attributes table.
For example, user.global.firstname and user.waveset.organization would be removed from the following table when you clicked the Remove Selected Attribute(s) button.
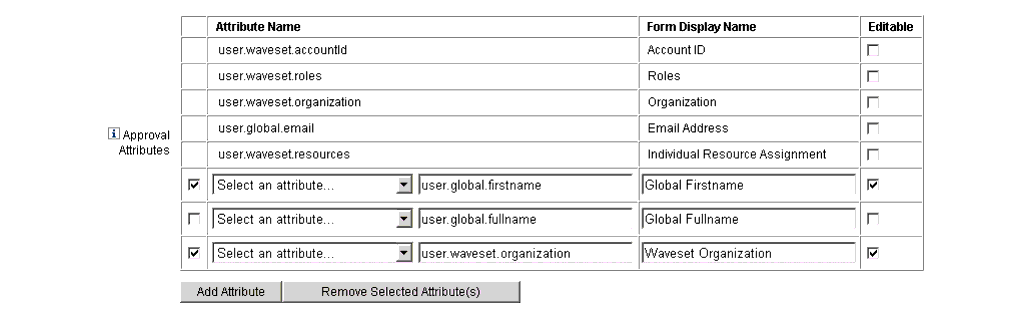
Figure 26. Removing Approval Attributes
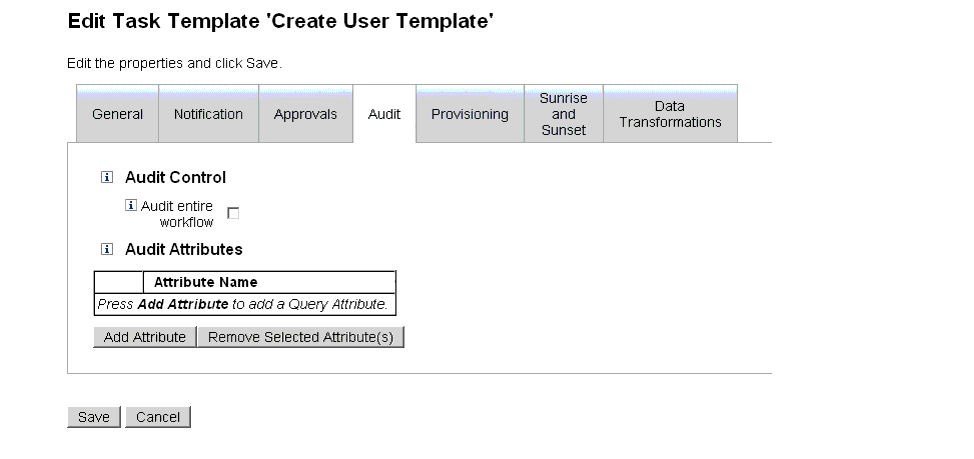
Configuring the Audit Tab
All of the configurable Task Templates support configuring workflows to audit certain tasks. Specifically, you can configure the Audit tab to control whether workflow events will be audited and specify which attributes will be stored for reporting purposes.
Figure 27. Audit Create User Template
To configure auditing from the User Template’s Audit tab:
- Enable the Audit entire workflow checkbox to activate the workflow auditing feature.
- Click the Add Attribute button (located in the Audit Attributes section) to select attributes you want to record for reporting purposes.
- When the Select an attribute menu displays in the Audit Attributes table, select an attribute from the list.
The attribute name will display in the adjacent text field.

Figure 28. Adding an Attribute
To remove attributes from the Audit Attributes table,
- Enable the checkbox adjacent to the attribute you want to remove.
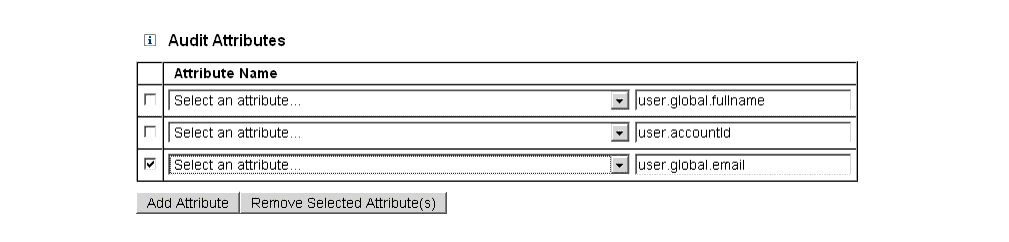
Figure 29. Removing the user.global.email Attribute
- Click the Remove Selected Attribute(s) button.
When you are finished configuring this tab, you can
- Select a different tab to continue editing the template(s).
- Click Save to save your changes and return to the Configure Tasks page.
- Click Cancel to discard your changes and return to the Configure Tasks page.
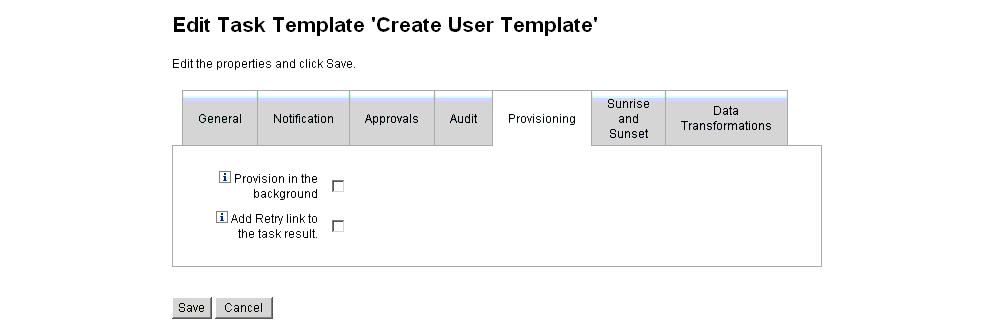
Configuring the Provisioning Tab
Note This tab is available for the Create and Update User Templates only.
You can use the Provisioning tab to configure the following options, which are related to provisioning:
Figure 30. Provisioning Tab: Create User Template
- Provision in the background – Enable this checkbox to run a create, delete, or update task in the background instead of running the task synchronously.
Provisioning in the background allows you to continue working in Identity Manager while the task executes.
- Add Retry link to the task result – Enable this checkbox to add a Retry link to the user interface when a provisioning error results from task execution. The Retry link allows the user to attempt the task again if it failed on the first attempt.
When you are finished configuring the Provisioning tab, you can
- Select a different tab to continue editing the template.
- Click Save to save your changes and return to the Configure Tasks page.
- Click Cancel to discard your changes and return to the Configure Tasks page.
Configuring the Sunrise and Sunset Tab
Note This tab is available for the Create User Template only.
You use the Sunrise and Sunset tab to select a method for determining the time and date when
- Provisioning will take place for a new user (sunrise).
- Deprovisioning will take place for a new user (sunset).
For example, you can specify a sunset date for a temporary worker whose contract expires after six months.
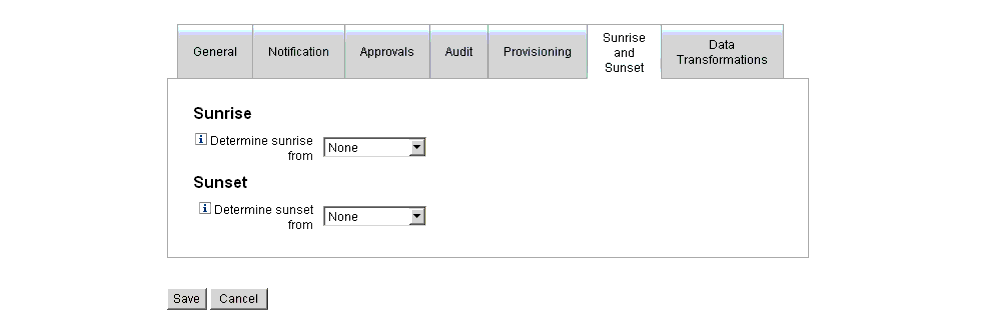
Figure 31. Sunrise and Sunset Tab: Create User Template
The rest of this section provides instructions for configuring the Sunrise and Sunset tab. The information is organized as follows:
Configuring Sunrises
This section provides instructions for determining the time and date provisioning will take place for a new user, and for specifying the user who will own the work item for sunrise.
To configure sunrises:
- Select one of the following options from the Determine sunrise from menu to specify how Identity Manager will determine a time and date for provisioning.
- Specifying a Time — Delays provisioning until a specified time in the future. Continue to page 29 for instructions.
- Specifying a Date — Delays provisioning until a specified calendar date in the future. Continue to page 29 for instructions.
- Specifying an Attribute — Delays provisioning until a specified date and time based on the attribute’s value in the user’s view. The attribute must contain a date/time string. When specifying an attribute to contain a date/time string, you can specify a data format to which the data is expected to conform.
Continue to page 30 for instructions.
- Specifying a Rule — Delays provisioning based on a rule that, when evaluated, produces a date/time string. As when specifying an attribute, you can specify a data format to which the data is expected to conform.
Continue to page 30 for instructions.
Note The Determine sunrise from menu defaults to the None option, which allows provisioning to take place immediately.
- Select a user from the Work Item Owner menu to specify who will own the work item for sunrise.
Note Sunrise work items are available from the Approvals tab.
- When you are finished configuring sunrises, you can
- Select a different tab to continue editing the Create User Template.
- Click Save to save your changes and return to the Configure Tasks page.
- Click Cancel to discard your changes and return to the Configure Tasks page.
Specifying a Time
To delay provisioning until a specified time,
- Select Specified time from the Determine sunrise from menu.
- When a new text field and menu display to the right of the Determine sunrise from menu, type a number into the blank text field and select a unit of time from the menu.
For example, if you want to provision a new user in two hours, specify the following:

Figure 32. Provisioning a New User in Two Hours
Specifying a Date
To delay provisioning until a specified calendar date,
- Select Specified day from the Determine sunrise from menu.
The following new menus display to the right of the Determine sunrise from menu.

Figure 33. New Menus
- Use these new menus to specify which week, which day of the week, and which month the provisioning should occur.
For example, if you want to provision a new user on the second Monday in September, specify the following:

Figure 34. Provisioning a New User by Date
Specifying an Attribute
To determine the provisioning date and time based on the value of an attribute in the users account data,
- Select Attribute from the Determine sunrise from menu and the following options become active:
- Sunrise Attribute menu – Provides a list of attributes currently defined for the view associated with the task configured by this template.
- Specific Date Format checkbox and menu – Enables you to specify a date format string for the attribute value (if necessary).
Note If you do not enable the Specific Date Format checkbox, date strings must conform to a format that is acceptable to the FormUtil method’s convertDateToString. Consult the product documentation for a complete list of supported date formats.
- Select an attribute from the Sunrise Attribute menu.
- If necessary, enable the Specific Date Format checkbox and when the Specific Date Format field becomes active, enter a date format string.
For example, to provision a new user based on their waveset.accountId attribute value using a day, month, and year format specify the following:

Figure 35. Provisioning a New User by Attribute
Specifying a Rule
To determine the provisioning date and time by evaluating a specified rule,
- Select Rule from the Determine sunrise from menu and the following options become active:
- Sunrise Rule menu – Provides a list of rules currently defined for your system.
- Specific Date Format checkbox and menu – Enables you to specify a date format string for the rule’s returned value (if necessary).
Note If you do not enable the Specific Date Format checkbox, date strings must conform to a format that is acceptable to the FormUtil method’s convertDateToString. Consult the product documentation for a complete list of supported date formats.
- Select a rule from the Sunrise Rule menu.
- If necessary, enable the Specific Date Format checkbox and when the Specific Date Format field becomes active, enter a date format string.
For example, to provision a new user based on the Email rule using a year, month, day, hours, minutes, and seconds format specify the following:

Figure 36. Provisioning a New User by Rule
Configuring Sunsets
The options and procedures for configuring sunsets (deprovisioning) are essentially the same as those provided for sunrises (provisioning) in the Configuring Sunrises section.
The only difference is that the Sunset section also provides a Sunset Task menu because you must specify a task to deprovision the user on the specified date and time.
To configure a sunset,
- Use the Determine sunset from menu to specify the method for determining when deprovisioning will take place:
Note The Determine sunset from menu defaults to the None option, which allows deprovisioning to take place immediately.
- Specified time – Delays deprovisioning until a specified time in the future. Review Specifying a Time for instructions.
- Specified date – Delays deprovisioning until a specified calendar date in the future. Review Specifying a Date for instructions.
- Attribute – Delays deprovisioning until a specified date and time based on the attribute’s value in the users’ account data. The attribute must contain a date/time string. When specifying an attribute to contain a date/time string, you can specify a date format to which the data is expected to conform.
Review Specifying an Attribute for instructions.
- Rule – Delays deprovisioning based on a rule that, when evaluated, produces a date/time string. As when specifying an attribute, you can specify a date format to which the data is expected to conform.
Review Specifying a Rule for instructions.
- Use the Sunset Task menu to specify a task to deprovision the user on the specified date and time.
- When you are finished configuring this tab, you can
- Select a different tab to continue editing the template.
- Click Save to save your changes and return to the Configure Tasks page.
- Click Cancel to discard your changes and return to the Configure Tasks page.
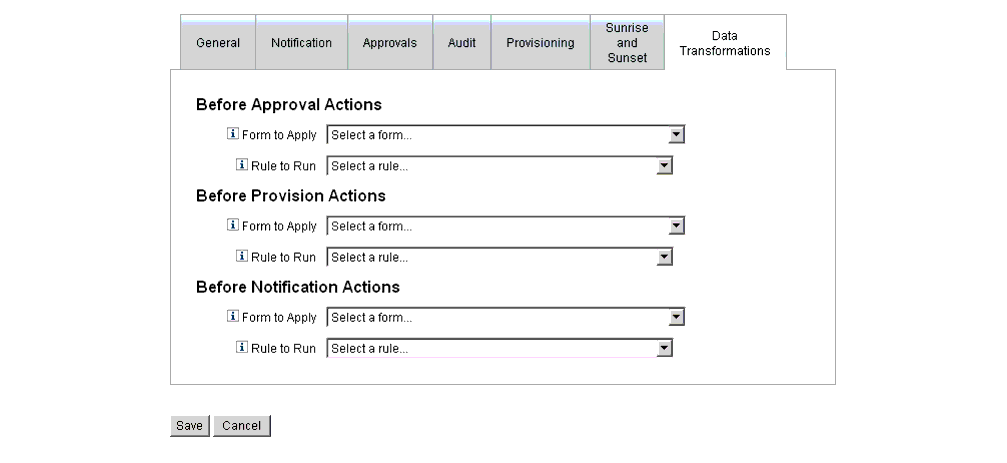
Configuring the Data Transformations Tab
Note This tab is available for the Create and Update User Templates only.
If you want to alter user account data as the workflow executes, you can use the Data Transformations tab to specify how Identity Manager will transform the data during provisioning.
For example, if you want forms or rules to generate email addresses that conform to company policy or if you want to generate sunrise or sunset dates.
When you select the Data Transformations tab, the following page displays:
Figure 37. Data Transformations Tab: Create User Template
This page consists of the following sections:
- Before Approval Actions – Configure the options in this section if you want to transform user account data before sending approval requests to specified approvers.
- Before Provision Actions – Configure the options in this section if you want to transform user account data before a provisioning action.
- Before Notification Actions – Configure the options in this section if you want to transform user account data before notifications are sent to specified recipients.
You can configure the following options in each section:
- Form to Apply menus – Provide a list of the forms currently configured for your system. Use these menus to specify forms that will be used to transform data from the users accounts.
- Rule to Run menus – Provide a list of the rules currently configured for your system. Use these menus to specify rules that will be used to transform data from the users accounts.
When you are finished configuring this tab, you can
- Select a different tab to continue editing the template.
- Click Save to save your changes and return to the Configure Tasks page.
- Click Cancel to discard your changes and return to the Configure Tasks page.
9
Task Templates