This chapter explains important steps to be performed before you replace field-
replaceable units (FRUs). Topics covered in this chapter include the following:
-
Tools needed to work on the system
-
How to disconnect peripherals
-
How to open the system unit
-
How to attach a wrist strap
Before you replace FRUs, you must halt the system in an orderly manner.
Caution -

You must halt the system in an orderly manner. When the operating
system or any other standalone program has already booted, do not use the
L1-A keys to halt the system. Abruptly aborting program execution may cause
damage to data files.
To Halt the System
1. Preparation.
a.
Save any files you are presently editing.
b.
Quit from any applications that will lose information when the system
halts.
2. Become superuser.
a.
Enter /bin/su to become superuser.
b.
Enter the superuser password.
3. Halt the system.
Enter /usr/etc/halt. The system displays system halt messages
followed by the > Monitor prompt.

4. Turn off the power.
Turn off the power in this order:
a.
External devices (if you have any)
b.
System unit
c.
Monitor
Caution -

Make sure your system is shut off. The green LED at the front of the
system unit should not be lit, and the fan should not be running. Do not
disconnect the power cord from the system unit's power outlet or the wall
outlet. This connection provides the ground path necessary to safely remove
and install SBus cards and internal components.
Halting a System That Does Not Respond Normally
To halt a system that is hung, or frozen, and unresponsive to commands:
1. Press L1-A.
The system displays the system boot prompt.
Note -
On some keyboards, L1-A appears on the front face of the Stop key. On
a system that has a terminal as a console, rather than a Sun keyboard and
bitmapped monitor, you must press Break instead of L1-A to obtain a boot
prompt.
2. Enter n
The system displays a help message and an ok prompt.
3. Enter sync
The system displays panic and boot messages.
The sync command helps prevent the system from losing data that was not
preserved when the system hung.
4. Wait for the login prompt.
Wait until the system boots and displays a system login prompt.
5. Turn off the power.
Turn off the power in this order:
a.
External storage devices (if you have any)
b.
System unit
c.
Monitor
Caution -

Make sure your system is shut off. The green LED on the front of
the system unit should not be lit, and the fan should not be running. Do not
disconnect the power cord from the system unit's power outlet or the wall
socket. This connection provides the ground path necessary to safely remove
and install the printed circuit boards and components.
The following example shows how to halt a hung system:

For additional information on the halt procedure see Chapter 1 of the Sun
System & Network Managers Guide and also the System & Network Administration
manual.
To remove and replace FRUs, you will need the following tools and materials:
-
Small phillips head screwdriver
-
Small Flat blade screwdriver
-
Hex head nutdriver, 3/16 inch
-
Anti-static mat for the SIMMs and the main logic board
-
A Volt-ohmmeter (VOM) for checking voltages and fuses
If your system unit has external storage devices connected to it, detach the
device's SCSI connector from the back of the system unit.
To detach external storage devices from the system unit:
1. Press in on the finger clips on the connector connecting the device to the
system unit.
2. Pull the connector off.
This action disconnects the SCSI cable from the system unit.
Figure 3-1 shows how to open the system unit. The latch buttons at the sides
allow the unit top and unit bottom to disengage.
To open the unit and gain access to the FRUs inside the system unit:
1. Turn off the power to the system unit.
2. Remove the top section from the system unit.
To remove the top section from the system unit do the following in sequence
(see Figure 3-1):
a.
Remove the screw holding the lock block to the back panel.
b.
Position the system on the table so that there is enough space to lay the
top section of the unit flat in front of the bottom.
c.
Grasp the unit top with your fingers over the latch buttons at the sides.
Press down on the unit top and depress the latch buttons.
d.
Rotate the unit top up and toward the front panel. Lay the unit top flat
on the table. The unit top and bottom are still connected by the power
and data cables leading from the disk drive(s) and power supply in the
unit top to the main logic board in the unit bottom.
Note -
The unit top contains the power supply and disk drives (see Figure 3-2)
and is the heavier of the two sections.
Warning -

Before powering up your system again, be sure to close the unit.
See "Closing the System Unit" towards the end of Chapter 5.
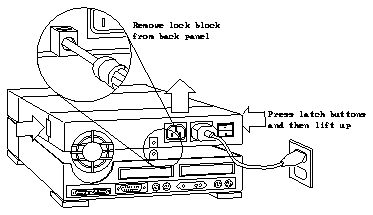
Figure 3-1
Opening the System Unit
Figure 3-3 and Figure 3-4 show the various components of the system unit.
The main logic board occupies the unit bottom. The SBus cards plug into the
main logic board. Four slots on the main logic board accept the Single Inline
Memory Modules (SIMMs).
The unit top contains the power supply in the rear of the top section. Mounted
just in front of the power supply is the bracket for both the hard disk drive and
the diskette drive. If you have upgraded your SPARCstation IPX from a
SPARCstation IPC you may have an earlier version of the disk drive bracket.
See Appendix F for information on earlier model disk drive brackets.
Caution -

The lithium battery molded into the NVRAM, located on the main
logic board next to the Boot PROM, may explode if mishandled or attempts are
made to recharge it or disassemble it.
Caution -

Electronic parts may be damaged by static electricity if touched by a
person not wearing a properly grounded wrist strap.
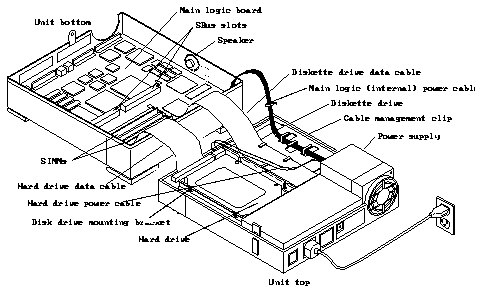
Figure 3-2
System Unit and Subassemblies

Figure 3-3
Top View of System Unit and Subassemblies
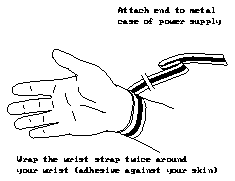
A wrist strap (or grounding strap) provides grounding for static electricity
between your body and the chassis of the system unit. Electric current and
voltage do not pass through the wrist strap.
After you have opened the system unit and before you handle any internal
components, attach the wrist strap to your wrist and to the metal casing of the
power supply in the top of the system unit. Parts that require the use of a wrist
strap are packed with one.
Caution -

If you do not wear a wrist strap, boards, cards and modules can be
damaged by harmful electrical charges.
To use a wrist strap:
1. Wrap the grounding strap twice around your wrist.
Make sure the adhesive side is against your skin.
2. Attach the end with the adhesive copper strip to the metal casing of the
power supply in the top of the system unit (see Figure 3-2).