
This chapter explains how to remove defective FRUs and install new ones in
the system unit. Part numbers for the FRUs are given in Appendix B.
The following units are field-replaceable:
Unit bottom
-
Single Inline Memory Modules (SIMMs)
Unit top
External parts
-
Mouse, mouse pad, and cable
Cables
-
Diskette drive data cable
-
Hard disk drive data cable
-
AC power cable for the system unit
-
AC power cable for the video monitor
-
Serial port adapter cable
Before you replace FRUs, make sure you have done the following:
-
Gathered the proper tools
-
Removed the external storage devices (if any)
Instructions for the steps listed above are described in Chapter 3.
Caution -

Printed circuit boards are made of delicate electronic components
that are extremely sensitive to static electricity. Ordinary amounts of static
from your clothes or work environment can destroy the boards.
Handle boards only by the non-conducting edges. Do not touch the
components themselves or any metal parts. Wear a grounding (wrist) strap
when handling the boards. Attach the wrist strap to the metal casing of the
power supply at the rear of the unit top.
Do not disconnect the power cord from the system unit's power outlet or from
the wall socket. This connection provides the ground path necessary to safely
remove and install the printed circuit boards and components. In addition,
keep the internal power supply cable connected to the main logic board.
Make sure that the system unit's power is turned Off by checking to make sure
that the green light-emitting diode (LED) at the front of the chassis is not lit
and the fan in the power supply is not running.
Before you attempt to replace or install a new board or module, make sure that
you have the right unit. Figure 4-1 shows a top view of the open system unit.
Part identification is printed on the part being replaced. Part Numbers are
presented in Appendix B.
Figure 4-1
Top View of the Unit
The system comes equipped with sixteen megabytes of Dynamic Random
Access Memory (DRAM). Physically, DRAM chips are grouped together in
Single Inline Memory Modules (SIMMs). Each 4-megabyte or 16-megabyte
SIMM plugs into one of the SIMM slots on the system unit's main logic board.
Additional SIMMs may be added to the system unit as needed, up to a
maximum of 4 SIMMs. For more information on installing SIMMs refer to the
Installing SPARCstation IPX and SPARCstation ELC SIMMs document.

Figure 4-2
4-megabyte SIMM
The maximum SPARCstation IPX memory configuration is 64 megabytes using
16-megabyte SIMMs, or 16 megabytes using 4-megabyte SIMMs. You can mix
4-megabyte and 16-megabyte SIMMs in the system. To add memory to a system
that has four 4-megabyte SIMMs, you must replace one or more 4-megabyte SIMMs
with one or more 16-megabyte SIMMs.
When you add memory modules to your system, follow these guidelines:
-
Slot 0 must always contain a SIMM. If slot 0 is empty or if the SIMM is
improperly installed, the system fails its power-on tests.
-
If you mix 4-megabyte and 16-megabyte SIMMs, you must install a
16-megabyte SIMM in slot 0. Otherwise, the system cannot boot from tape
or compact disc.
-
Install SIMMs in the following order:
Slot 0 (U0310)
Slot 2 (U0308)
Slot 1 (U0309)
Slot 3 (U0307)
Table 4-1 shows possible configurations for memory modules.
Caution -

SIMM slot 0 (U0310) must always be filled with either a 4-megabyte
or a 16-megabyte SIMM. If slot 0 is empty or if the SIMM in slot 0 is
improperly installed, the system fails its power-on tests with keyboard
diagnostic LED code 0011 or 0100 (see Chapter 2).
Configurations for memory modules are shown in Table 4-1.
Table 4-1
Possible Configurations for Memory Modules

SunOS, the Sundiag System Exerciser, SunDiagnostic Executive, and the POST
diagnostics can report memory errors encountered during program execution.
For information on diagnostics see Chapter 2, "Diagnostic Overview." Memory
error messages on the system monitor display usually include a physical
memory address of the error.
Depending on the diagnostic program you are running and the SunOS release
loaded, a SIMM location number ("U" number) may be displayed. If the
location number is present in the error message, follow the instructions later in
this chapter for removing the defective SIMM at that location and installing a
replacement (see Table 4-2 for SIMM location numbers).
If a location number is not displayed but a physical memory address is shown,
refer to the Table 4-2 to locate the SIMM group in which the defective SIMM is
installed.
For example, if an error is detected at physical memory address 12fe958, the
defective SIMM is in SIMM slot 1. Follow the instructions later in this chapter
for removing the defective SIMM at that location and installing a replacement
(see Table 4-2 for SIMM location numbers).
Table 4-2
Physical Memory Address Range of Memory Banks

Caution -

SIMMs are made of delicate electronic components that are
extremely sensitive to static electricity. Ordinary amounts of static from your
clothes or work environment can destroy the modules.
Handle SIMMs only by the edges. Do not touch components themselves or
any metal parts. Always wear a grounding strap when handling the modules.
To replace SIMMs (or any of the components in the unit bottom) attach the
wrist strap to the metal casing of the power supply in the unit top.
Do not disconnect the power cord from the system unit's power outlet or from
the wall socket. This connection provides the ground path necessary to safely
remove and install the modules. In addition, be sure the internal power cable
from the power supply in the unit top is plugged into the main logic board to
complete the ground.
Make sure that the system unit's power is turned OFF by checking to make
sure that the green light-emitting diode (LED) at the front of the chassis is not
lit and that the fan in the power supply is not running.
Removing a SIMM
The procedure for removing a SIMM is the same for 4-megabyte and
16-megabyte SIMMs.
To remove a 4-megabyte or 16-megabyte SIMM:
1. Preparation.
a.
Halt the system. Keep the power cord plugged in. See "Halting The
System" in Chapter 3.
b.
Open the system unit. See "Opening the System Unit" in Chapter 3.
c.
Attach the wrist strap to your wrist and to the metal casing of the power
supply. The wrist strap comes with the SIMMs. See "Attaching a Wrist
Strap" in Chapter 3.
d.
Place an antistatic mat, shiny side up, next to the system unit. A mat
comes with the SIMMs.
2. Remove the SIMM.
a.
Note the slots the SIMMs are plugged into.
b.
Locate the SIMM you want to remove (see Figures 4-1 earlier in this
chapter).
c.
The SIMMs are held in their slots by metal clips. To release the modules,
pry apart the clips with your fingernails while pushing the top of the
module gently forward (see Figure 4-3) about 30 degrees from the
vertical position. Pull the SIMM out of the socket.
Note -
The SIMMs are closely spaced. In order to remove a SIMM, you may
find it necessary to remove adjacent SIMMs first. If you are removing a
defective SIMM, take care not to get it mixed up with the other SIMMs.
Caution -

When you replace the SIMMs, replace them in the same slots in
which they were originally installed. Slot 0 must be filled with either a
4-megabyte or a 16-megabyte SIMM. If slot 0 is empty or if the SIMM in slot 0
is improperly installed, the system will fail its power-on tests with keyboard
diagnostic LED code 0011 (see Chapter 2 for a table of LED codes).

Figure 4-3
Removing a SIMM
Installing a SIMM
This section assumes you have already decided in which slots to install your
SIMMs. The procedure is the same for 4-megabyte and 16-megabyte SIMMs.
To install a 4-megabyte or 16-megabyte SIMM:
1. Preparation.
a.
Turn off the power to the system. Keep the power cord plugged in. See
"Halting The System" in Chapter 3.
b.
Open the system unit. See "Halting The System" either in Chapter 3.
c.
Attach the wrist strap to your wrist and to the metal casing of the power
supply. The wrist strap comes with the SIMMs. See "Attaching a Wrist
Strap" in Chapter 3.
2. Place the new SIMMs on an antistatic mat.
a.
Place an antistatic mat, shiny side up, next to the system unit. The mat
comes with the SIMMs.
b.
Open the antistatic envelope and take out the SIMMs.
c.
Place the SIMMs on the antistatic mat.
3. Select the SIMM slots.
Locate the SIMM slots on the main logic board. Decide where you want to
install the additional SIMMs.
Caution -

SIMM slot 0 (U0310) must always be filled with either a 4-megabyte
or a 16-megabyte SIMM. If slot 0 is empty or if the SIMM in slot 0 is
improperly installed, the system will fail its power-on tests with keyboard
diagnostic LED code 0011 or 0100 (see Chapter 2 for a table of LED codes).
4. Install the additional SIMMs.
a.
Holding a SIMM at its edges, insert it into the plastic guides at an angle
about 30 degrees from the vertical (see Figure 4-4) position.
Note -
The SIMM is keyed so it can only be installed in one way. See figure
4-4 for the location of the key.
b.
Pushing gently on the top, rotate the SIMM into an upright position. You
should hear it click into place.

Figure 4-4
Installing a SIMM
5. Close the system unit.
See "Closing the System Unit" in Chapter 5.
6. Power up the system.
See "How To Turn Your Power Back On" in Chapter 5.
7. If you have external devices, refer to the manuals that came with them for
the correct procedure for powering up external devices.
Warning -

Do not power up the system unit without replacing the top and
securing it. Failure to take this precaution may result in personal injury and
system damage.
The system can be equipped with a variety of optional SBus Cards. A list of
SBus cards can be found in Chapter 1, "SBus Cards." SBus cards plug into the
SBus slots on the system's main logic board.
SBus cards may be installed in either SBus slot.
Removing SBus Cards
To remove an SBus card from the system unit:
1. Preparation
a.
See and follow the instructions in Chapter 3 on halting your system, tools
needed, removing expansion units, opening the system unit, and
attaching a wrist strap.
b.
Make sure that the system unit's power is turned off by checking to make
sure that the green LED at the front of the chassis is not lit and that the
fan in the power supply is not running. The power cord should be
attached to the system unit and to the wall outlet. The internal power
cable to the power supply in the unit top should be connected to the
main logic board to complete the ground.
2. Locate the SBus card you want to remove.
3. Remove the external connectors attached to the SBus card.
a.
Put your index fingers or thumbs underneath the corners of the SBus
card where it is plugged into the slot.
b.
Lift up on the card (see Figure 4-5).
This action releases the SBus card from the SBus slot.
c.
Place the SBus card on an antistatic mat.
4. Replace the SBus slot filler panel (if necessary).
If you will not be reinstalling an SBus card, install the filler panel before
closing the system unit. Failure to do so can cause cooling problems inside
the system unit.
Caution -

The plastic SBus card retainer is not a handle. Pulling on the SBus
card retainer can cause it to break.
.
Figure 4-5
Removing an SBus Card
Installing SBus Cards
To install an SBus card in the system unit:
1. Preparation
a.
See and follow the instructions in Chapter 3 on halting your system, tools
needed, removing expansion units, opening the system unit, and
attaching a wrist strap.
b.
Make sure that the system unit's power is turned off by checking to make
sure that the green LED at the front of the chassis is not lit and that the
fan in the power supply is not running. The power cord should be
attached to the system unit and to the wall outlet. The internal power
cable to the power supply should remain connected to the main logic
board to complete the ground.
2. Remove the SBus slot filler panel for the desired slot.
The filler panel is located on the inner surface of the back panel of the
system unit.
Lift up on the two metal clips at the bottom of the filler panel, rotate the
bottom out, and set the filler panel aside. Save the filler panel in case you
remove the SBus card in the future.
Filler panels should be present if no SBus cards are installed to maintain
proper system cooling.

3. Slide the SBus card at an angle into the back panel of the system unit (see
Figure 4-6).
Make sure that the mounting plate on the SBus card hooks upward into the
holes at the back panel of the system unit. The mounting slots are above the
rectangular opening for the connector in the back panel.
Caution -

When replacing the SBus card, do not press down on the SBus card
retainer. The SBus card retainer is not a handle. Pressing down on it may
break the retainer.
Figure 4-6
Installing an SBus Card
4. Push the SBus card against the back panel.
Align the plug with the socket of the SBus slot and gently press the plug
into the socket by pressing with your fingers on the corners of the SBus
card.
Caution -

Using excessive force may bend or damage the pins.
5. Close the system unit.
See "Closing the System Unit" Chapter 5.
6. Replace the required cables to the SBus card.
Warning -

Do not power up the system unit without replacing the top and
securing it. Failure to take this precaution may result in personal injury and
system damage.
7. Turn the system unit's power on, and check for proper operation of the
system unit and the installed SBus card.
See "How to Turn the Power Back On" in Chapter 5.
One 3 1/2-inch half-height hard disk drive can be installed in the top section of
the system chassis. A 50-pin SCSI data cable and a 4-pin power cable connect
to the rear of the drive. The hard disk drive is mounted beside the diskette
drive. The hard disk drive can be installed without removing the disk drive
mounting bracket.
If the system is a SPARCstation IPX Upgrade, you may find an earlier model of
the disk drive bracket. For information on removing and installing the hard
drive in a system with an earlier model disk drive bracket see Appendix F.
You must remove early brackets in order to install or remove the hard drive.
Caution -

The hard disk drive contains electronic components that are
extremely sensitive to static electricity. Ordinary amounts of static from your
clothes or work environment can destroy the components.
Do not touch the components themselves or any metal parts. Wear a
grounding strap when handling the drive. See "Attaching a Wrist Strap" in
Chapter 3. Attach the wrist strap to the metal casing of the power supply.
Do not disconnect the power cord from the system unit's power outlet or from
the wall outlet. This connection provides the ground path necessary to safely
remove and install the hard disk drive.
Make sure that the system unit's power is turned OFF by checking to make
sure that the green light-emitting diode (LED) at the front of the chassis.
Removing a Hard Disk Drive
To remove a hard disk drive:
1. Preparation.
See and follow the instructions in Chapter 3 on halting your system, tools
needed, removing expansion units, opening the system unit, and attaching a
wrist strap. When working with the disk drive, attach the wrist strap to the
metal casing of the power supply.
2. Disconnect the cables.
a.
Remove the data cable from its connector on the main logic board. See
Figure 4-7 for the location of the data cable.
b.
Disconnect the internal power cable from the hard drive (see Figure 4-7
for the location of the power cable).
c.
Disconnect the data cable from the hard disk drive.
Set the data cable aside for installation on the replacement drive.
3. Loosen the screws and slide the disk drive out of the slots.
This completes the hard disk drive removal process.
Figure 4-7
Hard Disk Drive in the Disk Drive Bracket
Preparing a Hard Drive for Installation
To prepare a hard drive for installation, you must first verify that the jumpers
on the drive controller board are set correctly. After you are satisfied that the
jumper settings on the hard drive are correct, follow the directions later in the
chapter for installing the hard drive.
Verifying the Jumper Settings
Make sure the following jumpers on the drive controller board are set correctly:
a.
The SCSI device address jumpers must be set to SCSI address 3 (pins A0
and A1 are jumpered).
b.
The parity enable jumper is set.
c.
The waitspin option is disabled.
d.
The other jumpers are not set.
The above are the factory settings for SPARCstation IPX internal hard disk
drives.
Depending on the drive shipped with your system, the jumpers are located
either near the lower right corner of the drive controller board, or near the
lower left corner. Use Figures 4-8 and 4-9 to verify the jumper settings on your
hard drive.
Note -
The labels for the jumpers on the drive shown in Figure 4-8 are etched
onto the drive's controller board. The jumpers on the drive shown in Figure 4-9
are not labeled.

Figure 4-8
Jumper Settings for Hard Drives with Jumpers Near the Lower Right
Corner (settings labeled)

Figure 4-9
Jumper Settings for Hard Drives with Jumpers Near the Lower Left Corner
(settings not labeled)
To verify the jumper settings on the hard drive:
1. Turn the hard drive over carefully on the antistatic mat.
The drive controller board and the jumpers reside on the bottom of the
drive. You now have access to the drive controller board.
2. Inspect the jumper settings.
a.
Compare them to the settings shown in Figures 4-8 and 4-9.
b.
If the settings are the same as in the figure that matches your drive, leave
them as the are.
c.
If the settings are not the same, change them to match the settings in the
figure.
Installing a Hard Disk Drive
To install a hard disk drive:
1. Preparation.
Make sure you have followed the previous procedure on preparing the hard
disk drive for replacement.
2. Remove the 4 screws from the old disk drive.
Insert the screws halfway into the two outermost holes on both sides of the
new disk drive.
3. Attach the data cable to the new disk drive.
4. Lower the disk drive into the disk drive bracket slots so that the four
screws fit securely in the slots (see Figure 4-10 for the disk drive bracket
detail).
5. Slide the disk drive into the bracket toward the power supply and tighten
the four screws.
6. Attach the cables.
a.
Attach the hard drive data cable to the main logic board.
b.
Attach the internal hard drive power cable to the new disk drive.

Figure 4-10
Installing a Hard Drive
Note -
The drive may not sit perfectly flat until it is completely fastened.
7. Close the system unit.
See "Closing the System Unit" in Chapter 5.
8. Turn the system unit's power on.
See "How to Turn the Power Back On" in Chapter 5.
Check for proper operation of the system unit and the installed hard disk
drive.
This concludes the steps for installing the hard disk drive.
The disk drive bracket resides in the top part of the system unit in front of the
power supply (see Figure 4-11). It houses the diskette drive supplied with the
unit and has space for an optional hard disk drive. The hard drive may be
removed independently of the disk drive mounting bracket, but you must
remove the disk drive bracket before removing the diskette drive and before
replacing the power supply. Refer to Figures 4-11, 4-12, and 4-13 for the
location of the disk drive mounting bracket and the captive screw securing it to
the system.
Removing the Disk Drive Mounting Bracket
To remove the disk drive mounting bracket, follow these steps:
1. Preparation.
See and follow the instructions in Chapter 3 on halting your system, tools
needed, removing expansion units, opening the system unit, and attaching a
wrist strap. When you remove the disk drive bracket, the wrist strap should
be attached to the metal casing of the power supply.
2. Turn the system unit`s power off.
Make sure that the system unit's power is turned off by checking to make
sure that the green LED at the front of the chassis is not lit and that the fan
in the power supply is not running. The power cord should be attached to
the system unit and to the wall outlet.
3. Place an antistatic mat, shiny side up, near the unit.
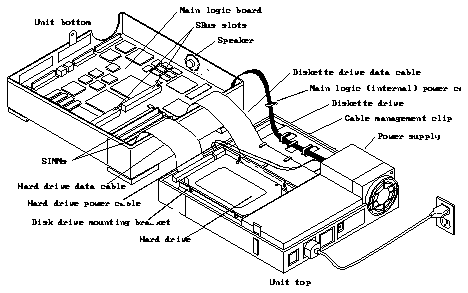
Figure 4-11
Open View of Unit
4. Disconnect cables.
a.
Detach the cables from the cable securing guides on the cable
management clip over the diskette drive (see Figure 4-11 and 4-12).
b.
Disconnect the power cable leading from the hard disk. See Figure 4-11.
c.
Disconnect the internal power cable leading from the main logic board.
Press the clip on the plug to release it from the main logic board.
d.
Disconnect the diskette drive data cable and the hard disk data cable (if a
hard disk is present) from their connectors on the main logic board (See
Figure 4-11).
Note -
When pulling up on the pull tabs, brace the main logic board near the
socket to minimize board flex.
5. Remove the captive screw.
Remove the captive Phillips head screw in the center rear of the bracket
(closest to the power supply). See Figures 4-12 and 4-13.
6. Remove the bracket.
a.
Tilt the bracket toward the front of the unit (see Figure 4-14) and
disconnect the power cable from the diskette drive.
b.
Lift the bracket out of the system unit and place it on an antistatic mat.
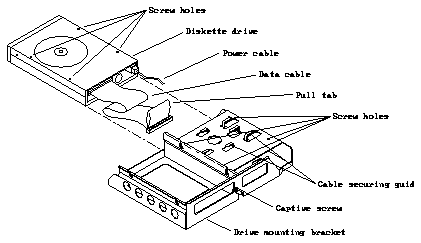
Figure 4-12
Disk Drive Mounting Bracket
Replacing the Disk Drive Mounting Bracket
To replace the disk drive mounting bracket follow these steps:
1. Preparation.
Before setting the disk drive bracket flat in the unit top, connect the power
cable to the diskette drive and the data cable to the hard drive, if one is
present.

Figure 4-13
Detail of Disk Drive Mounting Bracket
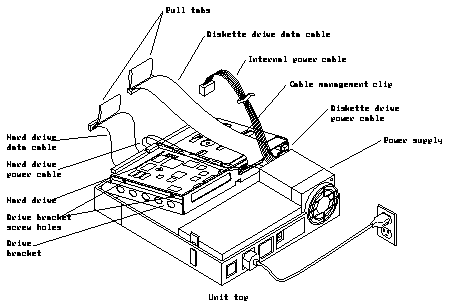
Figure 4-14
Removing and Replacing the Disk Drive Mounting Bracket
2. Install the bracket.
Tilt the disk drive bracket toward the front of the unit. Gently lower the
bracket into position in front of the power supply.
Note -
The disk drive bracket must engage a securing ridge at the inside front
of the unit top. If the bracket is installed incorrectly, you will not be able to
insert diskettes into the diskette drive.
3. Replace the captive screws.
Tighten the captive Phillips head screw at the center rear of the bracket to
secure it to the chassis. Be careful not to overtighten the screws or damage
may result.
4. Reconnect the cables.
a.
If a hard drive is present, connect the power cable to it.
b.
Secure the cables to the cable management clip over the diskette drive
(see Figures 4-11 and 4-12 for the location of the clip and the cable
securing guides).
c.
Connect the diskette drive data cable and the hard disk data cable (if a
hard disk is present) to their respective connectors on the main logic
board. (See Figure 4-14).
d.
Connect the internal power cable to its connection on the main logic
board.
5. Close the system unit.
See "Closing the System Unit" in Chapter 5.
The diskette drive is in the unit top at the front right side (see Figures 4-11,
4-12). A 34-pin data cable and a 4-pin power cable connect to the rear of the
drive. Four Phillips head screws attach the diskette drive to the mounting
bracket. The drive and the mounting bracket (described above) are secured to
the chassis by a single captive Phillips head screw at the center rear of the
bracket. See Figures 4-12 and 4-13.
Caution -

The diskette drive contains electronic components that are
extremely sensitive to static electricity. Ordinary amounts of static from your
clothes or work environment can destroy the components.
Do not touch the components themselves or any metal parts. Wear a
grounding strap attached to the metal casing of the power supply when
handling the drive. See "Attaching a Wrist Strap" in Chapter 3.
Do not disconnect the power cord from the system unit's power outlet or from
the wall socket. This connection provides the ground path necessary to safely
remove and install the diskette drive.
Removing a Diskette Drive
To remove the diskette drive:
1. Preparation.
See and follow the instructions earlier in this chapter for removing the disk
drive mounting bracket.
2. Remove the four Phillips head screws holding the diskette drive to the
disk drive mounting bracket. (See Figure 4-12.)
3. Remove the diskette drive from the bracket.
Slide the diskette drive out of the bracket as shown in Figure 4-12 and place
it on an antistatic mat.
4. Remove the data cable.
Remove the data cable from the diskette drive and set it aside for use with
the replacement drive.
This completes the diskette drive removal process.
Replacing a Diskette Drive
To replace the diskette drive:
1. Preparation.
Follow the instructions earlier in the chapter for removing the disk drive
bracket if you have not already done so.
2. Remove the defective diskette drive as instructed in the preceding section.
3. Connect the data cable to the replacement diskette drive.
Thread the data cable under the cable management clip so that it can be
folded back over the clip for connection to the main logic board (see Figure
4-11).
4. Install the disk drive.
a.
Slide the replacement drive under the cable management clip into the
disk drive mounting bracket.
b.
Align the four screw holes in the mounting bracket with the holes in the
diskette drive, insert the screws, and fasten the diskette drive securely in
the bracket.
5. Replace the disk drive mounting bracket in the unit top.
See "Replacing the Disk Drive Mounting Bracket" earlier in this chapter.
6. Secure the cables in the cable management clip over the diskette drive.
7. Close the system unit.
To do this, see "Closing the System Unit" in Chapter 5.
8. Turn on the system unit's power.
See "How to Turn the Power Back On" in Chapter 5.
Turn the system unit's power on, and check for proper operation of the
system unit and the installed diskette drive.
The power supply is a self-contained metal assembly in the system unit top
just behind the disk drive mounting bracket (see Figure 4-11).
The power supply is held in place by four hooks in the unit top that mate with
four holes in the power supply, and a PEM screw. The PEM screw is inserted
through the rear of the system unit after it engages the lock block on the
outside of the unit.
A 12-pin power cable connects the power supply to the main logic board just in
front of the SIMM slots in the right front corner (see Figure 4-11). Four-pin
power cables connect the diskette drive and hard drive to the power supply for
DC power.
The power supply is auto sensing and will operate with input voltage 100-120
Vac or 200-240 Vac without adjustment. If the power supply fails to operate,
replace it.
Caution -

Make sure that the system unit is unplugged from the AC power
outlet and the power switch is in the off position before you remove, replace,
or install the power supply in the system unit. Failure to take this precaution
may result in severe electrical shock.
Figure 4-15 shows how to remove and replace the power supply.
Removing the Power Supply
To remove the power supply follow these steps:
1. Preparation.
See and follow the instructions in Chapter 3 on halting your system, tools
needed, removing expansion units, opening the system unit, and attaching a
wrist strap.
2. Make sure that the system unit's power is turned off.
Check to make sure that the green LED at the front of the chassis is not lit
and that the fan in the power supply is not running.
The power cord should not be attached to the system unit and to the wall
outlet. The monitor power cable should also be disconnected from the
system unit.
3. Disconnect the system unit and monitor power cables.
4. Remove the disk drive mounting bracket.
The disk drive mounting bracket must be removed before the power supply
can be lifted out of the system unit. Follow the directions earlier in this
chapter for removing the disk drive mounting bracket.
5. Disconnect the internal power cable from the 12-pin connector on the
main logic board.
6. Remove the power supply.
Grasp the power supply firmly and slide it about 1/4 inch toward the front
of the unit to disengage it from the four hooks in the bottom of the system
unit. Lift the power supply straight up and out. If the power supply does
not lift easily, be sure that it has cleared the hooks.

Figure 4-15
Removing and Replacing the Power Supply
Installing the Power Supply
To install a new power supply follow these steps:
1. Remove the power cord from the wall outlet and the power receptacle on
the system unit's back panel.
2. Install the power supply.
a.
See Figure 4-14 for the position of the power supply. Align the holes in
the bottom of the power supply with the hooks in the system unit top.
b.
Lower the power supply into the unit top as shown in Figure 4-15.
c.
Properly position the power supply by pushing it firmly toward the rear
of the unit (about 1/4 inch) until it engages with the hooks.
3. Reattach the wrist strap to the metal casing of the new power supply.
Connect the AC power cord to the power connection to provide the ground
path for the wrist strap.
4. Reinstall the disk drive mounting bracket.
Reinstall the disk drive mounting bracket in front of the power supply. To
do this follow the directions for replacing the disk drive mounting bracket
earlier in this chapter.
5. Connect the internal power cable.
Connect the internal power cable to the white 12-pin connector on the main
logic board. The connector is keyed so that the power cable will fit only one
way.
6. Close the system unit.
See "Closing the System Unit" Chapter 5.
7. Connect the power cords.
Connect the system power cord and monitor power cord to the AC power
outlet.
8. Turn the system unit's power on.
See "How to Turn the Power Back On" in Chapter 5.
Turn the system unit's power on, and check for proper operation of the
system unit and the newly installed power supply.
If the newly installed power supply still does not work properly, a problem
exists in the system unit, such as a blown component or a short circuit.
Note -
Make sure the power supply is connected to the main logic board
before making any voltage measurements.
The main logic board contains the IU/FPU, the boot PROM, the NVRAM,
SIMMS, SBus cards, the on-board GX framebuffer, two RS423/232 ports, the
Ethernet port, a SCSI port, an audio in/audio out connector, and a
keyboard/mouse connector, as well as many other ICs (see figure 4-17). See
Chapter 1 for an overview of the main logic board.
In addition, a 12-pin connector terminates the power cable for the main logic
board. The 34-line diskette drive data cable connects to the main logic board to
the left of the 12-pin connector. The 50-line SCSI data cable power cable
connects along the front of the main logic board to the left of the diskette data
cable connections.
Serial Port Jumpers on the Main Logic Board
There are two serial port jumpers to set on the main logic board (See Figure
4-16). They reside next to the Cache Controller chip. The ports can be set
either as RS-232 ports or as RS-423 ports, but both must be set the same. The
jumpers are preset from the factory in asynchronous 423 mode, with the shunt
between posts 1 and 2 on both jumpers. To change them to 232 ports, change
the shunts on both jumpers to the position between posts 2 and 3.
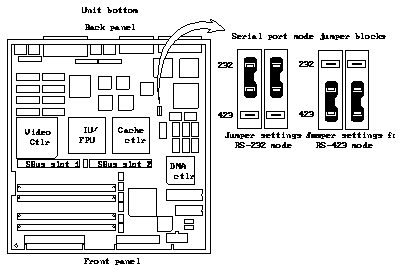
Figure 4-16
Serial port mode jumper blocks.
Main Logic Board Voltage Test Points
There are no voltage test points on the main logic board. If you need to
measure voltages, the safest place is at the power supply connection on the
main logic board (see Figure 4-17). See "Before Replacing the Main Logic
Board" later in this chapter for the connector wiring and voltages.
Caution -

SBus Cards are made of delicate electronic components that are
extremely sensitive to static electricity. Ordinary amounts of static from your
clothes or work environment can destroy the boards.
Handle cards only by the non-conducting edges. Do not touch components
themselves or any metal parts. Always wear a grounding strap when handling
the boards.
Do not disconnect the power cord from the system unit's power outlet. This
connection provides the ground path necessary to safely remove and install the
cards. In addition, the internal power cable from the power supply in the unit
top should be plugged in to complete the ground.
Make sure that the system unit's power is turned OFF by checking to make
sure that the green light-emitting diode (LED) at the front of the chassis is not
lit and that the fan in the power supply is not running.

Figure 4-17
Main Logic Board Layout
Before Replacing the Main Logic Board
This section explains what steps to perform before removing and replacing the
main logic board. Removing and replacing the main logic board is a drastic
step to take. Therefore, it is important to try to troubleshoot all other
possibilities before removing and replacing the main logic board. If you are
upgrading from a SPARCstation IPC to a SPARCstation IPX see the
SPARCstation IPX Upgrade Installation document for further instructions.
Eliminating Possible Problems
To check for and eliminate other possible problems before you replace the main
logic board do the following:
1. Preparation.
See and follow the instructions in Chapter 3 on halting your system, tools
needed, removing expansion units, opening the system unit, and
attaching a wrist strap. The wrist strap should be attached to the metal
casing of the power supply in the unit top.
d.
Make sure that the system unit's power is turned off by checking to make
sure that the green LED at the front of the chassis is not lit and that the
fan in the power supply is not running. The power cord should be
attached to the system unit and to the wall outlet. The internal power
cable from the power supply in the unit top should also be connected
to complete the ground.
e.
Attach a terminal to serial port A on the system unit. For details, see the
SPARCstation IPX Installation Guide.
This enables you to view output of the POST test results as they are run.
f.
Disconnect the graphics monitor, the keyboard, and the Ethernet
connector.
g.
Remove the SBus cards from the system. See "SBus Cards" earlier in this
chapter.
h.
Unplug the hard disk drive and the diskette drive from their data and
power cables. See Figures 4-11 and 4-14 in this chapter for the location of
the data and power cables.
2. Verify the Connections of Internal Parts
a.
Make sure all SIMMs are correctly seated (see Figure 4-17 for the location
of the SIMM slots), the power supply cable is attached, and all chips on
the main logic board correctly seated in their sockets.
b.
Follow the directions in Chapter 5 for turning the power on.
c.
Measure the power supply voltages.
With a VOM, measure the power supply voltages.
Caution -

Measuring voltages without connecting the DC cable will result in
inaccurate readings. Without load, the power supply will not regulate.
The wire colors are the following:
Red +5V
Blue +12V
Brown -12V
Gray POR (Power on reset)
Black Ground
Note -
The POR Signal is a TTL open collector and pull up is on the main
logic board.
The limits for the voltages are:
+5V 4.90 to 5.10
+12V 11.16 to 12.84
-12V -11.6 to -13.20 with a hard drive
-12V -10.2 to -13.8 without a hard drive
If the voltages are correct, you have ruled out that the power supply is
defective.
d.
Reconnect the cables and SBus cards on at a time and measure the
voltages. You can determine whether one of the system components is
holding down a power supply voltage in this way.
e.
Close the system unit.
To do this see "Closing the System Unit" in Chapter 5.
3. Run the Forth Toolkit.
a.
Turn on the system and the terminal. The system will start to boot.
b.
Interrupt the boot sequence by pressing the Break key on the terminal
keyboard.
4. The default prompt is the > prompt. You can reset the default prompt to
be the ok prompt. To make the default prompt the ok prompt, see the
Introduction to Open Boot 2.0.
a.
If you see the ok prompt, go to step d. If you see the > prompt, go to
the next step.
b.
At the '> prompt, enter n
c.
This enters the Forth Toolkit and displays its ok prompt.
d.
Use the commands shown below to set the diagnostic switch to true, set
the autoboot switch to false, and reset the system.

As POST tests run, view the results on the terminal screen.
e.
If all POST tests pass, go to the next section. If one or more of the
following POST tests fails, take one of the following actions:
i.
If the EPROM Checksum Test fails, replace the main logic board.
See "Removing the Main Logic Board" and "Replacing the Main
Logic Board" later in this chapter.
ii.
If the Limited Main Memory Address Test fails, numbers of Single
Inline Memory Modules (SIMMs) are displayed on the terminal.
Replace the defective SIMM. See "Single Inline Memory Modules
(SIMMs)" earlier in this chapter.
iii.
If any other test fails, replace the main logic board. See "Removing
the Main Logic Board" and "Replacing the Main Logic Board" later
in this chapter.
iv.
If you see nothing on the display and the system appears dead,
replace the main logic board. See "Removing the Main Logic Board"
and "Replacing the Main Logic Board" later in this chapter.
5. Finishing Up.
a.
At the '> or ok prompt, turn off the system's power switch.
b.
Open the system unit.
See "Opening the System Unit" in Chapter 3.
c.
Replace the SBus cards.
See "SBus Cards" earlier in this chapter.
d.
Reconnect the power and data cables to the hard disk drives and the
diskette drive.
See Figures 4-11 and 4-14 in this chapter for the location of the data and
power cables.
e.
Close the system unit.
See "Closing the System Unit" in Chapter 5.
6. If you have identified the problem, go to the next step. If you have not
identified the problem, go to Step 8.
7. Disconnect the terminal and reconnect the graphics monitor, the
keyboard, and the Ethernet connector.
To reconnect the graphics monitor see "Installing Your Monitor" in Chapter
2 of the SPARCstation IPX Installation Guide.
8. Turn the system and the terminal on and run the Sun Diagnostic
Executive with the cache disabled only if all POST tests passed.
The Sun Diagnostic Executive is an independent operating system. It runs
exhaustive subsystem tests independent of the SunOS Operating System.
See the SunDiagnostic Executive User's Guide for Desktop SPARCstations.
9. At the > or ok prompts, turn off the system's power switch.
10. Disconnect the terminal and reconnect the graphics monitor, the
keyboard, and the Ethernet connector.
To reconnect the graphics monitor see the SPARCstation IPX Installation
Guide.
Removing the Main Logic Board
This section explains how to remove the main logic board from the system
unit.
Figure 4-18 shows how to replace the main logic board.
Note -
Removing and replacing the main logic board is a drastic step to take.
See "Before Replacing the Main Logic Board" for troubleshooting information.
To remove the main logic board:
1. Preparation.
See and follow the instructions in Chapter 3 on halting your system, tools
needed, removing expansion units, opening the system unit, and attaching a
wrist strap. Attach the wrist strap to the metal casing of the power supply
in the unit top.
2. Turn off the Power.
Make sure that the system unit's power is turned off by checking to make
sure that the green LED at the front of the chassis is not lit and that the fan
in the power supply is not running. The power cord should be attached to
the system unit and to the wall outlet.
3. Disconnect all of the cables from the connectors at the rear of the system
unit.
4. Place an antistatic mat, shiny side down, next to the system unit.
5. Remove the SBus cards.
See "SBus Cards" earlier in this chapter.
6. Remove the SIMMs from the main logic board.
Note carefully the slots in which the individual SIMMs were installed so
that they may be installed properly in the replacement main logic board.
7. Disconnect the cables.
a.
Disconnect the 12-pin power supply cable from the connector in the right
front corner of the main logic board (see Figure 4-17) by squeezing the
clip at the end of the cable and pulling straight up.
b.
Disconnect the speaker cable from the speaker connector in the center
front of the main logic board (see Figure 4-17).
Remove the speaker from the channels securing it to the side of the
system enclosure.
Caution -

Do not touch or press on the speaker cone. You may damage the
speaker or the sound quality.
c.
Disconnect the 34-line diskette data cable from the connector on the main
logic board by pulling firmly on the tab attached to the cable (see Figure
4-17) and fold it out of the way.
d.
Disconnect the hard disk drive data cable from the data connector on the
main logic board (see Figure 4-17). Fold it out of the way.
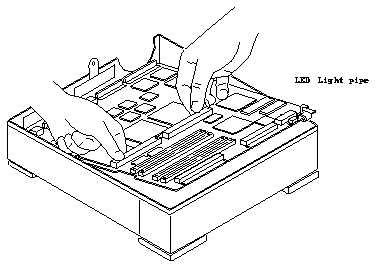
Figure 4-18
Removing and Replacing the Main Logic Board
Note -
Step 8 is optional, subject to the customer's request.
8. Remove the NVRAM chip.
a.
With an IC extractor, remove the NVRAM chip from its socket slowly
and evenly (see Figure 4-17 for the location of the NVRAM chip).
b.
Store the NVRAM chip in conductive foam to prevent damage from
electrostatic discharge. Save the NVRAM chip for re-use.
9. Remove the slide lock from the Ethernet connector with a small flat blade
screwdriver.
10. Remove the two hexhead screws from the video connector with a 3/16 inch
hex head nutdriver.
11. Remove the two small Phillips head screws from SCSI connector with a
small Phillips screwdriver.
12. Remove the main logic board.
a.
Slide the main logic board toward the front of the chassis to release it
from the three hooks in the bottom of the chassis.
b.
Grasp the board by the SBus connectors with both hands. Raise the front
of the board and lift it out toward the front of the unit (see Figure 4-18).
Avoid handling any of the delicate electronic components or touching
any of the main logic board's traces.
c.
Remove the LED light pipe located at the front of the main logic board
for reinstallation on the replacement board (see Figure 4-18).
d.
Place the main logic board on an antistatic mat.
Replacing the Main Logic Board
This section explains how to replace the main logic board into the system unit.
Note -
If the customer has requested reuse of the NVRAM chip from the
defective main logic board, be sure you have removed the NVRAM chip from
the defective board using an IC extractor. Remove the NVRAM from its socket
slowly and evenly. See "Replacing the Main Logic Board" for more information
on removing the NVRAM chip.
Diskless workstations will always need to reuse the NVRAM chip because the
NVRAM holds the Ethernet address.
To replace the main logic board:
1. Install the main logic board.
a.
Replace the LED light pipe. Follow the instructions for installing the
LED light pipe later in the chapter.
b.
Insert the connectors on the rear of the replacement board into the back
panel.
c.
Align the board so that the three mounting holes align with the hooks in
the bottom of the chassis.
d.
Once the board is properly positioned, slide it toward the rear bezel until
the hooks lock into the mounting holes.
2. Install the screws.
Install the screws for the Ethernet, Video, and SCSI connectors in the back
panel of the system (see Figure 4-17).
3. Install the NVRAM.
If the NVRAM chip has been removed for reuse, install the NVRAM chip
removed from the old main logic board on the new main logic board.
Match the pin 1 indicator on the NVRAM chip with the indicator on the
socket. Holding the NVRAM chip at the edges, carefully align the pins and
insert the NVRAM chip in the socket. Figure 4-17 shows the location of the
NVRAM chip.
4. Install the SIMMs.
Remove SIMMs taken from the old main logic board and install them in the
corresponding SIMM slots of the new logic board. See instructions earlier in
this chapter for removing and replacing SIMMs.
5. Reconnect the cables.
a.
Connect the 12-pin power cable from the power supply to the white
connector (see Figure 4-17) in the right front corner of the main logic
board.
The connector is keyed so that the power cable will fit only one way.
b.
Connect the 34-line diskette drive data cable to the connector on the main
logic board (see Figure 4-17).
The connector is keyed so it will fit only one way.
c.
Connect the hard disk drive data cable to the data connector on the main
logic board (see Figure 4-17).
The connector is keyed so that it will only fit one way.
6. Re-install the SBus cards.
Re-install the SBus cards as directed in "SBus Cards" earlier in this chapter.
7. Install the speaker.
Install the speaker into the channels in the side of the system enclosure and
connect the speaker cable to the plug on the main logic board (see
Figure 4-17).
Caution -

Do not touch or press on the speaker cone. You may damage the
speaker or the sound quality
8. Connect all of the cables to the ports at the rear of the system unit.
9. Close the system unit.
See "Closing the System Unit" in Chapter 5.
10. Turn on the system unit's power.
Turn the system unit's power on, and check for proper system operation.
See "How to Turn the Power Back On" in Chapter 5.
This section describes the removal and replacement procedures for the
NVRAM chip. The NVRAM chip must always be removed and replaced in a
diskless system.
To remove the NVRAM:
1. With an IC extractor, remove the NVRAM chip from its socket slowly and
evenly (see Figure 4-17 for the location of the NVRAM chip).
2. Store the NVRAM chip in conductive foam to prevent damage from
electrostatic discharge. Save the NVRAM chip for re-use.
To Replace the NVRAM:
1. If the NVRAM chip has been removed for reuse, install the NVRAM chip
removed from the old main logic board on the new main logic board.
2. Match the pin 1 indicator on the NVRAM chip with the indicator on the
socket.
3. Holding the NVRAM chip at the edges, carefully align the pins and insert
the NVRAM chip in the socket.
Figure 4-17 shows the location of the NVRAM chip.
The LED light pipe clips onto the front of the main logic board between the
power supply connection and the LED (see Figures 4-17 and 4-18). First,
follow the instructions for removing the main logic board earlier in this
chapter.
Pull the light pipe gently from the edge of the main logic board. Replace the
light pipe by aligning its locating tabs with the edge of the board and pushing
it gently into place. When it is properly installed inside the system enclosure,
one end of the light pipe should extend up to the small indicator hole in the
system unit front panel. The other end should sit next to the LED.
The speaker is mounted at the right side of the system on the right hand side of
the unit bottom (see Figure 4-11).
To test if the speaker assembly needs to be replaced:
1. Preparation.
a.
Locate the speaker assembly (see Figure 4-11).
b.
Close the system unit. To do this see "Closing the System Unit" in
Chapter 5.
2. Bring up the system and boot SunOS.
To do this, see "Booting Your Workstation" in Chapter 1 of the Sun System &
Network Manager's Guide.
3. To generate sound, enter either of the following commands:

If either of the sound tests fails, replace the speaker assembly as directed in
the following procedures. If either of the sound tests passes, do not replace
the speaker.
Removing the Speaker
To remove the speaker, follow these steps:
1. Preparation.
See and follow the instructions in Chapter 3 on halting your system, tools
needed, removing expansion units, opening the system unit, and attaching a
wrist strap. The wrist strap should be attached to the metal casing of the
power supply in the unit top.
2. Turn off the power to the system unit.
Make sure that the system unit's power is turned off by checking to make
sure that the green LED at the front of the chassis is not lit and that the fan
in the power supply is not running. The power cord should be attached to
the system unit and to the wall outlet. The internal power cable from the
power supply in the unit top should be connected to the main logic board
to complete the necessary ground.
3. Remove the speaker assembly.
a.
Locate the speaker assembly on the right side of the open unit bottom
and its 2-pin connector at the center front of the main logic board near
the LED (see Figures 4-11 and 4-17).
b.
Unplug the 2-pin connector from the main logic board.
c.
Slide the speaker up and out of the mounting slots.
Caution -

Do not touch or press on the speaker cone. You may damage the
speaker or the sound quality.
Replacing the Speaker
To replace the speaker, follow these steps:
1. Install the speaker.
a.
Slide the speaker into the mounting slots and push it down.
b.
Plug the 2-pin connector onto the main logic board. The connector is
keyed so it will fit only one way.
2. Close the system unit.
See "Closing the System Unit" in Chapter 5.
3. Turn on the power to the system unit.
Turn the system unit's power on, and check for proper operation of the
system unit and the installed speaker. See "How to Turn the Power Back
On" in Chapter 5.
The latch button assemblies attach to the inner sides of the unit top near the
rear and directly adjacent to the power supply. A latch button assembly
consists of a corrugated white plastic latch button and a metal latch spring (See
Figure 4-19). The button itself fits into the latch spring holes by the molded
plastic tabs projecting from the inner, non-corrugated side of the button. The
latch button and metal latch spring are shipped assembled.
Figure 4-19 shows how to replace the latch button assemblies.
Note -
In order to reach the latch button assemblies, the components in the
unit top must be removed. It is best to replace them, if needed, when
operations are to be performed on the disk drives or power supply.
Removing Latch Button Assemblies
To remove the latch button assemblies:
1. Preparation.
See and follow the instructions in Chapter 3 on halting your system, tools
needed, removing expansion units, opening the system unit, and attaching a
wrist strap. The wrist strap should be attached to the metal casing of the
power supply in the unit top to complete the ground.
2. Remove the latch button assemblies.
a.
To remove the latch button assemblies, first follow the instructions earlier
in this chapter for removing the disk drive mounting bracket and the
power supply.
b.
Grasp the Latch spring at the top. Bend the spring toward the center of
the unit top and then return it back to its original position. The assembly
should detach from the unit side panel on the inside.
Replacing the Latch Button Assemblies
To replace the latch button assemblies:
1. Preparation.
Place the pre-assembled latch button and latch spring in the empty, inverted
unit top next to the rectangular holes in the unit side panels; fit the latch
button loosely into the opening.
2. Replace the latch button assemblies.
With your finger, press the latch spring firmly into the corner angle of the
unit top. Then push down. You will hear it click when it snaps into place.

Figure 4-19
Installing the Latch Button Assemblies
