
This chapter explains how to remove and replace a power supply.
To remove the power supply, follow these steps:
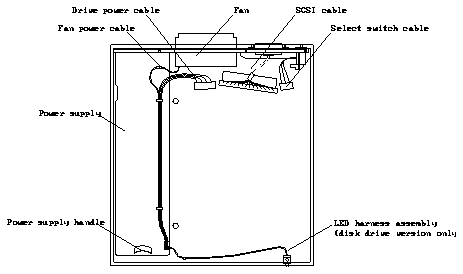
See Figure 7-1. Note that the tape drive version does not have the LED harness assembly.
Figure 7-1 Power Supply Location
The fan assembly is mounted on the I/O bracket assembly.
A DSM with a tape drive does not have a LED harness assembly connected to the power supply. Skip this step if the DSM is a tape drive version.
See the following figure. Place the power supply aside.
Figure 7-2 Removing the Power Supply
You have removed the power supply from the DSM. If you removed the power supply to get access to the defective I/O bracket, see "Removing an I/O Bracket Assembly" in Chapter 8. See the following section if you removed the power supply because it is defective.
Follow these steps to replace a power supply:
See Figure 7-3.
See Figure 7-3.
Figure 7-3 Replacing the Power Supply
The connectors are keyed, so they can be connected only one way. Skip this step if the DSM is the tape drive version. See Figure 7-1.
The fan assembly is mounted on the I/O bracket assembly. The connectors are keyed, and they can be connected one way only. Route the power supply cable through the clip located on the power supply.
See "Replacing a Disk Drive" in Chapter 5, if the DSM contains a disk drive. See "Replacing a Tape Drive" in Chapter 6, if the DSM contains a tape drive.
